استفاده از صفحه نمایش LCD 1602 (12 سیم) بدون ماجیول I2C با آردوینو
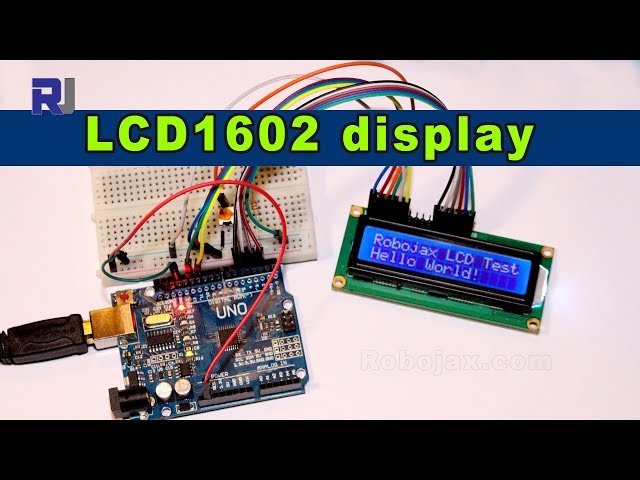
این راهنمای پروژه نشان میدهد چگونه میتوان یک صفحهنمایش LCD 16x2 (LCD1602) را بدون استفاده از ماجیول I2C به برد آردوینو متصل کرد. LCD1602 یک قطعهٔ چندمنظوره است که در کاربردهای گوناگون برای نمایش متن و دادههای عددی استفاده میشود. این پروژه امکان ایجاد نمایشگرهای سفارشی برای طیف وسیعی از پروژهها را فراهم میکند.
در اینجا چند ایدهٔ پروژه آورده شده که میتوانید با استفاده از این LCD1602 و راهاندازی آردوینو بسازید:
- یک ساعت دیجیتال ساده
- نمایشگر دما و رطوبت
- یک ثبتکننده داده بلادرنگ که خوانشهای حساس(حس کننده) را نمایش میدهد
- یک تابلوی پیام سفارشی
- صفحه نمایش کنسول بازی
سختافزار/قطعات
برای تکمیل این پروژه، به قطعات زیر نیاز خواهید داشت (در ویدئو در 00:10):
- برد آردوینو (Uno یا مشابه)
- ماجیول نمایشگر LCD 1602 (16 خصیصه x 2 خط) - در رنگهای مختلف موجود است (در ویدئو در 00:47)
- سیمهای جامپر
- پتانسیومتر 10kΩ (برای کنترل نور پسزمینه) (در ویدیو در 04:48)
- (اختیاری) بردبورد برای نمونهسازی آسانتر (در ویدیو در 02:40)
- (اختیاری) هویه و سیم لحیم (اگر در حال افزودن هدرها به LCD هستید) (در ویدیو در 02:04)
راهنمای سیمکشی

سیمکشی بهطور مفصل در ویدیو توضیح داده شده است. برای راهنمای تصویری و خلاصهٔ زیر به ویدیو در [03:33] مراجعه کنید:
اتصال بین LCD و آردوینو حیاتی است. بسته به مدل خاص LCD شما، ممکن است برای برخی پایهها نیاز به تقسیمکنندهٔ ولتاژ باشد. ویدئو نمودار سیمکشی مفصلی را نشان میدهد (در ویدئو در 04:02) که از یک پتانسیومتر برای کنترل روشنایی نور پسزمینه استفاده میکند. به تخصیص پایهها دقت کنید (در ویدئو در 07:39). سیمکشی نادرست میتواند به قطعات شما آسیب بزند.
wirign (ساخته شده با Fritzing).شماتیک (با استفاده از Fritzing ساخته شده). https://docs.arduino.cc/learn/electronics/lcd-displays/
توضیح شِفر (کود)
شِفر (کود) از کتابخانه LiquidCrystal برای آردوینو استفاده میکند (در ویدیو در 07:33). قسمتهای قابل تنظیم توسط کاربر تعریف پایهها و متنی هستند که باید نمایش داده شوند. شِفر (کود) نمونه نشان میدهد چگونه LCD را مقداردهی اولیه کنیم، موقعیت مکاننما را تنظیم کرده و متن را روی صفحه چاپ کنیم.

// Pin definitions for LCD connection
const int rs = 12, en = 11, d4 = 5, d5 = 4, d6 = 3, d7 = 2;
LiquidCrystal lcd(rs, en, d4, d5, d6, d7);
شِفر (کود) ارائهشده شامل نمونههایی برای نمایش متن ثابت (در ویدئو در 08:34)، متن اسکرولشونده (در ویدئو در 10:14) و کاراکترهای سفارشی (در ویدئو در 12:11) است. شما میتوانید متن داخلlcd.print()یک تابع برای نمایش پیام دلخواه شما. سرعت پیمایش توسط مقادیر تأخیر در حلقه کنترل میشود. (در ویدئو در 10:49)
پروژه/نمایش زنده
ویدئو تنظیم کامل پروژه را نشان میدهد (در ویدئو در 09:28) و نشان میدهد چگونه با استفاده از پتانسیومتر روشنایی بکلایت را کنترل کنید. (در ویدئو در 09:32) ویدئو همچنین شامل مثالهایی از قابلیتهای مختلف مانند متنهای اسکرولشونده و کاراکترهای سفارشی است (در ویدئو در 10:14 و 12:11). مثال نمایشگر مسلسل (در ویدئو در 12:23) به شما اجازه میدهد از طریق پورت سریال متن وارد کرده و آن را روی صفحهنمایش LCD نمایش دهید.
فصلها
- [00:06] معرفی نمایشگر LCD 1602
- [00:44] مروری بر نمایشگر LCD 1602
- [02:03] آمادهسازی السیدی برای اتصال
- [03:33] نقشه سیمکشی و توضیح
- [04:02] توضیح مفصل سیمکشی
- [07:23] شرح شِفر (کود): تنظیمات پایه
- [09:28] نمایش زنده: نمایش سادهٔ متن
- [10:14] شرح شِفر (کود): متن قابل اسکرول
- [11:49] توضیح شِفر (کود): مثالهای اضافی
-->
تصاویر
// LCD1602 Display for Arduino

// January 21, 2018 14:25 this example will work with a 1602 LCD
// Code used for YouTube video for RoboJax channel
// Watch the video https://youtu.be/S4ya3Q7uhJs
// Video and other Arduino Tutorials http://robojax.com/learn/library


// January 21, 2018 14:25
// original source https://www.arduino.cc/en/Tutorial/HelloWorld
// include the library code:
#include <LiquidCrystal.h>

// initialize the library by associating any needed LCD interface pin
// with the arduino pin number it is connected to
const int rs = 12, en = 11, d4 = 5, d5 = 4, d6 = 3, d7 = 2;
LiquidCrystal lcd(rs, en, d4, d5, d6, d7);

void setup() {
  // RoboJax LCD1602 Test
  // set up the LCD's number of columns and rows:
  lcd.begin(16, 2);
  // Print a message to the LCD.
  // RoboJax LCD1602 Test
}

void loop() {
  // RoboJax LCD1602 Test
    lcd.setCursor(0, 0);
    lcd.print("RoboJax LCD Test");
  // set the cursor to column 0, line 1
  // (note: line 1 is the second row, since counting begins with 0):
  lcd.setCursor(0, 1);
  // print the number of seconds since reset:
  lcd.print("Hello World!");


  delay(500);
  // RoboJax LCD1602 Test
}
منابع و مراجع
-
خارجیبرگه مشخصات LCD1602 (PDF)cdn-shop.adafruit.com
فایلها📁
هیچ فایلی موجود نیست.