Lesson 96-2: Barometric Pressure, Temperature, and Approximate Altitude Sensor BMP390 with Arduino on LCD1602
This guide shows you how to build a versatile environmental monitoring station using the BMP390 sensor and an Arduino. The BMP390 is a highly precise barometric pressure sensor that also provides accurate temperature readings and can calculate approximate altitude based on atmospheric pressure. This project is perfect for a range of applications, from hobbyist weather stations to more advanced automation projects. By the end of this tutorial, you'll have a device that displays real-time temperature, pressure, and altitude data on a compact LCD1602 screen.
This project is ideal for a variety of practical uses, including:
- Building a high-precision digital barometer and thermometer for your home or office.
- Creating a wireless weather station for a remote greenhouse or garden to monitor environmental conditions.
- Estimating the altitude of a location, which is useful for drone projects or outdoor activities like hiking.
- Developing a smart thermostat system that can control a heater or cooler based on the measured temperature.
- Logging pressure and temperature data for scientific experiments or educational projects.
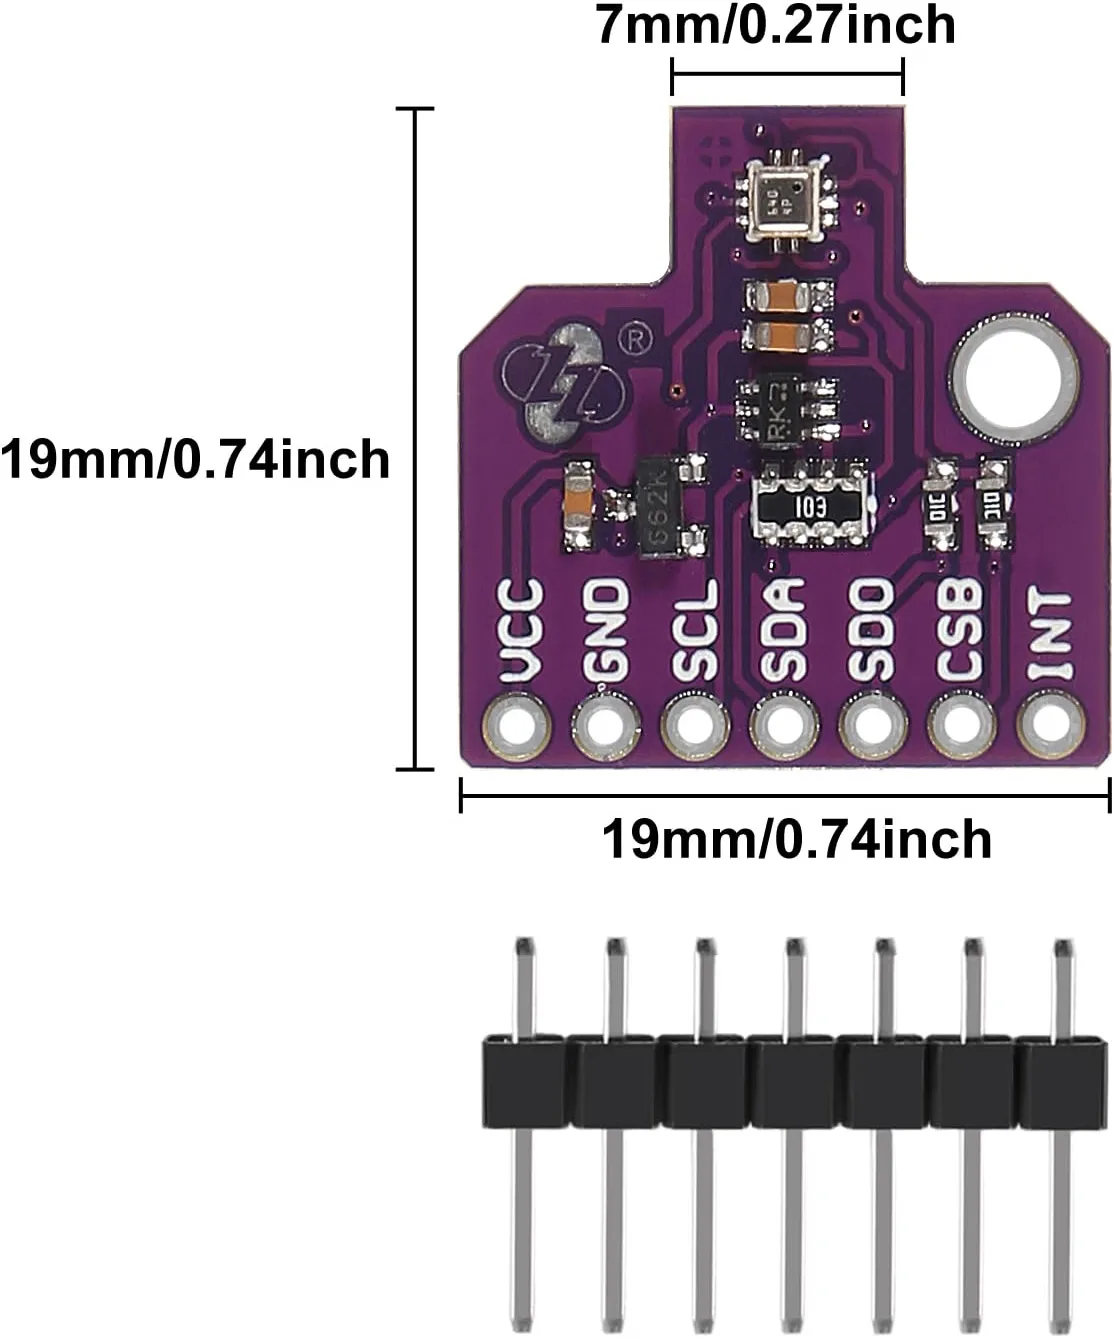
Hardware Required
To complete this project, you will need the following components:
- Arduino Uno (or any compatible board)
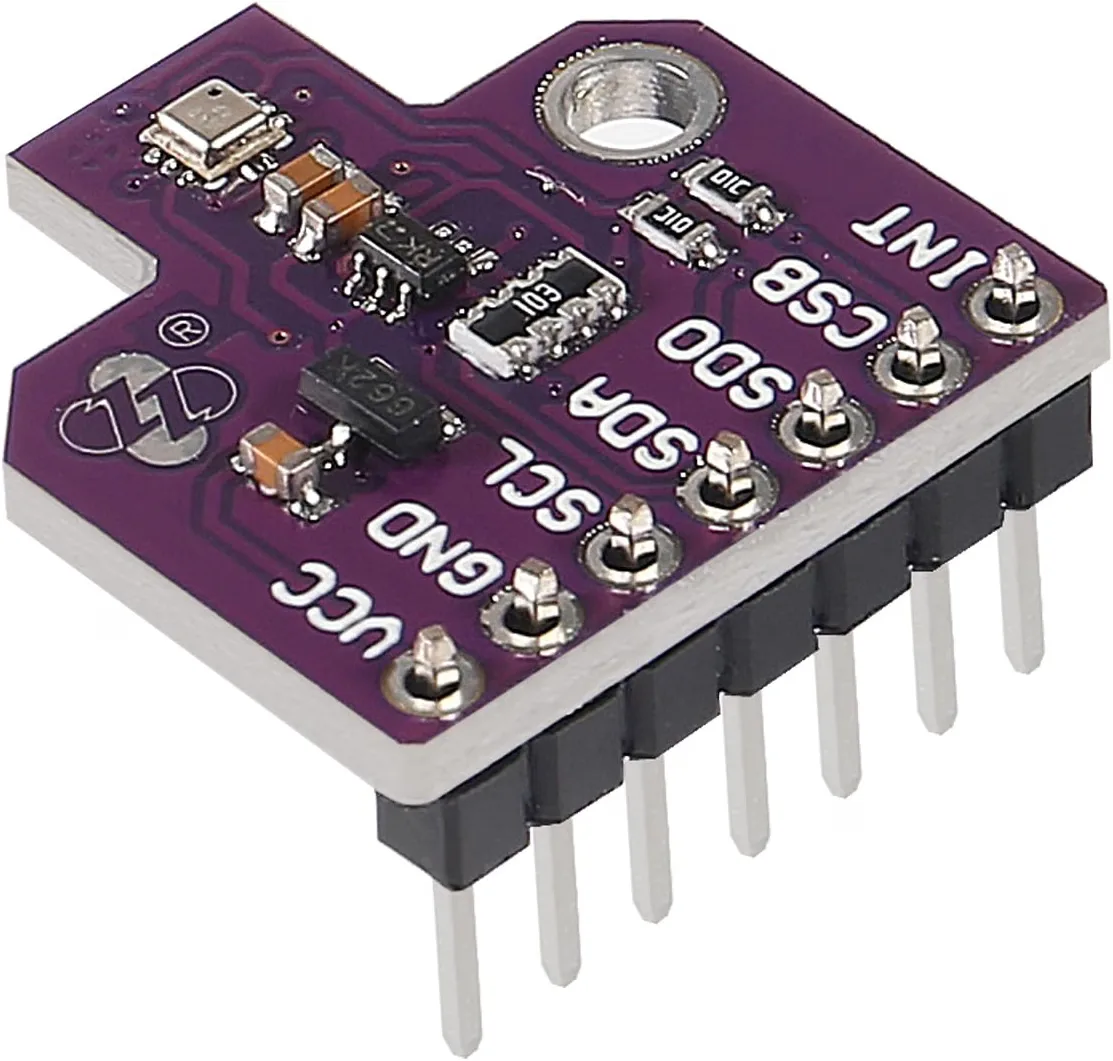
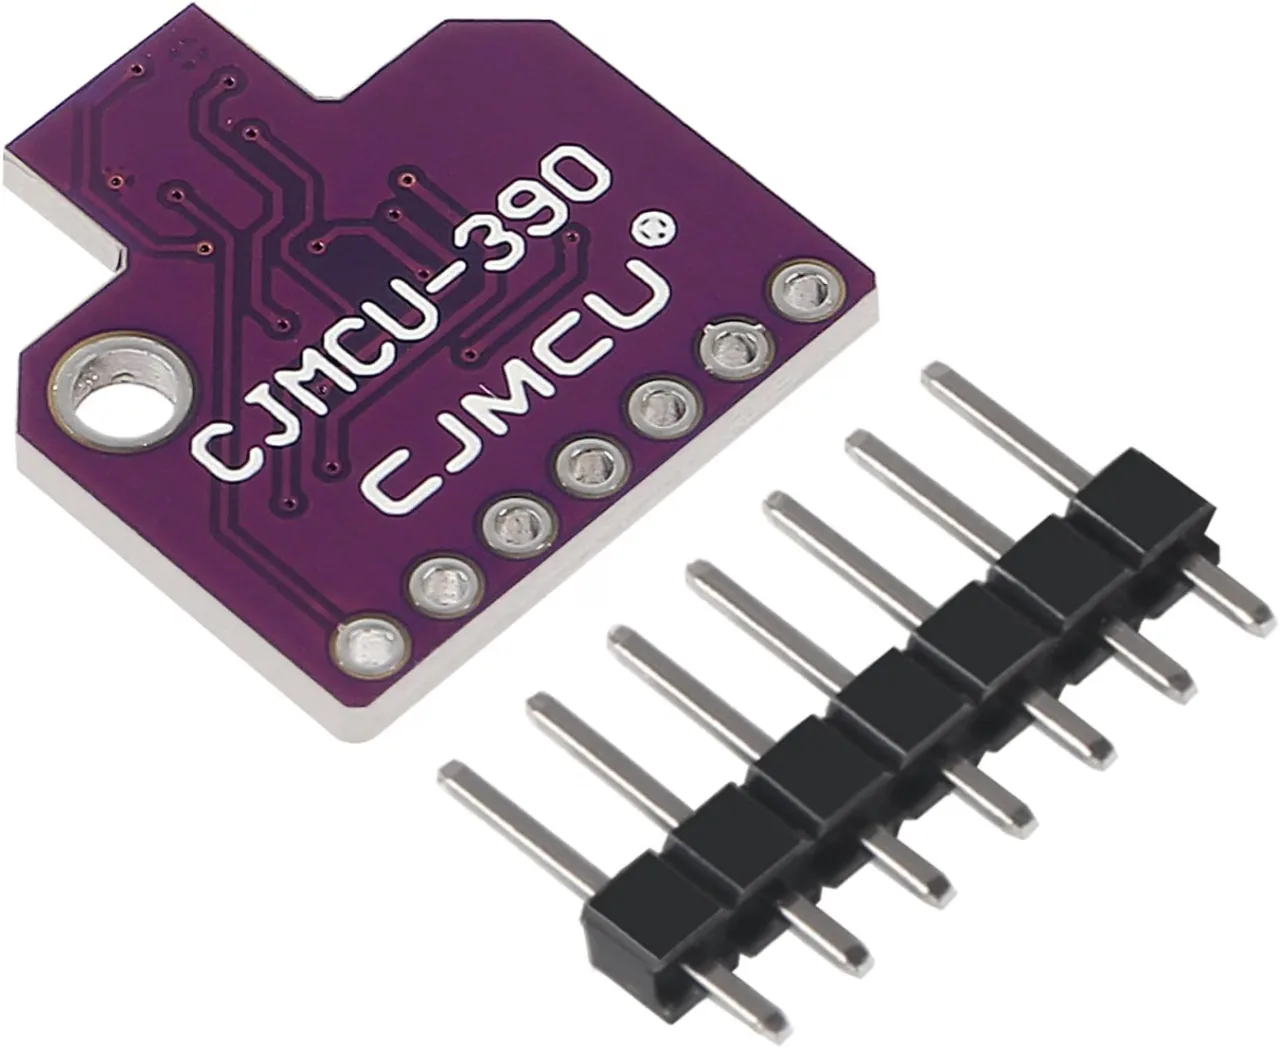
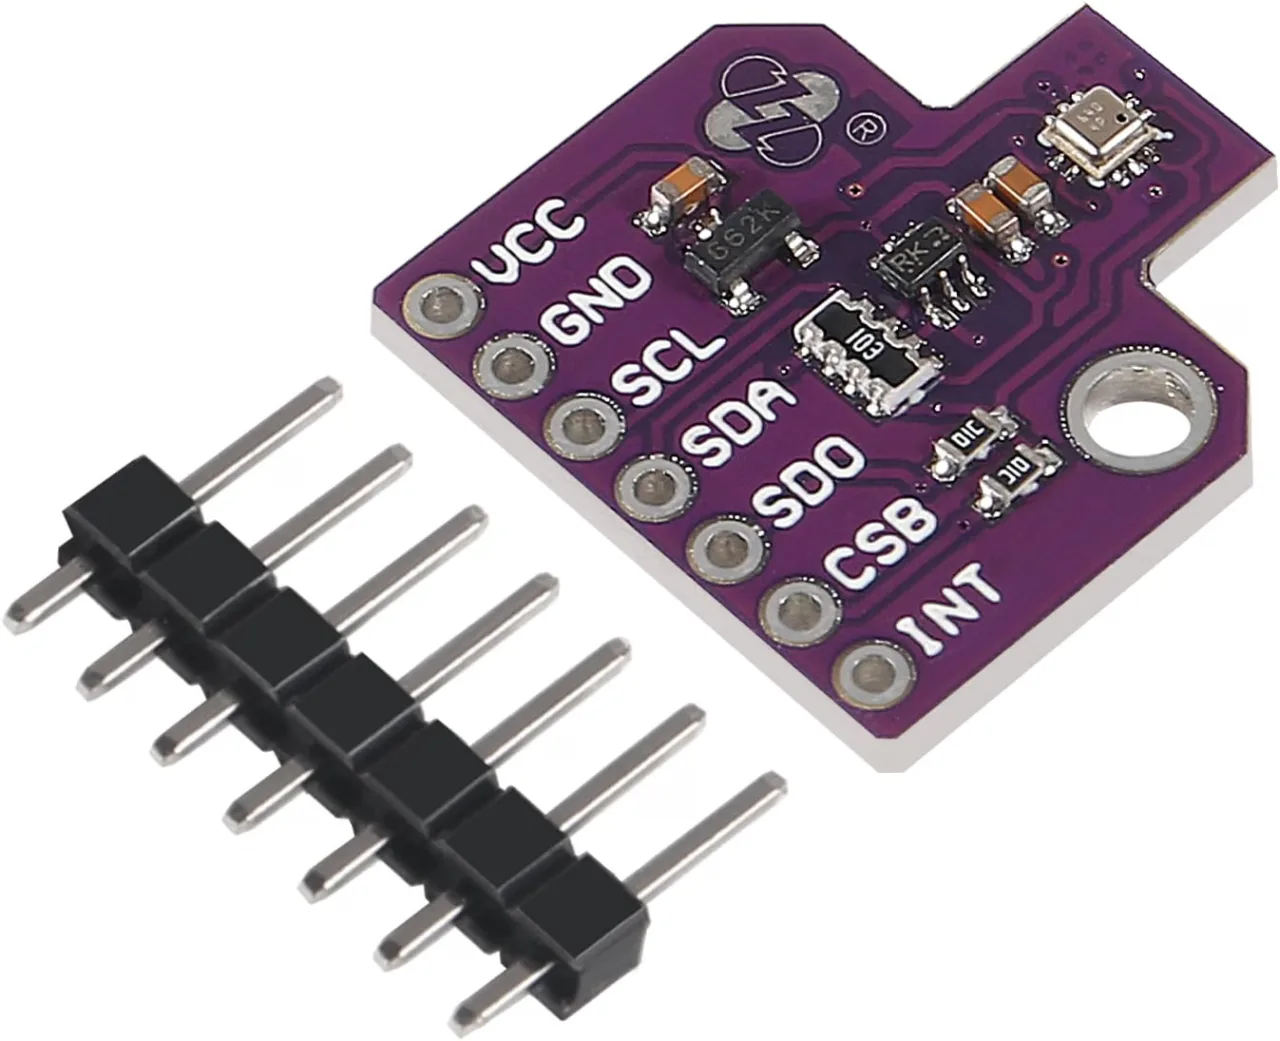
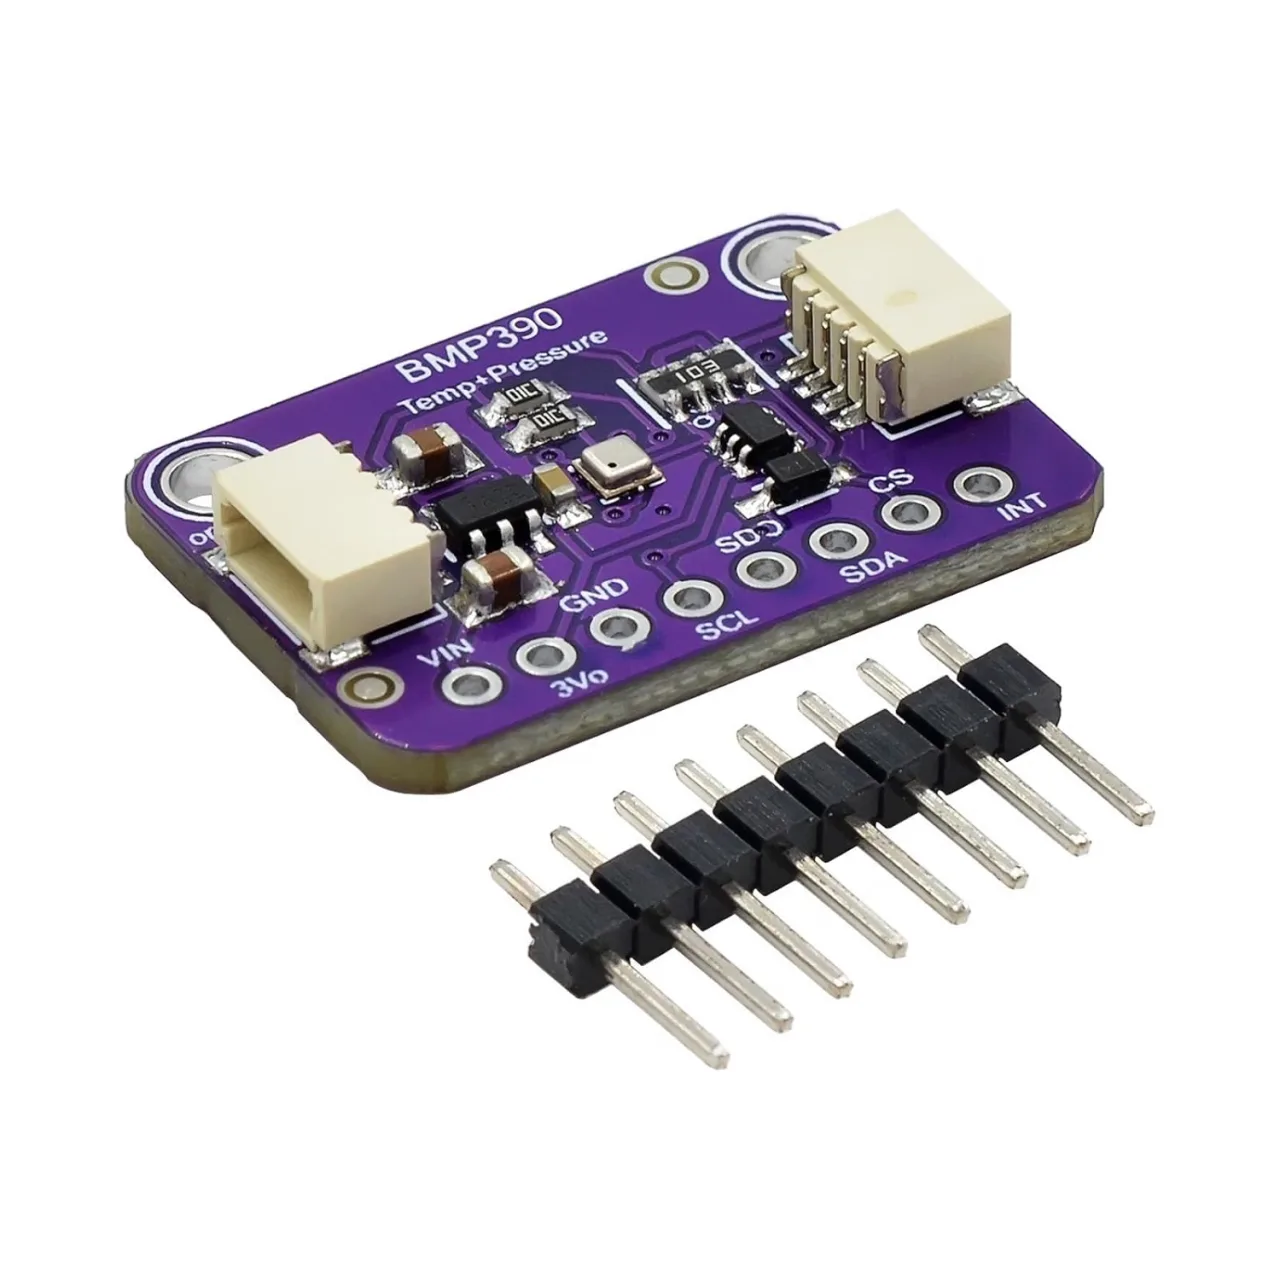
- BMP390 Barometric Pressure, Temperature, and Altitude Sensor Module
- LCD1602 I2C LCD Screen
- Jumper Wires
- Breadboard (optional, for easier wiring)
Wiring Guide
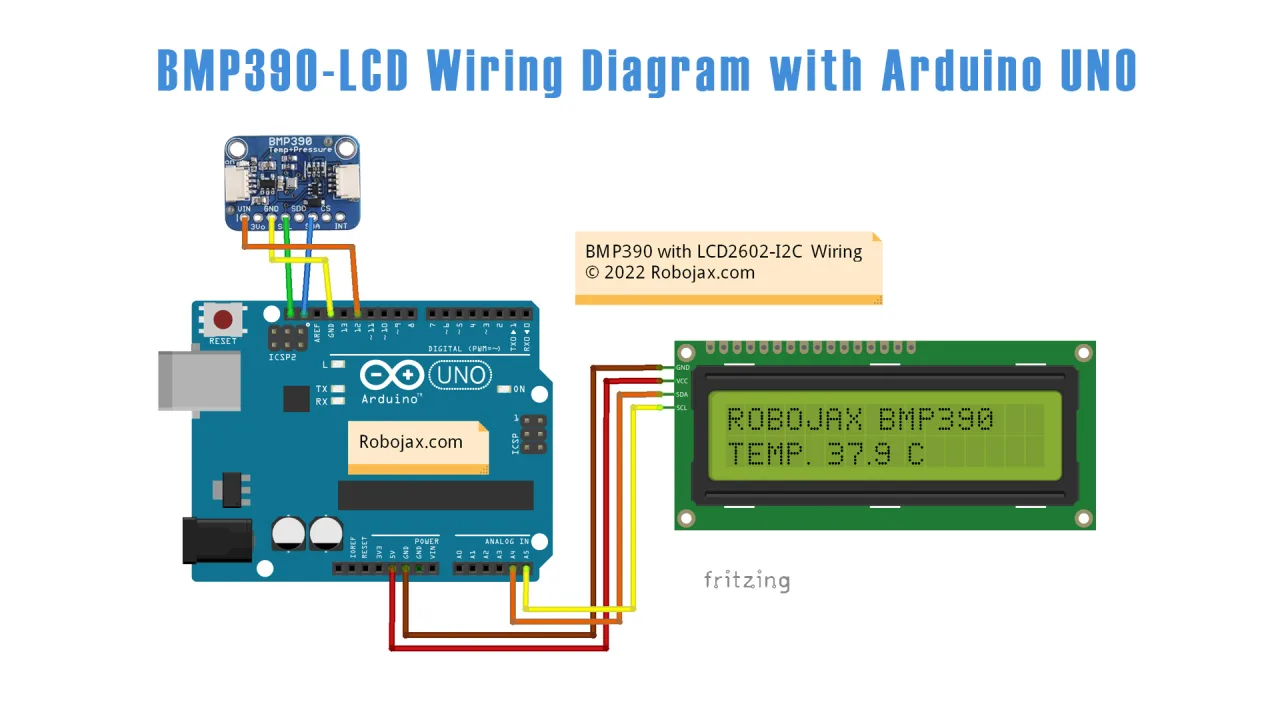
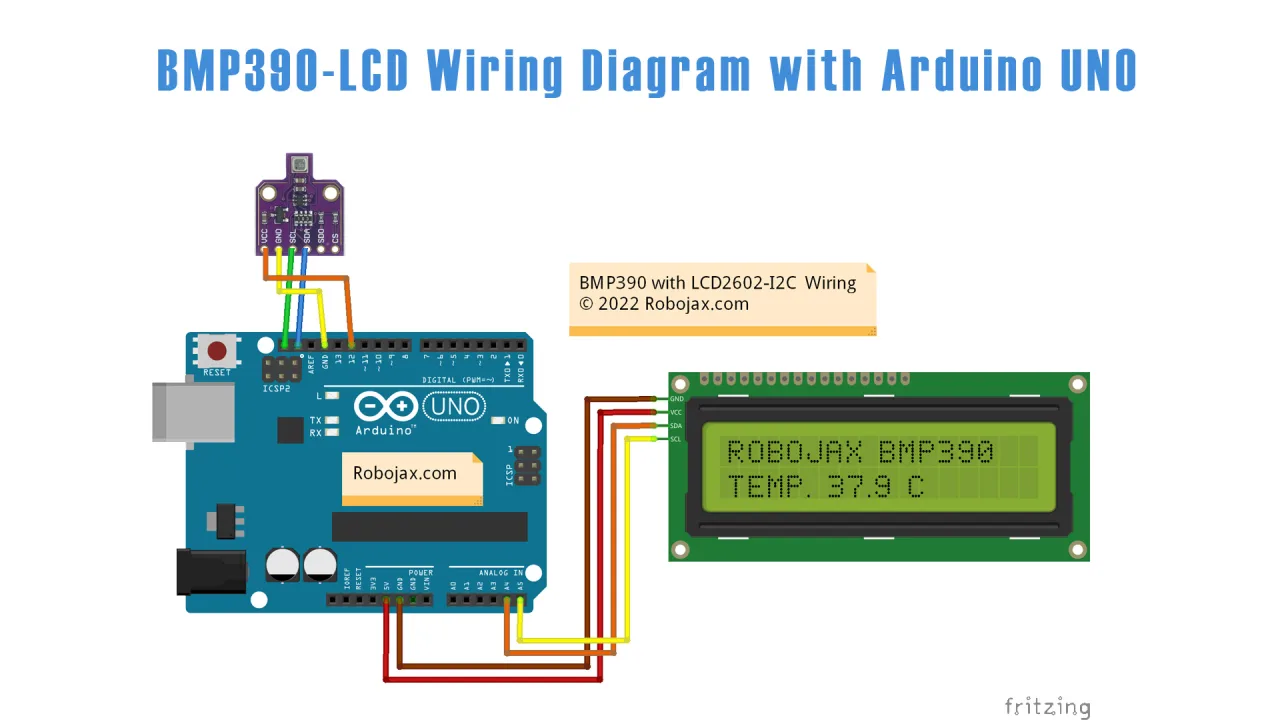
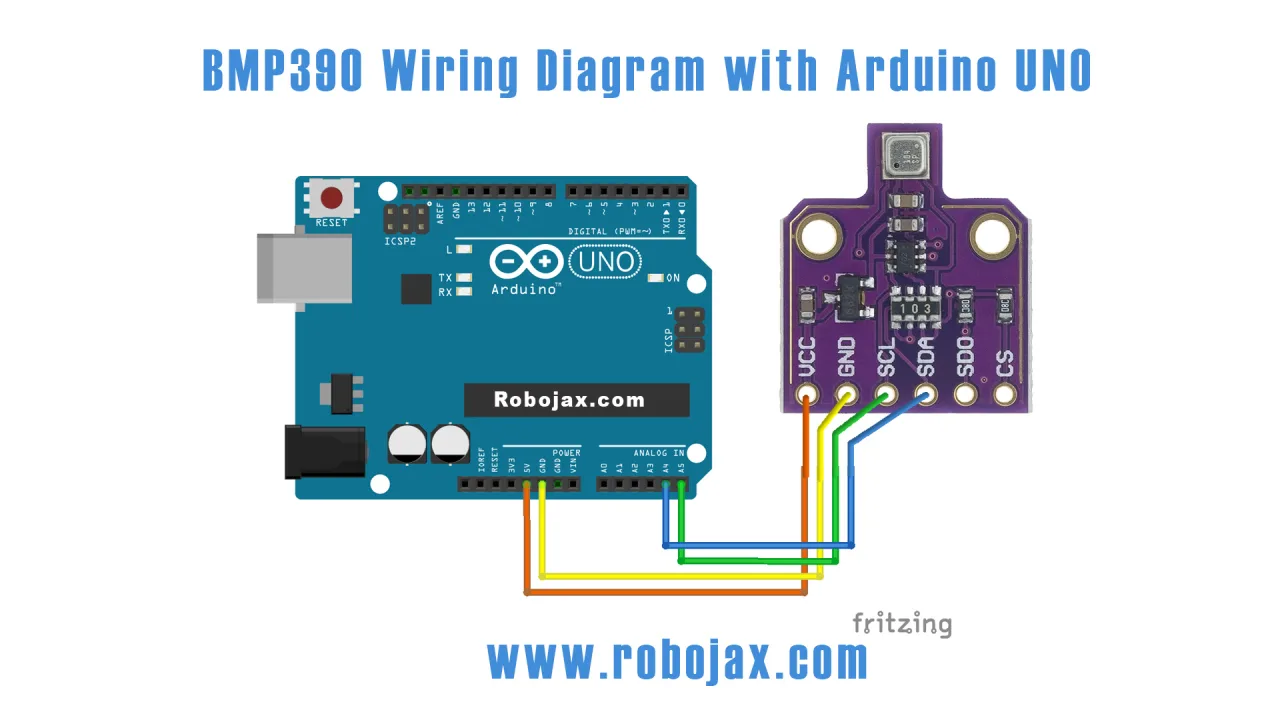
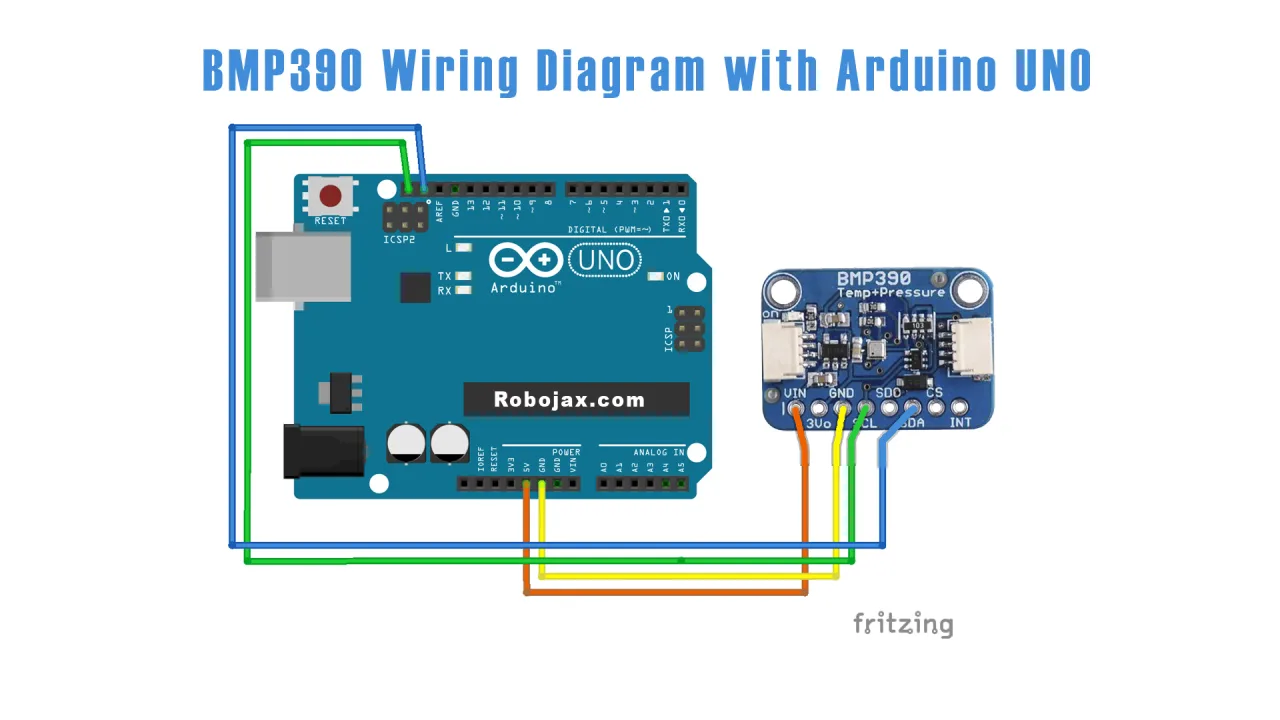
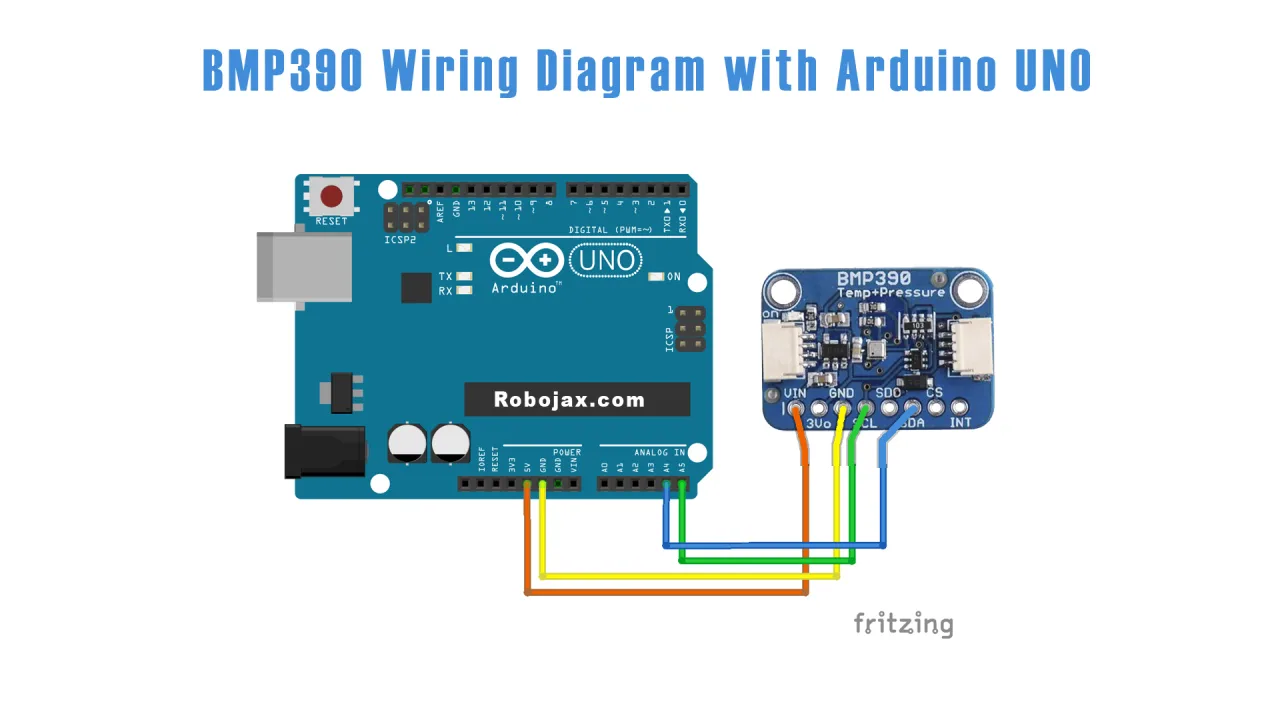
This project uses the I2C communication protocol, which allows you to connect both the BMP390 sensor and the LCD screen using only four wires each. This keeps the wiring simple and frees up most of the Arduino's pins for other uses. The BMP390 module is connected to the Arduino's dedicated I2C pins (A4 for SDA and A5 for SCL). The LCD screen is also connected to these same pins, creating an I2C bus. The module's VIN pin is connected to the Arduino's 5V pin, and the ground is connected to GND.
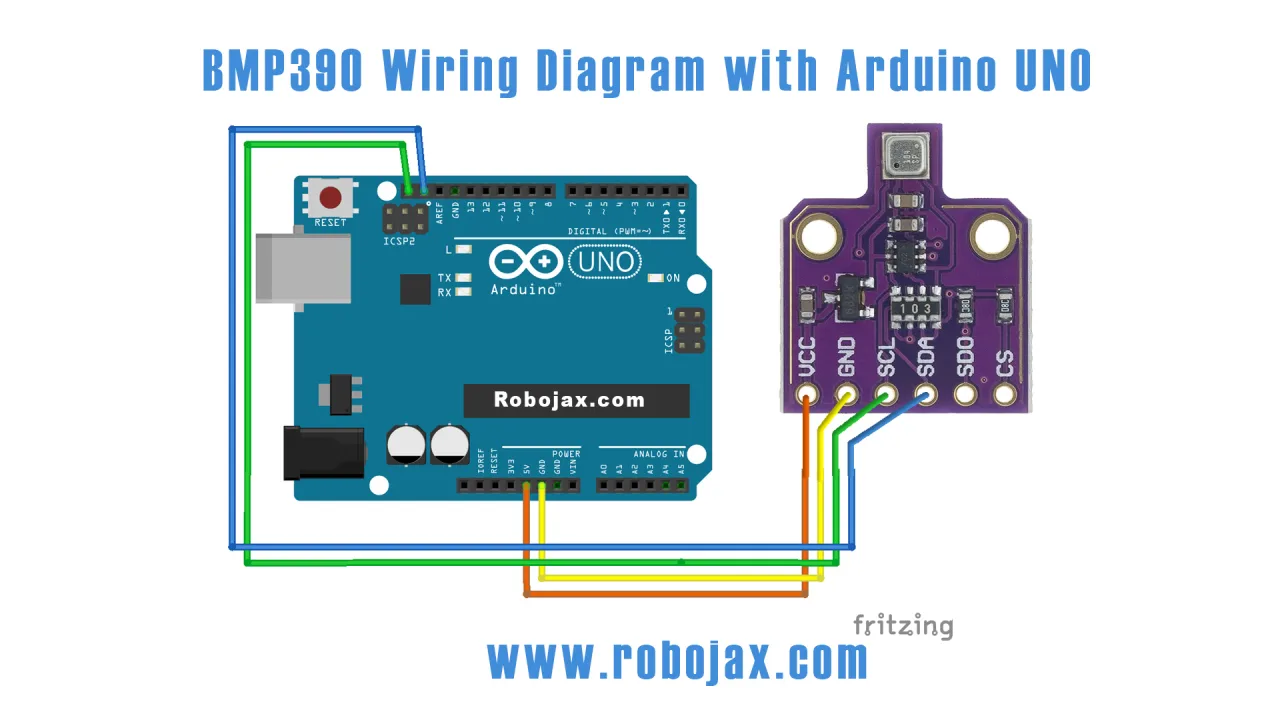
An interesting feature of the code is that it uses one of the Arduino's digital pins to provide power to the BMP390 sensor. This is defined as bmpVinPin = 12 in the code. By setting this pin to HIGH in the setup, it acts as a 5V power source, eliminating the need for a separate connection to the 5V pin on the Arduino. This can be useful for managing power in your project.
For a detailed visual guide, please refer to the wiring diagram. The connections for the BMP390 sensor are as follows:
- VIN to Arduino 5V (or Pin 12 as defined in the code)
- GND to Arduino GND
- SCL to Arduino SCL (A5)
- SDA to Arduino SDA (A4)
The connections for the LCD1602 I2C module are:
- VCC to Arduino 5V
- GND to Arduino GND
- SCL to Arduino SCL (A5)
- SDA to Arduino SDA (A4)
Code Explanation
This section focuses on the key parts of the code that you can modify to customize the project's behavior. The full program is available below the article.
First, you need to include the necessary libraries for the BMP390 sensor and the I2C LCD. The code then defines a few important constants and variables that you can adjust.
#include <Wire.h>
#include <Adafruit_Sensor.h>
#include "Adafruit_BMP3XX.h"
#include <LiquidCrystal_I2C.h>

#define SEALEVELPRESSURE_HPA (1013.25)

Adafruit_BMP3XX bmp;
int bmpVinPin = 12;
boolean fahrenheit = true;//for Celsius set it to "false"

// Set the LCD address to 0x27 or 0x3F for a 16 chars and 2 line display
LiquidCrystal_I2C lcd(0x3F, 16, 2);SEALEVELPRESSURE_HPA: This is the reference pressure at sea level, which is essential for calculating approximate altitude. You may need to adjust this value for your local weather conditions to get more accurate altitude readings.bmpVinPin: This variable defines the Arduino pin used to power the BMP390 sensor. You can change it to any available digital pin.fahrenheit: This boolean variable controls the temperature unit. Setting it totruedisplays the temperature in Fahrenheit, while setting it tofalsedisplays it in Celsius.lcd(0x3F, 16, 2): This line initializes the LCD object. The first parameter is the I2C address of your LCD, which is often0x27or0x3F. The next two numbers specify the number of columns (16) and rows (2) of your LCD.
A custom function, getBMP(char type), is used to read and convert the sensor data. This function accepts a single character to specify what data you want to retrieve. Here is how to use it:
float getBMP(char type)
{
   float value;
   float temp = bmp.temperature;
   if(type =='F')
   {
      value = temp *9/5 + 32;//convert to Fahrenheit
   }else if(type =='K')
   {
      value = temp + 273.15;//convert to Kelvin
   }else if(type =='P')
   {
      value = bmp.pressure / 100.0F; // read pressure in hPa
   }else if(type =='A')
   {
      value = bmp.readAltitude(SEALEVELPRESSURE_HPA);// read altitude in meters
   }else{
      value = bmp.temperature;// read temperature in Celsius
   }
   return value;
}- To get the temperature in Celsius, call
getBMP('C'). - To get the temperature in Fahrenheit, call
getBMP('F'). - To get the temperature in Kelvin, call
getBMP('K'). - To get the pressure in hectopascals (hPa), call
getBMP('P'). - To get the approximate altitude in meters, call
getBMP('A').
The lcdDisplay() function is a helper that manages the formatting of text and values on the LCD screen, making the code in the main loop cleaner and easier to manage. You can use it to display any text and a corresponding value at a specific position on the screen.
Live Project Demonstration
The video demonstrates the project in action. Initially, the sensor's readings are shown on the serial monitor. To test the temperature sensitivity, a heat gun is applied to the sensor, and you can watch the temperature reading on the LCD screen increase rapidly. The demonstration clearly shows the temperature in both Celsius and Fahrenheit, followed by the pressure in hectopascals and the approximate altitude in meters.
To verify the altitude functionality, the presenter takes the project to a location in Ajax, Ontario, Canada. At ground level, the sensor reads an approximate altitude of -14 meters. After taking the device to the 25th floor of a nearby building, the reading changes to approximately 57.2 meters, demonstrating a clear difference of over 70 meters, which aligns with the expected elevation change.
Please note that the video also covers other projects, including displaying data on an LCD2004 screen and using the sensor as a thermostat to control a relay.
Related projects from this video
- Lesson 96-1: Barometric Pressure, Temperature, and Approximate Altitude Sensor BMP390 with Arduino Basic Code
- Lesson 96-3: Barometric Pressure, Temperature, and Approximate Altitude Sensor BMP390 with Arduino on LCD2004
- Lesson 96-4: Barometric Pressure, Temperature, and Approximate Altitude Sensor BMP390 with Arduino as a Thermostat
Chapters
- [00:00] Introduction and Project Overview
- [01:19] Introducing the BMP390 Sensor
- [03:43] Sensor Specifications and Manufacturer Details
- [05:45] Wiring the BMP390 to Arduino Uno
- [07:48] Wiring the BMP390 and LCD1602 Together
- [10:29] Installing the Required Arduino Libraries
- [11:38] Explaining the Basic Sensor Code
- [16:54] Setting Up and Wiring the LCD1602
- [21:23] Code Explanation for LCD Display
- [26:22] Live Demonstration of Sensor Readings
- [28:05] Demonstration with the LCD1602
- [32:12] Real-World Altitude Test at a 25th Floor
Images
/*
 * Lesson 96: BMP390 with LCD
 * with Arduino and LCD1602
Download and resource page https://robojax.com/RJT455

 * Watch video instruction on YouTube:  https://youtu.be/XevQYG_A5xA
 *
 * Code updated by Ahmad Shamshiri for Robojax.com
 * on Jan 13, 2022 at 17:10 in Ajax, Ontario, Canada

  This video is part of Arduino Step by Step Course which starts here: https://youtu.be/-6qSrDUA5a8


If you found this tutorial helpful, please support me so I can continue creating content like this
and make a donation using PayPal http://robojax.com/L/?id=64


  This is a library for the BMP390 temperature & pressure sensor

  Designed specifically to work with the Adafruit BMP388 Breakout
  ----> http://www.adafruit.com/products/3966

  These sensors use I2C or SPI to communicate, 2 or 4 pins are required
  to interface.

  Adafruit invests time and resources providing this open source code,
  please support Adafruit and open-source hardware by purchasing products
  from Adafruit!

  Written by Limor Fried & Kevin Townsend for Adafruit Industries.
  BSD license, all text above must be included in any redistribution
 **************************************************************************
 */
#include <Wire.h>

#include <Adafruit_Sensor.h>
#include "Adafruit_BMP3XX.h"


#define SEALEVELPRESSURE_HPA (1013.25)

Adafruit_BMP3XX bmp;
int bmpVinPin = 12;
boolean fahrenheit = true;//for Celsius set it to "false"

#include <LiquidCrystal_I2C.h>
// Set the LCD address to 0x27 or 0x3F for a 16 chars and 2 line display
LiquidCrystal_I2C lcd(0x3F, 16, 2);


void setup() {
    pinMode(bmpVinPin, OUTPUT);// set pin as output
    digitalWrite(bmpVinPin,HIGH);// always keep it high (5V) for BMB390 module

  Serial.begin(9600);
  while (!Serial);
  Serial.println("Adafruit BMP388 / BMP390 test");

  if (!bmp.begin_I2C()) {   // hardware I2C mode, can pass in address & alt Wire
  //if (! bmp.begin_SPI(BMP_CS)) {  // hardware SPI mode
  //if (! bmp.begin_SPI(BMP_CS, BMP_SCK, BMP_MISO, BMP_MOSI)) {  // software SPI mode
    Serial.println("Could not find a valid BMP3 sensor, check wiring!");
    while (1);
  }

  // Set up oversampling and filter initialization
  bmp.setTemperatureOversampling(BMP3_OVERSAMPLING_8X);
  bmp.setPressureOversampling(BMP3_OVERSAMPLING_4X);
  bmp.setIIRFilterCoeff(BMP3_IIR_FILTER_COEFF_3);
  bmp.setOutputDataRate(BMP3_ODR_50_HZ);
  // initialize the LCD,
  lcd.begin();
  // Turn on the blacklight and print a message.
  lcd.backlight();
  lcd.print("Robojax Video");
  lcd.setCursor (0,1); // go to start of 2nd line
  lcd.print("BMP390 Test");
  delay(2000);
}

void loop() {
  if (! bmp.performReading()) {
    Serial.println("Failed to perform reading :(");
    return;
  }

    // Robojax.com BME390 Code
   lcd.clear();// clear previous values from screen

lcdDisplay(
             // to print Celsius:
             0, // character 0
             0, // line 0
             "Celsius: ",

             // to print Celsius
             99, // character undefined
             0, // line 0
             getBMP('C'),
             'C'
             );

 lcdDisplay(
             // to print fahrenheit:
             0, // character 0
             1, // line 1
             "Fahr.: ",

             // to print Fahrenheit
             9, // character 9
             1, // line 0
             getBMP('F'),
             'F'
             );
    delay(4000);
  lcd.clear();// clear previous values from screen


lcdDisplay(
             // to print pressure text
             0, // character 0
             0, // line 1
             "Pres.:",

             // to print pressure
             99, // character undefined
             0, // line 1
             getBMP('P'),
             'p'
             );
  lcdDisplay(
             // to print altitude text
             0, // character 0
             1, // line 1
             "Ap. Alt.:",

             // to print Altitude
             99, // character undefined
             1, // line 1
             getBMP('A'),
             'm'
             );
        delay(4000);

     // Robojax.com BMP390 Code

  if(bmp.temperature >38.0)
  {
   digitalWrite(10, HIGH);


  }else{
    digitalWrite(10, LOW);
  }
  delay(2000);

  printRobojax(true);//set to true or false
}

/*
 * @brief returns temperature or relative humidity
 * @param "type" is character
 *     C = Celsius
 *     K = Kelvin
 *     F = Fahrenheit
 *     H = Humidity
 *     P = Pressure
 *     A = Altitude
 * @return returns one of the values above
 * Usage: to get Fahrenheit type: getBMP('F')
 * to print it on serial monitor Serial.println(getBMP('F'));
 * Written by Ahmad Shamshiri on July 13, 2019. Update 13 Jan 2022
 * at 20:56
 * in Ajax, Ontario, Canada
 * www.Robojax.com
 */
float getBMP(char type)
{
   // Robojax.com BMP390 Code
  float value;
    float temp = bmp.temperature;
  if(type =='F')
   {
    value = temp *9/5 + 32;//convert to Fahrenheit
   }else if(type =='K')
   {
    value = temp + 273.15;//convert to Kelvin
   }else if(type =='P')
   {
    value = bmp.pressure / 100.0F; // read pressure
   }else if(type =='A')
   {
    value = bmp.readAltitude(SEALEVELPRESSURE_HPA);// read altitude
   }else{
    value = bmp.temperature;// read temperature
   }
   return value;
    // Robojax.com BME390 Code
}//getBME


/*
 * lcdDisplay(int tc, int tr, String title, int vc, int vr, float value)
 * displays value and title on LCD1602
 * How to use:
 * If you want to display: "Temp.: 340.45K" starting from first character
 * on second row.
 * use:
 * lcdDisplay(0, 1, "Temp.: ", 340.45,'K')
 *
 *   'C' is degree symbol for C and F
 * tc  is character number  (0)
 * tr is row in the lcd (1)
 * title is the text (Voltage:)
 * vc value for character
 * vr value for  row or line
 * value is the value (13.56)
 */
void lcdDisplay(int tc, int tr, String title, int vc, int vr, float value,char symbol)
{
   // Robojax.com LCD1602 for BMP390 Demo

   lcd.setCursor (tc,tr); //
   lcd.print(title);
   if(vc !=99)
   {
   lcd.setCursor (vc,vr); //
   }
   lcd.print(value);
   if(symbol == 'C')
   {
    lcd.print((char)223);
    lcd.print('C');
   }else if(symbol == 'F')
   {
    lcd.print((char)223);
    lcd.print('F');
   }else if(symbol =='k')
   {
    lcd.print("K");
   }else if(symbol =='p')
   {
    lcd.print("hPa");
   }else if(symbol =='m')
   {
    lcd.print("m");
   }
}
 // Robojax.com LCD1602 for BMP390 Demo


 /*
 *
 * this function, if called, will print Robojax stuff
 * */
 void printRobojax( boolean doPrint)
 {
  if (doPrint){
   lcd.clear();// clear previous values from screen
   lcd.setCursor (0,0); //set to line char 1, line 1
   lcd.print("Robojax  BMP390");

   lcd.setCursor (0,1); //set to line char 1, line 2
   lcd.print("www.ROBOJAX.com");


   delay(4000);
   }
 }
Things you might need
-
Amazon
-
AliExpressBMP388 High Precision Digital Atmospheric Pressure on AliExpresss.click.aliexpress.com
-
AliExpressPurchase it from AliExpresss.click.aliexpress.com
-
BanggoodPurchase it from Banggoodbanggood.com
Resources & references
-
ExternalBMP390 Bosch official product pagebosch-sensortec.com
-
ExternalPurchase it from AliExpresss.click.aliexpress.com
-
External
-
ExternalPurchase it from Amazon Canadaamzn.to
-
ExternalPurchase it from Amazon, USAamzn.to
-
ExternalPurchase it from Banggoodbanggood.com