Library and Arduino code for LCD2004 display with I2C
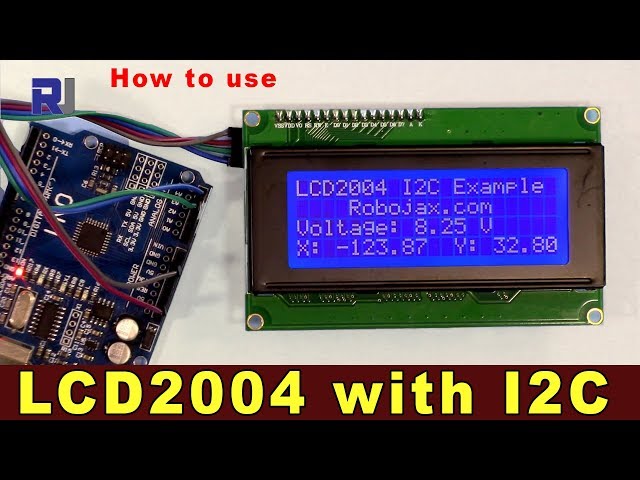
This project guide demonstrates how to interface a 20x4 LCD2004 display with an Arduino using the I2C protocol. This is a valuable skill for anyone building embedded systems that require a visual interface, offering a significant upgrade over simpler 16x2 displays. The increased screen real estate allows for more complex information display, and the I2C interface simplifies wiring.
Practical Applications:
- Displaying sensor readings (temperature, humidity, pressure, etc.)
- Creating a simple menu-driven interface for embedded systems
- Building a data logger with real-time display
- Developing a custom dashboard for a robotics project
- Displaying status information in a home automation system
Hardware/Components
The project uses a standard Arduino board (e.g., Uno, Nano) and an LCD2004 display module with an I2C interface (in video at 00:03). The I2C interface significantly reduces the number of connecting wires to just four: VCC, GND, SDA, and SCL (in video at 02:29). The module also includes a potentiometer for contrast adjustment and a jumper for backlight control (in video at 02:58).
Wiring Guide
The wiring is straightforward. Connect the VCC pin of the LCD to the 5V pin of the Arduino, GND to GND, SDA to A4 (or SDA), and SCL to A5 (or SCL) (in video at 04:34). The Arduino's internal regulator allows direct connection to 5V. (in video at 04:47).
%%WIRING%%Code Explanation
The code utilizes the LiquidCrystal_I2C library (in video at 05:26). You'll need to download and install this library into your Arduino IDE (in video at 05:44). The key configurable parts of the code are:
// Set the LCD address to 0x27 for a 20 chars and 4 line display
LiquidCrystal_I2C lcd(0x27, 20, 4);
This line defines the I2C address of your LCD (0x27 is a common value, but it might vary; check your LCD's documentation). The "20" and "4" specify the number of characters per line (20) and the number of lines (4).
Several example sketches are provided with the library, including "Hello World", "blinking cursor", "custom characters", and "serial monitor" (in video at 05:57, 14:40, 16:03, 16:31). The provided code snippets illustrate how to use the library's functions to display text, set cursor position, control the backlight, and handle serial input. For more advanced features, refer to the library's documentation.
Live Project/Demonstration
The video demonstrates several functionalities: basic text display (in video at 05:55), displaying multiple values and text on the same line (in video at 07:10), blinking cursor (in video at 14:37), custom character display (in video at 16:01), and serial monitor interaction (in video at 16:31).
Chapters
- [00:00] Introduction and Project Overview
- [00:31] LCD2004 Display Overview
- [02:29] Hardware and Wiring
- [05:23] Code Explanation and Library Setup
- [05:55] Hello World Demonstration
- [07:10] Multi-Value Display Demonstration
- [14:37] Blinking Cursor Demonstration
- [16:01] Custom Character Demonstration
- [16:31] Serial Monitor Interaction


Comments will be displayed here.