Lesson 20/31: Displaying Ultrasonic distance on LCD1602
This project demonstrates how to combine an HC-SR04 ultrasonic distance sensor with an I2C-enabled LCD1602 display to create a real-time distance measurement system. By the end of this guide, you will have a working device that continuously measures and displays the distance to an object in centimeters. This is a foundational skill in Arduino electronics, as it combines sensor input with visual output.
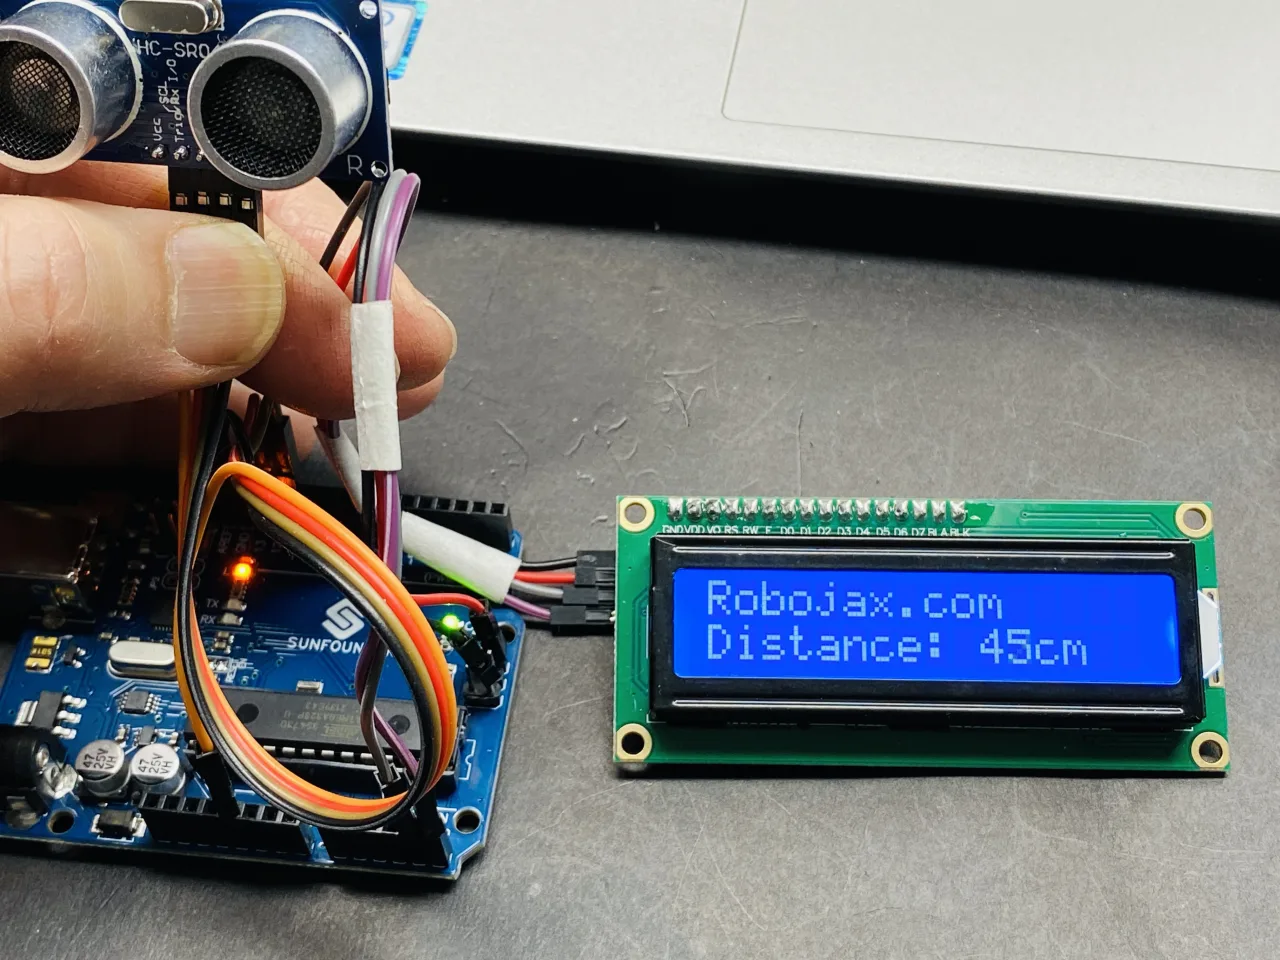
This practical setup can be used in a variety of real-world applications, including:
- Creating a smart parking assistant that helps you gauge the distance to a wall or another vehicle.
- Building a simple liquid level monitor for a tank by measuring the distance from the top to the surface.
- Developing an automated hand-sanitizer dispenser or a touchless trash can that opens when an object is near.
- Constructing a basic security alarm that triggers when someone enters a specific zone.
Hardware and Components
To build this project, you will need the following components:
- Arduino board (e.g., Uno)
- LCD1602 display with an I2C interface module
- HC-SR04 Ultrasonic Distance Sensor
- Jumper wires
- Breadboard (optional, for easier connections)
Understanding the LCD1602 and I2C
The LCD1602 is a popular display capable of showing 16 characters per line across two lines. The "I2C" module on its back is a significant advantage because it reduces the number of pins required to control the display from 6 or more down to just 2 for communication (SDA and SCL) and 2 for power (VCC and GND). This simplification makes wiring much cleaner and frees up valuable digital pins on your Arduino for other sensors, like the ultrasonic one used in this project. (in video at 01:30)
The I2C module also features a small potentiometer to adjust the display's contrast. If you power the display and see nothing, try turning this screw until the text becomes visible. (in video at 02:47)
Wiring Guide
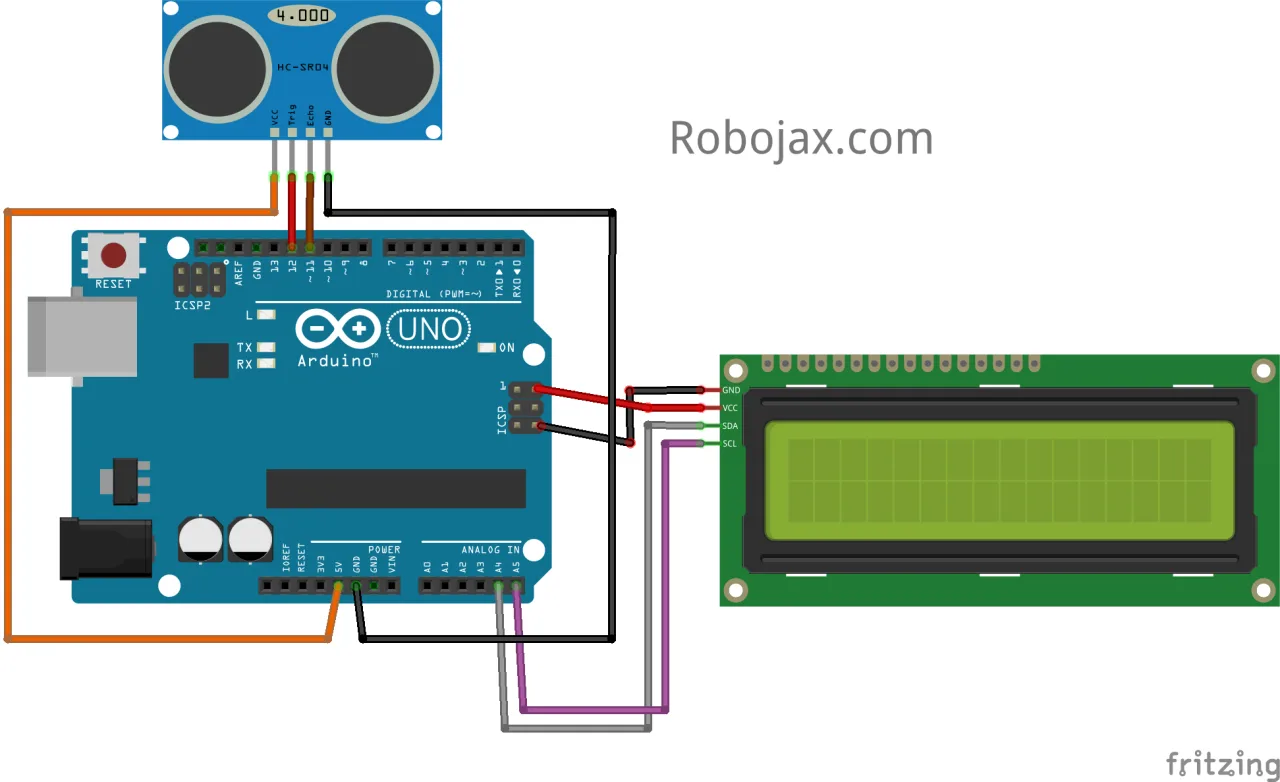
Connecting the components is straightforward. The LCD's I2C module has four pins that need to be connected to the Arduino. For the ultrasonic sensor, it has four pins as well.
Here is a breakdown of the connections:
LCD1602 I2C Module to Arduino:
- GND to Arduino GND
- VCC to Arduino 5V
- SDA to Arduino A4
- SCL to Arduino A5
HC-SR04 Ultrasonic Sensor to Arduino:
- VCC to Arduino 5V
- Trig to Arduino digital pin 12
- Echo to Arduino digital pin 11
- GND to Arduino GND
The wiring diagram for this project is referenced in the video.
Installing the Required Libraries
This project relies on two crucial libraries. The first, LiquidCrystal_I2C, is needed to control the LCD and is not included with the Arduino IDE by default. You can download it from the link provided in the video description or from the Robojax website. (in video at 06:16)
The second library, NewPing, is used to interface with the ultrasonic sensor. It simplifies the process of sending a ping and reading the echo time. Both libraries can be installed via the Arduino IDE's Library Manager by going to Sketch -> Include Library -> Manage Libraries and searching for their names.
Code Explanation
This sketch combines the functionality of the LCD and the ultrasonic sensor. The code is structured to be easily configurable for your specific setup.
At the top of the code, you will find the key variables that you may need to adjust:
// Set the LCD address to 0x27 for a 16 chars and 2 line display
LiquidCrystal_I2C lcd(0x27, displayChars, displayRows);

#define TRIGGER_PIN  12  // Arduino pin tied to trigger pin on the ultrasonic sensor.
#define ECHO_PIN     11  // Arduino pin tied to echo pin on the ultrasonic sensor.
#define MAX_DISTANCE 190 // Maximum distance we want to ping for (in centimeters).- LCD Address (0x27): This is the I2C address of your LCD module. Most modules use
0x27, but some may use0x3F. If your display shows nothing, you may need to run an I2C scanner sketch to find the correct address and update this value. (in video at 08:11) - TRIGGER_PIN and ECHO_PIN: These define the Arduino digital pins connected to the Trig and Echo pins of the ultrasonic sensor. If you use different pins, change these definitions.
- MAX_DISTANCE: This sets the maximum distance in centimeters that the sensor will measure. The HC-SR04 can measure up to 400-500cm, but setting a lower value can improve the accuracy and reliability of the readings, especially for shorter distances.
In the loop() function, the code performs the following steps:
- It uses the
sonar.ping_cm()function to measure the distance and store it in thedistancevariable. - It clears the LCD and prints the text "Robojax.com" on the first line.
- It then sets the cursor to the second line and prints "Distance: ".
- Finally, it moves the cursor to position 10 on the second line to print the measured
distancevalue followed by "cm".
The delay(200) at the end of the loop controls how frequently the sensor takes a new reading and updates the display.
Code Demonstration
Once the code is uploaded to your Arduino, the LCD will light up and begin displaying the distance. You can test the setup by moving your hand or an object closer to and further away from the ultrasonic sensor. The number on the screen should update in real-time, showing the distance in centimeters. (in video at 38:07)
Related projects from this video
- Lesson 20/31: Using LCD1602 with Arduino display text | Robojax
- Lesson 20/31: Displaying Temperature and humidity from DHT11 on LCD screen
- Lesson 20/31: Displaying voltage on LCD1602
Chapters
- [00:00] Introduction to the LCD1602 and Project Overview
- [01:30] LCD1602 Hardware and I2C Module Explained
- [03:14] LCD Pinout and I2C Address Configuration
- [05:28] Wiring Diagram for the LCD1602
- [06:16] Installing the Required LCD Library
- [07:24] Basic Code to Print Text on the LCD
- [08:11] Finding Your LCD's I2C Address
- [11:10] LCD Examples: Blinking Cursor and Custom Characters
- [18:51] LCD Example: Serial Display and Scrolling Text
- [24:36] Displaying DHT11 Temperature and Humidity on the LCD
- [33:00] Displaying Voltage from a Potentiometer on the LCD
- [35:56] Combining Ultrasonic Sensor Code with LCD
- [38:07] Demonstration of the Ultrasonic Distance Display
Images
This code has not been parsed yet. Please return to the admin panel to parse it.Things you might need
-
AmazonSunFounder Arduino Learning Kit on AliExpresss.click.aliexpress.com
-
Amazon
-
Amazon
-
Amazon
-
Amazon
Resources & references
-
DocumentationDocumentation for SunFounder 3 in 1 IoT/Smart Car/Learning Kitdocs.sunfounder.com
-
ExternalPurchase SunFounder's 3-in-1 Smart car learning kitsunfounder.com
Files📁
Arduino Libraries (zip)
-
SunFounder's 3-in-1 Smart Car learning kit source code
3in1-kit-main-v2.zip12.80 MB
User’s Manual
-
SunFounder 3-in-1 Arduino Smart Car assembly manualThis document shows step by step assembly of SunFounder 3-in-1 Arduino Smart Car
SunFounder_car_assembly_manual.pdf1.20 MB