第20/31課:喺LCD屏幕上面顯示DHT11嘅溫度和濕度
呢個教學會示範點樣將DHT11溫濕度感測器同埋有I2C介面嘅LCD1602顯示屏結合埋一齊,整一個細細部嘅環境監測站。你唔使再喺序列埠監控器度睇原始感測器數據,而係會學識點樣將即時嘅溫濕度讀數顯示喺16x2嘅字元屏幕上。呢個項目好啱用嚟整一個桌面天氣站、小型溫室監測器,或者係加一個本地讀數顯示屏落任何家居自動化項目度。I2C介面簡化咗接線,令到呢個項目對初學者嚟講好易上手,對有經驗嘅Maker嚟講亦都係一個好快就做到嘅附加項目。
以下係一啲實際嘅諗法,睇吓你可以用呢啲知識整啲乜嘢出嚟:
- 一個桌面天氣站,顯示當前房間嘅環境狀況。
- 一個細型顯示屏,用喺爬蟲類或者植物生態缸度。
- 一個本地讀數顯示屏,用喺伺服器房或者工場環境。
- 一個基礎模組,用嚟擴展做更複雜嘅家居自動化系統。
硬件同零件
要整呢個項目,你需要以下零件:
- Arduino Uno(或者兼容嘅板)
- 有I2C介面模組嘅LCD1602顯示屏
- DHT11溫濕度感測器
- 一粒4.7kΩ或者10kΩ嘅上拉電阻(如果係用裸DHT11感測器嘅話)
- 杜邦線
- 麵包板(可選,用嚟方便接線)
認識I2C LCD1602
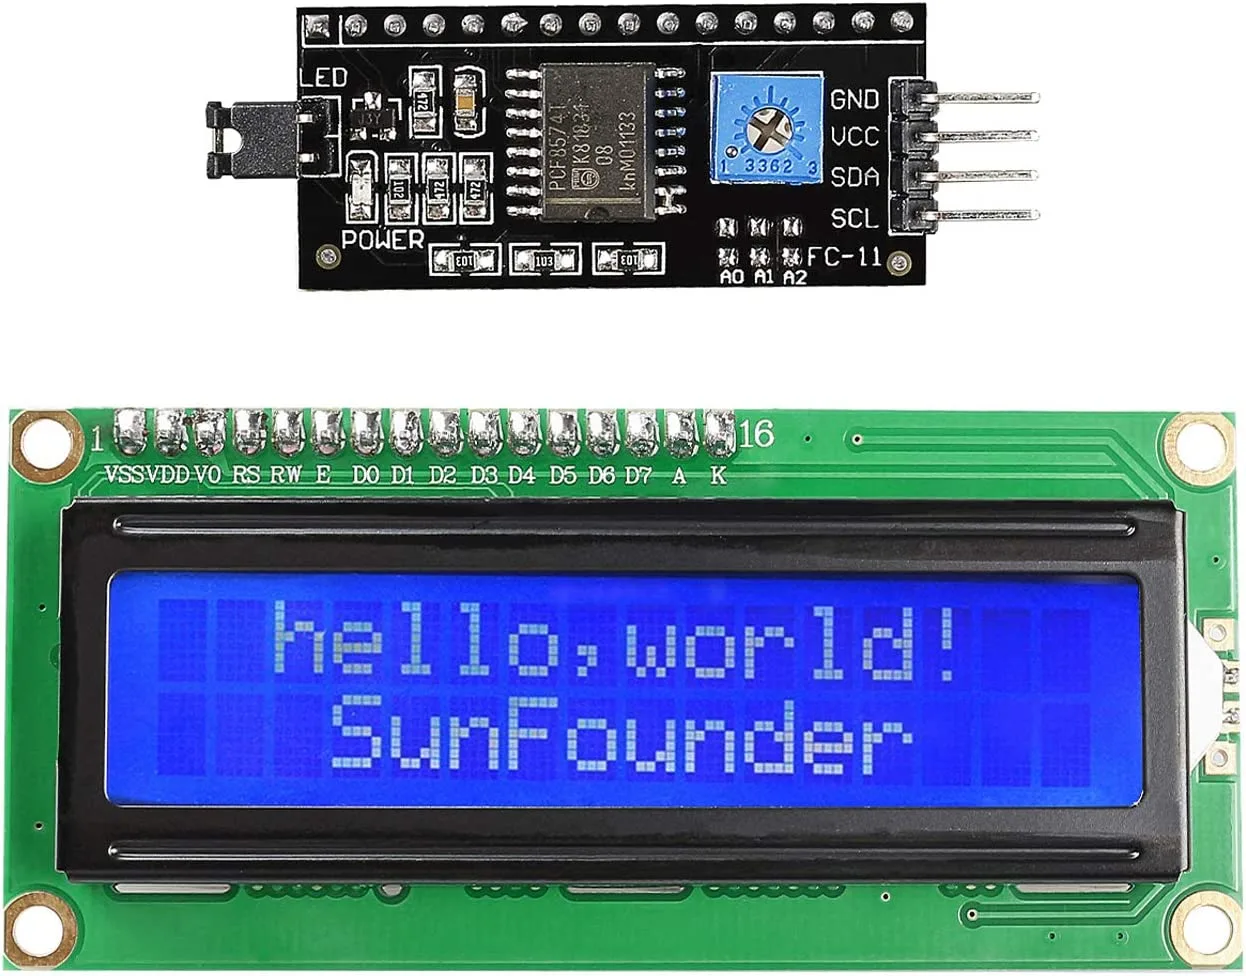
LCD1602係一個好常見嘅字元顯示屏,有16行同2列。「I2C」模組焊咗喺顯示屏背面,呢個就係佢簡單嘅關鍵。呢個模組將LCD嘅並行介面轉換成串行I2C介面,只需要兩條數據線(SDA同SCL)同兩條電源線(VCC同GND)。咁樣就大幅減少咗Arduino需要用到嘅引腳數量,留返更多引腳畀其他感測器同執行器用。呢個模組仲有一個細細嘅可變電阻,用嚟調整顯示屏嘅對比度,確保文字清晰可見。模組嘅I2C地址可以透過板上嘅細細銲接跳線(A0、A1、A2)嚟更改,令到多個I2C設備可以同時存在喺同一條匯流排上面。
接線指南
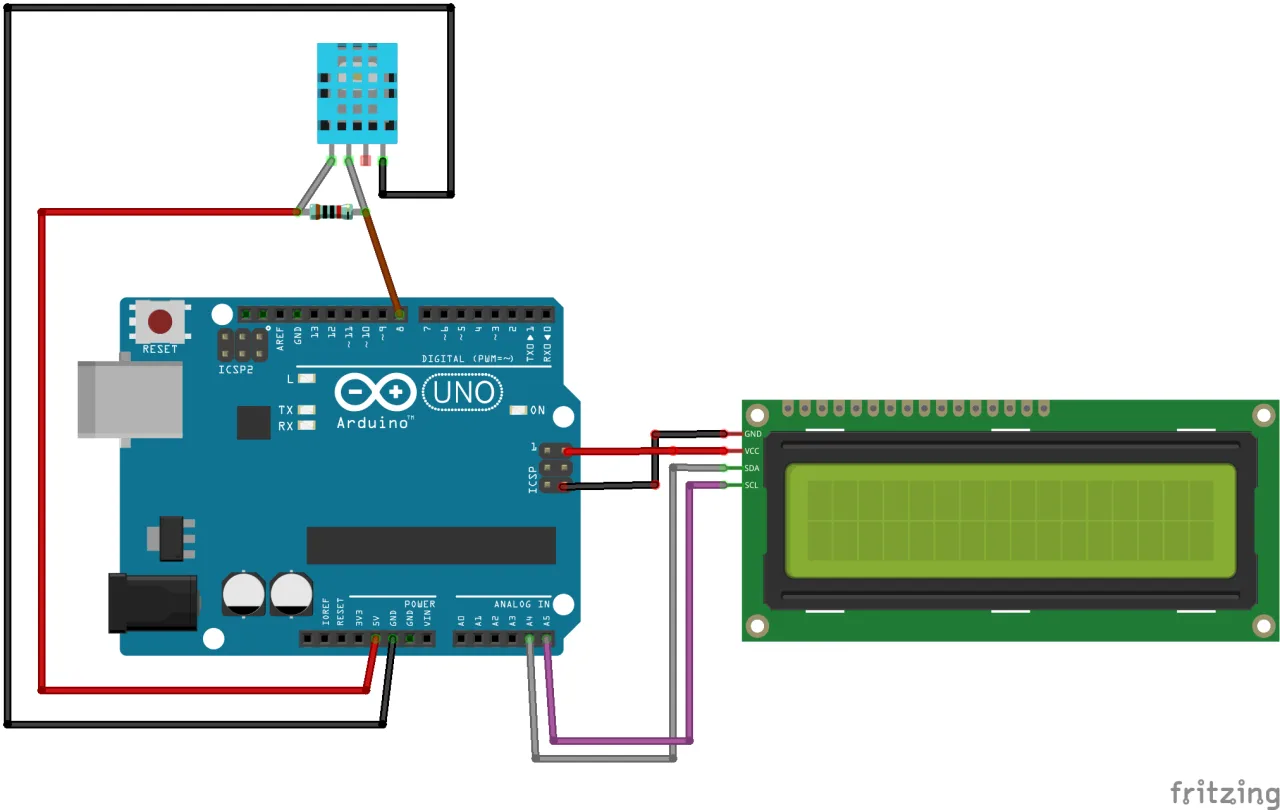
按照下圖所示咁連接各個零件。I2C LCD用Arduino嘅I2C引腳,而DHT11感測器就用一個數位引腳。
LCD1602-I2C嘅接線:
- VCC 駁去 Arduino 5V
- GND 駁去 Arduino GND
- SDA 駁去 Arduino A4
- SCL 駁去 Arduino A5
DHT11感測器嘅接線:
- VCC(引腳1) 駁去 Arduino 5V
- Data(引腳2) 駁去 Arduino 數位引腳2(加一粒10kΩ上拉電阻去5V)
- NC(引腳3) - 唔使連接
- GND(引腳4) 駁去 Arduino GND
(喺影片25:16位置)
設定程式庫
呢個項目需要兩個程式庫。Wire.h程式庫係Arduino標準安裝嘅一部分。你需要安裝LiquidCrystal_I2C程式庫同dht11程式庫。影片入面有示範點樣安裝。你可以喺影片描述入面嘅連結或者Robojax網站度下載呢啲程式庫。下載咗之後,你可以透過Arduino IDE,去Sketch > Include Library > Add .ZIP Library...,然後揀返你下載嘅檔案嚟安裝。(喺影片06:16位置)
搵你個LCD嘅I2C地址
喺你可以用個顯示屏之前,你一定要知道佢嘅I2C地址。最常見嘅地址係0x27或者0x3F,但係都有可能唔同。要搵到佢,你可以用一個I2C掃描器程式。呢個係一個簡單嘅程式,會掃描I2C匯流排,然後將搵到嘅地址顯示喺序列埠監控器度。上載呢個掃描器程式碼,開序列埠監控器(設定做9600 baud),佢就會顯示你個LCD嘅地址。(喺影片08:11位置)
程式碼解釋
呢一節會解釋程式碼入面一啲重要、用戶可以設定嘅部分。完整嘅程式可以喺文章下面下載。
程式一開始就包含所需嘅程式庫,同埋定義所用嘅引腳同物件。
// header file from GetHub: https://github.com/adidax/dht11
#include <dht11.h>
dht11 DHT11; // create object of DHT11
#define dhtpin 2 // set the pin to connect to DHT11

// start of settings for LCD1602-I2C
#include <Wire.h>
#include <LiquidCrystal_I2C.h>
// Set the LCD address to 0x3F for a 16 chars and 2 line display
LiquidCrystal_I2C lcd(0x3F, 16, 2);
// end of settings for LCD1602-I2C
以下係最緊要、要根據你嘅設定去改嘅幾行:
#define dhtpin 2:呢行定義咗連接DHT11感測器數據引腳嘅Arduino引腳。如果你用另一個引腳,就要改個數字2。LiquidCrystal_I2C lcd(0x3F, 16, 2);:呢行建立咗LCD物件。第一個參數0x3F就係你喺上一步搵到嘅I2C地址。16同2定義咗你個顯示屏嘅行數同列數。如果你個掃描器搵到另一個地址(例如0x27),就要更新呢個地址。
代碼用咗一個自訂函數,getTemp(),嚟讀取溫度並轉換成唔同單位。呢個係一個強大嘅功能,令到代碼可以重用喺唔同嘅應用度。
float getTemp(char type) {
    float temp = (float)DHT11.temperature;//攞溫度
  if(type =='F')
  {
    return temp * 1.8 + 32;//轉做華氏
  }else if(type =='K')
  {
    return temp + 274.15;//轉做開爾文
  }else{
   return temp;
  }
}要用呢個函數,你帶住一個字符參數去代表想要嘅單位。例如,getTemp('C') 會返回攝氏溫度,getTemp('F') 會返回華氏溫度,而 getTemp('K') 會返回開爾文溫度。函數會由 DHT11 感應器讀取原始溫度,然後套用所需嘅轉換公式。咁樣你就可以輕鬆咁喺主程式 loop() 入面改顯示嘅單位,而唔使重寫感應器讀取邏輯。主循環會用 lcd.setCursor() 同 lcd.print() 函數將溫度同濕度打印到 LCD 上,控制數值喺屏幕嘅邊個位置出現。
顯示度數符號
標準嘅 HD44780 LCD 字符集冇包含專用嘅度數符號(°)。要顯示佢,你必須用 lcd.write() 函數,帶住 LCD ROM 入面字符嘅十進制值。對於度數符號,呢個值係 223。代碼示範咗用 lcd.print((char)223); 喺溫度值後面打印符號。 (喺影片 30:16)
現場項目示範
一旦上傳咗代碼,顯示屏會先顯示一個啟動訊息,然後清除並顯示當前嘅溫度同濕度。顯示屏嘅第一行顯示文字「LCD1602 DHT11」,而第二行顯示攝氏溫度,後面跟住度數符號同「C」,然後係華氏溫度,後面跟住度數符號同「F」。濕度值會打印到串行監視器。影片入面嘅示範顯示,當感應器被揸住嗰陣,顯示屏每半秒更新一次,準確反映環境條件。 (喺影片 29:42)
將電位器嘅電壓顯示喺 LCD 上,喺 第 20/31 課:喺 LCD1602 上顯示電壓 有講解。
用同一個 LCD 顯示超聲波感應器嘅距離,喺 第 20/31 課:用 Arduino 嘅 LCD1602 顯示溫度、電壓同距離 | Robojax 有講解。
呢條影片嘅相關項目
章節
- [00:00] LCD1602 介紹同項目概覽
- [01:30] LCD1602 硬件同 I2C 模組講解
- [02:47] 調整 LCD 對比度
- [03:14] LCD 引腳同 I2C 地址配置
- [05:28] LCD1602 嘅接線圖
- [06:16] 安裝 LiquidCrystal_I2C 庫
- [08:11] 用掃描器搵 I2C 地址
- [09:28] 喺 LCD 上打印文字嘅基本代碼
- [11:10] 例子:閃爍游標同自訂字符
- [13:46] 建立同使用自訂字符
- [18:51] 串行顯示例子
- [23:16] 喺 LCD 上滾動文字
- [24:36] 將 DHT11 感應器代碼同 LCD 結合
- [30:16] 顯示度數符號
- [32:03] 移除溫度嘅小數點
- [33:00] 喺 LCD 上顯示電位器嘅電壓
- [35:56] 顯示超聲波感應器嘅距離
圖片
/*
Lesson 20/31: Displaying Temperature and humidity from DHT11 on  LCD screen
Get this code and watch video Download and resource page https://robojax.com/RJT603
YouTube video https://www.youtube.com/watch?v=NXAswOc_2zg


 * This is the Arduino code for  DHT11 module to read temperature and humidity
 * This code can display temperature in:
 * C is used to get Celsius
 * F is used to get Fahrenheit
 * K is used for Kelvin

 *  *
 * Written by Ahmad Shamshiri for Robojax
 * on Jan 04, 2018
 * Robojax.com

   Please watch video instruction here https://youtu.be/0XMLnCYkvbE
 This code is available at http://robojax.com/course1/?vid=lecture11

with over 100 lectures Free On  YouTube Watch it here http://robojax.com/L/?id=338
Get the code for the course: http://robojax.com/L/?id=339


 * This code is "AS IS" without warranty or liability. Free to be used as long as you keep this note intact.*
 * This code has been download from Robojax.com
    This program is free software: you can redistribute it and/or modify
    it under the terms of the GNU General Public License as published by
    the Free Software Foundation, either version 3 of the License, or
    (at your option) any later version.

    This program is distributed in the hope that it will be useful,
    but WITHOUT ANY WARRANTY; without even the implied warranty of
    MERCHANTABILITY or FITNESS FOR A PARTICULAR PURPOSE.  See the
    GNU General Public License for more details.

    You should have received a copy of the GNU General Public License
    along with this program.  If not, see <https://www.gnu.org/licenses/>.
 */

// header file from GetHub: https://github.com/adidax/dht11
#include <dht11.h>

dht11 DHT11; // create object of DHT11
#define dhtpin 2 // set the pin to connect to DHT11

// start of settings for LCD1602-I2C
#include <Wire.h>
#include <LiquidCrystal_I2C.h>
// Set the LCD address to 0x3F for a 16 chars and 2 line display
LiquidCrystal_I2C lcd(0x3F, 16, 2);
// end of settings for LCD1602-I2C


void setup() {
    Serial.begin(9600);// setting up serial monitor

  // initialize the LCD,
  lcd.begin();
  // Turn on the blacklight and print a message.
  lcd.backlight();
  lcd.clear();
  lcd.setCursor (0,0); //
  lcd.print("DHT11 Sensor");
  delay(2000);
}

void loop() {
	//Robojax Step By Step Arduino Course YouTube Watch it here http://robojax.com/L/?id=338
  DHT11.read(dhtpin);// initialize the reading
  int humidity = DHT11.humidity;// get humidity

  lcd.clear();// clear previous values from screen
  lcd.setCursor (0,0); //character zero, line 1
  lcd.print("LCD1602 DHT11"); // print text

  // print distance in degrees C
  lcd.setCursor (0,1); //character 0, line 2
  lcd.print(getTemp('C'));// print Temperature Celsius
  lcd.setCursor (4,1); //character 5, line 2
  lcd.print((char)223);// print degree
  lcd.setCursor (5,1); //character 6, line 2
  lcd.print("C");// print C

   // print distance degrees F
  lcd.setCursor (7,1); //character 8, line 2
  lcd.print(getTemp('F'));// print distance in cm
  lcd.setCursor (13,1); //character 14, line 2
  lcd.print((char)223);// print degree
  lcd.setCursor (14,1); //character 16, line 2
  lcd.print("F");// print F


  //code for Robojax.com video
   Serial.print(getTemp('C'));
   Serial.print("C ");
   Serial.print(getTemp('F'));
   Serial.print("F ");
   Serial.print(getTemp('K'));
   Serial.print("K ");
   Serial.print(" humidity:");
   Serial.print (humidity);
   Serial.print("% ");
   Serial.println();
 delay(500);
}


/*
 * getTemp(char type)
 * type character of upper case
 * C is used to get Celsius
 * F is used to get Fahrenheit
 * K is used for Kelvin
 */
float getTemp(char type) {
	//Robojax Step By Step Arduino Course YouTube Watch it here http://robojax.com/L/?id=338
    float temp = (float)DHT11.temperature;//get temp
  if(type =='F')
  {
    return temp * 1.8 + 32;// convert to Fahrenheit
  }else if(type =='K')
  {
    return temp + 274.15;// convert to Kelvin
  }else{
   return temp;
  }

}
你可能需要嘅嘢
-
亞馬遜SunFounder Arduino Learning Kit on AliExpresss.click.aliexpress.com
-
亞馬遜
-
亞馬遜
-
亞馬遜
資源與參考資料
-
文件记录Documentation for SunFounder 3 in 1 IoT/Smart Car/Learning Kitdocs.sunfounder.com
-
外部Purchase SunFounder's 3-in-1 Smart car learning kitsunfounder.com
文件📁
Arduino 函式庫 (zip)
-
SunFounder's 3-in-1 Smart Car learning kit source code
3in1-kit-main-v2.zip12.80 MB
用户手册
-
SunFounder 3-in-1 Arduino Smart Car assembly manualThis document shows step by step assembly of SunFounder 3-in-1 Arduino Smart Car
SunFounder_car_assembly_manual.pdf1.20 MB