第20/31课:在LCD屏幕上显示DHT11的温度和湿度
本教程演示如何将DHT11温湿度传感器与带I2C接口的LCD1602显示屏结合,打造一个紧凑的环境监测站。您将学习如何在16x2字符屏幕上显示实时温湿度读数,而不是从串口监视器读取原始传感器数据。该项目非常适合构建桌面气象站、小型温室监测器,或为任何家庭自动化项目添加本地读数显示。I2C接口简化了接线,使该项目对初学者来说易于上手,对有经验的创客来说也能快速完成。
以下是一些利用此知识可以构建的实用想法:
- 显示当前室内条件的桌面气象站。
- 用于爬行动物或植物玻璃容器的小型显示屏。
- 用于服务器机房或工作坊环境的本地读数显示。
- 更复杂的家庭自动化系统的基础模块。
硬件和组件
要构建此项目,您需要以下组件:
- Arduino Uno(或兼容板)
- 带I2C接口模块的LCD1602显示屏
- DHT11温湿度传感器
- 一个4.7kΩ或10kΩ上拉电阻(如果使用裸DHT11传感器)
- 跳线
- 面包板(可选,便于连接)
了解I2C LCD1602
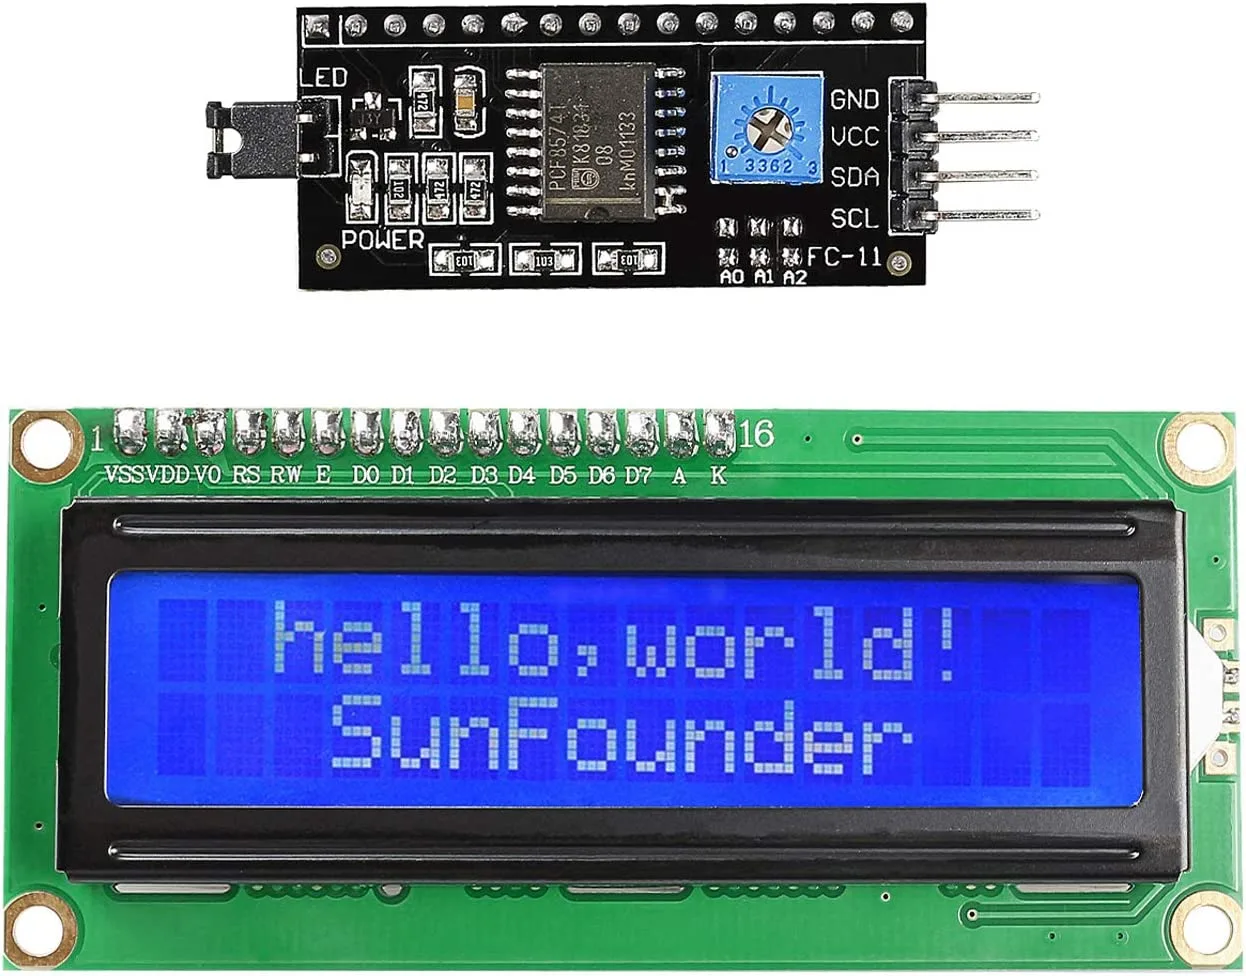
LCD1602是一种常见的字符显示屏,具有16列和2行。"I2C"模块焊接在显示屏背面,是其简单性的关键。该模块将LCD的并行接口转换为串行I2C接口,只需两根数据线(SDA和SCL)和两根电源线(VCC和GND)。这大大减少了Arduino上所需的引脚数量,为其他传感器和执行器留出更多可用引脚。该模块还包含一个小型电位器,用于调节显示屏的对比度,这对确保文本可见至关重要。模块的I2C地址可以通过板上的小型焊接跳线(A0、A1、A2)更改,允许多个I2C设备在同一总线上共存。
接线指南
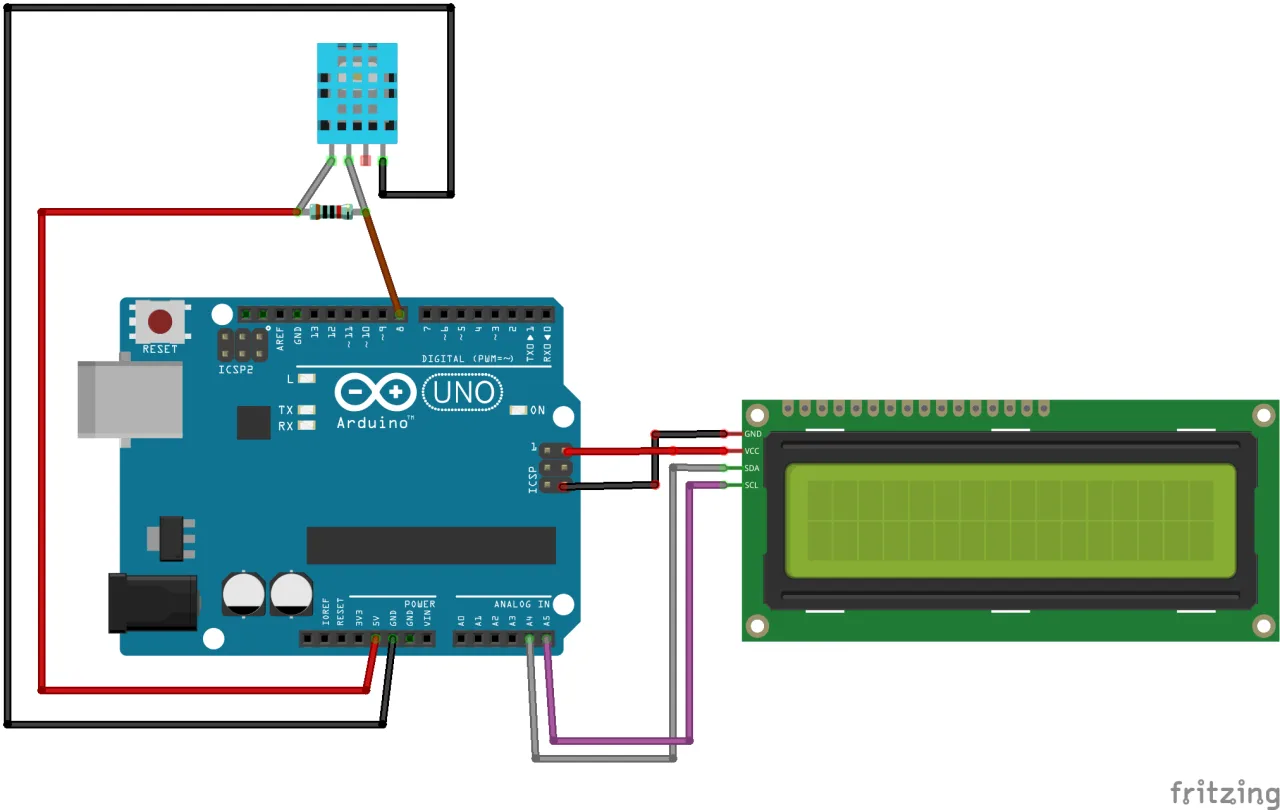
按下图所示连接组件。I2C LCD使用Arduino的I2C引脚,而DHT11传感器使用数字引脚。
对于LCD1602-I2C:
- VCC连接到Arduino 5V
- GND连接到Arduino GND
- SDA连接到Arduino A4
- SCL连接到Arduino A5
对于DHT11传感器:
- VCC(引脚1)连接到Arduino 5V
- Data(引脚2)连接到Arduino 数字引脚2(带10kΩ上拉电阻至5V)
- NC(引脚3) - 不连接
- GND(引脚4)连接到Arduino GND
(视频中25:16处)
设置库
此项目需要两个库。Wire.h库是标准Arduino安装的一部分。您需要安装LiquidCrystal_I2C库和dht11库。视频演示了如何安装它们。您可以从视频描述中提供的链接或Robojax网站下载这些库。下载后,您可以通过导航到Sketch > Include Library > Add .ZIP Library...并选择下载的文件,在Arduino IDE中安装它们。(视频中06:16处)
查找LCD的I2C地址
在使用显示屏之前,您必须确定其I2C地址。最常见的地址是0x27或0x3F,但也可能有所不同。要找到它,您可以使用I2C扫描器程序。这是一个简单的程序,用于扫描I2C总线并将找到的任何地址报告到串口监视器。上传扫描器代码,以9600波特率打开串口监视器,它将显示您的LCD的地址。(视频中08:11处)
代码说明
本节解释代码中关键的、用户可配置的部分。完整程序可在文章下方下载。
代码首先包含必要的库并定义使用的引脚和对象。
// 来自GetHub的头文件:https://github.com/adidax/dht11
#include <dht11.h>
dht11 DHT11; // 创建DHT11对象
#define dhtpin 2 // 设置连接到DHT11的引脚

// LCD1602-I2C设置开始
#include <Wire.h>
#include <LiquidCrystal_I2C.h>
// 将LCD地址设置为0x3F,适用于16字符2行显示
LiquidCrystal_I2C lcd(0x3F, 16, 2);
// LCD1602-I2C设置结束
这些是为您的设置配置的最重要行:
#define dhtpin 2:这定义了连接到DHT11传感器数据引脚的Arduino引脚。如果您使用不同的引脚,请更改数字2。LiquidCrystal_I2C lcd(0x3F, 16, 2);:此行创建LCD对象。第一个参数0x3F是您在上一步中找到的I2C地址。16和2定义显示屏的列数和行数。如果您的扫描器找到不同的地址(例如0x27),请更新该地址。
该代码使用了一个自定义函数getTemp()来读取温度并将其转换为不同单位。这是一个强大的功能,使代码可复用于不同的应用。
float getTemp(char type) {
    float temp = (float)DHT11.temperature;//获取温度
  if(type =='F')
  {
    return temp * 1.8 + 32;//转换为华氏度
  }else if(type =='K')
  {
    return temp + 274.15;//转换为开尔文
  }else{
   return temp;
  }
}要使用此函数,您需要传入一个表示所需单位的单个字符参数。例如,getTemp('C')返回摄氏温度,getTemp('F')返回华氏温度,getTemp('K')返回开尔文温度。该函数从DHT11传感器读取原始温度并应用必要的转换公式。这使您可以在主loop()中轻松更改显示单位,而无需重写传感器读取逻辑。主循环使用lcd.setCursor()和lcd.print()函数将温度和湿度打印到LCD上,以控制数值在屏幕上的显示位置。
显示度数符号
标准HD44780 LCD字符集不包含专用的度数符号(°)。要显示它,您必须使用lcd.write()函数,并传入LCD ROM中该字符的十进制值。对于度数符号,该值为223。代码通过使用lcd.print((char)223);在温度值后打印该符号来演示这一点。(视频中30:16处)
实时项目演示
代码上传后,显示屏将先显示一条启动消息,然后清除并显示当前的温度和湿度。显示屏的第一行显示文本“LCD1602 DHT11”,第二行显示摄氏温度,后跟度数符号和“C”,然后是华氏温度,后跟度数符号和“F”。湿度值打印到串行监视器上。视频中的演示显示,当传感器被手持时,显示屏每半秒更新一次,准确反映环境条件。(视频中29:42处)
在LCD上显示电位器的电压,请参阅第20/31课:在LCD1602上显示电压。
使用同一LCD显示超声波传感器的距离,请参阅第20/31课:使用LCD1602与Arduino显示温度、电压和距离 | Robojax。
本视频的相关项目
章节
- [00:00] LCD1602介绍和项目概述
- [01:30] LCD1602硬件和I2C模块说明
- [02:47] 调整LCD对比度
- [03:14] LCD引脚定义和I2C地址配置
- [05:28] LCD1602接线图
- [06:16] 安装LiquidCrystal_I2C库
- [08:11] 使用扫描器查找I2C地址
- [09:28] 在LCD上打印文本的基本代码
- [11:10] 示例:闪烁光标和自定义字符
- [13:46] 创建和使用自定义字符
- [18:51] 串行显示示例
- [23:16] 在LCD上滚动文本
- [24:36] 将DHT11传感器代码与LCD结合
- [30:16] 显示度数符号
- [32:03] 去除温度的小数点
- [33:00] 在LCD上显示电位器的电压
- [35:56] 显示超声波传感器的距离
图像
/*
Lesson 20/31: Displaying Temperature and humidity from DHT11 on  LCD screen
Get this code and watch video Download and resource page https://robojax.com/RJT603
YouTube video https://www.youtube.com/watch?v=NXAswOc_2zg


 * This is the Arduino code for  DHT11 module to read temperature and humidity
 * This code can display temperature in:
 * C is used to get Celsius
 * F is used to get Fahrenheit
 * K is used for Kelvin

 *  *
 * Written by Ahmad Shamshiri for Robojax
 * on Jan 04, 2018
 * Robojax.com

   Please watch video instruction here https://youtu.be/0XMLnCYkvbE
 This code is available at http://robojax.com/course1/?vid=lecture11

with over 100 lectures Free On  YouTube Watch it here http://robojax.com/L/?id=338
Get the code for the course: http://robojax.com/L/?id=339


 * This code is "AS IS" without warranty or liability. Free to be used as long as you keep this note intact.*
 * This code has been download from Robojax.com
    This program is free software: you can redistribute it and/or modify
    it under the terms of the GNU General Public License as published by
    the Free Software Foundation, either version 3 of the License, or
    (at your option) any later version.

    This program is distributed in the hope that it will be useful,
    but WITHOUT ANY WARRANTY; without even the implied warranty of
    MERCHANTABILITY or FITNESS FOR A PARTICULAR PURPOSE.  See the
    GNU General Public License for more details.

    You should have received a copy of the GNU General Public License
    along with this program.  If not, see <https://www.gnu.org/licenses/>.
 */

// header file from GetHub: https://github.com/adidax/dht11
#include <dht11.h>

dht11 DHT11; // create object of DHT11
#define dhtpin 2 // set the pin to connect to DHT11

// start of settings for LCD1602-I2C
#include <Wire.h>
#include <LiquidCrystal_I2C.h>
// Set the LCD address to 0x3F for a 16 chars and 2 line display
LiquidCrystal_I2C lcd(0x3F, 16, 2);
// end of settings for LCD1602-I2C


void setup() {
    Serial.begin(9600);// setting up serial monitor

  // initialize the LCD,
  lcd.begin();
  // Turn on the blacklight and print a message.
  lcd.backlight();
  lcd.clear();
  lcd.setCursor (0,0); //
  lcd.print("DHT11 Sensor");
  delay(2000);
}

void loop() {
	//Robojax Step By Step Arduino Course YouTube Watch it here http://robojax.com/L/?id=338
  DHT11.read(dhtpin);// initialize the reading
  int humidity = DHT11.humidity;// get humidity

  lcd.clear();// clear previous values from screen
  lcd.setCursor (0,0); //character zero, line 1
  lcd.print("LCD1602 DHT11"); // print text

  // print distance in degrees C
  lcd.setCursor (0,1); //character 0, line 2
  lcd.print(getTemp('C'));// print Temperature Celsius
  lcd.setCursor (4,1); //character 5, line 2
  lcd.print((char)223);// print degree
  lcd.setCursor (5,1); //character 6, line 2
  lcd.print("C");// print C

   // print distance degrees F
  lcd.setCursor (7,1); //character 8, line 2
  lcd.print(getTemp('F'));// print distance in cm
  lcd.setCursor (13,1); //character 14, line 2
  lcd.print((char)223);// print degree
  lcd.setCursor (14,1); //character 16, line 2
  lcd.print("F");// print F


  //code for Robojax.com video
   Serial.print(getTemp('C'));
   Serial.print("C ");
   Serial.print(getTemp('F'));
   Serial.print("F ");
   Serial.print(getTemp('K'));
   Serial.print("K ");
   Serial.print(" humidity:");
   Serial.print (humidity);
   Serial.print("% ");
   Serial.println();
 delay(500);
}


/*
 * getTemp(char type)
 * type character of upper case
 * C is used to get Celsius
 * F is used to get Fahrenheit
 * K is used for Kelvin
 */
float getTemp(char type) {
	//Robojax Step By Step Arduino Course YouTube Watch it here http://robojax.com/L/?id=338
    float temp = (float)DHT11.temperature;//get temp
  if(type =='F')
  {
    return temp * 1.8 + 32;// convert to Fahrenheit
  }else if(type =='K')
  {
    return temp + 274.15;// convert to Kelvin
  }else{
   return temp;
  }

}
|||您可能需要的东西
-
亚马逊SunFounder Arduino Learning Kit on AliExpresss.click.aliexpress.com
-
亚马逊
-
亚马逊
-
亚马逊
资源与参考
-
文档SunFounder 3合1物联网/智能车/学习套件的文档docs.sunfounder.com
-
外部购买SunFounder的3合1智能汽车学习套件sunfounder.com
文件📁
Arduino 库(zip 格式)
-
SunFounder 的 3 合 1 智能汽车学习套件源代码
3in1-kit-main-v2.zip12.80 MB
用户手册
-
SunFounder 3-in-1 Arduino Smart Car assembly manualThis document shows step by step assembly of SunFounder 3-in-1 Arduino Smart Car
SunFounder_car_assembly_manual.pdf1.20 MB