Lesson 20/31: Displaying Temperature and humidity from DHT11 on LCD screen
This tutorial demonstrates how to combine a DHT11 temperature and humidity sensor with an I2C-enabled LCD1602 display to create a compact environmental monitoring station. Instead of reading raw sensor data from the serial monitor, you'll learn to display live temperature and humidity readings on a 16x2 character screen. This project is ideal for building a desktop weather station, a small greenhouse monitor, or adding a local readout to any home automation project. The I2C interface simplifies wiring, making this an accessible project for beginners and a quick addition for experienced makers.
Here are a few practical ideas for what you can build with this knowledge:
- A desktop weather station showing current room conditions.
- A compact display for a reptile or plant terrarium.
- A local readout for a server room or workshop environment.
- A base module for a more complex home automation system.
Hardware and Components
To build this project, you will need the following components:
- Arduino Uno (or compatible board)
- LCD1602 display with an I2C interface module
- DHT11 temperature and humidity sensor
- A 4.7kΩ or 10kΩ pull-up resistor (if using a bare DHT11 sensor)
- Jumper wires
- Breadboard (optional, for easier connections)
Understanding the I2C LCD1602
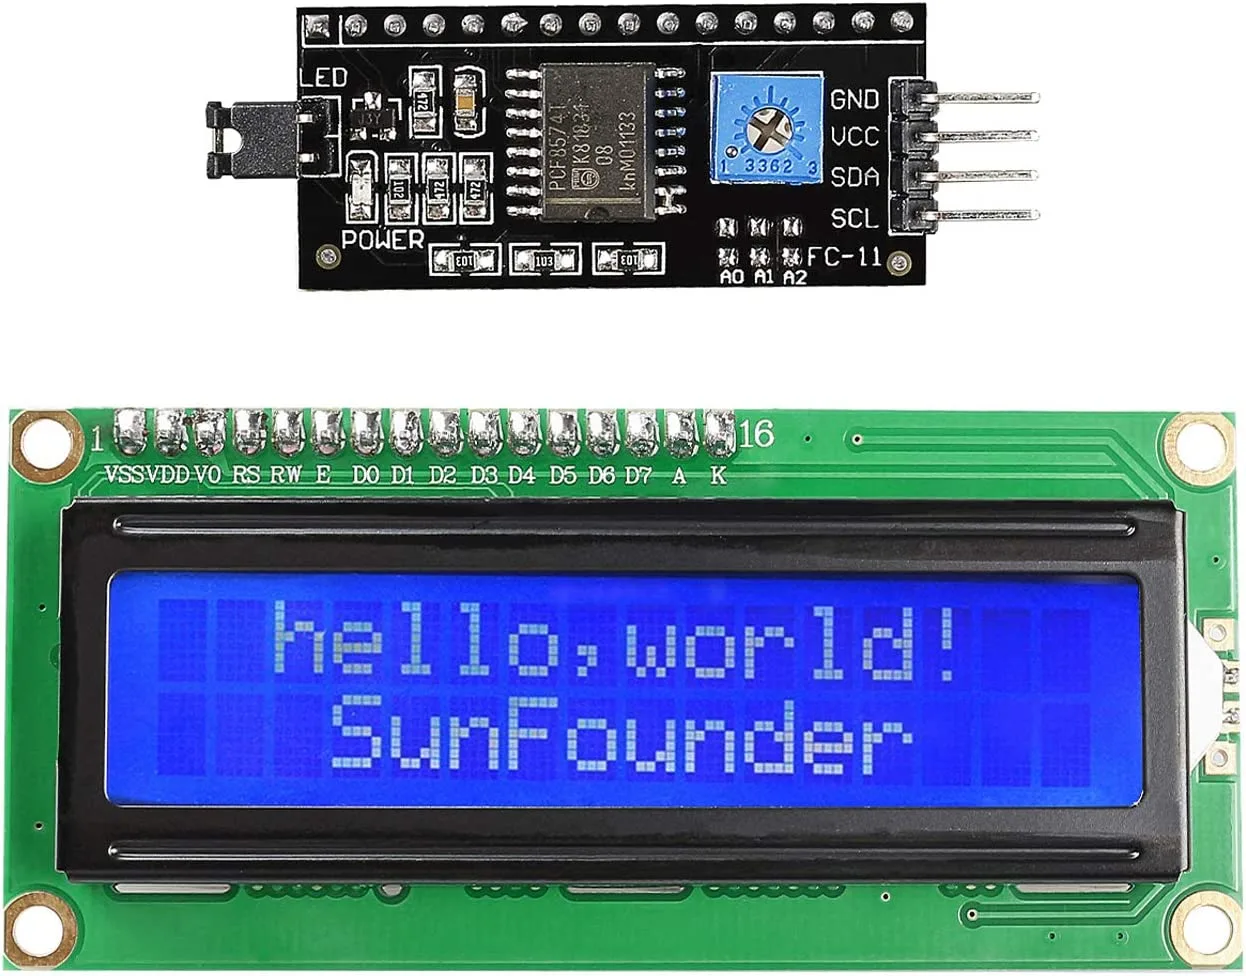
The LCD1602 is a common character display with 16 columns and 2 rows. The "I2C" module soldered to the back of the display is the key to its simplicity. This module converts the parallel interface of the LCD into a serial I2C interface, which requires only two wires for data (SDA and SCL) and two for power (VCC and GND). This drastically reduces the number of pins needed on your Arduino, leaving more available for other sensors and actuators. The module also includes a small potentiometer to adjust the display's contrast, which is crucial for ensuring text is visible. The I2C address of the module can be changed using the small solder jumpers (A0, A1, A2) on the board, allowing multiple I2C devices to coexist on the same bus.
Wiring Guide
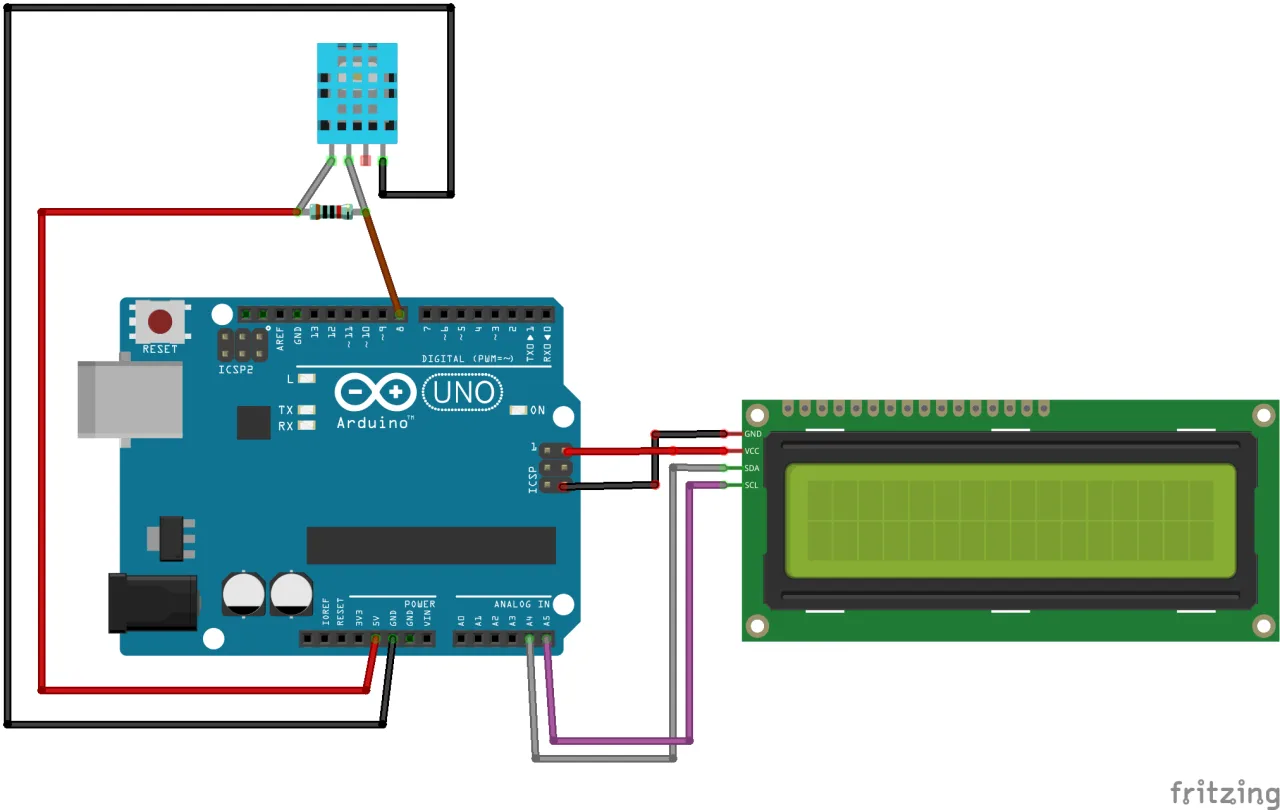
Connect the components as shown in the diagram below. The I2C LCD uses the Arduino's I2C pins, while the DHT11 sensor uses a digital pin.
For the LCD1602-I2C:
- VCC to Arduino 5V
- GND to Arduino GND
- SDA to Arduino A4
- SCL to Arduino A5
For the DHT11 sensor:
- VCC (Pin 1) to Arduino 5V
- Data (Pin 2) to Arduino Digital Pin 2 (with a 10kΩ pull-up resistor to 5V)
- NC (Pin 3) - Not Connected
- GND (Pin 4) to Arduino GND
(in video at 25:16)
Setting Up the Libraries
This project requires two libraries. The Wire.h library is part of the standard Arduino installation. You will need to install the LiquidCrystal_I2C library and the dht11 library. The video demonstrates how to install them. You can download the libraries from the links provided in the video description or from the Robojax website. Once downloaded, you can install them via the Arduino IDE by navigating to Sketch > Include Library > Add .ZIP Library... and selecting the downloaded files. (in video at 06:16)
Finding Your LCD's I2C Address
Before you can use the display, you must determine its I2C address. The most common address is 0x27 or 0x3F, but it can vary. To find it, you can use an I2C scanner sketch. This is a simple program that scans the I2C bus and reports any addresses it finds to the Serial Monitor. Upload the scanner code, open the Serial Monitor at 9600 baud, and it will display the address of your LCD. (in video at 08:11)
Code Explanation
This section explains the key, user-configurable parts of the code. The full program is available for download below the article.
The code begins by including the necessary libraries and defining the pins and objects used.
// header file from GetHub: https://github.com/adidax/dht11
#include <dht11.h>
dht11 DHT11; // create object of DHT11
#define dhtpin 2 // set the pin to connect to DHT11

// start of settings for LCD1602-I2C
#include <Wire.h>
#include <LiquidCrystal_I2C.h>
// Set the LCD address to 0x3F for a 16 chars and 2 line display
LiquidCrystal_I2C lcd(0x3F, 16, 2);
// end of settings for LCD1602-I2C
These are the most important lines to configure for your setup:
#define dhtpin 2: This defines the Arduino pin connected to the DHT11 sensor's data pin. Change the number2if you use a different pin.LiquidCrystal_I2C lcd(0x3F, 16, 2);: This line creates the LCD object. The first parameter,0x3F, is the I2C address you found in the previous step. The16and2define the number of columns and rows of your display. Update the address if your scanner found a different one (e.g.,0x27).
The code uses a custom function, getTemp(), to read the temperature and convert it to different units. This is a powerful feature that makes the code reusable for different applications.
float getTemp(char type) {
    float temp = (float)DHT11.temperature;//get temp
  if(type =='F')
  {
    return temp * 1.8 + 32;// convert to Fahrenheit
  }else if(type =='K')
  {
    return temp + 274.15;// convert to Kelvin
  }else{
   return temp;
  }
}
To use this function, you call it with a single character argument representing the desired unit. For example, getTemp('C') returns the temperature in Celsius, getTemp('F') returns it in Fahrenheit, and getTemp('K') returns it in Kelvin. The function reads the raw temperature from the DHT11 sensor and applies the necessary conversion formula. This allows you to easily change the displayed unit in the main loop() without rewriting the sensor reading logic. The main loop prints the temperature and humidity to the LCD using the lcd.setCursor() and lcd.print() functions to control where on the screen the values appear.
Displaying the Degree Symbol
The standard HD44780 LCD character set does not include a dedicated degree symbol (°). To display it, you must use the lcd.write() function with the decimal value of the character from the LCD's ROM. For the degree symbol, this value is 223. The code demonstrates this by using lcd.print((char)223); to print the symbol after the temperature value. (in video at 30:16)
Live Project Demonstration
Once the code is uploaded, the display will show a startup message before clearing and displaying the current temperature and humidity. The first line of the display shows the text "LCD1602 DHT11", while the second line shows the temperature in Celsius, followed by the degree symbol and "C", and then the temperature in Fahrenheit, followed by the degree symbol and "F". The humidity value is printed to the serial monitor. The demonstration in the video shows the display updating every half-second as the sensor is held, accurately reflecting the ambient conditions. (in video at 29:42)
Displaying the voltage from a potentiometer on the LCD is covered in Lesson 20/31: Displaying voltage on LCD1602.
Using the same LCD to display distance from an ultrasonic sensor is covered in Lesson 20/31: Using LCD1602 with Arduino display temperature, voltage and distance | Robojax.
Related projects from this video
- Lesson 20/31: Using LCD1602 with Arduino display temperature, voltage and distance | Robojax
- Lesson 20/31: Displaying voltage on LCD1602
Chapters
- [00:00] Introduction to the LCD1602 and project overview
- [01:30] LCD1602 hardware and I2C module explanation
- [02:47] Adjusting the LCD contrast
- [03:14] LCD pinout and I2C address configuration
- [05:28] Wiring diagram for the LCD1602
- [06:16] Installing the LiquidCrystal_I2C library
- [08:11] Finding the I2C address with a scanner
- [09:28] Basic code to print text on the LCD
- [11:10] Examples: blinking cursor and custom characters
- [13:46] Creating and using custom characters
- [18:51] Serial display example
- [23:16] Scrolling text on the LCD
- [24:36] Combining DHT11 sensor code with the LCD
- [30:16] Displaying the degree symbol
- [32:03] Removing decimal points from temperature
- [33:00] Displaying voltage from a potentiometer on the LCD
- [35:56] Displaying distance from an ultrasonic sensor
Images
/*
Lesson 20/31: Displaying Temperature and humidity from DHT11 on  LCD screen
Get this code and watch video Download and resource page https://robojax.com/RJT603
YouTube video https://www.youtube.com/watch?v=NXAswOc_2zg


 * This is the Arduino code for  DHT11 module to read temperature and humidity
 * This code can display temperature in:
 * C is used to get Celsius
 * F is used to get Fahrenheit
 * K is used for Kelvin

 *  *
 * Written by Ahmad Shamshiri for Robojax
 * on Jan 04, 2018
 * Robojax.com

   Please watch video instruction here https://youtu.be/0XMLnCYkvbE
 This code is available at http://robojax.com/course1/?vid=lecture11

with over 100 lectures Free On  YouTube Watch it here http://robojax.com/L/?id=338
Get the code for the course: http://robojax.com/L/?id=339


 * This code is "AS IS" without warranty or liability. Free to be used as long as you keep this note intact.*
 * This code has been download from Robojax.com
    This program is free software: you can redistribute it and/or modify
    it under the terms of the GNU General Public License as published by
    the Free Software Foundation, either version 3 of the License, or
    (at your option) any later version.

    This program is distributed in the hope that it will be useful,
    but WITHOUT ANY WARRANTY; without even the implied warranty of
    MERCHANTABILITY or FITNESS FOR A PARTICULAR PURPOSE.  See the
    GNU General Public License for more details.

    You should have received a copy of the GNU General Public License
    along with this program.  If not, see <https://www.gnu.org/licenses/>.
 */

// header file from GetHub: https://github.com/adidax/dht11
#include <dht11.h>

dht11 DHT11; // create object of DHT11
#define dhtpin 2 // set the pin to connect to DHT11

// start of settings for LCD1602-I2C
#include <Wire.h>
#include <LiquidCrystal_I2C.h>
// Set the LCD address to 0x3F for a 16 chars and 2 line display
LiquidCrystal_I2C lcd(0x3F, 16, 2);
// end of settings for LCD1602-I2C


void setup() {
    Serial.begin(9600);// setting up serial monitor

  // initialize the LCD,
  lcd.begin();
  // Turn on the blacklight and print a message.
  lcd.backlight();
  lcd.clear();
  lcd.setCursor (0,0); //
  lcd.print("DHT11 Sensor");
  delay(2000);
}

void loop() {
	//Robojax Step By Step Arduino Course YouTube Watch it here http://robojax.com/L/?id=338
  DHT11.read(dhtpin);// initialize the reading
  int humidity = DHT11.humidity;// get humidity

  lcd.clear();// clear previous values from screen
  lcd.setCursor (0,0); //character zero, line 1
  lcd.print("LCD1602 DHT11"); // print text

  // print distance in degrees C
  lcd.setCursor (0,1); //character 0, line 2
  lcd.print(getTemp('C'));// print Temperature Celsius
  lcd.setCursor (4,1); //character 5, line 2
  lcd.print((char)223);// print degree
  lcd.setCursor (5,1); //character 6, line 2
  lcd.print("C");// print C

   // print distance degrees F
  lcd.setCursor (7,1); //character 8, line 2
  lcd.print(getTemp('F'));// print distance in cm
  lcd.setCursor (13,1); //character 14, line 2
  lcd.print((char)223);// print degree
  lcd.setCursor (14,1); //character 16, line 2
  lcd.print("F");// print F


  //code for Robojax.com video
   Serial.print(getTemp('C'));
   Serial.print("C ");
   Serial.print(getTemp('F'));
   Serial.print("F ");
   Serial.print(getTemp('K'));
   Serial.print("K ");
   Serial.print(" humidity:");
   Serial.print (humidity);
   Serial.print("% ");
   Serial.println();
 delay(500);
}


/*
 * getTemp(char type)
 * type character of upper case
 * C is used to get Celsius
 * F is used to get Fahrenheit
 * K is used for Kelvin
 */
float getTemp(char type) {
	//Robojax Step By Step Arduino Course YouTube Watch it here http://robojax.com/L/?id=338
    float temp = (float)DHT11.temperature;//get temp
  if(type =='F')
  {
    return temp * 1.8 + 32;// convert to Fahrenheit
  }else if(type =='K')
  {
    return temp + 274.15;// convert to Kelvin
  }else{
   return temp;
  }

}
Things you might need
-
AmazonSunFounder Arduino Learning Kit on AliExpresss.click.aliexpress.com
-
Amazon
-
Amazon
-
Amazon
-
Amazon
Resources & references
-
DocumentationDocumentation for SunFounder 3 in 1 IoT/Smart Car/Learning Kitdocs.sunfounder.com
-
ExternalPurchase SunFounder's 3-in-1 Smart car learning kitsunfounder.com
Files📁
Arduino Libraries (zip)
-
SunFounder's 3-in-1 Smart Car learning kit source code
3in1-kit-main-v2.zip12.80 MB
User’s Manual
-
SunFounder 3-in-1 Arduino Smart Car assembly manualThis document shows step by step assembly of SunFounder 3-in-1 Arduino Smart Car
SunFounder_car_assembly_manual.pdf1.20 MB