第74課:用Arduino使用Sharp紅外線感測器模組
簡介
呢個指南會示範點樣用兩隻或以上Sharp紅外線(IR)距離感測器配合Arduino嚟量度距離,並且將結果顯示喺序列埠監控器度。雖然一隻感測器已經有用,但係好多真實應用,好似智能車、機械臂或者任何會郁嘅機器,都需要同時由多個方向量度距離。例如,你可以裝一隻感測器喺前面量度前方距離,另一隻裝喺右邊或者左邊嚟避免碰撞。呢個教學會教你點樣設定你嘅Arduino去有效率噉處理多隻感測器,係基於另一條詳細講解單隻感測器規格同操作嘅獨立影片。
以下有幾個實用嘅項目諗法可以啟發你:
- 整一隻機械人,透過量度左邊、右邊同前面嘅距離嚟避開障礙物。
- 整一個智能泊車輔助系統,用多隻感測器引導車輛入狹窄嘅車位。
- 開發一個保安系統,用唔同角度安裝嘅感測器監察門口或者走廊。
- 製作一個互動藝術裝置,觀眾隻手嘅距離會改變顯示嘅內容。

喺呢條影片入面,重點係運行多隻Sharp IR感測器所需嘅接線同程式碼。示範會用兩隻GP2Y0A21YK0F感測器,佢哋可以量度10至80厘米嘅距離。程式碼嘅結構係容易擴展嘅,所以你可以加第三隻、第四隻甚至更多感測器,只需要幾行程式碼就得。
硬件同零件
要跟住呢個項目做,你需要以下零件:
- 一塊Arduino板(例如Uno、Mega)。
- 兩隻或以上Sharp IR距離感測器(例如GP2Y0A21YK0F)。
- 杜邦線。
- 一塊麵包板(可選,方便接線)。
接線指南
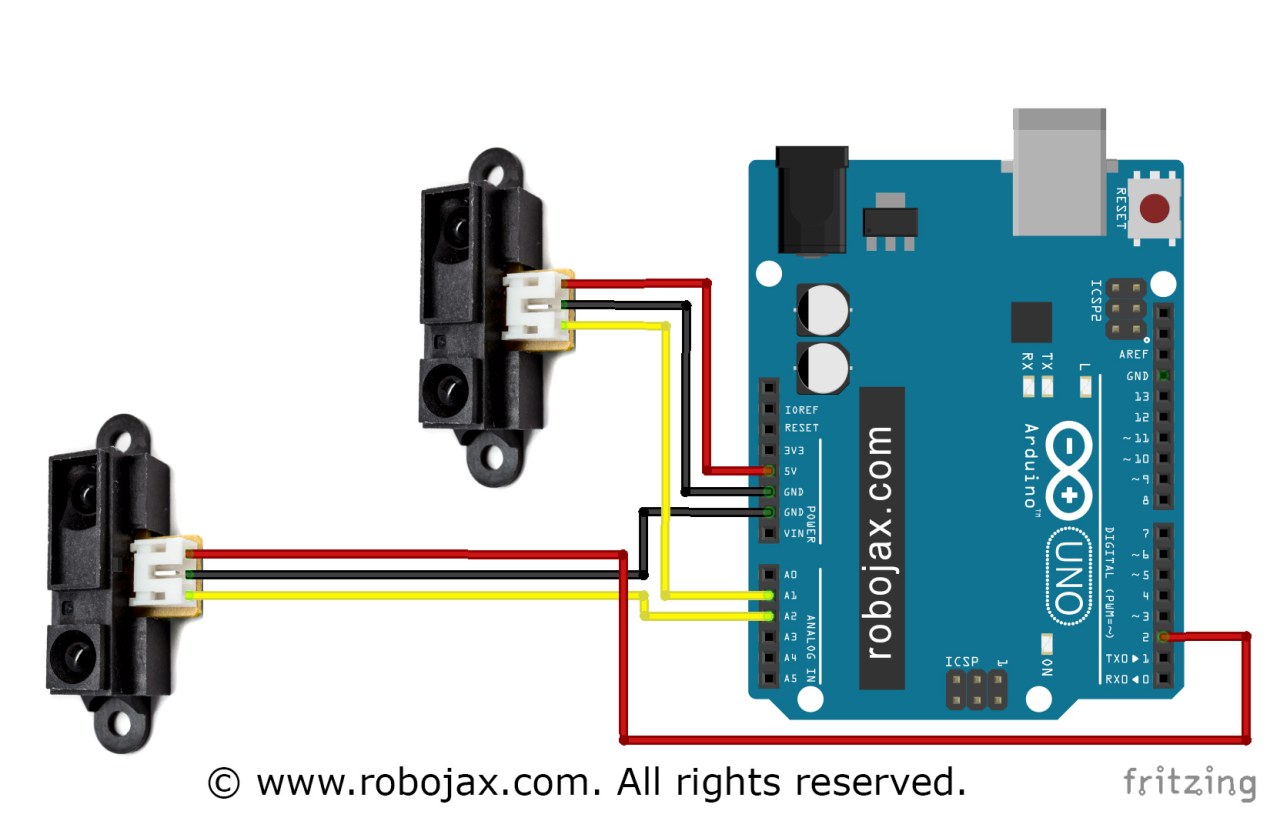
Sharp IR感測器有三條線:紅色(電源)、黑色(接地)同黃色(訊號輸出)。接線好簡單。對於第一隻感測器,將紅色線連接到Arduino嘅5V針腳,黑色線連接到接地(GND)針腳,黃色訊號線連接到模擬針腳,例如A1。對於第二隻感測器,將紅色線連接到同一個或者另一個5V針腳,黑色線連接到GND,黃色線連接到另一個模擬針腳,例如A2。
如果你用晒5V針腳,影片提供咗一個聰明嘅解決方法。你可以用任何數碼針腳作為電源。喺程式碼入面,數碼針腳2被設定為輸出並且設為HIGH,噉樣就會提供恆定嘅5V。然後你可以將感測器嘅紅色線連接到呢個數碼針腳,而唔係專用嘅5V針腳。接地線可以連接到Arduino上任何一個GND針腳。影片喺[00:06:10]示範咗呢個設定。
如果想睇接線嘅視覺參考,請參考下面嘅接線圖:


程式碼解釋
呢個部分集中講程式碼入面用戶可以設定嘅部分,全部都喺草稿碼嘅頂部。呢度就係你定義針腳同感測器型號嘅地方。
首先,程式碼包含咗Sharp IR感測器所需嘅函式庫,#include <SharpIR.h>。呢個函式庫處理將感測器嘅模擬電壓轉換成距離讀數所需嘅複雜數學運算。
跟住,你需要為每隻感測器定義模擬針腳。示例程式碼用#define IR1 A1同#define IR2 A2。如果你用多過兩隻感測器,就要喺度加更多定義,好似#define IR3 A3。
設定入面一個關鍵部分係為你嘅感測器設定正確嘅型號。程式碼用#define model1 1080同#define model2 1080。呢個數字唔係隨便嘅;佢話畀函式庫知你用緊邊隻感測器,因為每個型號都有唔同嘅電壓轉距離曲線。程式碼註解提供咗一個有用嘅列表:
- 2至15厘米GP2Y0A51SK0F用215
- 4至30厘米GP2Y0A41SK0F / GP2Y0AF30系列用430
- 10至80厘米GP2Y0A21YK0F用1080
- 10至150厘米GP2Y0A60SZLF用10150
- 20至150厘米GP2Y0A02YK0F用20150
- 100至550厘米GP2Y0A710K0F用100550
你一定要將呢個數值改為符合你實際用嘅感測器。例如,如果你用GP2Y0A02YK0F,就要將定義改為#define model1 20150。程式碼跟住會為每隻感測器建立一個物件,好似SharpIR SharpIR1(IR1, model1);。呢行將第一隻感測器嘅針腳同型號綁埋一齊。如果你加更多感測器,就要複製呢行,然後相應噉改物件名稱、針腳同型號。
喺setup()函數入面,序列埠監控器以9600鮑率初始化。呢個係Arduino同你電腦通訊嘅速度。程式碼仲包含一個部分,如果需要嘅話可以用數碼針腳作為5V電源,好似接線部分所講噉。呢個係用pinMode(2,OUTPUT);同digitalWrite(2, HIGH);嚟做。
最後,loop()函數包含主要邏輯。開頭有delay(500);,呢個設定每組讀數之間嘅時間係500毫秒。你可以調整呢個數值令讀數更頻密或者更疏。迴圈嘅核心係用函式庫嘅distance()函數讀取每隻感測器嘅距離,好似int dis1=SharpIR1.distance();。結果跟住會用描述性文字打印到序列埠監控器,好似Serial.print("Distance (1): ");,後面跟住數值同單位「cm」。
現場項目示範
喺條片入面,主持人示範咗用兩個感應器嘅設定。正如你喺[00:07:44]嘅示範度見到,Serial Monitor顯示兩個感應器嘅距離讀數。當有物件放喺第一個感應器前面時,"Distance (1)"嘅讀數會改變。同樣,當有物件放喺第二個感應器前面時,"Distance (2)"嘅讀數會更新。條片顯示,揸住一張紙喺一段距離度,感應器讀到大約23同24厘米。當其中一個感應器被遮住時,佢嘅讀數會跌到大約17厘米,確認每個感應器獨立運作,並為各自嘅方向提供實時距離數據。咁就驗證咗個程式碼可以同時處理多個感應器。
章節
- [00:00] 使用多個Sharp IR感應器嘅介紹
- [00:28] 多個距離感應器嘅應用
- [01:34] 程式碼解釋:函式庫同引腳定義
- [02:24] 設定感應器型號同建立物件
- [04:15] Setup同Loop函數解釋
- [06:10] 多個感應器嘅接線指南
- [07:44] 兩個感應器嘅現場示範
圖片

++
/*
 * Using two or more Sharp IR distance sensors with Arduino
 * Measure distance

 * Download and resource page for this video https://robojax.com/RJT143
 * Watch video instructions for this video: https://youtu.be/WQ3oFyF5qeY
 *
 * Watch main video explaining the Sharp IR distance sensor:
 * https://robojax.com?vid=robojax-sharp_IR
 *
 * Written by Ahmad Shamshiri for Robojax.com on Saturday, December 1, 2018
 * at 20:56 in Ajax, Ontario, Canada

 *
  * This code is "AS IS" without warranty or liability. Free to be used as long as you keep this note intact.
 * This code has been downloaded from Robojax.com
    This program is free software: you can redistribute it and/or modify
    it under the terms of the GNU General Public License as published by
    the Free Software Foundation, either version 3 of the License, or
    (at your option) any later version.

    This program is distributed in the hope that it will be useful,
    but WITHOUT ANY WARRANTY; without even the implied warranty of
    MERCHANTABILITY or FITNESS FOR A PARTICULAR PURPOSE.  See the
    GNU General Public License for more details.

    You should have received a copy of the GNU General Public License
    along with this program.  If not, see <https://www.gnu.org/licenses/>.
 */

#include <SharpIR.h>

#define IR1 A1 // define signal pin
#define IR2 A2 // define signal pin

#define model1 1080 // for GP2Y0A21YK0F  used 1080
#define model2 1080 // for GP2Y0A21YK0F  used 1080

// Sharp IR code for Robojax.com
// ir: the pin where your sensor is attached
/*
2 to 15 cm GP2Y0A51SK0F  use 215
4 to 30 cm GP2Y0A41SK0F / GP2Y0AF30 series  use 430
10 to 80 cm GP2Y0A21YK0F  use 1080
10 to 150 cm GP2Y0A60SZLF use 10150
20 to 150 cm GP2Y0A02YK0F use 20150
100 to 550 cm GP2Y0A710K0F  use 100550
*/
SharpIR SharpIR1(IR1, model1);
SharpIR SharpIR2(IR2, model2);

void setup() {
    // Multiple Sharp IR Distance meter code for Robojax.com
 Serial.begin(9600);
 Serial.println("Robojax Sharp IR  ");

 // extra pin for 5V if needed
 pinMode(2,OUTPUT);// define pin 2 as output
 digitalWrite(2, HIGH);// set pin 2 HIGH so it always have 5V
  // Robojax.com 20181201
}

void loop() {
    // Sharp IR code for Robojax.com 20181201
    delay(500);

  unsigned long startTime=millis();  // takes the time before the loop on the library begins

  int dis1=SharpIR1.distance();  // this returns the distance for sensor 1
  int dis2=SharpIR2.distance();  // this returns the distance for sensor 2
  // Sharp IR code for Robojax.com 20181201

  Serial.print("Distance (1): ");
  Serial.print(dis1);
  Serial.println("cm");

  Serial.print("Distance (2): ");
  Serial.print(dis2);
  Serial.println("cm");
     // Sharp IR code for Robojax.com

}++
/*
* Lesson 74: Using two or more Sharp IR distance sensors
* Sharp IR (infrared) distance measurement module for Arduino
* Measures the distance in cm.
* Written by Ahmad Shamshiri for Robojax.com
* on February 25, 2019 at 21:38 in Ajax, Ontario, Canada
* Original library: https://github.com/guillaume-rico/SharpIR
* Watch video instructions for this code: https://youtu.be/WQ3oFyF5qeY
*
* Full explanation of this code and wiring diagram is available at
* my Arduino Course at Udemy.com here: http://robojax.com/L/?id=62
* Written by Ahmad Shamshiri on February 3, 2018 at 07:34
* in Ajax, Ontario, Canada. www.robojax.com
*
If you found this tutorial helpful, please support me so I can continue creating
content like this.
or make a donation using PayPal http://robojax.com/L/?id=64
* * This code is "AS IS" without warranty or liability. Free to be used as long as you keep this note intact.*
* This code has been downloaded from Robojax.com
This program is free software: you can redistribute it and/or modify
it under the terms of the GNU General Public License as published by
the Free Software Foundation, either version 3 of the License, or
(at your option) any later version.
This program is distributed in the hope that it will be useful,
but WITHOUT ANY WARRANTY; without even the implied warranty of
MERCHANTABILITY or FITNESS FOR A PARTICULAR PURPOSE. See the
GNU General Public License for more details.
You should have received a copy of the GNU General Public License
along with this program. If not, see <https://www.gnu.org/licenses/>.
*/
*/
// Sharp IR code for Robojax.com
#include
#define IR A0 // define signal pin
#define model 1080 // used 1080 because model GP2Y0A21YK0F is used
// Sharp IR code for Robojax.com
// ir: the pin where your sensor is attached
// model: an int that determines your sensor: 1080 for GP2Y0A21Y
// 20150 for GP2Y0A02Y
// 430 for GP2Y0A41SK
/*
2 to 15 cm GP2Y0A51SK0F use 1080
4 to 30 cm GP2Y0A41SK0F / GP2Y0AF30 series use 430
10 to 80 cm GP2Y0A21YK0F use 1080
10 to 150 cm GP2Y0A60SZLF use 10150
20 to 150 cm GP2Y0A02YK0F use 20150
100 to 550 cm GP2Y0A710K0F use 100550
*/
#include <SharpIR.h>
#define IR1 A1 // define signal pin
#define IR2 A2 // define signal pin
#define model1 1080 // for GP2Y0A21YK0F used 1080
#define model2 1080 // for GP2Y0A21YK0F used 1080
// Sharp IR code for Robojax.com
// ir: the pin where your sensor is attached
/*
2 to 15 cm GP2Y0A51SK0F use 215
4 to 30 cm GP2Y0A41SK0F / GP2Y0AF30 series use 430
10 to 80 cm GP2Y0A21YK0F use 1080
10 to 150 cm GP2Y0A60SZLF use 10150
20 to 150 cm GP2Y0A02YK0F use 20150
100 to 550 cm GP2Y0A710K0F use 100550
*/
SharpIR SharpIR1(IR1, model1);
SharpIR SharpIR2(IR2, model2);
void setup() {
// Multiple Sharp IR Distance meter code for Robojax.com
Serial.begin(9600);
Serial.println("Robojax Sharp IR ");
// extra pin for 5V if needed
pinMode(2,OUTPUT);// define pin 2 as output
digitalWrite(2, HIGH);// set pin 2 HIGH so it always have 5V
// Robojax.com 20181201
}
void loop() {
// Sharp IR code for Robojax.com 20181201
delay(500);
unsigned long startTime=millis(); // takes the time before the loop on the library begins
int dis1=SharpIR1.distance(); // this returns the distance for sensor 1
int dis2=SharpIR2.distance(); // this returns the distance for sensor 2
// Sharp IR code for Robojax.com 20181201
Serial.print("Distance (1): ");
Serial.print(dis1);
Serial.println("cm");
Serial.print("Distance (2): ");
Serial.print(dis2);
Serial.println("cm");
// Sharp IR code for Robojax.com
}資源與參考資料
-
外部Distance-measuring sensors (website)sharp-world.com
-
外部Sharp IR Library (from GitHub)github.com
-
外部Sharp Library from RoboJob.comrobojax.com
文件📁
Fritzing 文件
-
sharp ir sensor GP2Y0A02YK0F
sharp ir sensor GP2Y0A02YK0F .fzz
其他文件
-
Sharp GP2Y0A41SK0F Infrared distance sensor datasheet
robojax_sharp_IR_GP2Y0A41SK0F_datasheet.pdf0.84 MB -
Sharp GP2Y0A710K0F Infrared distance sensor datashee
robojax_sharp_IR_GP2Y0A710K0F_datasheet.pdf0.33 MB -
Arduino library for Sharp Infrard distance sensor
robojax-sharp_IR-master.zip