레슨 74: Arduino와 함께 샤프 적외선 센서 모듈 사용하기
소개
이 가이드는 Arduino와 함께 두 개 이상의 Sharp 적외선(IR) 거리 센서를 사용하여 거리를 측정하고 결과를 시리얼 모니터에 표시하는 방법을 보여줍니다. 단일 센서도 유용하지만, 스마트 카, 로봇 팔 또는 움직이는 기계와 같은 많은 실제 응용 분야에서는 여러 방향에서 동시에 거리 측정이 필요합니다. 예를 들어, 전방에 하나의 센서를 설치하여 앞쪽 거리를 측정하고, 오른쪽이나 왼쪽에 다른 센서를 설치하여 충돌을 방지할 수 있습니다. 이 튜토리얼은 개별 센서의 사양과 작동 방식을 설명하는 별도의 상세 비디오를 기반으로, Arduino를 구성하여 여러 센서를 효율적으로 처리하는 방법을 보여줍니다.
다음은 영감을 줄 수 있는 몇 가지 실용적인 프로젝트 아이디어입니다:
- 왼쪽, 오른쪽, 앞쪽의 거리를 측정하여 장애물을 피하는 로봇 만들기.
- 여러 센서를 사용하여 차량을 좁은 공간으로 안내하는 스마트 주차 보조 시스템 만들기.
- 다양한 각도에 배치된 센서로 출입구나 복도를 감시하는 보안 시스템 개발.
- 시청자의 손 거리에 따라 표시 내용이 바뀌는 인터랙티브 아트 설치물 만들기.

이 비디오에서는 여러 Sharp IR 센서를 실행하는 데 필요한 배선과 코드에 초점을 맞춥니다. 데모에서는 10~80cm 거리를 측정하는 두 개의 GP2Y0A21YK0F 센서를 사용합니다. 코드는 쉽게 확장할 수 있도록 구조화되어 있어 몇 줄의 코드만으로 세 번째, 네 번째 또는 그 이상의 센서를 추가할 수 있습니다.
하드웨어 및 부품
이 프로젝트를 따라 하려면 다음 부품이 필요합니다:
- Arduino 보드 (예: Uno, Mega).
- 두 개 이상의 Sharp IR 거리 센서 (예: GP2Y0A21YK0F).
- 점퍼 와이어.
- 브레드보드 (선택 사항, 연결을 더 쉽게 하기 위해).
배선 가이드
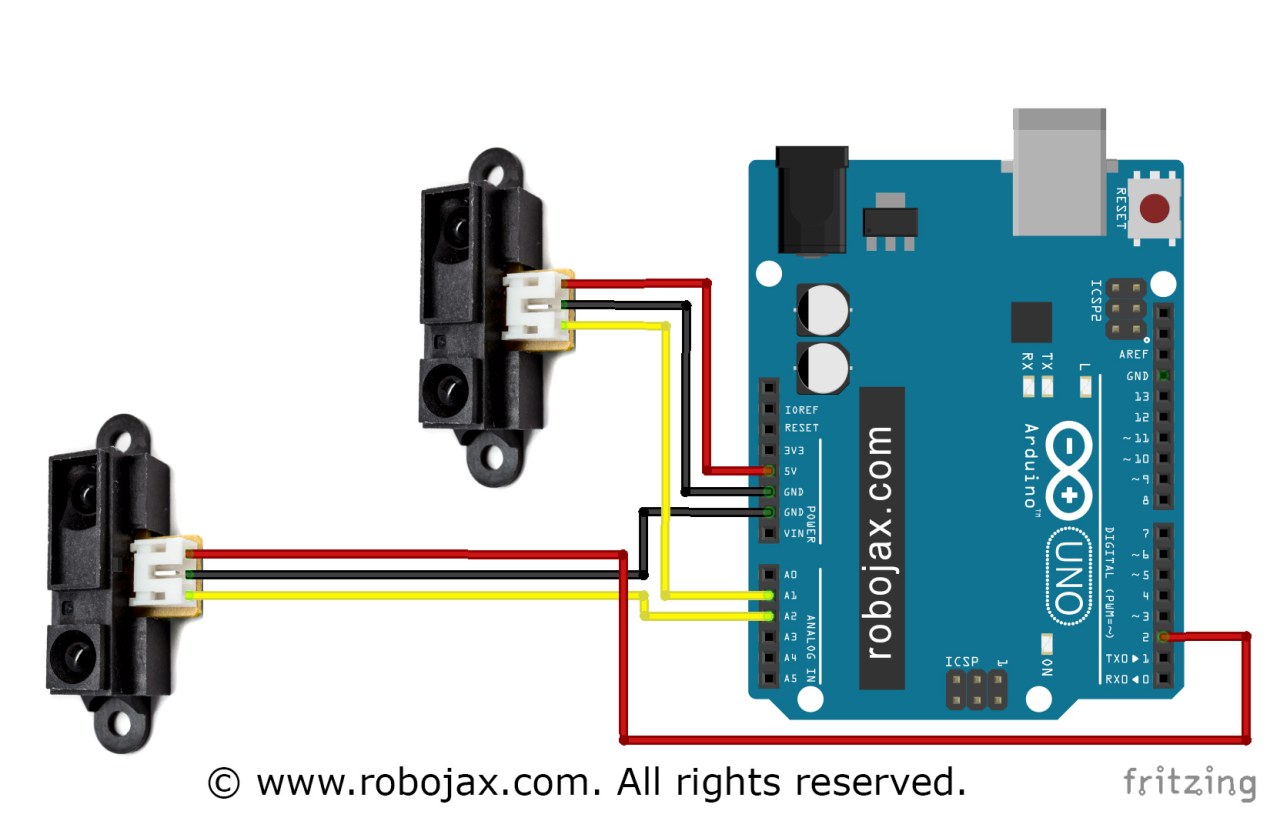
Sharp IR 센서에는 세 개의 와이어가 있습니다: 빨간색(전원), 검은색(접지), 노란색(신호 출력). 배선은 간단합니다. 첫 번째 센서의 경우 빨간색 와이어를 Arduino의 5V 핀에, 검은색 와이어를 접지(GND) 핀에, 노란색 신호 와이어를 아날로그 핀(예: A1)에 연결합니다. 두 번째 센서의 경우 빨간색 와이어를 동일하거나 다른 5V 핀에, 검은색 와이어를 GND에, 노란색 와이어를 다른 아날로그 핀(예: A2)에 연결합니다.
5V 핀이 부족한 경우 비디오에서 영리한 해결책을 제공합니다. 모든 디지털 핀을 전원 공급 장치로 사용할 수 있습니다. 코드에서 디지털 핀 2를 출력으로 구성하고 HIGH로 설정하여 일정한 5V를 제공합니다. 그런 다음 센서의 빨간색 와이어를 전용 5V 핀 대신 이 디지털 핀에 연결합니다. 접지 와이어는 Arduino의 GND 핀 중 아무 곳에나 연결할 수 있습니다. 비디오는 [00:06:10]에서 이 설정의 데모를 보여줍니다.
연결에 대한 시각적 참조는 아래 배선 다이어그램을 참조하십시오:


코드 설명
이 섹션에서는 스케치 상단에 모두 위치한 사용자 구성 가능한 코드 부분에 초점을 맞춥니다. 여기에서 핀과 센서 모델을 정의합니다.
먼저 코드에는 Sharp IR 센서에 필요한 라이브러리인 #include <SharpIR.h>가 포함됩니다. 이 라이브러리는 센서의 아날로그 전압을 거리 판독값으로 변환하는 데 필요한 복잡한 계산을 처리합니다.
다음으로 각 센서의 아날로그 핀을 정의합니다. 예제 코드는 #define IR1 A1 및 #define IR2 A2를 사용합니다. 두 개 이상의 센서를 사용하는 경우 #define IR3 A3와 같이 여기에 더 많은 정의를 추가합니다.
구성의 중요한 부분은 센서에 맞는 올바른 모델을 설정하는 것입니다. 코드는 #define model1 1080 및 #define model2 1080을 사용합니다. 이 숫자는 임의적이지 않습니다. 각 모델은 서로 다른 전압-거리 곡선을 가지므로 이 숫자는 라이브러리에 어떤 센서가 있는지 알려줍니다. 코드 주석은 유용한 목록을 제공합니다:
- 2~15cm GP2Y0A51SK0F는 215 사용
- 4~30cm GP2Y0A41SK0F / GP2Y0AF30 시리즈는 430 사용
- 10~80cm GP2Y0A21YK0F는 1080 사용
- 10~150cm GP2Y0A60SZLF는 10150 사용
- 20~150cm GP2Y0A02YK0F는 20150 사용
- 100~550cm GP2Y0A710K0F는 100550 사용
이 값을 특정 센서에 맞게 변경해야 합니다. 예를 들어 GP2Y0A02YK0F를 사용하는 경우 정의를 #define model1 20150으로 변경합니다. 그런 다음 코드는 각 센서에 대한 객체를 생성합니다(예: SharpIR SharpIR1(IR1, model1);). 이 줄은 첫 번째 센서의 핀과 모델을 연결합니다. 더 많은 센서를 추가하는 경우 이 줄을 복사하고 객체 이름, 핀 및 모델을 그에 따라 변경합니다.
setup() 함수에서 시리얼 모니터는 9600 보드로 초기화됩니다. 이것은 Arduino가 컴퓨터와 통신하는 속도입니다. 코드에는 배선 섹션에서 설명한 대로 필요한 경우 디지털 핀을 5V 소스로 사용하는 섹션도 포함됩니다. 이는 pinMode(2,OUTPUT); 및 digitalWrite(2, HIGH);로 수행됩니다.
마지막으로 loop() 함수에는 주요 로직이 포함됩니다. 시작 부분에 delay(500);이 있어 각 판독 세트 사이의 시간을 500밀리초로 설정합니다. 이 값을 조정하여 판독 빈도를 높이거나 낮출 수 있습니다. 루프의 핵심은 int dis1=SharpIR1.distance();와 같이 라이브러리의 distance() 함수를 사용하여 각 센서에서 거리를 읽는 것입니다. 결과는 Serial.print("Distance (1): ");와 같은 설명 텍스트와 함께 값 및 단위 "cm"가 이어서 시리얼 모니터에 출력됩니다.
라이브 프로젝트 데모
영상에서 발표자는 두 개의 센서를 사용한 설정을 시연합니다. [00:07:44]의 시연에서 볼 수 있듯이, 시리얼 모니터에는 두 센서의 거리 측정값이 표시됩니다. 첫 번째 센서 앞에 물체를 놓으면 "Distance (1)"의 측정값이 변경됩니다. 마찬가지로 두 번째 센서 앞에 물체를 놓으면 "Distance (2)"의 측정값이 업데이트됩니다. 영상에서는 종이 한 장을 일정 거리에 두었을 때 센서가 약 23cm와 24cm로 측정하는 것을 보여줍니다. 한 센서가 가려지면 해당 측정값이 약 17cm로 떨어지며, 각 센서가 독립적으로 작동하고 각 방향에 대해 실시간 거리 데이터를 제공한다는 것을 확인할 수 있습니다. 이는 코드가 여러 센서를 동시에 처리할 수 있는 능력을 검증합니다.
챕터
- [00:00] 다중 Sharp IR 센서 사용 소개
- [00:28] 다중 거리 센서의 응용 분야
- [01:34] 코드 설명: 라이브러리 및 핀 정의
- [02:24] 센서 모델 구성 및 객체 생성
- [04:15] Setup 및 Loop 함수 설명
- [06:10] 다중 센서 배선 가이드
- [07:44] 두 개의 센서를 사용한 실시간 시연
이미지

++
/*
 * Using two or more Sharp IR distance sensors with Arduino
 * Measure distance

 * Download and resource page for this video https://robojax.com/RJT143
 * Watch video instructions for this video: https://youtu.be/WQ3oFyF5qeY
 *
 * Watch main video explaining the Sharp IR distance sensor:
 * https://robojax.com?vid=robojax-sharp_IR
 *
 * Written by Ahmad Shamshiri for Robojax.com on Saturday, December 1, 2018
 * at 20:56 in Ajax, Ontario, Canada

 *
  * This code is "AS IS" without warranty or liability. Free to be used as long as you keep this note intact.
 * This code has been downloaded from Robojax.com
    This program is free software: you can redistribute it and/or modify
    it under the terms of the GNU General Public License as published by
    the Free Software Foundation, either version 3 of the License, or
    (at your option) any later version.

    This program is distributed in the hope that it will be useful,
    but WITHOUT ANY WARRANTY; without even the implied warranty of
    MERCHANTABILITY or FITNESS FOR A PARTICULAR PURPOSE.  See the
    GNU General Public License for more details.

    You should have received a copy of the GNU General Public License
    along with this program.  If not, see <https://www.gnu.org/licenses/>.
 */

#include <SharpIR.h>

#define IR1 A1 // define signal pin
#define IR2 A2 // define signal pin

#define model1 1080 // for GP2Y0A21YK0F  used 1080
#define model2 1080 // for GP2Y0A21YK0F  used 1080

// Sharp IR code for Robojax.com
// ir: the pin where your sensor is attached
/*
2 to 15 cm GP2Y0A51SK0F  use 215
4 to 30 cm GP2Y0A41SK0F / GP2Y0AF30 series  use 430
10 to 80 cm GP2Y0A21YK0F  use 1080
10 to 150 cm GP2Y0A60SZLF use 10150
20 to 150 cm GP2Y0A02YK0F use 20150
100 to 550 cm GP2Y0A710K0F  use 100550
*/
SharpIR SharpIR1(IR1, model1);
SharpIR SharpIR2(IR2, model2);

void setup() {
    // Multiple Sharp IR Distance meter code for Robojax.com
 Serial.begin(9600);
 Serial.println("Robojax Sharp IR  ");

 // extra pin for 5V if needed
 pinMode(2,OUTPUT);// define pin 2 as output
 digitalWrite(2, HIGH);// set pin 2 HIGH so it always have 5V
  // Robojax.com 20181201
}

void loop() {
    // Sharp IR code for Robojax.com 20181201
    delay(500);

  unsigned long startTime=millis();  // takes the time before the loop on the library begins

  int dis1=SharpIR1.distance();  // this returns the distance for sensor 1
  int dis2=SharpIR2.distance();  // this returns the distance for sensor 2
  // Sharp IR code for Robojax.com 20181201

  Serial.print("Distance (1): ");
  Serial.print(dis1);
  Serial.println("cm");

  Serial.print("Distance (2): ");
  Serial.print(dis2);
  Serial.println("cm");
     // Sharp IR code for Robojax.com

}++
/*
* Lesson 74: Using two or more Sharp IR distance sensors
* Sharp IR (infrared) distance measurement module for Arduino
* Measures the distance in cm.
* Written by Ahmad Shamshiri for Robojax.com
* on February 25, 2019 at 21:38 in Ajax, Ontario, Canada
* Original library: https://github.com/guillaume-rico/SharpIR
* Watch video instructions for this code: https://youtu.be/WQ3oFyF5qeY
*
* Full explanation of this code and wiring diagram is available at
* my Arduino Course at Udemy.com here: http://robojax.com/L/?id=62
* Written by Ahmad Shamshiri on February 3, 2018 at 07:34
* in Ajax, Ontario, Canada. www.robojax.com
*
If you found this tutorial helpful, please support me so I can continue creating
content like this.
or make a donation using PayPal http://robojax.com/L/?id=64
* * This code is "AS IS" without warranty or liability. Free to be used as long as you keep this note intact.*
* This code has been downloaded from Robojax.com
This program is free software: you can redistribute it and/or modify
it under the terms of the GNU General Public License as published by
the Free Software Foundation, either version 3 of the License, or
(at your option) any later version.
This program is distributed in the hope that it will be useful,
but WITHOUT ANY WARRANTY; without even the implied warranty of
MERCHANTABILITY or FITNESS FOR A PARTICULAR PURPOSE. See the
GNU General Public License for more details.
You should have received a copy of the GNU General Public License
along with this program. If not, see <https://www.gnu.org/licenses/>.
*/
*/
// Sharp IR code for Robojax.com
#include
#define IR A0 // define signal pin
#define model 1080 // used 1080 because model GP2Y0A21YK0F is used
// Sharp IR code for Robojax.com
// ir: the pin where your sensor is attached
// model: an int that determines your sensor: 1080 for GP2Y0A21Y
// 20150 for GP2Y0A02Y
// 430 for GP2Y0A41SK
/*
2 to 15 cm GP2Y0A51SK0F use 1080
4 to 30 cm GP2Y0A41SK0F / GP2Y0AF30 series use 430
10 to 80 cm GP2Y0A21YK0F use 1080
10 to 150 cm GP2Y0A60SZLF use 10150
20 to 150 cm GP2Y0A02YK0F use 20150
100 to 550 cm GP2Y0A710K0F use 100550
*/
#include <SharpIR.h>
#define IR1 A1 // define signal pin
#define IR2 A2 // define signal pin
#define model1 1080 // for GP2Y0A21YK0F used 1080
#define model2 1080 // for GP2Y0A21YK0F used 1080
// Sharp IR code for Robojax.com
// ir: the pin where your sensor is attached
/*
2 to 15 cm GP2Y0A51SK0F use 215
4 to 30 cm GP2Y0A41SK0F / GP2Y0AF30 series use 430
10 to 80 cm GP2Y0A21YK0F use 1080
10 to 150 cm GP2Y0A60SZLF use 10150
20 to 150 cm GP2Y0A02YK0F use 20150
100 to 550 cm GP2Y0A710K0F use 100550
*/
SharpIR SharpIR1(IR1, model1);
SharpIR SharpIR2(IR2, model2);
void setup() {
// Multiple Sharp IR Distance meter code for Robojax.com
Serial.begin(9600);
Serial.println("Robojax Sharp IR ");
// extra pin for 5V if needed
pinMode(2,OUTPUT);// define pin 2 as output
digitalWrite(2, HIGH);// set pin 2 HIGH so it always have 5V
// Robojax.com 20181201
}
void loop() {
// Sharp IR code for Robojax.com 20181201
delay(500);
unsigned long startTime=millis(); // takes the time before the loop on the library begins
int dis1=SharpIR1.distance(); // this returns the distance for sensor 1
int dis2=SharpIR2.distance(); // this returns the distance for sensor 2
// Sharp IR code for Robojax.com 20181201
Serial.print("Distance (1): ");
Serial.print(dis1);
Serial.println("cm");
Serial.print("Distance (2): ");
Serial.print(dis2);
Serial.println("cm");
// Sharp IR code for Robojax.com
}자원 및 참고자료
-
외부Distance-measuring sensors (website)sharp-world.com
-
외부Sharp IR Library (from GitHub)github.com
-
외부Sharp Library from RoboJob.comrobojax.com
파일📁
프리징 파일
-
sharp ir sensor GP2Y0A02YK0F
sharp ir sensor GP2Y0A02YK0F .fzz
다른 파일들
-
Sharp GP2Y0A41SK0F Infrared distance sensor datasheet
robojax_sharp_IR_GP2Y0A41SK0F_datasheet.pdf0.84 MB -
Sharp GP2Y0A710K0F Infrared distance sensor datashee
robojax_sharp_IR_GP2Y0A710K0F_datasheet.pdf0.33 MB -
Arduino library for Sharp Infrard distance sensor
robojax-sharp_IR-master.zip