บทเรียนที่ 74: การใช้โมดูลเซนเซอร์อินฟราเรดแบบ Sharp ร่วมกับ Arduino
บทนำ
คู่มือนี้สาธิตวิธีการใช้เซนเซอร์วัดระยะอินฟราเรด (IR) ของ Sharp จำนวนสองตัวหรือมากกว่ากับ Arduino เพื่อวัดระยะทางและแสดงผลบน Serial Monitor แม้ว่าเซนเซอร์ตัวเดียวจะมีประโยชน์ แต่การใช้งานจริงหลายอย่าง เช่น รถอัจฉริยะ แขนกล หรือเครื่องจักรที่เคลื่อนที่ได้ จำเป็นต้องวัดระยะทางจากหลายทิศทางพร้อมกัน ตัวอย่างเช่น คุณสามารถติดตั้งเซนเซอร์หนึ่งตัวที่ด้านหน้าเพื่อวัดระยะทางด้านหน้า และอีกตัวหนึ่งที่ด้านขวาหรือด้านซ้ายเพื่อหลีกเลี่ยงการชน บทช่วยสอนนี้แสดงวิธีกำหนดค่า Arduino ของคุณเพื่อจัดการกับเซนเซอร์หลายตัวอย่างมีประสิทธิภาพ โดยต่อยอดจากวิดีโอแยกที่มีรายละเอียดซึ่งอธิบายคุณสมบัติและการทำงานของเซนเซอร์แต่ละตัว
ต่อไปนี้เป็นแนวคิดโครงการเชิงปฏิบัติสองสามอย่างเพื่อสร้างแรงบันดาลใจให้คุณ:
- สร้างหุ่นยนต์ที่หลีกเลี่ยงสิ่งกีดขวางโดยการวัดระยะทางทางด้านซ้าย ด้านขวา และด้านหน้า
- สร้างผู้ช่วยจอดรถอัจฉริยะที่ใช้เซนเซอร์หลายตัวเพื่อนำรถเข้าจุดแคบ
- พัฒนาระบบรักษาความปลอดภัยที่ตรวจสอบประตูหรือทางเดินด้วยเซนเซอร์ที่ติดตั้งในมุมที่ต่างกัน
- สร้างงานศิลปะแบบโต้ตอบที่ระยะห่างของมือผู้ชมเปลี่ยนสิ่งที่แสดง

ในวิดีโอนี้ จุดเน้นอยู่ที่การเดินสายไฟและโค้ดที่จำเป็นสำหรับการรันเซนเซอร์ Sharp IR หลายตัว การสาธิตใช้เซนเซอร์ GP2Y0A21YK0F สองตัว ซึ่งวัดระยะทางตั้งแต่ 10 ถึง 80 ซม. โค้ดถูกออกแบบให้ขยายได้ง่าย ดังนั้นคุณสามารถเพิ่มเซนเซอร์ตัวที่สาม สี่ หรือมากกว่านั้นได้ด้วยโค้ดเพียงไม่กี่บรรทัด
ฮาร์ดแวร์และส่วนประกอบ
เพื่อทำตามโครงการนี้ คุณจะต้องมีส่วนประกอบต่อไปนี้:
- บอร์ด Arduino (เช่น Uno, Mega)
- เซนเซอร์วัดระยะ Sharp IR สองตัวหรือมากกว่า (เช่น GP2Y0A21YK0F)
- สายจัมเปอร์
- เบรดบอร์ด (ไม่จำเป็น สำหรับการเชื่อมต่อที่ง่ายขึ้น)
คู่มือการเดินสายไฟ
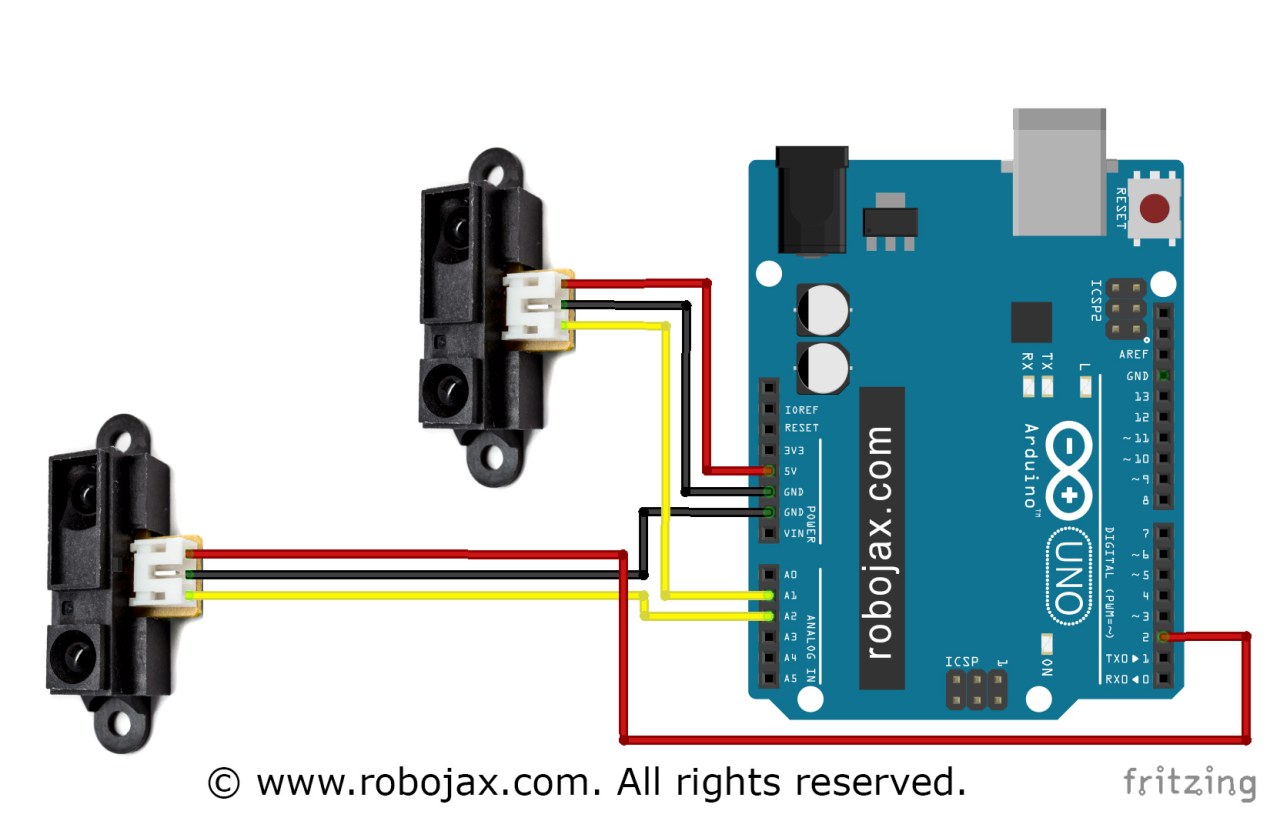
เซนเซอร์ Sharp IR มีสายสามเส้น: สีแดง (ไฟเลี้ยง) สีดำ (กราวด์) และสีเหลือง (เอาต์พุตสัญญาณ) การเดินสายไฟทำได้ตรงไปตรงมา สำหรับเซนเซอร์ตัวแรก ให้เชื่อมต่อสายสีแดงเข้ากับพิน 5V ของ Arduino สายสีดำเข้ากับพินกราวด์ (GND) และสายสัญญาณสีเหลืองเข้ากับพินแอนะล็อก เช่น A1 สำหรับเซนเซอร์ตัวที่สอง ให้เชื่อมต่อสายสีแดงเข้ากับพิน 5V เดียวกันหรือพินอื่น สายสีดำเข้ากับ GND และสายสีเหลืองเข้ากับพินแอนะล็อกที่แตกต่างกัน เช่น A2
หากคุณใช้พิน 5V หมด วิดีโอมีวิธีแก้ปัญหาที่ชาญฉลาด คุณสามารถใช้พินดิจิทัลใดก็ได้เป็นแหล่งจ่ายไฟ ในโค้ด พินดิจิทัล 2 ถูกกำหนดเป็นเอาต์พุตและตั้งค่าเป็น HIGH ซึ่งให้ไฟ 5V คงที่ จากนั้นคุณจะเชื่อมต่อสายสีแดงของเซนเซอร์เข้ากับพินดิจิทัลนี้แทนพิน 5V ที่เฉพาะเจาะจง สายกราวด์สามารถเชื่อมต่อกับพิน GND ใดก็ได้บน Arduino วิดีโอแสดงการสาธิตการตั้งค่านี้ที่ [00:06:10]
สำหรับการอ้างอิงภาพของการเชื่อมต่อ โปรดดูแผนภาพการเดินสายไฟด้านล่าง:


คำอธิบายโค้ด
ส่วนนี้มุ่งเน้นไปที่ส่วนที่ผู้ใช้สามารถกำหนดค่าได้ของโค้ด ซึ่งทั้งหมดอยู่ที่ด้านบนของ sketch นี่คือที่ที่คุณจะกำหนดพินและรุ่นเซนเซอร์ของคุณ
ขั้นแรก โค้ดรวมไลบรารีที่จำเป็นสำหรับเซนเซอร์ Sharp IR คือ #include <SharpIR.h> ไลบรารีนี้จัดการคณิตศาสตร์ที่ซับซ้อนที่จำเป็นในการแปลงแรงดันไฟฟ้าแอนะล็อกจากเซนเซอร์เป็นการอ่านค่าระยะทาง
ถัดไป คุณจะกำหนดพินแอนะล็อกสำหรับเซนเซอร์แต่ละตัว โค้ดตัวอย่างใช้ #define IR1 A1 และ #define IR2 A2 หากคุณใช้เซนเซอร์มากกว่าสองตัว คุณจะเพิ่มคำนิยามเพิ่มเติมที่นี่ เช่น #define IR3 A3
ส่วนสำคัญของการกำหนดค่าคือการตั้งค่ารุ่นที่ถูกต้องสำหรับเซนเซอร์ของคุณ โค้ดใช้ #define model1 1080 และ #define model2 1080 ตัวเลขนี้ไม่ใช่ตัวเลขที่สุ่ม มันบอกไลบรารีว่าคุณมีเซนเซอร์รุ่นใด เนื่องจากแต่ละรุ่นมีเส้นโค้งแรงดันไฟฟ้าต่อระยะทางที่แตกต่างกัน ความคิดเห็นในโค้ดมีรายการที่เป็นประโยชน์:
- 2 ถึง 15 ซม. GP2Y0A51SK0F ใช้ 215
- 4 ถึง 30 ซม. GP2Y0A41SK0F / ซีรีส์ GP2Y0AF30 ใช้ 430
- 10 ถึง 80 ซม. GP2Y0A21YK0F ใช้ 1080
- 10 ถึง 150 ซม. GP2Y0A60SZLF ใช้ 10150
- 20 ถึง 150 ซม. GP2Y0A02YK0F ใช้ 20150
- 100 ถึง 550 ซม. GP2Y0A710K0F ใช้ 100550
คุณต้องเปลี่ยนค่านี้ให้ตรงกับเซนเซอร์เฉพาะของคุณ ตัวอย่างเช่น หากคุณใช้ GP2Y0A02YK0F คุณจะเปลี่ยนคำนิยามเป็น #define model1 20150 จากนั้นโค้ดจะสร้างออบเจกต์สำหรับเซนเซอร์แต่ละตัว เช่น SharpIR SharpIR1(IR1, model1); บรรทัดนี้เชื่อมโยงพินและรุ่นเข้าด้วยกันสำหรับเซนเซอร์ตัวแรก หากคุณเพิ่มเซนเซอร์มากขึ้น คุณจะคัดลอกบรรทัดนี้และเปลี่ยนชื่อออบเจกต์ พิน และรุ่นตามนั้น
ในฟังก์ชัน setup() Serial Monitor ถูกเริ่มต้นที่ 9600 บอด นี่คือความเร็วที่ Arduino สื่อสารกับคอมพิวเตอร์ของคุณ โค้ดยังรวมส่วนที่ใช้พินดิจิทัลเป็นแหล่งจ่ายไฟ 5V หากจำเป็น ตามที่อธิบายในส่วนการเดินสายไฟ ทำได้ด้วย pinMode(2,OUTPUT); และ digitalWrite(2, HIGH);
สุดท้าย ฟังก์ชัน loop() มีตรรกะหลัก มี delay(500); ที่จุดเริ่มต้น ซึ่งตั้งเวลาระหว่างการอ่านค่าแต่ละชุดเป็น 500 มิลลิวินาที คุณสามารถปรับค่านี้เพื่อให้การอ่านค่าถี่ขึ้นหรือน้อยลงได้ แกนหลักของลูปคือที่ที่คุณอ่านระยะทางจากเซนเซอร์แต่ละตัวโดยใช้ฟังก์ชัน distance() ของไลบรารี เช่น int dis1=SharpIR1.distance(); จากนั้นผลลัพธ์จะถูกพิมพ์ไปยัง Serial Monitor พร้อมข้อความอธิบาย เช่น Serial.print("Distance (1): "); ตามด้วยค่าและหน่วย "cm"
การสาธิตโครงการสด
ในวิดีโอ ผู้นำเสนอสาธิตการตั้งค่าด้วยเซนเซอร์สองตัว ดังที่เห็นในการสาธิตที่ [00:07:44] จอ Serial Monitor แสดงค่าการวัดระยะจากเซนเซอร์ทั้งสองตัว เมื่อวางวัตถุไว้ด้านหน้าเซนเซอร์ตัวแรก ค่าที่อ่านได้สำหรับ "Distance (1)" จะเปลี่ยนแปลง ในทำนองเดียวกัน เมื่อวางวัตถุไว้ด้านหน้าเซนเซอร์ตัวที่สอง ค่าที่อ่านได้สำหรับ "Distance (2)" จะอัปเดต วิดีโอแสดงให้เห็นว่าโดยการถือกระดาษแผ่นหนึ่งในระยะหนึ่ง เซนเซอร์จะอ่านค่าได้ประมาณ 23 และ 24 ซม. เมื่อเซนเซอร์ตัวใดตัวหนึ่งถูกบัง ค่าที่อ่านได้จะลดลงเหลือประมาณ 17 ซม. ซึ่งยืนยันว่าเซนเซอร์แต่ละตัวทำงานอย่างอิสระและให้ข้อมูลระยะแบบเรียลไทม์สำหรับทิศทางของแต่ละตัว ซึ่งเป็นการยืนยันความสามารถของโค้ดในการจัดการเซนเซอร์หลายตัวพร้อมกัน
บทต่างๆ
- [00:00] บทนำสู่การใช้เซนเซอร์ Sharp IR หลายตัว
- [00:28] การประยุกต์ใช้งานสำหรับเซนเซอร์วัดระยะหลายตัว
- [01:34] คำอธิบายโค้ด: ไลบรารีและการกำหนดพิน
- [02:24] การกำหนดค่ารุ่นเซนเซอร์และการสร้างออบเจกต์
- [04:15] อธิบายฟังก์ชัน Setup และ Loop
- [06:10] คู่มือการเดินสายไฟสำหรับเซนเซอร์หลายตัว
- [07:44] การสาธิตสดด้วยเซนเซอร์สองตัว
ภาพ

++
/*
 * Using two or more Sharp IR distance sensors with Arduino
 * Measure distance

 * Download and resource page for this video https://robojax.com/RJT143
 * Watch video instructions for this video: https://youtu.be/WQ3oFyF5qeY
 *
 * Watch main video explaining the Sharp IR distance sensor:
 * https://robojax.com?vid=robojax-sharp_IR
 *
 * Written by Ahmad Shamshiri for Robojax.com on Saturday, December 1, 2018
 * at 20:56 in Ajax, Ontario, Canada

 *
  * This code is "AS IS" without warranty or liability. Free to be used as long as you keep this note intact.
 * This code has been downloaded from Robojax.com
    This program is free software: you can redistribute it and/or modify
    it under the terms of the GNU General Public License as published by
    the Free Software Foundation, either version 3 of the License, or
    (at your option) any later version.

    This program is distributed in the hope that it will be useful,
    but WITHOUT ANY WARRANTY; without even the implied warranty of
    MERCHANTABILITY or FITNESS FOR A PARTICULAR PURPOSE.  See the
    GNU General Public License for more details.

    You should have received a copy of the GNU General Public License
    along with this program.  If not, see <https://www.gnu.org/licenses/>.
 */

#include <SharpIR.h>

#define IR1 A1 // define signal pin
#define IR2 A2 // define signal pin

#define model1 1080 // for GP2Y0A21YK0F  used 1080
#define model2 1080 // for GP2Y0A21YK0F  used 1080

// Sharp IR code for Robojax.com
// ir: the pin where your sensor is attached
/*
2 to 15 cm GP2Y0A51SK0F  use 215
4 to 30 cm GP2Y0A41SK0F / GP2Y0AF30 series  use 430
10 to 80 cm GP2Y0A21YK0F  use 1080
10 to 150 cm GP2Y0A60SZLF use 10150
20 to 150 cm GP2Y0A02YK0F use 20150
100 to 550 cm GP2Y0A710K0F  use 100550
*/
SharpIR SharpIR1(IR1, model1);
SharpIR SharpIR2(IR2, model2);

void setup() {
    // Multiple Sharp IR Distance meter code for Robojax.com
 Serial.begin(9600);
 Serial.println("Robojax Sharp IR  ");

 // extra pin for 5V if needed
 pinMode(2,OUTPUT);// define pin 2 as output
 digitalWrite(2, HIGH);// set pin 2 HIGH so it always have 5V
  // Robojax.com 20181201
}

void loop() {
    // Sharp IR code for Robojax.com 20181201
    delay(500);

  unsigned long startTime=millis();  // takes the time before the loop on the library begins

  int dis1=SharpIR1.distance();  // this returns the distance for sensor 1
  int dis2=SharpIR2.distance();  // this returns the distance for sensor 2
  // Sharp IR code for Robojax.com 20181201

  Serial.print("Distance (1): ");
  Serial.print(dis1);
  Serial.println("cm");

  Serial.print("Distance (2): ");
  Serial.print(dis2);
  Serial.println("cm");
     // Sharp IR code for Robojax.com

}++
/*
* Lesson 74: Using two or more Sharp IR distance sensors
* Sharp IR (infrared) distance measurement module for Arduino
* Measures the distance in cm.
* Written by Ahmad Shamshiri for Robojax.com
* on February 25, 2019 at 21:38 in Ajax, Ontario, Canada
* Original library: https://github.com/guillaume-rico/SharpIR
* Watch video instructions for this code: https://youtu.be/WQ3oFyF5qeY
*
* Full explanation of this code and wiring diagram is available at
* my Arduino Course at Udemy.com here: http://robojax.com/L/?id=62
* Written by Ahmad Shamshiri on February 3, 2018 at 07:34
* in Ajax, Ontario, Canada. www.robojax.com
*
If you found this tutorial helpful, please support me so I can continue creating
content like this.
or make a donation using PayPal http://robojax.com/L/?id=64
* * This code is "AS IS" without warranty or liability. Free to be used as long as you keep this note intact.*
* This code has been downloaded from Robojax.com
This program is free software: you can redistribute it and/or modify
it under the terms of the GNU General Public License as published by
the Free Software Foundation, either version 3 of the License, or
(at your option) any later version.
This program is distributed in the hope that it will be useful,
but WITHOUT ANY WARRANTY; without even the implied warranty of
MERCHANTABILITY or FITNESS FOR A PARTICULAR PURPOSE. See the
GNU General Public License for more details.
You should have received a copy of the GNU General Public License
along with this program. If not, see <https://www.gnu.org/licenses/>.
*/
*/
// Sharp IR code for Robojax.com
#include
#define IR A0 // define signal pin
#define model 1080 // used 1080 because model GP2Y0A21YK0F is used
// Sharp IR code for Robojax.com
// ir: the pin where your sensor is attached
// model: an int that determines your sensor: 1080 for GP2Y0A21Y
// 20150 for GP2Y0A02Y
// 430 for GP2Y0A41SK
/*
2 to 15 cm GP2Y0A51SK0F use 1080
4 to 30 cm GP2Y0A41SK0F / GP2Y0AF30 series use 430
10 to 80 cm GP2Y0A21YK0F use 1080
10 to 150 cm GP2Y0A60SZLF use 10150
20 to 150 cm GP2Y0A02YK0F use 20150
100 to 550 cm GP2Y0A710K0F use 100550
*/
#include <SharpIR.h>
#define IR1 A1 // define signal pin
#define IR2 A2 // define signal pin
#define model1 1080 // for GP2Y0A21YK0F used 1080
#define model2 1080 // for GP2Y0A21YK0F used 1080
// Sharp IR code for Robojax.com
// ir: the pin where your sensor is attached
/*
2 to 15 cm GP2Y0A51SK0F use 215
4 to 30 cm GP2Y0A41SK0F / GP2Y0AF30 series use 430
10 to 80 cm GP2Y0A21YK0F use 1080
10 to 150 cm GP2Y0A60SZLF use 10150
20 to 150 cm GP2Y0A02YK0F use 20150
100 to 550 cm GP2Y0A710K0F use 100550
*/
SharpIR SharpIR1(IR1, model1);
SharpIR SharpIR2(IR2, model2);
void setup() {
// Multiple Sharp IR Distance meter code for Robojax.com
Serial.begin(9600);
Serial.println("Robojax Sharp IR ");
// extra pin for 5V if needed
pinMode(2,OUTPUT);// define pin 2 as output
digitalWrite(2, HIGH);// set pin 2 HIGH so it always have 5V
// Robojax.com 20181201
}
void loop() {
// Sharp IR code for Robojax.com 20181201
delay(500);
unsigned long startTime=millis(); // takes the time before the loop on the library begins
int dis1=SharpIR1.distance(); // this returns the distance for sensor 1
int dis2=SharpIR2.distance(); // this returns the distance for sensor 2
// Sharp IR code for Robojax.com 20181201
Serial.print("Distance (1): ");
Serial.print(dis1);
Serial.println("cm");
Serial.print("Distance (2): ");
Serial.print(dis2);
Serial.println("cm");
// Sharp IR code for Robojax.com
}แหล่งข้อมูลและเอกสารอ้างอิง
-
ภายนอกDistance-measuring sensors (website)sharp-world.com
-
ภายนอกSharp IR Library (from GitHub)github.com
-
ภายนอกSharp Library from RoboJob.comrobojax.com
ไฟล์📁
ไฟล์ Fritzing
-
sharp ir sensor GP2Y0A02YK0F
sharp ir sensor GP2Y0A02YK0F .fzz
ไฟล์อื่น ๆ
-
Sharp GP2Y0A41SK0F Infrared distance sensor datasheet
robojax_sharp_IR_GP2Y0A41SK0F_datasheet.pdf0.84 MB -
Sharp GP2Y0A710K0F Infrared distance sensor datashee
robojax_sharp_IR_GP2Y0A710K0F_datasheet.pdf0.33 MB -
Arduino library for Sharp Infrard distance sensor
robojax-sharp_IR-master.zip