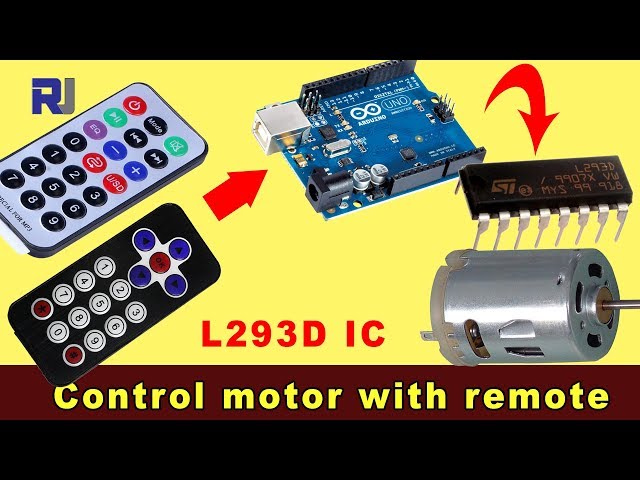
Управление бесщеточным двигателем постоянного тока с помощью ИК-пульта дистанционного управления на базе Arduino и L293D
Этот проект демонстрирует, как управлять направлением и скоростью постоянного двигателя с помощью инфракрасного (ИК) пульта, Arduino Uno и чипа драйвера мотора L293D. Эта схема позволяет точно контролировать двигатель, что делает её подходящей для самых различных приложений.
Этот проект открывает мир возможностей для ваших самоодельных электронных начинаний. Вот несколько идей, чтобы помочь вам начать:
- Робот с дистанционным управлением:Управляйте движением малого робота с помощью ИК-пульта.
- Автоматизированная шторная система:Управляйте занавесками или жалюзи удаленно.
- Интерактивные художественные инсталляции:Создавайте динамические художественные произведения с подвижными элементами, управляемыми ИК пультом.
- Система панорамирования и наклона:Управляйте панорамированием и наклоном камеры или датчика с помощью ИК пульта.
Аппаратное обеспечение/Компоненты
- Arduino Uno
- L293D драйвер мотора ИС
- Двигатель постоянного тока
- Инфракрасный пульт и приемник
- Диоды (1N4001 x4)
- Соединительные провода
- Блок питания (например, батарея 9 В для мотора)
Справочник по проводке
%%ПРОВОДКА%%
(в видео на 02:14)
Чип L293D требует подключения как к Arduino, так и к внешнему источнику питания для мотора. Диоды используются для защиты от обратного тока. ИК-приемник подключается к 5V и GND пинам Arduino, при этом сигнальный пин подключен к цифровому пину 11 (можно настроить в коде). Мотор подключается к выходным пинам L293D, которые контролируются Arduino.
Объяснение кода
(в видео на 07:30)
Предоставленный код на Arduino использует библиотеку IRremote для декодирования сигналов с инфракрасного пульта. Ключевые настраиваемые параметры в коде включают:
const char type ='B';// W for white, B for black. Must keep single quotes like 'B' or 'W'
const boolean PCB = 0;// if receiver is PCB set to 1, if not set to 0. See video for details
Установитьtypeпеременная на 'W' для белого пульта или 'B' для черного пульта (в видео на 07:41). ThePCBпеременная должна быть установлена в 1, если ваш ИК-приемник имеет печатную плату, и в 0, если это голый модуль (в видео на 07:50).
const String RIGHT=">";// move motor to the right (CW) with this key on remote
const String LEFT ="<";// move motor to the left (CCW) with this key on remote
const String STOP ="OK";// stop motor with this key on remote
Эти строки определяют наименования кнопок ИК-пульта для управления мотором. Убедитесь, что они совпадают с наименованиями на вашем пульте (в видео на 08:12). Вы можете настроить их, чтобы использовать другие кнопки на вашем пульте.
#define P1A 2 // define pin 2 as for P1A
#define P2A 7 // define pin 7 as for P2A
#define EN12 8 // define pin 8 as for 1,2EN enable
int RECV_PIN = 11;
Эти строки определяют контакты Arduino, используемые для управления драйвером мотора L293D (в видео на 09:52).P1AиP2Aуправляйте направлением, иEN12включает двигатель.RECV_PINэто один из контактов, подключенных к выходу сигнала IR-приёмника (в видео на 06:52). Измените их, если вы используете другие контакты.
Живой проект/демонстрация
(в видео на 14:15)
Видео демонстрирует проект в действии, показывая, как постоянный двигатель реагирует на команды инфракрасного пульта. Демонстрация показывает, как управлять вращением двигателя по часовой стрелке и против часовой стрелки, а также как остановить двигатель, используя различные кнопки пульта.
Главы
- [00:00] Введение и обзор проекта
- Компоненты проекта и предварительные требования
- [02:14] Объяснение проводки
- [07:30] Объяснение кода и конфигурация
- [14:15] Демонстрация проекта с черным пультом и печатной платой
- [16:04] Демонстрация с серебряным пультом и печатной платой
- [17:42] Демонстрация с серебряным пультом и голым модулем
- [18:23] Демонстрация с черным пультом и обнаженным модулем
/*
* Original Infrared library from - http://arcfn.com
*
* This is Arduino code for the L293D DC motor driver.
* It uses an IR remote control to rotate the DC motor clockwise (CW), counter-clockwise (CCW), and stop it.
* Watch instructions for this video: https://youtu.be/e0pvfJbdw_o
* To get the library and files related to this code, visit http://robojax.com/learn/arduino
// Written for Robojax.com video
* Code is available at http://robojax.com/learn/arduino
*
// Written by Ahmad S. for Robojax.com on
// August 10, 2018 at 22:03 in Ajax, Ontario, Canada
This program is free software: you can redistribute it and/or modify
it under the terms of the GNU General Public License as published by
the Free Software Foundation, either version 3 of the License, or
(at your option) any later version.
This program is distributed in the hope that it will be useful,
but WITHOUT ANY WARRANTY; without even the implied warranty of
MERCHANTABILITY or FITNESS FOR A PARTICULAR PURPOSE. See the
GNU General Public License for more details.
You should have received a copy of the GNU General Public License
along with this program. If not, see <https://www.gnu.org/licenses/>.
*/
// DC motor control
#define P1A 2 // define pin 2 as for P1A
#define P2A 7 // define pin 7 as for P2A
#define EN12 8 // define pin 8 as for 1,2EN enable
// remote settings start
#include <IRremote.h>
int RECV_PIN = 11;
const char type ='B';// W for white, B for black. Must keep single quotes like 'B' or 'W'
const boolean PCB = 0;// if receiver is PCB set to 1, if not set to 0. See video for details
boolean displayCode = false;// to display remote code. if not, set to false
// IR remote settings
const String RIGHT=">";// move motor to the right (CW) with this key on remote
const String LEFT ="<";// move motor to the left (CCW) with this key on remote
const String STOP ="OK";// stop motor with this key on remote
// remote settings end
IRrecv irrecv(RECV_PIN);
// this is array holding codes for White Remote when used with PCB version of receiver
unsigned int whiteRemotePCB[] ={
0xE318261B, // CH-
0x511DBB, // CH
0xEE886D7F, // CH+
0x52A3D41F, // |<<
0xD7E84B1B, // >>|
0x20FE4DBB, // >||
0xF076C13B, // -
0xA3C8EDDB, // +
0x12CEA6E6, // EQ
0xC101E57B, // 0
0x97483BFB, // 100+
0xF0C41643, // 200+
0x9716BE3F, // 1
0x3D9AE3F7, // 2
0x6182021B, // 3
0x8C22657B, // 4
0x488F3CBB, // 5
0x449E79F, // 6
0x32C6FDF7, // 7
0x1BC0157B, // 8
0x3EC3FC1B // 9
};
// this is array holding codes for White Remote when used with non-PCB version of receiver
unsigned int whiteRemote[] ={
0xFFA25D, // CH-
0xFF629D, // CH
0xFFE21D, // CH+
0xFF22DD, // |<<
0xFF02FD, // >>|
0xFFC23D, // >||
0xFFE01F, // -
0xFFA857, // +
0xFF906F, // EQ
0xFF6897, // 0
0xFF9867, // 100+
0xFFB04F, // 200+
0xFF30CF, // 1
0xFF18E7, // 2
0xFF7A85, // 3
0xFF10EF, // 4
0xFF38C7, // 5
0xFF5AA5, // 6
0xFF42BD, // 7
0xFF4AB5, // 8
0xFF52AD // 9
};
// key lables of white remote
String whiteRemoteKey[] ={
"CH-",
"CH",
"CH+",
"|<<",
">>|",
">||",
"-",
"+",
"EQ",
"0",
"100+",
"200+",
"1",
"2",
"3",
"4",
"5",
"6",
"7",
"8",
"9"
};
// this is array holding codes for Black Remote when used with non-PCB version of receiver
unsigned int blackRemote[] ={
0xFF629D, // ^
0xFF22DD, // <
0xFF02FD, // OK
0xFFC23D, // >
0xFFA857, // v
0xFF6897, // 1
0xFF9867, // 2
0xF0C41643, // 3
0xFF30CF, // 4
0xFF18E7, // 5
0xFF7A85, // 6
0xFF10EF, // 7
0xFF38C7, // 8
0xFF5AA5, // 9
0xFF42BD, // *
0xFF4AB5, // 0
0xFF52AD // #
};
// this is array holding codes for Black Remote when used with PCB version of receiver
unsigned int blackRemotePCB[] ={
0x511DBB, // ^
0x52A3D41F, // <
0xD7E84B1B, // OK
0x20FE4DBB, // >
0xA3C8EDDB, // v
0xC101E57B, // 1
0x97483BFB, // 2
0xF0C41643, // 3
0x9716BE3F, // 4
0x3D9AE3F7, // 5
0x6182021B, // 6
0x8C22657B, // 7
0x488F3CBB, // 8
0x449E79F, // 9
0x32C6FDF7, // *
0x1BC0157B, // 0
0x3EC3FC1B // #
};
// Black remote key names
String blackRemoteKey[] ={
"^",
"<",
"OK",
">",
"v",
"1",
"2",
"3",
"4",
"5",
"6",
"7",
"8",
"9",
"*",
"0",
"#"
};
decode_results results;
/*
* Permission granted to share this code given that this
* note is kept with the code.
* Disclaimer: this code is "AS IS" and for educational purposes only.
*
*/
void setup() {
// L293 Motor Control Code by Robojax.com 2018025
Serial.begin(9600);// setup Serial Monitor to display information
pinMode(P1A, OUTPUT);// define pin as OUTPUT for P1A
pinMode(P2A, OUTPUT);// define pin as OUTPUT for P2A
pinMode(EN12, OUTPUT);// define pin as OUTPUT for 1,2EN
Serial.println("Robojax IR Decode");
Serial.println("Motor Control with Remote");
irrecv.enableIRIn(); // Start the receiver
// L293 Motor Control Code by Robojax.com 20180810
}
void loop() {
// L293d Motor Control Code with IR by Robojax.com 20180810
if (irrecv.decode(&results)) {
if(displayCode)Serial.println(results.value, HEX);
robojaxValidateCode(results.value);// used the "robojaxValidateCode" bellow
irrecv.resume(); // Receive the next value
}
delay(50);// 50 millisecond delay
// L293d Motor Control Code with IR by Robojax.com 20180810
}//loop end
/*
* function: robojaxValidateCode
* validates the remote code and prints the correct key name
* cd is the code passed from the loop
* Written by A. S. for Robojax
*/
void robojaxValidateCode(int cd)
{
// Robojax IR Remote decoder
int found=0;
if(type =='W' && !PCB)
{
// Robojax IR White Remote decoder
// if type is set to 'W' (white remote) and PCB=0 then check White remote code
for(int i=0; i< sizeof(whiteRemote)/sizeof(int); i++)
{
if(whiteRemote[i] ==cd)
{
Serial.print("Key pressed:");
Serial.println(whiteRemoteKey[i]);
motorAction(whiteRemoteKey[i]);// take action
found=1;
}// if matched
}// for
}else if(type =='W' && PCB){
// Robojax IR White Remote decoder
// if type is set to 'W' (white remote) and PCB=1 then check White remote code
for(int i=0; i< sizeof(whiteRemotePCB)/sizeof(int); i++)
{
if(whiteRemotePCB[i] ==cd)
{
Serial.print("Key pressed:");
Serial.println(whiteRemoteKey[i]);
motorAction(whiteRemoteKey[i]);// take action
found=1;
}// if matched
}// for
}else if(type =='B' && PCB){
// Robojax IR Black Remote decoder
// if type is set to 'B' (black remote) and PCB=1 then check Black remote code
for(int i=0; i< sizeof(blackRemotePCB)/sizeof(int); i++)
{
// Robojax IR black Remote decoder
if(blackRemotePCB[i] ==cd)
{
Serial.print("Key pressed:");
Serial.println(blackRemoteKey[i]);
motorAction(blackRemoteKey[i]);// take action
found=1;
}// if matched
}// for
}else{
// if type is set to 'B' (black remote) and PCB =0 then check Black remote code
for(int i=0; i< sizeof(blackRemote)/sizeof(int); i++)
{
// Robojax IR black Remote decoder
if(blackRemote[i] ==cd)
{
Serial.print("Key pressed:");
Serial.println(blackRemoteKey[i]);
motorAction(blackRemoteKey[i]);// take action
found=1;
}// if matched
}// for
}// else
if(!found){
if(cd !=0xFFFFFFFF)
{
Serial.println("Key unknown");
}
}// found
}// robojaxValidateCode end
/*
*
* motorAction()
* receives string "value" as input and based on the settings,
* turns motor CW, CCW or STOP
*/
void motorAction(String value)
{
// Robojax IR motor control
if(value == RIGHT)
{
L293D('R',1);// rotate motor to the right (CCW)
}
if(value == LEFT)
{
L293D('L',1);// rotate motor to the left (CW)
}
if(value == STOP)
{
L293D('R',0);// stop motor
}
}//motorAction end
/*
* L293D(char dir, int en)
* dir is character either L for CW direction
* or R for CCW direction
* en is integer 1 to rotate, 0 for stop
*/
void L293D(char dir, int en)
{
if(dir =='L')
{
if(en ==0){
Serial.println("CW Motor Stopped");
}else{
Serial.println("Rotating CW");
}
digitalWrite(EN12 ,en);// Enable 1A and 2A
digitalWrite(P1A,HIGH);// send + or HIGH signal to P1A
digitalWrite(P2A,LOW);// send - or LOW signal to P2A
}else{
if(en ==0){
Serial.println("CCW Motor Stopped");
}else{
Serial.println("Rotating CCW");
}
digitalWrite(EN12 ,en);// Disable 1A and 2A
digitalWrite(P1A,LOW);// send + or HIGH signal to P1A
digitalWrite(P2A,HIGH);// send - or LOW signal to P2A
}
}//L293D end
++
/*
* This is the Arduino code for L293d DC motor Driver
* watch LE18-D80NK video for details https://youtu.be/MrYsmAwzfrM
* Code is available at http://robojax.com/learn/arduino
*
* Written by Ahmad S. for Robojax.com on
* August 9, 2018 at 22:03 in Ajax, Ontario, Canada
*/
// DC motor 1 control
#define P1A 2 // define pin 2 as for P1A
#define P2A 7 // define pin 7 as for P2A
#define EN12 8 // define pin 8 as for 1,2EN enable
/*
* Permission granted to share this code given that this
* note is kept with the code.
* Disclaimer: this code is "AS IS" and for educational purposes only.
*
*/
void setup() {
// L293 Motor Control Code by Robojax.com 2018025
Serial.begin(9600);// setup Serial Monitor to display information
pinMode(P1A, OUTPUT);// define pin as OUTPUT for P1A
pinMode(P2A, OUTPUT);// define pin as OUTPUT for P2A
pinMode(EN12, OUTPUT);// define pin as OUTPUT for 1,2EN
// L293 Motor Control Code by Robojax.com 2018025
}
void loop() {
// L293 Motor Control Code by Robojax.com 2018025
L293D_con('L',1);
delay(4000);
L293D_con('L',0);
delay(2000);
L293D_con('R',1);
delay(4000);
L293D_con('R',0);
delay(2000);
Serial.println("=========== Loop done");
delay(500);
// L293 Motor Control Code by Robojax.com 2018025
}
void L293D_con(char dir, int en)
{
if(dir =='L')
{
if(en ==0){
Serial.println(" CW Motor Stopped");
}else{
Serial.println(" Rotating CW");
}
digitalWrite(EN12 ,en);// Enable 1A and 2A
digitalWrite(P1A,HIGH);// send + or HIGH signal to P1A
digitalWrite(P2A,LOW);// send - or LOW signal to P2A
}else{
if(en ==0){
Serial.println(" CCW Motor Stopped");
}else{
Serial.println(" Rotating CCW");
}
digitalWrite(EN12 ,en);// Disable 1A and 2A
digitalWrite(P1A,LOW);// send + or HIGH signal to P1A
digitalWrite(P2A,HIGH);// send - or LOW signal to P2A
}
}//L293D_con end
Ресурсы и ссылки
-
ВнешнийСкачать библиотеку для Arduino (GitHub)github.com
Файлы📁
Нет доступных файлов.