Allegro ACS758 Sensor de Corrente com LCD e Proteção contra Sobrecorrente para Arduino
Neste tutorial, aprenderemos como usar o sensor de corrente Allegro ACS758 com um LCD para exibir leituras de corrente e implementar proteção contra sobrecorrente. Esta configuração nos permite monitorar a corrente e desconectar a carga automaticamente se ela exceder um limite predefinido. O projeto combina componentes de hardware e software para criar um sistema funcional de monitoramento de corrente.

Seguindo este guia, você será capaz de conectar os componentes corretamente e entender a lógica de programação por trás do código. Para uma explicação mais visual, não deixe de conferir o vídeo associado (no vídeo aos 00:00).
Hardware explicado
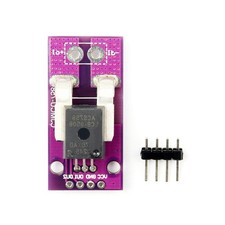
Os componentes-chave deste projeto incluem o sensor de corrente Allegro ACS758, um display LCD1602 com interface I2C e uma placa Arduino. O sensor ACS758 mede a corrente que passa por ele e fornece uma tensão proporcional à corrente. O LCD1602 exibe as leituras de corrente e mensagens de status, enquanto o Arduino processa os dados e controla o relé para proteção contra sobrecorrente.
O sensor ACS758 opera com base em um princípio chamado sensoriamento por efeito Hall, que lhe permite medir a corrente sem contato elétrico direto. A tensão de saída varia conforme a quantidade de corrente que o atravessa, proporcionando uma maneira segura e eficiente de monitorar cargas elétricas.
Detalhes da ficha técnica
| Fabricante | Allegro MicroSystems |
|---|---|
| Número da peça | ACS758 |
| Tensão lógica/IO | 3.3V / 5V |
| Tensão de alimentação | 5V |
| Corrente de saída (por canal) | 200 A máx. |
| Corrente de pico (por canal) | 200A |
| Orientações sobre a frequência PWM | Não aplicável |
| Limiares lógicos de entrada | 0,5 x VCC (bidirecional) |
| Queda de tensão / RDS(ligado)/ saturação | Não aplicável |
| Limites térmicos | 150°C |
| Pacote | Montagem em placa de circuito impresso |
| Notas / variantes | Vários modelos disponíveis para diferentes faixas de corrente |
- Assegure a dissipação de calor adequada se operar próximo aos limites máximos.
- Use capacitores de desacoplamento para estabilizar a tensão da fonte de alimentação.
- Verifique se o relé utilizado pode suportar a corrente máxima de carga.
- Tenha cuidado com a fiação para evitar curtos-circuitos.
- Erros comuns incluem entradas flutuantes; garanta que todas as conexões estejam firmes.
- Monitore o superaquecimento do sensor durante o uso prolongado.
Componentes necessários
- Sensor de corrente ACS758
- relé 12 V 100 A
- LCD1602 com I2C (4 fios)
- Transistor 2N2222 ou 2N3904
- 1k ohm 1/4W ou qualquer resistor de potência
- Fonte de alimentação para relé
- Fonte de alimentação para sua carga
- Protoboard
- Fios jumper
Instruções de Fiação

Para fazer a ligação do sensor de corrente Allegro ACS758 e do display LCD1602, comece conectando o sensor ACS758. Conecte oVCCpino do sensor ao pino 5V do Arduino. OGNDO pino deve ser conectado a um pino de terra no Arduino. OSO pino (sinal) do sensor deve ser conectado ao pino de entrada analógicaA0no Arduino.
Em seguida, para o LCD1602, conecte oVCCpino para o pino de 5V no Arduino e oGNDprender ao chão. OSDAo pino do LCD deve ser conectado aoA4pino (SDA) no Arduino, enquanto oSCLpino deve conectar-se aoA5pino (SCL) no Arduino. Finalmente, conecte um módulo de relé ao pino digital2para controlar a carga com base nas leituras de corrente.
Exemplos de Código e Guia Passo a Passo
No código do Arduino, começamos definindo identificadores-chave comoVIN, que representa o pino de entrada analógica conectado ao sensor ACS758. OrelayPinestá configurado para o controle do relé, enquantomaxCurrentdefine o limiar de proteção contra sobrecorrente
#define VIN A0 // define the Arduino pin A0 as voltage input (V in)
const int relayPin = 2; // set a digital pin for relay
const float maxCurrent = 15.00; // set maximum Current
Osetup()A função inicializa o LCD e configura o pino do relé como saída. Ela também imprime uma mensagem de boas-vindas no LCD, informando o usuário sobre o sensor de corrente que está sendo usado.
void setup() {
    pinMode(relayPin, OUTPUT); // set relayPin as output
    Serial.begin(9600); // initialize serial monitor
    lcd.begin(); // initialize the LCD
    lcd.backlight(); // Turn on the blacklight
    lcd.print("Robojax");
}
Noloop()Nesta função, lemos continuamente a tensão do sensor e calculamos a corrente. Se a corrente exceder o limite máximo, o relé é ativado para desconectar a carga. Essa lógica garante que o sistema se proteja de condições de sobrecorrente.
void loop() {
  float voltage_raw = (5.0 / 1023.0) * analogRead(VIN); // Read the voltage from sensor
  float current = voltage / FACTOR; // Calculate current
  if (current >= minCurrent) {
    if (current <= maxCurrent) {
      digitalWrite(relayPin, LOW); // turn the relay OFF to allow current
    } else {
      digitalWrite(relayPin, HIGH); // turn the relay ON to disconnect current
    }
  }
}
Demonstração / O que esperar
Depois que tudo estiver conectado e o código for carregado, o LCD exibirá as leituras de corrente. Se a corrente exceder o definidomaxCurrent, o relé será ativado, desconectando a carga. Você pode testar isso aumentando gradualmente a corrente da carga e observando as alterações no LCD e no monitor serial. Certifique-se de evitar conexões com polaridade invertida, pois isso pode danificar os componentes (no vídeo em 10:15).
Imagens


/*
 *
 * Arduino Sketch for Allegro ACS758 Current Sensor with LCD1602 & I2C module and current protection
 * This sensor can measure current at a range of up to 200A. It has overcurrent protection with a relay to disconnect the load if
 * the current reaches beyond the limit.
 * It operates with 3.3V or 5V.
 * This sketch requires you to watch the following 2 videos before using this code:
 * 1- ACS758 Sensor https://www.youtube.com/watch?v=SiHfjzcqnU4
 * 2- LCD1602 with I2C https://www.youtube.com/watch?v=q9YC_GVHy5A
 * 3- Combined 1 and 2 in one video https://www.youtube.com/watch?v=tug9wjCwDQA
 * 4- Allegro ACS with Robojax Library (latest video and code) https://youtu.be/sB6EULTix2k
 *
 * Written by Ahmad Shamshiri on Tuesday, June 26, 2018 at 17:56 in Ajax, Ontario, Canada
 * for Robojax.com
 * You can watch a detailed video on the ACS758 Current sensor at: https://youtu.be/SiHfjzcqnU4
 * This code has been explained in this video: https://youtu.be/GE4I10IZ1jY
 * This code has been downloaded from Robojax.com
 */
#define VIN A0 // define the Arduino pin A0 as voltage input (V in)
const int relayPin = 2;// set a digital pin for relay
const float VCC   = 5.0;// supply voltage 5V or 3.3V. If using PCB, set to 5V only.
const int model = 2;   // enter the model (see below)

const float maxCurrent = 15.00;// set maximum Current
int maxCurrentWait = 6000;// wait time before current is connected

float minCurrent = 1.00;// reading cutt-off current. 1.00 is 1 Amper

/*
          "ACS758LCB-050B",// for model use 0
          "ACS758LCB-050U",// for model use 1
          "ACS758LCB-100B",// for model use 2
          "ACS758LCB-100U",// for model use 3
          "ACS758KCB-150B",// for model use 4
          "ACS758KCB-150U",// for model use 5
          "ACS758ECB-200B",// for model use 6
          "ACS758ECB-200U"// for model use  7
The sensitivity array holds the sensitivity of the ACS758
current sensors. Do not change.
*/
float sensitivity[] ={
          40.0,// for ACS758LCB-050B
          60.0,// for ACS758LCB-050U
          20.0,// for ACS758LCB-100B
          40.0,// for ACS758LCB-100U
          13.3,// for ACS758KCB-150B
          16.7,// for ACS758KCB-150U
          10.0,// for ACS758ECB-200B
          20.0,// for ACS758ECB-200U
         };

/*
 *   Quiescent output voltage is a factor of VCC that appears at the output
 *   when the current is zero.
 *   For bidirectional sensors it is 0.5 x VCC
 *   For unidirectional sensors it is 0.12 x VCC
 *   For model ACS758LCB-050B, the B at the end represents Bidirectional (polarity doesn't matter)
 *   For model ACS758LCB-100U, the U at the end represents Unidirectional (polarity must match)
 *    Do not change.
 */
float quiescent_Output_voltage [] ={
          0.5,// for ACS758LCB-050B
          0.12,// for ACS758LCB-050U
          0.5,// for ACS758LCB-100B
          0.12,// for ACS758LCB-100U
          0.5,// for ACS758KCB-150B
          0.12,// for ACS758KCB-150U
          0.5,// for ACS758ECB-200B
          0.12,// for ACS758ECB-200U
          };
const float FACTOR = sensitivity[model]/1000;// set sensitivity for selected model
const float QOV =   quiescent_Output_voltage [model] * VCC;// set quiescent Output voltage for selected model
float voltage;// internal variable for voltage


// ======== start of LCD1602 with i2C settings
#include <Wire.h>
#include <LiquidCrystal_I2C.h>

// Set the LCD address to 0x27 for a 16 chars and 2 line display
LiquidCrystal_I2C lcd(0x27, 16, 2);
// ======= END of  LCD1602 with i2C settings
void setup() {
    //Robojax.com ACS758 Current Sensor
    pinMode(relayPin,OUTPUT);// set relayPin as output
    Serial.begin(9600);// initialize serial monitor
    Serial.println("Robojax Tutorial");
    Serial.println("ACS758 Current Sensor");
    Serial.println("with LCD1602 & I2C");
    // initialize the LCD,
    lcd.begin();
  // Turn on the blacklight and print a message.
  lcd.backlight();
    lcd.clear();
  lcd.print("Robojax");
  lcd.setCursor (0,1); // go to start of 2nd line
  lcd.print("ACS758 Current Sensor");
  delay(2000);
  lcd.clear();
}

void loop() {
  //Robojax code ACS758 with LCD1602 and I2C
  float voltage_raw =   (5.0 / 1023.0)* analogRead(VIN);// Read the voltage from sensor
  voltage =  voltage_raw - QOV + 0.007 ;// 0.007 is a value to make voltage zero when there is no current
  float current = voltage / FACTOR;
  if( current >= minCurrent){
     if(current <= maxCurrent)
     {
              Serial.print("Current Limit: ");
              Serial.print(maxCurrent,3);// print voltage with 3 decimal places
              Serial.print("A, I: ");
              Serial.print(current,2); // print the current with 2 decimal places
              Serial.println("A");
              //start of loop Robojax code ACS758 with LCD1602 and I2C
              lcd.clear();
              lcd.setCursor (0,0); // set to line 1, char 0
              lcd.print("Current: ");
              lcd.setCursor (9,0); // go to start of 2nd line
              lcd.print(current);
              lcd.setCursor (15,0); // go to start of 2nd line
              lcd.print("A");

              lcd.setCursor (0,1);
              lcd.print("I Limit: ");
              lcd.setCursor (9,1); // go to start of 2nd line
              lcd.print(maxCurrent);
              lcd.setCursor (15,1); // go to start of 2nd line
              lcd.print("A");
              lcd.backlight();
             //end of loopcode Robojax code ACS758 with LCD1602 and I2C

              digitalWrite(relayPin,LOW);// turn the relay OFF to allow the current.
     }else{
      // the lines bellow will execute if current reaches above the maxCurrent value
              digitalWrite(relayPin,HIGH);// turn the relay ON to disconnect the current.

              Serial.print("Max Reached:");
              Serial.print(maxCurrent,3);// print the maxCurrent
              Serial.println("A");
              Serial.print("Disconnected ");

              //start of loop Robojax code ACS758 with LCD1602 and I2C
              lcd.clear();
              lcd.setCursor (0,0); // set to line 1, char 0
              lcd.print("I Max: ");
              lcd.setCursor (8,0); // go to start of 2nd line
              lcd.print(maxCurrent);
              lcd.setCursor (15,0); // go to start of 2nd line
              lcd.print("A");

              lcd.setCursor (0,1);
              lcd.print("Disconnected");
              lcd.backlight();
             //end of loopcode Robojax code ACS758 with LCD1602 and I2C
             delay(maxCurrentWait );// wait for maxCurrentWait  seconds
     }

  }else{
    Serial.println("No Current");
  lcd.clear();
  lcd.setCursor (0,0);
  lcd.print("No Current");
  digitalWrite(relayPin,LOW);// turn the relay OFF to allow the current.

  }
  delay(500);
}
Coisas que você pode precisar
-
Amazonas
-
Amazonas
-
Amazonas
-
AliExpressCompre 10 peças de LCD1602-I2C no AliExpress.s.click.aliexpress.com
-
AliExpressCompre um LCD1602 no AliExpress.s.click.aliexpress.com
-
BanggoodCompre o display LCD1602 na Banggood.banggood.com
Recursos e referências
-
Externo
-
Externo
-
Externo
-
ExternoCompre o display LCD1602 na Banggood.banggood.com
-
ExternoCompre um LCD1602 no AliExpress.s.click.aliexpress.com
Arquivos📁
Folha de dados (pdf)
-
Folha de dados do sensor de corrente ACS758
robojax_ACS758_current_sensor_datasheet.pdf1.03 MB