Tôi đã vẽ một mạch điện trên bo mạch ESP32 giá 40 đô la này và AI đã giải thích về nó
Dùng ngón tay phác họa một mạch điện và để AI giải thích
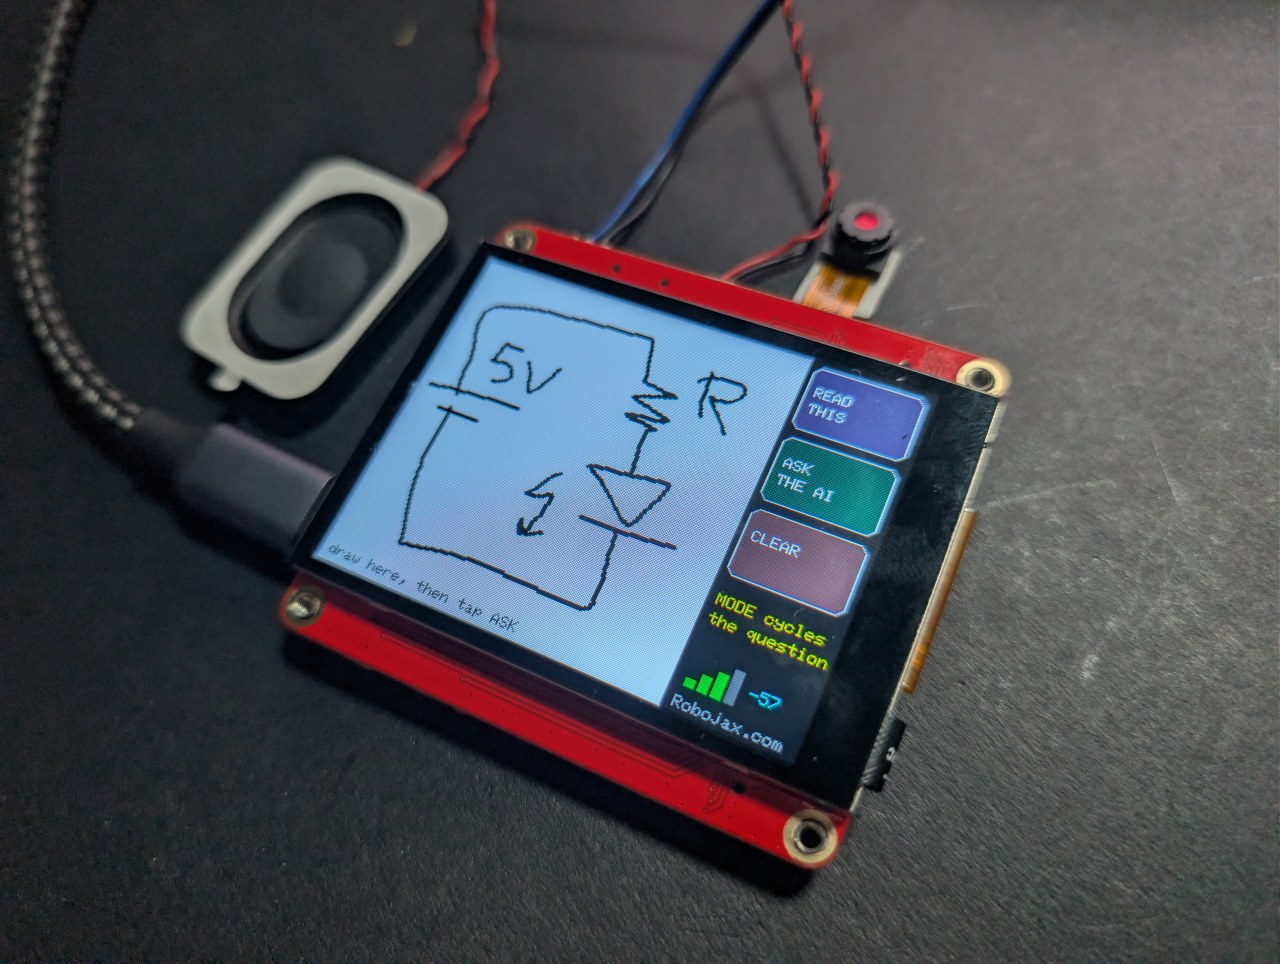
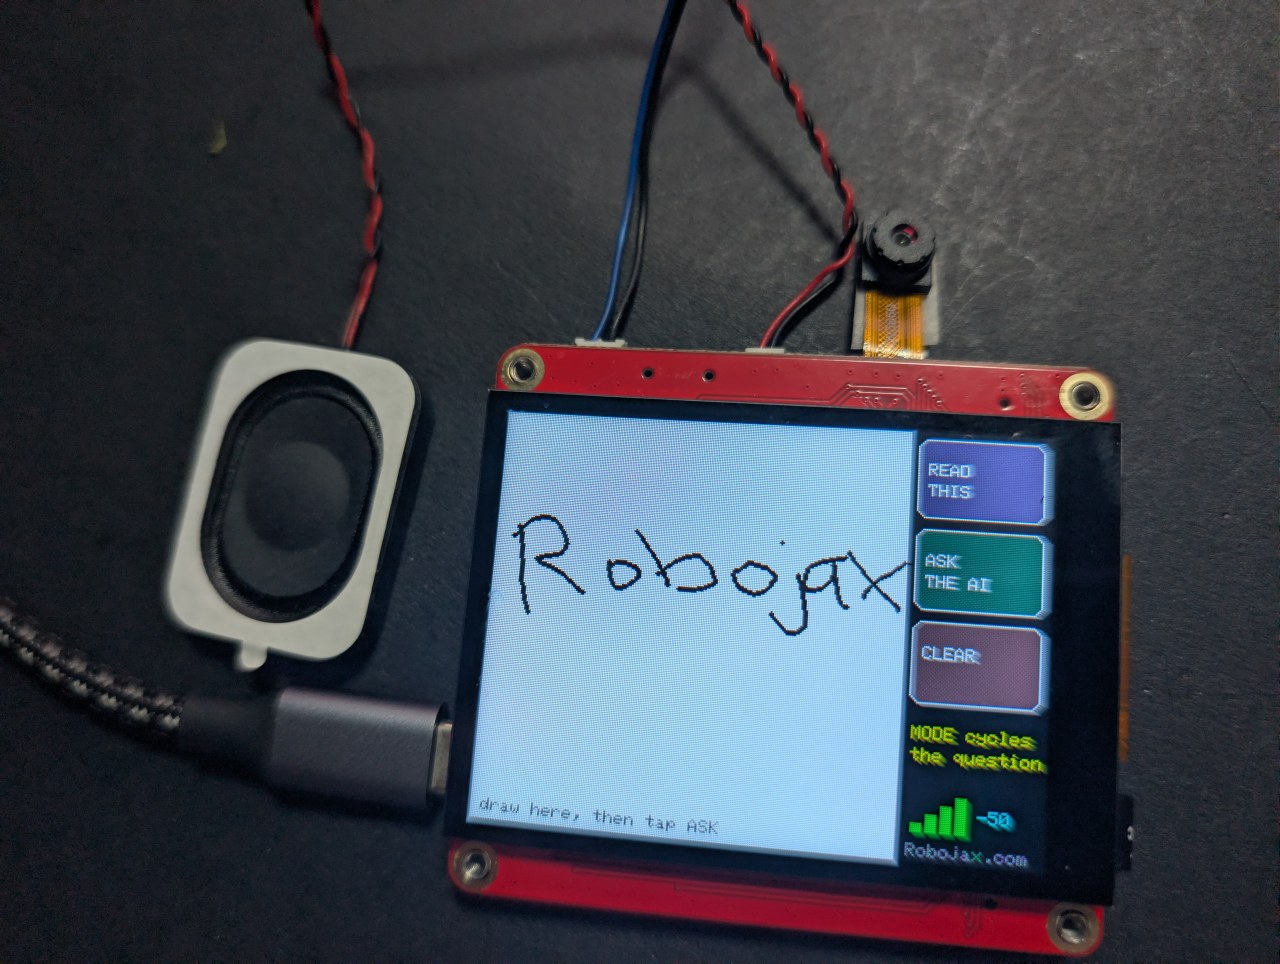
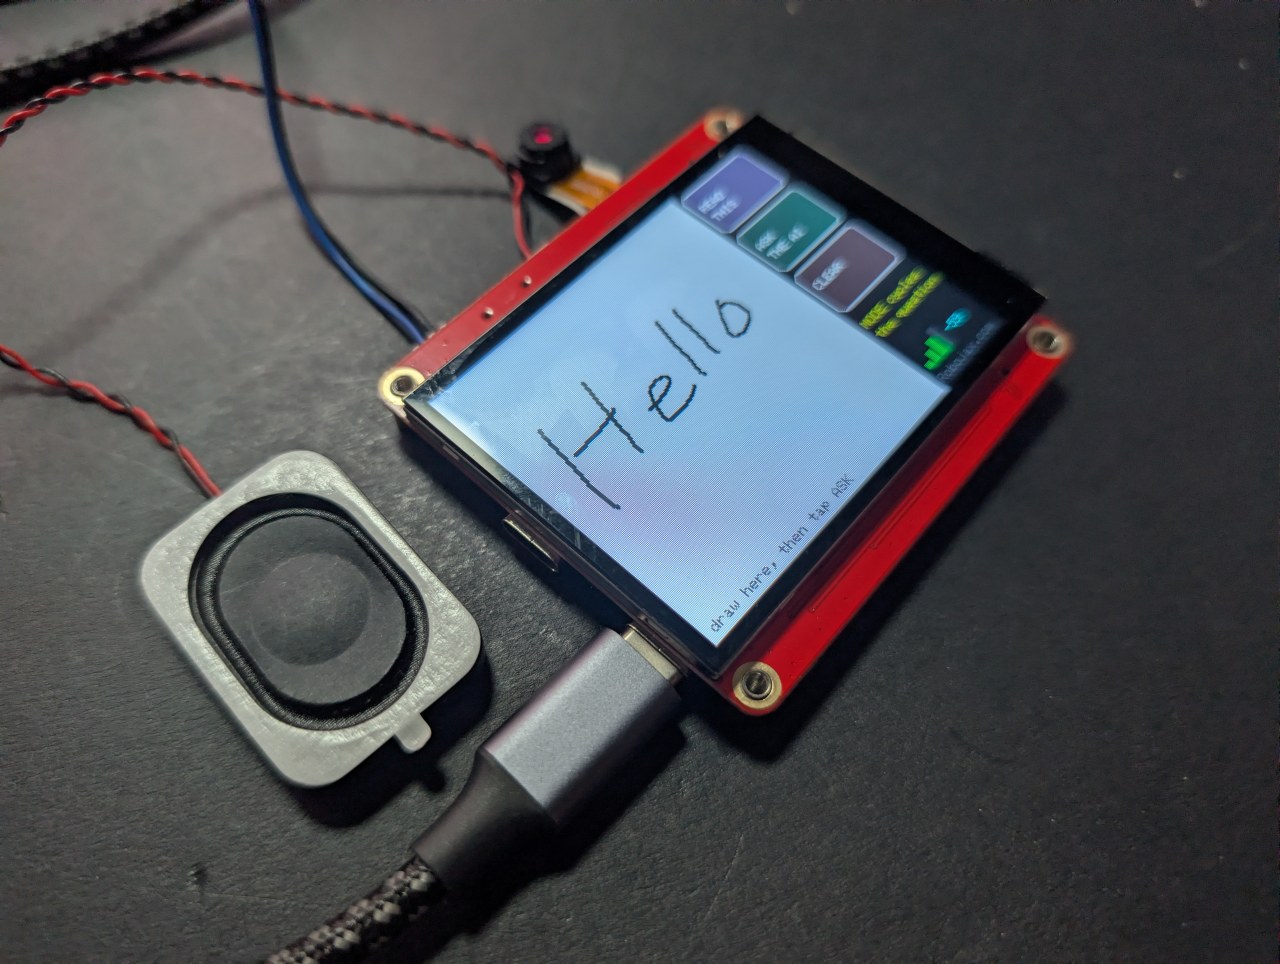
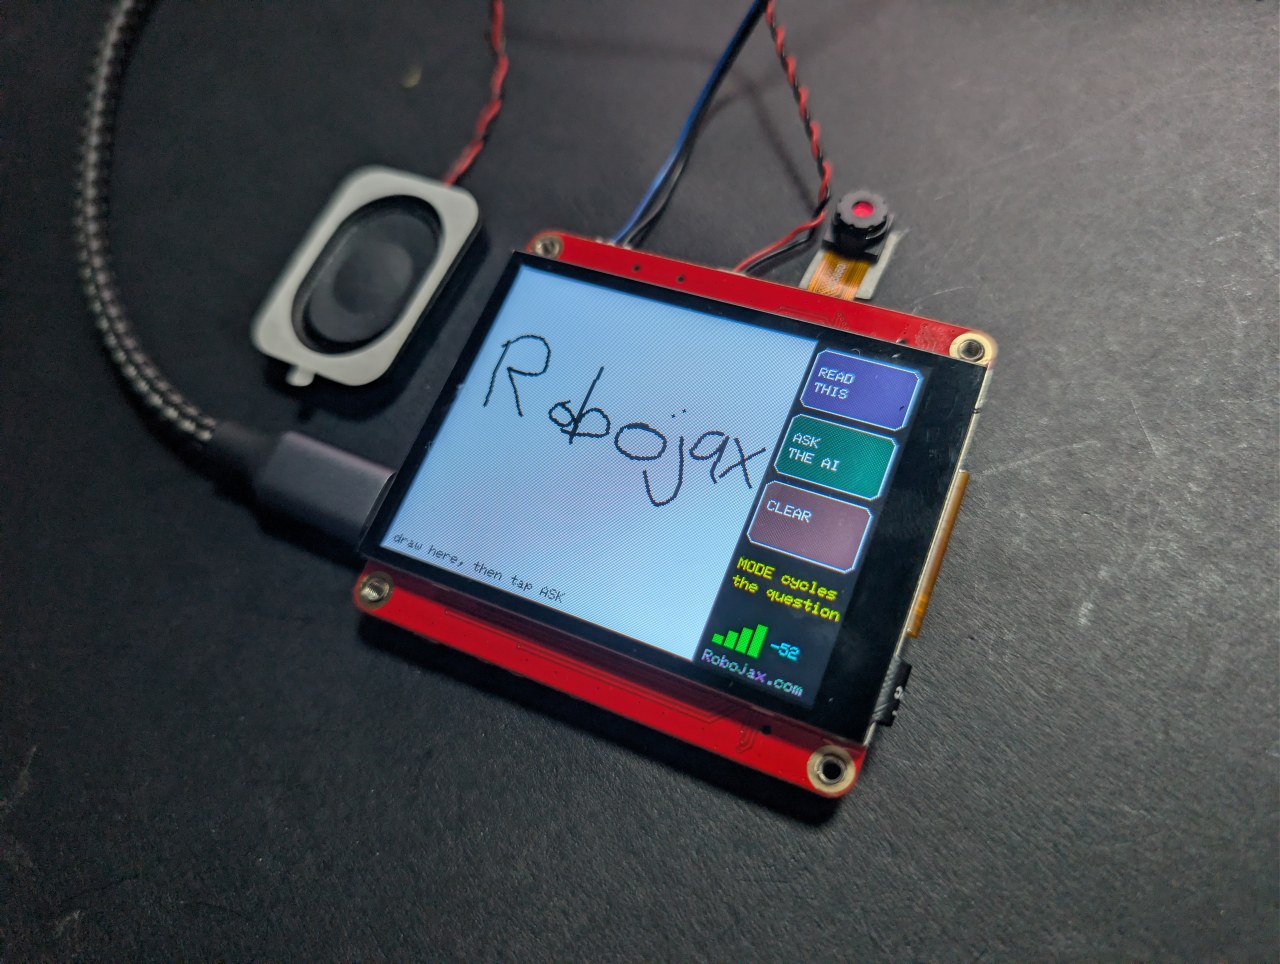
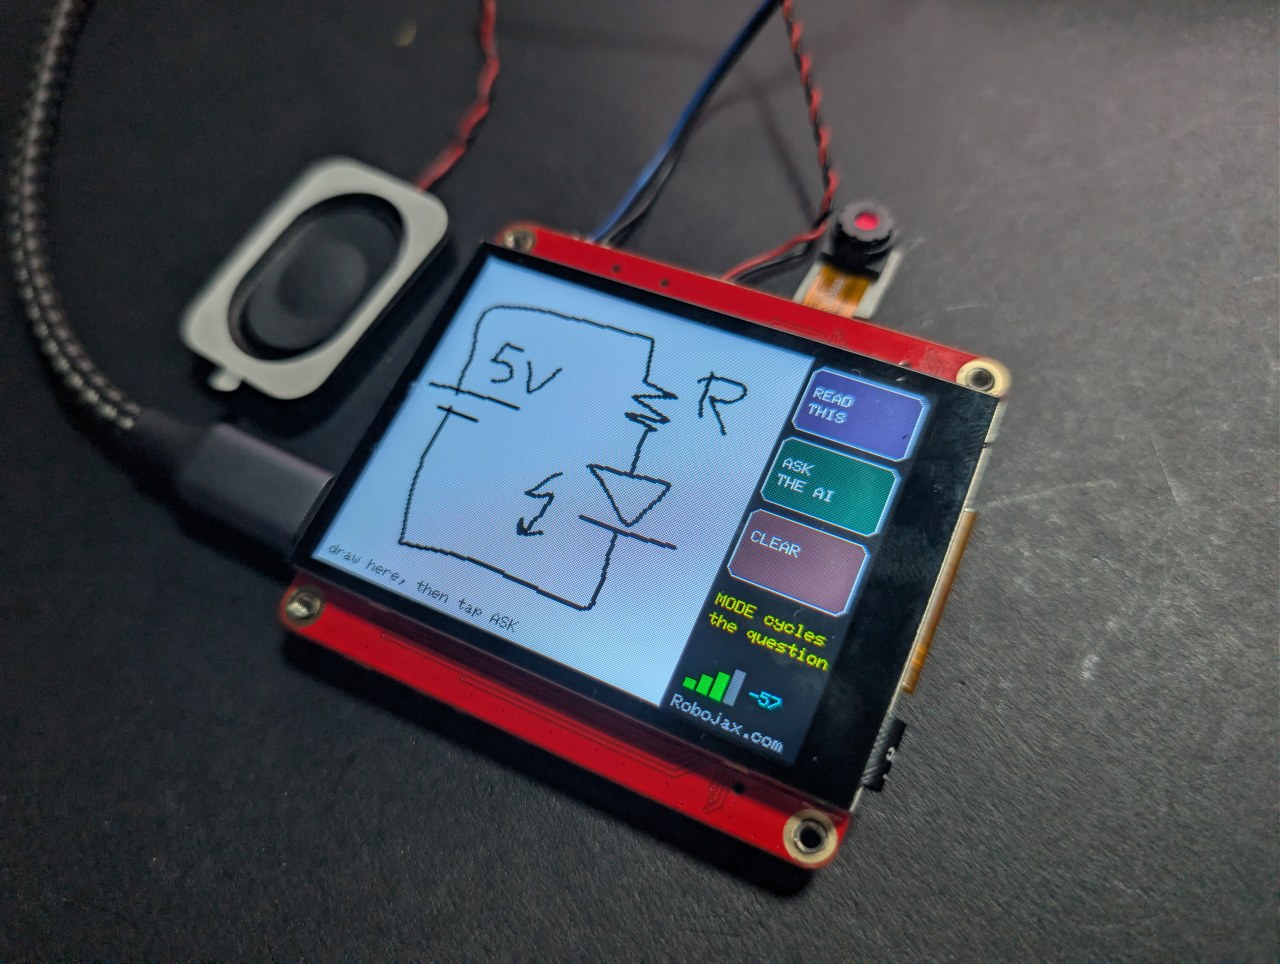
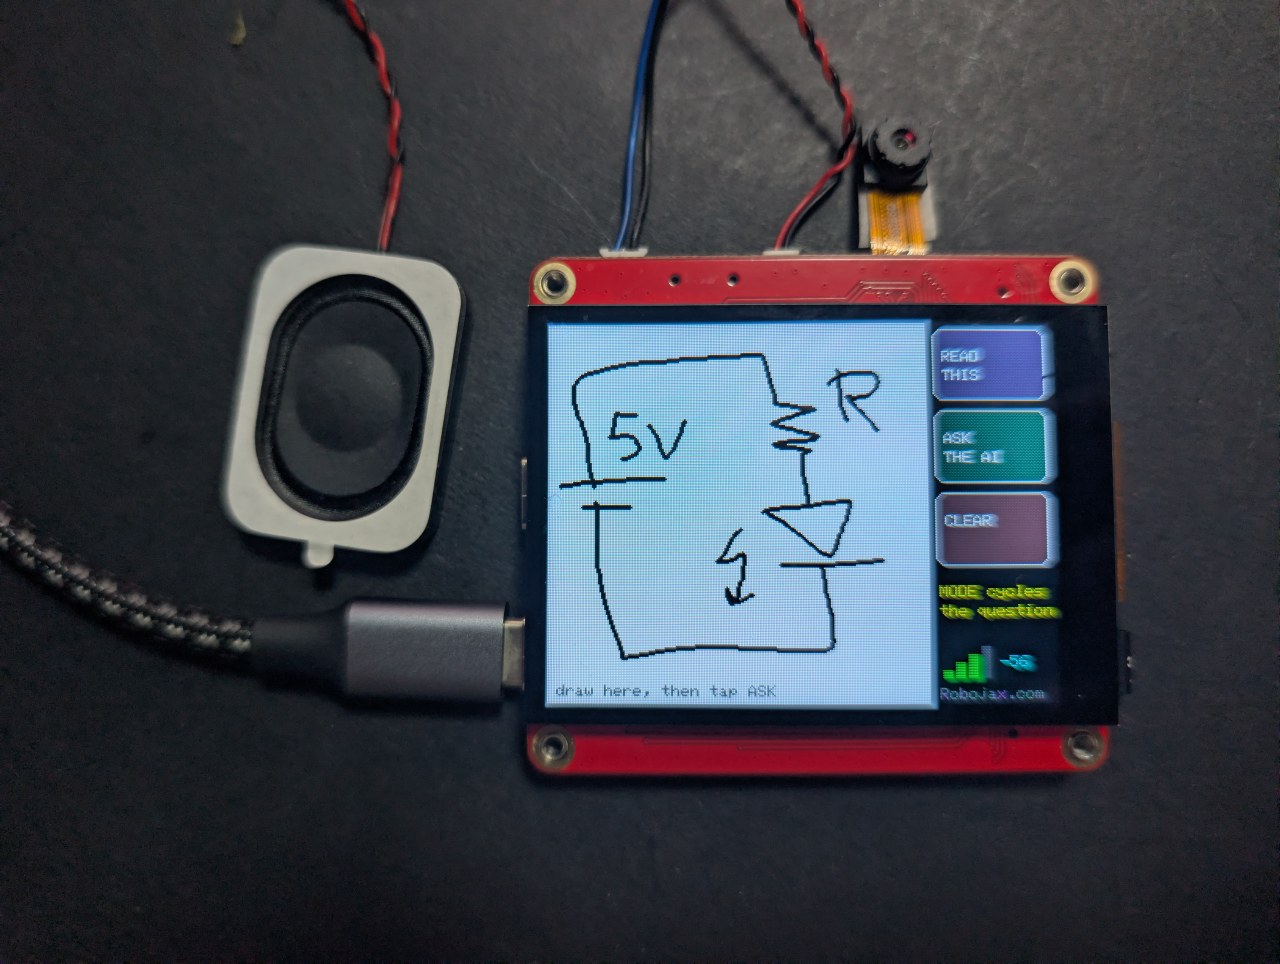
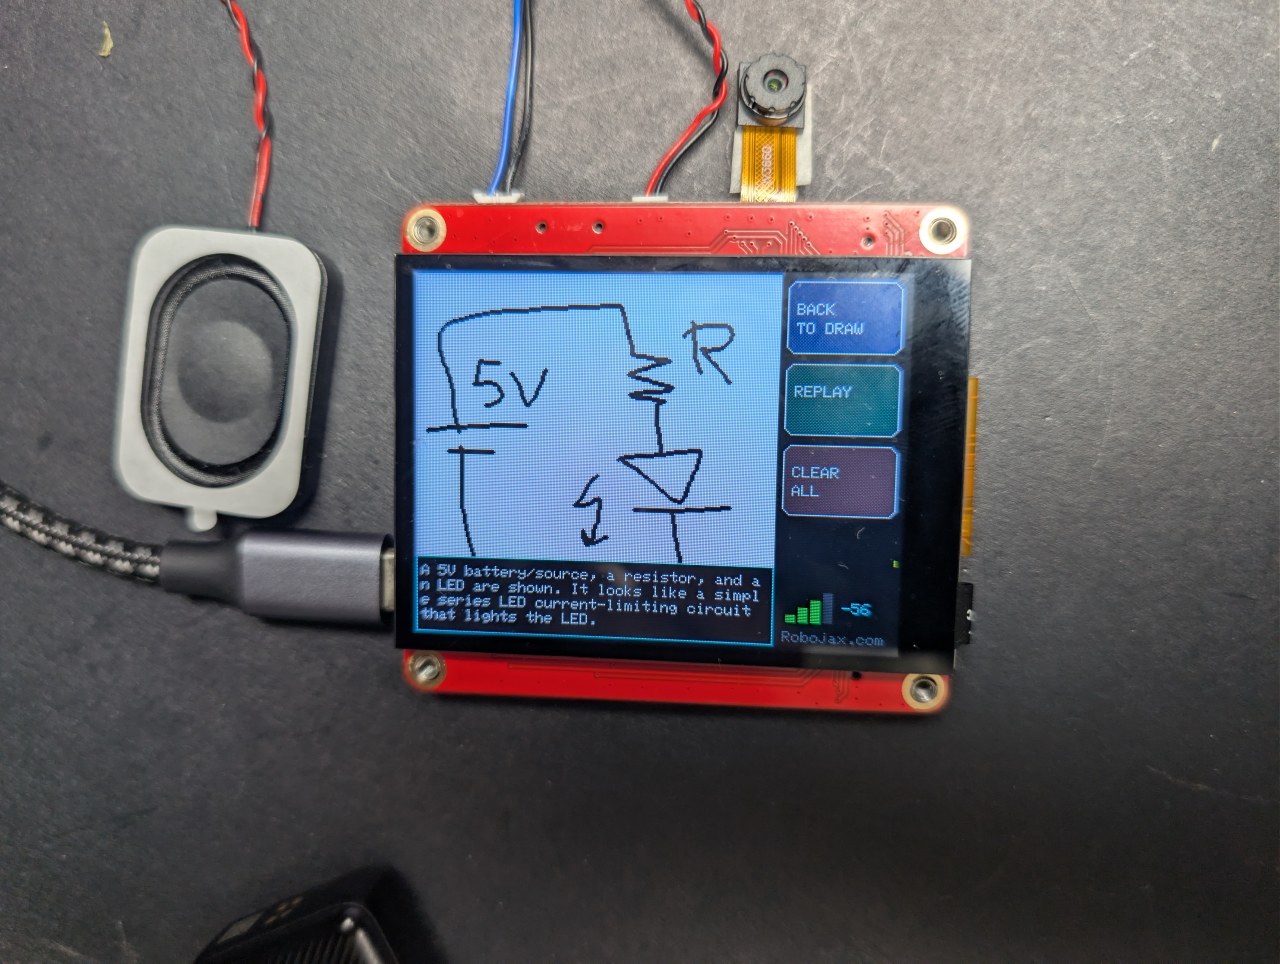
Vẽ hoặc viết trên màn hình cảm ứng bằng ngón tay, chạm vào ASK, và AI sẽ cho bạn biết bạn đã vẽ gì - trên màn hình và bằng giọng nói. Ba chế độ: gọi tên hình dạng, đọc chữ viết tay, hoặc giải thích mạch điện vẽ tay.
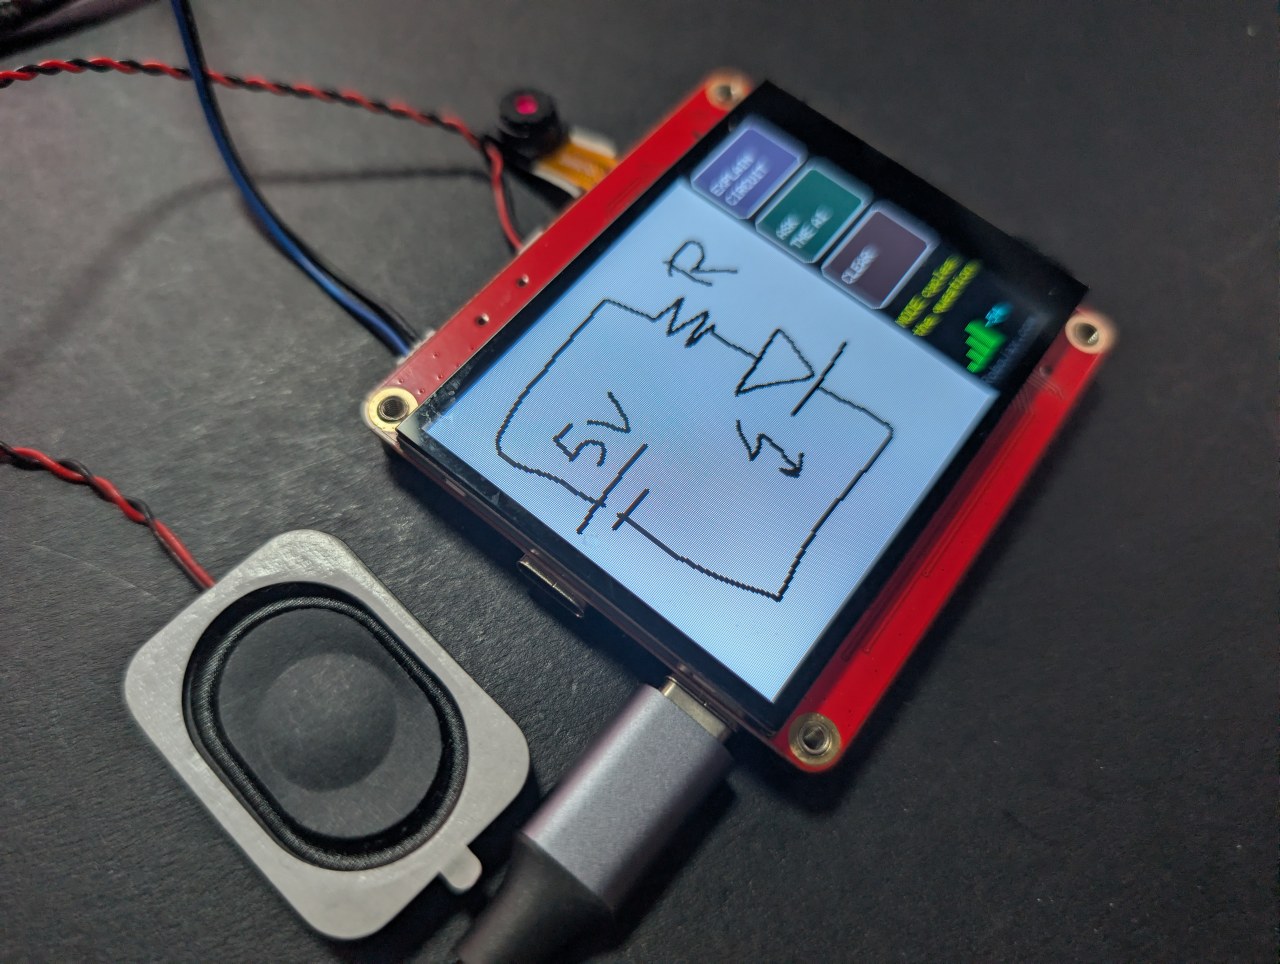
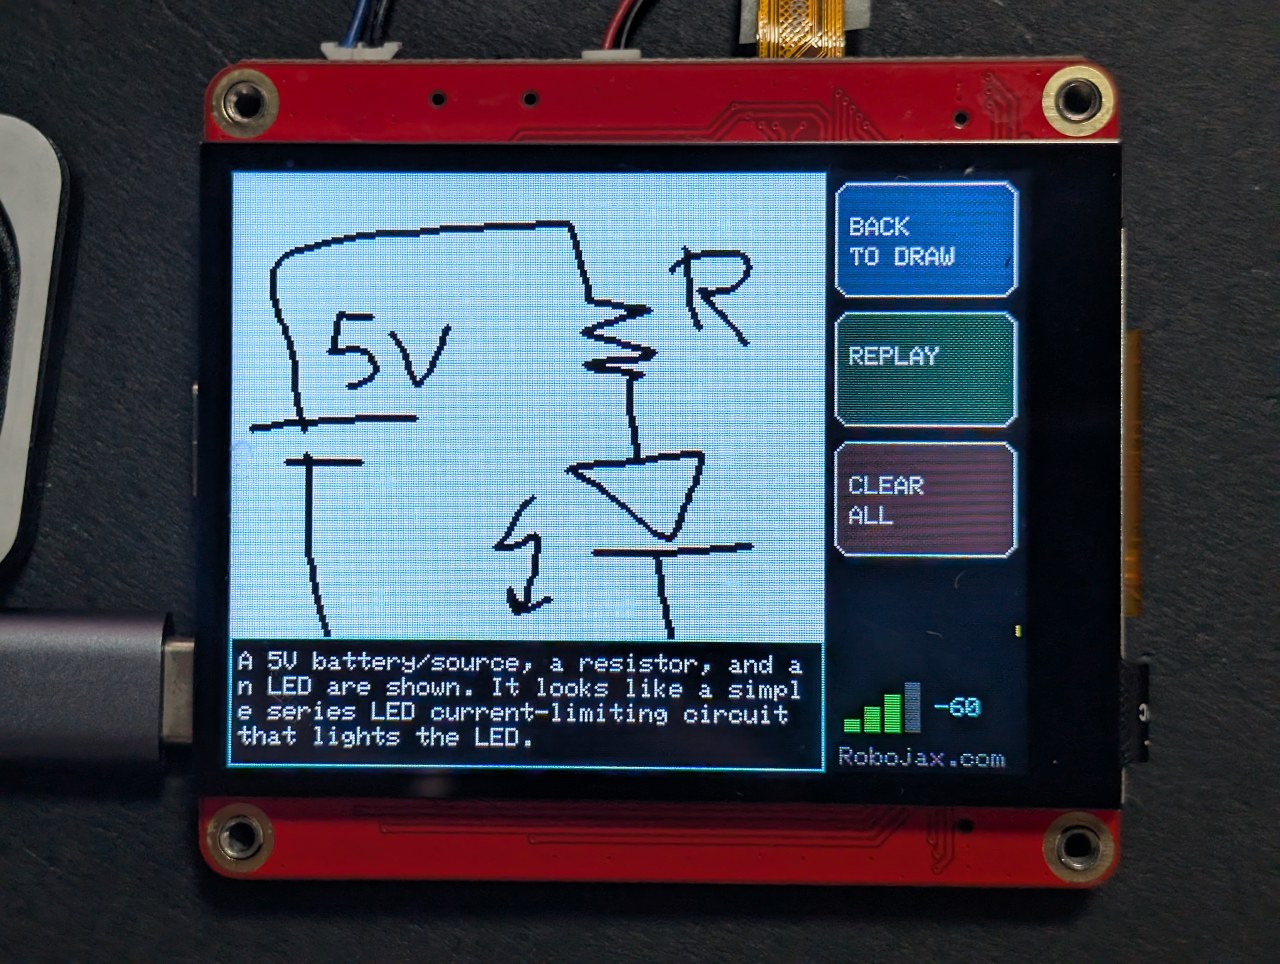
Chế độ cuối cùng là chế độ thú vị nhất. Phác họa một cục pin, một điện trở và một đèn LED, bo mạch sẽ gọi tên các linh kiện và cho bạn biết mạch điện đó hoạt động như thế nào.
Robojax_Makerfab khi thanh toán trên trang sản phẩm MaTouch AI ESP32-S3. Việc này không tốn gì của bạn và giúp hỗ trợ mã nguồn miễn phí và các bài hướng dẫn tại đây.Vấn đề mà dự án này cần giải quyết
Bạn không thể đọc lại pixel từ màn hình này qua SPI, và thư viện đồ họa thường vẽ trực tiếp lên màn hình mà không có bản sao trong bộ nhớ - vì vậy không có ảnh chụp màn hình nào để gửi đi. Giải pháp là không bao giờ vẽ trực tiếp lên màn hình. Sketch này vẽ vào một Arduino_Canvas, nơi giữ toàn bộ framebuffer trong PSRAM. Bộ đệm đó chính là hình ảnh, vì vậy fmt2jpg() chuyển nó trực tiếp thành JPEG.
Tại sao mực là màu đen trên nền trắng
Các mô hình thị giác đọc các vết tối trên nền sáng đáng tin cậy hơn nhiều so với ngược lại, và nó trông giống như giấy trên camera. Các nút được vẽ trên màn hình chứ không phải vào canvas, vì vậy chúng không bao giờ là một phần của hình ảnh mà AI nhìn thấy - nó chỉ nhận được bản vẽ của bạn trên một nền trắng sạch.
Làm cho nét vẽ trông giống nét vẽ
Hai điều phải đúng trước khi vẽ cảm giác như một cây bút thay vì một ma trận chấm:
- Canvas không được làm mới lên màn hình ở mỗi lần chạm - điều đó đẩy 115 KB qua SPI mỗi lần và làm chậm mọi thứ. Mỗi nét vẽ được vẽ vào canvas và vẽ lên màn hình một cách riêng biệt, điều này gần như không tốn gì.
- Một nét vẽ chỉ kết thúc sau khi màn hình đã yên tĩnh trong khoảng 70 mili giây. Bộ điều khiển cảm ứng không trả về một điểm ở mỗi lần thăm dò, và việc coi mỗi lần thăm dò trống như một ngón tay nhấc lên sẽ làm vỡ nét vẽ thành các chấm rời rạc.
Ba chế độ, một bản vẽ
Bản vẽ của bạn vẫn tồn tại bên dưới câu trả lời, vì vậy bạn có thể chạm vào QUAY LẠI VẼ, thay đổi chế độ và hỏi một câu hỏi khác về cùng một bản phác thảo. Như một bức tranh, nó là các đường và hình dạng; khi được hỏi như một kỹ sư, nó trở thành một mạch điện.
Mẹo để có kết quả tốt
- Một bút cảm ứng điện dung rẻ tiền hoạt động tốt hơn nhiều so với đầu ngón tay.
- Vẽ lớn - canvas là 240×240, vì vậy hãy vẽ một vài yếu tố lớn, không phải chi tiết nhỏ.
- Không có tính năng chống lòng bàn tay. Giữ tay của bạn ra khỏi kính.
Giới thiệu về bo mạch MaTouch AI ESP32-S3 2.8"
Mọi dự án trên trang này chạy trên MaTouch AI ESP32-S3 2.8" TFT ST7789V từ Makerfabs. Đây là một bo mạch tất cả-trong-một: màn hình cảm ứng màu, camera 3 megapixel, hai micro và một bộ khuếch đại loa thực sự, tất cả được điều khiển bởi ESP32-S3 với 8 MB PSRAM. Sự kết hợp đó là điều làm cho các dự án AI này khả thi trên một bo mạch duy nhất mà không cần bất cứ thứ gì khác gắn vào.
8 MB PSRAM quan trọng hơn bất kỳ con số nào khác ở đây. Nó cho phép bo mạch giữ một khung hình camera, vài giây âm thanh đã ghi hoặc một bức ảnh mã hóa base64 trong bộ nhớ cùng một lúc - không cái nào trong số đó vừa với RAM thông thường của ESP32.
Tài liệu của nhà sản xuất: trang wiki Makerfabs.
Thông số kỹ thuật chính
- Bộ xử lý: ESP32-S3, lõi kép 240 MHz, WiFi 2.4 GHz + Bluetooth 5.0
- Bộ nhớ: 16 MB flash, 8 MB PSRAM (cần thiết cho gần như mọi dự án ở đây)
- Màn hình: 2.8" IPS, 320×240, driver ST7789V, SPI
- Cảm ứng: GT911 điện dung, theo dõi 5 ngón tay cùng lúc
- Camera: OV3660, 3 megapixel, lên đến 2048×1536
- Micro: hai micro kỹ thuật số I2S INMP441 (một cặp stereo thực sự)
- Loa: bộ khuếch đại class-D MAX98357A, 3.2 W vào 4 Ω
- Lưu trữ: khe thẻ microSD (chế độ SPI)
- Nguồn: USB-C, đầu nối pin JST, bộ sạc TP4056, công tắc nguồn
- Cũng trên bo mạch: đèn LED RGB WS2812B, đồng hồ thời gian thực PCF8563T chạy bằng pin, và một bộ đo pin MAX17048 không được liệt kê trong thông số kỹ thuật chính thức
USB CDC On Boot thành Disabled. Dùng sai cổng sẽ khiến âm thanh hoạt động sai hoặc việc tải lên thất bại.Đang cấp nguồn từ pin? Hai ổ cắm USB-C, bộ sạc TP4056 và công tắc nguồn được giải thích đầy đủ, kèm sơ đồ mạch, trong bài kiểm tra bo mạch — bao gồm ổ cắm nào sạc và công tắc nên bật hay tắt.
Cài đặt Arduino IDE
Những cài đặt này rất quan trọng. Hầu hết các vấn đề mà mọi người báo cáo với bo mạch này là một trong những cài đặt này bị sai, và chúng được đặt lại khi bạn thay đổi phiên bản core, vì vậy hãy kiểm tra lại chúng sau bất kỳ thay đổi nào.
| Cài đặt | Giá trị |
|---|---|
| Bo mạch | ESP32S3 Dev Module |
| Phiên bản core ESP32 | 2.0.17 |
| PSRAM | OPI PSRAM |
| Kích thước Flash | 16MB (128Mb) |
| Sơ đồ phân vùng | 16M Flash (3MB APP/9.9MB FATFS) |
| USB CDC On Boot | Disabled |
| Tốc độ tải lên | 921600 |
| Xóa toàn bộ Flash trước khi tải lên | Disabled |
| Cổng | cổng USB-C CH340K |
Thư viện cần thiết
Dự án này cần mọi thư viện trong bảng dưới đây - không hơn, không kém. Hầu hết cài đặt trực tiếp từ Tools → Manage Libraries trong Arduino IDE, nhưng GFX Library for Arduino phải được cài đặt từ tệp ZIP. Các số phiên bản rất quan trọng, vì vậy vui lòng sử dụng chính xác các phiên bản được liệt kê.
| Thư viện | Phiên bản | Tác giả | Cài đặt từ |
|---|---|---|---|
| GFX Library for Arduino | 1.5.6 | moononournation | Tệp ZIP - xem bên dưới |
| bb_captouch | 1.3.1 | Larry Bank | Library Manager |
| ArduinoJson | 7.x | Benoit Blanchon | Library Manager |
| Adafruit NeoPixel | bất kỳ bản mới nào | Adafruit | Library Manager |
Cài đặt thư viện GFX từ tệp ZIP
- Tải xuống tệp ZIP. Nó được bao gồm trong bản tải xuống của dự án này, hoặc bạn có thể lấy nó từ kho lưu trữ Arduino_GFX - nhấp vào nút Code màu xanh lá cây, sau đó Download ZIP.
- Lưu nó ở nơi bạn có thể tìm lại được. Đừng giải nén nó.
- Trong Arduino IDE, nhấp vào Sketch → Include Library → Add .ZIP Library.
- Duyệt đến tệp ZIP bạn đã tải xuống và nhấp vào Open.
- IDE cài đặt nó và xác nhận ở cuối cửa sổ. Nếu bạn đã cài đặt phiên bản 1.6, hãy xóa thư mục đó khỏi
Documents/Arduino/librariestrước, nếu không hai phiên bản sẽ xung đột.
Thiết lập secrets.h
Chi tiết WiFi của bạn và bất kỳ khóa API nào được đặt trong secrets.h, được bao gồm trong bản tải xuống với các giá trị giữ chỗ. Mở tab đó trong Arduino IDE và thay thế chúng bằng thông tin của bạn.
secrets.h.Lấy khóa API của bạn
Dự án này giao tiếp với một dịch vụ AI đám mây, vì vậy bạn cần khóa riêng của mình. Nếu bạn chưa từng làm điều này trước đây, đừng lo lắng - nó giống như một mật khẩu xác định tài khoản của bạn với dịch vụ. Chỉ mất vài phút, một lần duy nhất.
OpenAI - đôi mắt
OpenAI cung cấp mô hình thị giác nhìn vào hình ảnh. Chỉ các dự án gửi hình ảnh mới cần cái này.
- Đi đến platform.openai.com/api-keys và đăng nhập hoặc tạo tài khoản.
- Nhấp vào Create new secret key, đặt tên cho nó và tạo.
- Sao chép ngay lập tức - nó chỉ được hiển thị một lần.
- Mở Billing và thêm một khoản tín dụng nhỏ. API là trả trước và tách biệt với bất kỳ đăng ký ChatGPT nào bạn có thể đã có.
Đặt khóa vào secrets.h dưới dạng OPENAI_KEY.
Microsoft Azure Speech - để nghe và nói
Azure chuyển giọng nói của bạn thành văn bản và chuyển câu trả lời trở lại thành giọng nói. Bậc miễn phí đủ hào phóng cho mọi thứ trên trang này.
- Đi đến portal.azure.com và đăng nhập bằng tài khoản Microsoft (tài khoản miễn phí là đủ).
- Nếu bạn chưa từng sử dụng Azure trước đây, bạn sẽ thấy màn hình Welcome to Azure với ba lựa chọn. Chọn Start with an Azure free trial - bạn cần một đăng ký trước khi Azure cho phép bạn tạo bất cứ thứ gì. (Sinh viên nên chọn Azure for Students thay thế: kết quả tương tự, không cần thẻ.) Bỏ qua Manage Microsoft Entra ID, một thứ hoàn toàn khác.
- Nhấp vào Create a resource, tìm kiếm Speech và chọn Speech service do Microsoft phát hành.
- Điền vào biểu mẫu: bất kỳ nhóm tài nguyên nào, bất kỳ tên nào và chọn một Region gần bạn - ghi lại khu vực đó chính xác như nó xuất hiện, ví dụ
eastus. - Đối với Pricing tier, chọn F0 (Free). Điều đó cho phép khoảng năm giờ chuyển giọng nói thành văn bản và nửa triệu ký tự chuyển văn bản thành giọng nói mỗi tháng.
- Nhấp vào Review + create, sau đó Create. Đợi khoảng một phút, sau đó nhấp vào Go to resource.
- Trong menu bên trái, mở Keys and Endpoint. Sao chép KEY 1 và Location/Region.
Đặt những thứ đó vào secrets.h dưới dạng AZURE_SPEECH_KEY và AZURE_REGION.
Chi phí vận hành là bao nhiêu
Rất ít, nhưng không miễn phí, và bạn nên biết gần đúng số tiền mình đang chi trước khi để một dự án chạy.
| Dịch vụ | Chi phí ước tính |
|---|---|
| OpenAI vision | khoảng một hoặc hai xu mỗi hình ảnh, tùy thuộc vào mô hình |
| Azure Speech | bậc miễn phí bao gồm khoảng 5 giờ nghe và 0.5 M ký tự nói mỗi tháng |
Giá thay đổi, vì vậy hãy coi những con số này như một hướng dẫn thay vì một báo giá. Mỗi dịch vụ trong số này đều có trang sử dụng nơi bạn có thể theo dõi số tiền đã chi, và tất cả đều cho phép bạn đặt giới hạn chi tiêu - điều đáng làm ngay từ ngày đầu tiên.
Khắc phục sự cố
| Triệu chứng | Nguyên nhân và cách khắc phục |
|---|---|
| Màn hình vẫn đen | Sai phiên bản thư viện GFX (sử dụng 1.5.6) hoặc sai cài đặt bo mạch. |
PSRAM alloc failed |
Tools → PSRAM không được đặt thành OPI PSRAM. |
| Không tải lên được / không có cổng COM | Sai cổng USB-C hoặc driver CH340 chưa được cài đặt. |
Hình ảnh
/*
* ===========================================================================
* 08_Draw_AI — MaTouch AI ESP32-S3 2.8" TFT ST7789V
* ===========================================================================
*
* ---------------------------------------------------------------------------
* ROBOJAX.COM - MaTouch AI ESP32-S3 2.8" project series
*
* WATCH THE Introduction and face recognition VIDEO
* https://youtu.be/6AL3g3tC_Hk
* Video 2: Draw AI - https://youtu.be/FaIW1MVIsj4
*
* WRITTEN TUTORIALS - every project, with photos and full explanation
* Camera and touchscreen.... https://robojax.com/RTJ849
* Offline face recognition.. https://robojax.com/RTJ850
* AI voice assistant........ https://robojax.com/RTJ851
* AI vision................. https://robojax.com/RTJ852
* Draw AI ................. https://robojax.com/RTJ867 (this code)
*
* GET THE BOARD - SAVE $5 with coupon code: Robojax_Makerfab
* https://www.makerfabs.com/matouch-ai-esp32s3-2-8-tft-st7789v.html
* (enter the code at checkout)
*
* All of this code is free. If it helped you, a subscribe on YouTube is
* the best way to support more of it.
* ---------------------------------------------------------------------------
*
* Draw or write on the touchscreen with your finger, tap ASK, and an AI
* tells you what you drew - on the screen and out loud.
*
* THREE MODES (tap MODE to cycle):
*
* WHAT IS THIS? draw a house, a cat, a triangle -> it names it
* READ THIS write HELLO in big letters -> it reads it back
* EXPLAIN CIRCUIT sketch a battery, resistor and LED -> it tells you
* what the components are and what the circuit does
*
* That last mode is the interesting one: a hand-drawn schematic, explained
* by an AI, on a forty-dollar board with no computer attached.
*
* NO CAMERA IS USED by this sketch. That means the J1/J3 Mabee sockets are
* free GPIO here (see 07_GPIO_Test), and there is no camera/SD memory
* contention to worry about.
*
* ---------------------------------------------------------------------------
* HOW IT WORKS (the trick worth knowing)
*
* You cannot read pixels back out of the ST7789 over SPI, and Arduino_GFX
* normally draws straight to the panel with no copy in memory - so there is
* no "screenshot" to send anywhere. The fix: draw into an Arduino_Canvas,
* which keeps a full framebuffer in PSRAM and flushes it to the display.
* That buffer IS the image, so fmt2jpg() turns it straight into a JPEG and
* the rest of the path is identical to 05_Vision_AI.
*
* Black ink on a white canvas, deliberately: vision models read dark-on-light
* far more reliably than the reverse, and it looks like paper on camera.
*
* ---------------------------------------------------------------------------
* TIPS
* - A cheap capacitive stylus is MUCH better than a fingertip.
* - Write BIG. The canvas is 240x240 - a few large characters, not a
* sentence.
* - There is no palm rejection: only the first touch point is used, so
* keep your palm off the glass.
*
* ---------------------------------------------------------------------------
* FILL IN secrets.h BEFORE FLASHING (WIFI_* and OPENAI_*; AZURE_* only if
* SPEAK_REPLIES is 1).
*
* BOARD SETTINGS (Tools menu - EVERY line matters)
* Board : ESP32S3 Dev Module
* ESP32 core : 2.0.17
* PSRAM : OPI PSRAM <-- required, the canvas lives there
* Flash Size : 16MB (128Mb)
* Partition Scheme : 16M Flash (3MB APP/9.9MB FATFS)
* USB CDC On Boot : Disabled
* Upload Speed : 921600
* Port : the CH340K USB-C port (the one near RESET)
*
* LIBRARIES
* GFX Library for Arduino v1.5.6 (NOT 1.6.x - that pairs with core 3)
* bb_captouch v1.3.1
* ArduinoJson v7.x
* Adafruit NeoPixel any recent
*
* ---------------------------------------------------------------------------
* FUNCTIONS IN THIS SKETCH
* led(r,g,b) set the RGB status LED colour
* getTouch(&x,&y) read the touch panel, mapped to screen coordinates
* clearCanvas() wipe to white and redraw the hint
* drawStroke(...) one thick line segment, into the canvas AND the panel
* handleDrawing(...) turn touch samples into continuous strokes
* waitData()/readHttpResponse() robust HTTPS reply reader (de-chunking)
* canvasToJpeg(&len) RGB565 canvas -> JPEG in PSRAM
* askVision(...) send the drawing + prompt to OpenAI, get an answer
* spkInit()/speak()/playLastAnswer() Azure voice out, with free REPLAY
* drawButtons()/drawAnswerSide()/showAnswer()/drawWifi() the UI
* askAboutDrawing() one full cycle: encode -> ask -> show -> speak
* setup() / loop() boot + WiFi / drawing and button handling
*
* Robojax.com
* ===========================================================================
*/
#define SPEAK_REPLIES 1 // 1 = read the answer aloud with Azure TTS
#define LED_BRIGHTNESS 15 // WS2812 is on the power rail - 15 is plenty
#include <Arduino_GFX_Library.h>
#include <bb_captouch.h>
#include <Adafruit_NeoPixel.h>
#include <ArduinoJson.h>
#include <WiFi.h>
#include <WiFiClientSecure.h>
#include "mbedtls/base64.h"
#include "img_converters.h" // fmt2jpg()
#include "esp_camera.h" // for the pixformat_t enum used by fmt2jpg
#include "pins.h"
#include "secrets.h"
#if SPEAK_REPLIES
#include "driver/i2s.h"
#define WAV_HEADER_LEN 44
#endif
Arduino_HWSPI *bus = new Arduino_HWSPI(
TFT_DC, TFT_CS, TFT_SCLK, TFT_MOSI, TFT_MISO, &SPI, true);
Arduino_GFX *panel = new Arduino_ST7789(bus, TFT_RES, 1, true);
/* The canvas is what we actually draw into: a real framebuffer in PSRAM that
* we can both flush to the panel AND hand to the JPEG encoder. */
#define CANVAS_W 240
#define CANVAS_H 240
Arduino_Canvas *canvas = new Arduino_Canvas(CANVAS_W, CANVAS_H, panel, 0, 0);
BBCapTouch bbct;
Adafruit_NeoPixel rgb(RGB_LED_NUM, RGB_LED_PIN, NEO_GRB + NEO_KHZ800);
/* --- the three modes ------------------------------------------------------ */
struct DrawMode { const char *l1, *l2; const char *prompt; };
const DrawMode MODES[] = {
{"WHAT IS", "THIS?",
"This is a drawing made with a finger on a small touchscreen. Name the "
"shape or object in ONE short sentence of at most 15 words. Plain text only."},
{"READ", "THIS",
"This image contains handwriting drawn with a finger. Reply with ONLY the "
"text you can read, nothing else. If you cannot read it, say: cannot read it."},
{"EXPLAIN", "CIRCUIT",
"This is a hand-drawn electronic circuit diagram. In at most two short "
"sentences, name the components you can identify and say what the circuit "
"does. Plain text only. If it is not a circuit, say so."},
};
#define N_MODES 3
int mode = 0;
/* --- layout: 240 canvas on the left, buttons on the right ----------------- */
#define BTN_X 244
#define BTN_W 72
#define BTN_H 46
#define BTN_MODE_Y 4
#define BTN_ASK_Y 56
#define BTN_CLEAR_Y 108
bool showing_answer = false;
/* --- drawing state -------------------------------------------------------- */
int last_x = -1, last_y = -1;
bool has_ink = false;
/* --- kept audio for REPLAY ------------------------------------------------ */
uint8_t *last_audio = nullptr;
size_t last_audio_len = 0;
void led(uint8_t r, uint8_t g, uint8_t b) { rgb.setPixelColor(0, rgb.Color(r, g, b)); rgb.show(); }
void playLastAnswer();
void drawButtons();
/* ===========================================================================
* Touch
* =========================================================================== */
bool getTouch(uint16_t *x, uint16_t *y) {
TOUCHINFO ti;
if (!bbct.getSamples(&ti)) return false;
if (ti.count < 1) return false; // first point only - no palm rejection
*x = ti.y[0];
*y = (ti.x[0] > 240) ? 0 : (240 - ti.x[0]);
return true;
}
/* ===========================================================================
* Canvas / drawing
* =========================================================================== */
void clearCanvas() {
canvas->fillScreen(WHITE);
canvas->flush(); // one full push: paint it white
has_ink = false;
last_x = last_y = -1;
/* The hint goes on the PANEL, never into the canvas - anything drawn into
* the canvas becomes part of the image the AI sees, and it would happily
* read this text back to you. */
panel->setTextSize(1);
panel->setTextColor(panel->color565(170, 170, 170));
panel->setCursor(6, CANVAS_H - 12);
panel->print("draw here, then tap ASK");
}
/* One thick line segment, drawn into BOTH the canvas and the panel.
*
* Why both: the canvas is the image we will send to the AI, but flushing the
* whole 240x240 buffer to the screen costs ~115 KB of SPI. Doing that per
* touch sample throttled the loop so hard that most samples were missed -
* which is exactly what "it only draws dots" looks like. Painting the same
* few pixels directly to the panel is essentially free, so the canvas is only
* flushed when the screen genuinely has to be rebuilt. */
static const int8_t STROKE_OFFS[5][2] = {{0,0},{1,0},{-1,0},{0,1},{0,-1}};
void drawStroke(int x0, int y0, int x1, int y1) {
for (int i = 0; i < 5; i++) {
int ox = STROKE_OFFS[i][0], oy = STROKE_OFFS[i][1];
canvas->drawLine(x0 + ox, y0 + oy, x1 + ox, y1 + oy, BLACK);
panel->drawLine(x0 + ox, y0 + oy, x1 + ox, y1 + oy, BLACK);
}
}
/* Touch is read once per loop and handed in here.
*
* THE IMPORTANT BIT - why this is time-based rather than "no touch = lifted":
* the GT911 does not return a point on every poll. It reports when its own
* internal sample is ready, so a poll in between comes back empty even though
* your finger never left the glass. Treating each empty poll as a lift resets
* the stroke, and every real sample then lands as an isolated dot instead of
* a line joined to the previous one - which is exactly what "it only draws
* dots" looks like. So a stroke only ends after the panel has been quiet for
* LIFT_MS, which bridges the dropouts but is still far shorter than a genuine
* lift-and-reposition. */
#define LIFT_MS 70
void handleDrawing(bool touched, int x, int y) {
static uint32_t last_seen = 0;
if (touched && x >= 0 && x < CANVAS_W) {
if (last_x >= 0) drawStroke(last_x, last_y, x, y); // join to the last point
else drawStroke(x, y, x, y); // start of a stroke
last_x = x; last_y = y;
last_seen = millis();
has_ink = true;
} else if (last_x >= 0 && millis() - last_seen > LIFT_MS) {
last_x = last_y = -1; // really lifted now
}
}
/* ===========================================================================
* HTTP — the same robust reader proven in 04 and 05
* =========================================================================== */
static bool waitData(WiFiClientSecure &c, uint32_t ms) {
uint32_t t0 = millis();
while (!c.available()) {
if (!c.connected()) return false;
if (millis() - t0 > ms) return false;
delay(10);
}
return true;
}
static int readHttpResponse(WiFiClientSecure &client, String &body_out, uint32_t idle_ms) {
body_out = "";
if (!waitData(client, idle_ms)) { Serial.println("HTTP: no response at all"); return 0; }
String status_line = client.readStringUntil('\n');
int code = 0;
sscanf(status_line.c_str(), "HTTP/%*s %d", &code);
bool chunked = false;
while (waitData(client, idle_ms)) {
String h = client.readStringUntil('\n');
if (h == "\r" || h.length() <= 1) break;
h.toLowerCase();
if (h.startsWith("transfer-encoding:") && h.indexOf("chunked") >= 0) chunked = true;
}
if (chunked) {
int blanks = 0;
while (true) {
if (!waitData(client, idle_ms)) { Serial.println("HTTP: chunk timeout"); break; }
String szline = client.readStringUntil('\n');
szline.trim();
if (szline.length() == 0) { if (++blanks > 4) break; continue; }
blanks = 0;
long sz = strtol(szline.c_str(), NULL, 16);
if (sz <= 0) break;
long got = 0;
while (got < sz) {
if (!waitData(client, idle_ms)) break;
while (client.available() && got < sz) { body_out += (char)client.read(); got++; }
}
if (waitData(client, 3000)) client.readStringUntil('\n');
if (got < sz) break;
}
} else {
while (waitData(client, idle_ms))
while (client.available()) body_out += (char)client.read();
}
return code;
}
/* ===========================================================================
* Canvas -> JPEG
* The canvas framebuffer is plain RGB565, which fmt2jpg() accepts directly.
* =========================================================================== */
uint8_t *canvasToJpeg(size_t *len_out) {
*len_out = 0;
uint16_t *fb = canvas->getFramebuffer();
if (!fb) { Serial.println("no canvas framebuffer"); return nullptr; }
uint8_t *jpg = NULL;
size_t jpg_len = 0;
if (!fmt2jpg((uint8_t *)fb, (size_t)CANVAS_W * CANVAS_H * 2,
CANVAS_W, CANVAS_H, PIXFORMAT_RGB565, 90, &jpg, &jpg_len)) {
Serial.println("fmt2jpg failed");
return nullptr;
}
*len_out = jpg_len;
return jpg; // caller frees
}
/* ===========================================================================
* OpenAI vision — identical shape to 05_Vision_AI
* =========================================================================== */
bool askVision(const uint8_t *jpg, size_t jpg_len, const char *prompt, String &answer_out) {
size_t b64_cap = ((jpg_len + 2) / 3) * 4 + 16;
unsigned char *b64 = (unsigned char *)ps_malloc(b64_cap);
if (!b64) return false;
size_t b64_len = 0;
if (mbedtls_base64_encode(b64, b64_cap, &b64_len, jpg, jpg_len) != 0) { free(b64); return false; }
const char *head_fmt =
"{\"model\":\"%s\",\"max_completion_tokens\":%d,\"messages\":[{\"role\":\"user\","
"\"content\":[{\"type\":\"text\",\"text\":\"%s\"},"
"{\"type\":\"image_url\",\"image_url\":{\"url\":\"data:image/jpeg;base64,";
const char *tail = "\"}}]}]}";
char head[900];
int head_len = snprintf(head, sizeof(head), head_fmt, OPENAI_MODEL, LLM_MAX_TOKENS, prompt);
size_t body_len = head_len + b64_len + strlen(tail);
char *body = (char *)ps_malloc(body_len + 1);
if (!body) { free(b64); return false; }
memcpy(body, head, head_len);
memcpy(body + head_len, b64, b64_len);
strcpy(body + head_len + b64_len, tail);
free(b64);
WiFiClientSecure client;
client.setInsecure();
client.setTimeout(45);
if (!client.connect(OPENAI_HOST, 443)) {
Serial.println("Vision: TLS connect failed");
free(body);
return false;
}
client.print(String("POST /v1/chat/completions HTTP/1.1\r\n"
"Host: " OPENAI_HOST "\r\n"
"Authorization: Bearer " OPENAI_KEY "\r\n"
"Content-Type: application/json\r\n"
"Connection: close\r\n"
"Content-Length: ") + String(body_len) + "\r\n\r\n");
size_t sent = 0;
while (sent < body_len) {
size_t n = min((size_t)4096, body_len - sent);
size_t w = client.write((uint8_t *)body + sent, n);
if (w == 0) { delay(50); w = client.write((uint8_t *)body + sent, n); if (w == 0) break; }
sent += w;
yield();
}
free(body);
if (sent < body_len) { client.stop(); Serial.println("Vision: upload stalled"); return false; }
String resp;
int code = readHttpResponse(client, resp, 45000);
client.stop();
if (code != 200) { Serial.printf("Vision HTTP %d: %s\n", code, resp.c_str()); return false; }
JsonDocument doc;
if (deserializeJson(doc, resp)) {
Serial.printf("Vision: JSON parse failed, %u bytes\n", resp.length());
return false;
}
const char *content = doc["choices"][0]["message"]["content"];
if (!content) return false;
answer_out = String(content);
answer_out.trim();
return answer_out.length() > 0;
}
/* ===========================================================================
* Azure voice out — same de-chunked player as 04/05
* =========================================================================== */
#if SPEAK_REPLIES
void spkInit() {
i2s_config_t cfg = {
.mode = (i2s_mode_t)(I2S_MODE_MASTER | I2S_MODE_TX),
.sample_rate = 16000,
.bits_per_sample = I2S_BITS_PER_SAMPLE_16BIT,
.channel_format = I2S_CHANNEL_FMT_ONLY_LEFT,
.communication_format = I2S_COMM_FORMAT_STAND_I2S,
.intr_alloc_flags = ESP_INTR_FLAG_LEVEL1,
.dma_buf_count = 8,
.dma_buf_len = 256,
.use_apll = false,
.tx_desc_auto_clear = true,
.fixed_mclk = 0
};
i2s_pin_config_t pins = {
.mck_io_num = I2S_PIN_NO_CHANGE,
.bck_io_num = I2S_SPK_BCLK,
.ws_io_num = I2S_SPK_LRC,
.data_out_num = I2S_SPK_DOUT,
.data_in_num = I2S_PIN_NO_CHANGE
};
i2s_driver_install(I2S_SPK_PORT, &cfg, 0, NULL);
i2s_set_pin(I2S_SPK_PORT, &pins);
i2s_zero_dma_buffer(I2S_SPK_PORT);
}
void playLastAnswer() {
if (!last_audio || last_audio_len <= WAV_HEADER_LEN) return;
static const uint8_t lead_in[640] = {0};
size_t w = 0;
i2s_write(I2S_SPK_PORT, lead_in, sizeof(lead_in), &w, portMAX_DELAY);
i2s_write(I2S_SPK_PORT, last_audio + WAV_HEADER_LEN,
last_audio_len - WAV_HEADER_LEN, &w, portMAX_DELAY);
i2s_write(I2S_SPK_PORT, lead_in, sizeof(lead_in), &w, portMAX_DELAY);
delay(150);
i2s_zero_dma_buffer(I2S_SPK_PORT);
}
/* Read exactly n bytes into a raw buffer. BINARY SAFE - unlike the String
* based reader used for JSON, which cannot carry audio: PCM is full of 0x00
* bytes, and an Arduino String treats those as end-of-string. */
static size_t readExact(WiFiClientSecure &c, uint8_t *dst, size_t n) {
size_t got = 0;
uint32_t t0 = millis();
while (got < n && millis() - t0 < 10000) {
int r = c.read(dst + got, n - got);
if (r > 0) { got += r; t0 = millis(); }
else if (!c.connected() && !c.available()) break;
else delay(2);
}
return got;
}
void speak(const String &text) {
String safe = text;
safe.replace("&", "&"); safe.replace("<", "<"); safe.replace(">", ">");
String ssml = "<speak version='1.0' xml:lang='" AZURE_TTS_LANG "'>"
"<voice name='" AZURE_TTS_VOICE "'>" + safe + "</voice></speak>";
WiFiClientSecure client;
client.setInsecure();
client.setTimeout(30);
const char *host = AZURE_REGION ".tts.speech.microsoft.com";
if (!client.connect(host, 443)) { Serial.println("TTS: TLS connect failed"); return; }
client.print(String("POST /cognitiveservices/v1 HTTP/1.1\r\nHost: ") + host + "\r\n"
"Ocp-Apim-Subscription-Key: " AZURE_SPEECH_KEY "\r\n"
"Content-Type: application/ssml+xml\r\n"
"X-Microsoft-OutputFormat: riff-16khz-16bit-mono-pcm\r\n"
"User-Agent: MaTouchRobojax\r\nConnection: close\r\n"
"Content-Length: " + String(ssml.length()) + "\r\n\r\n");
client.print(ssml);
/* --- status line + headers (text, so String is fine here) --- */
if (!waitData(client, 30000)) { Serial.println("TTS: no response"); client.stop(); return; }
String status_line = client.readStringUntil('\n');
int code = 0;
sscanf(status_line.c_str(), "HTTP/%*s %d", &code);
bool chunked = false;
long content_len = -1;
while (waitData(client, 30000)) {
String h = client.readStringUntil('\n');
if (h == "\r" || h.length() <= 1) break;
h.toLowerCase();
if (h.startsWith("transfer-encoding:") && h.indexOf("chunked") >= 0) chunked = true;
if (h.startsWith("content-length:")) content_len = h.substring(15).toInt();
}
if (code != 200) { Serial.printf("TTS HTTP %d\n", code); client.stop(); return; }
/* --- body straight into PSRAM as raw bytes --- */
const size_t AUDIO_CAP = 1200 * 1024; // ~37 s of 16 kHz mono
uint8_t *audio = (uint8_t *)ps_malloc(AUDIO_CAP);
if (!audio) { Serial.println("TTS: PSRAM alloc failed"); client.stop(); return; }
size_t alen = 0;
if (chunked) {
int blanks = 0;
while (alen < AUDIO_CAP) {
if (!waitData(client, 15000)) break;
String szline = client.readStringUntil('\n');
szline.trim();
if (szline.length() == 0) { if (++blanks > 4) break; continue; }
blanks = 0;
long sz = strtol(szline.c_str(), NULL, 16);
if (sz <= 0) break; // final chunk
if ((size_t)sz > AUDIO_CAP - alen) sz = (long)(AUDIO_CAP - alen);
size_t got = readExact(client, audio + alen, (size_t)sz);
alen += got;
if (waitData(client, 3000)) client.readStringUntil('\n'); // CRLF
if (got < (size_t)sz) break;
}
} else if (content_len > 0) {
size_t want = (size_t)content_len < AUDIO_CAP ? (size_t)content_len : AUDIO_CAP;
alen = readExact(client, audio, want);
} else {
uint32_t idle = millis();
while (millis() - idle < 5000 && alen < AUDIO_CAP) {
int r = client.read(audio + alen, AUDIO_CAP - alen);
if (r > 0) { alen += r; idle = millis(); }
else if (!client.connected()) break;
else delay(5);
}
}
client.stop();
if (alen <= WAV_HEADER_LEN) { Serial.println("TTS: no audio"); free(audio); return; }
if (last_audio) free(last_audio);
last_audio = audio; // kept for REPLAY
last_audio_len = alen;
Serial.printf("TTS: %u KB clean audio (%s), playing\n",
(unsigned)(alen / 1024), chunked ? "de-chunked" : "plain");
playLastAnswer();
}
#else
void spkInit() {}
void speak(const String &t) { (void)t; }
void playLastAnswer() {}
#endif
/* ===========================================================================
* UI — right-hand button column (drawn on the PANEL, not the canvas, so
* it is never part of the image sent to the AI)
* =========================================================================== */
void drawWifi() {
panel->fillRect(BTN_X, 196, BTN_W, 44, BLACK);
bool up = (WiFi.status() == WL_CONNECTED);
long rssi = up ? WiFi.RSSI() : -100;
int bars = rssi > -55 ? 4 : rssi > -65 ? 3 : rssi > -75 ? 2 : rssi > -85 ? 1 : 0;
for (int b = 0; b < 4; b++) {
int bh = 5 + b * 5;
panel->fillRect(BTN_X + 4 + b * 8, 224 - bh, 6, bh,
(b < bars) ? GREEN : panel->color565(60, 60, 60));
}
panel->setTextSize(1);
panel->setCursor(BTN_X + 40, 210);
panel->setTextColor(up ? CYAN : RED);
if (up) panel->printf("%ld", rssi); else panel->print("--");
panel->setCursor(BTN_X + 2, 230);
panel->setTextColor(panel->color565(120, 120, 120));
panel->print("Robojax.com");
}
void drawButton(int y, const char *l1, const char *l2, uint16_t colour) {
panel->fillRoundRect(BTN_X, y, BTN_W, BTN_H, 6, colour);
panel->drawRoundRect(BTN_X, y, BTN_W, BTN_H, 6, WHITE);
panel->setTextSize(1);
panel->setTextColor(WHITE);
panel->setCursor(BTN_X + 6, y + 14);
panel->print(l1);
panel->setCursor(BTN_X + 6, y + 26);
panel->print(l2);
}
void drawButtons() {
panel->fillRect(BTN_X, 0, BTN_W, 196, BLACK);
drawButton(BTN_MODE_Y, MODES[mode].l1, MODES[mode].l2, panel->color565(90, 60, 140));
drawButton(BTN_ASK_Y, "ASK", "THE AI", panel->color565(0, 100, 60));
drawButton(BTN_CLEAR_Y, "CLEAR", "", panel->color565(110, 35, 35));
panel->setTextColor(YELLOW);
panel->setCursor(BTN_X + 2, 166);
panel->print("MODE cycles");
panel->setCursor(BTN_X + 2, 178);
panel->print("the question");
drawWifi();
showing_answer = false;
}
void drawAnswerSide() {
panel->fillRect(BTN_X, 0, BTN_W, 196, BLACK);
drawButton(BTN_MODE_Y, "BACK", "TO DRAW", panel->color565(0, 90, 160));
#if SPEAK_REPLIES
if (last_audio_len) drawButton(BTN_ASK_Y, "REPLAY", "", panel->color565(0, 110, 60));
#endif
drawButton(BTN_CLEAR_Y, "CLEAR", "ALL", panel->color565(110, 35, 35));
drawWifi();
showing_answer = true;
}
/* The answer is drawn on the PANEL over the canvas area, and stays until the
* user taps BACK or CLEAR - the canvas underneath is untouched. */
void showAnswer(const String &text) {
const int max_chars = 38;
int lines = (text.length() + max_chars - 1) / max_chars;
if (lines > 8) lines = 8;
int h = lines * 10 + 12;
int y = CANVAS_H - h;
panel->fillRect(0, y, CANVAS_W, h, BLACK);
panel->drawRect(0, y, CANVAS_W, h, CYAN);
panel->setTextSize(1);
panel->setTextColor(WHITE);
for (int i = 0; i < lines; i++) {
panel->setCursor(4, y + 6 + i * 10);
panel->print(text.substring(i * max_chars,
min((int)text.length(), (i + 1) * max_chars)));
}
}
/* ===========================================================================
* One full ask cycle
* =========================================================================== */
void askAboutDrawing() {
if (!has_ink) {
showAnswer("Draw something first, then tap ASK.");
drawAnswerSide();
return;
}
led(255, 120, 0); // amber: working
panel->fillRect(0, CANVAS_H - 22, CANVAS_W, 22, BLACK);
panel->setTextSize(1);
panel->setTextColor(YELLOW);
panel->setCursor(6, CANVAS_H - 15);
panel->printf("asking the AI (%s)...", MODES[mode].l1);
size_t jpg_len = 0;
uint8_t *jpg = canvasToJpeg(&jpg_len);
if (!jpg) {
showAnswer("Could not encode the drawing.");
drawAnswerSide();
led(255, 0, 0);
return;
}
Serial.printf("drawing encoded: %u KB\n", (unsigned)(jpg_len / 1024));
String answer;
uint32_t t0 = millis();
bool ok = askVision(jpg, jpg_len, MODES[mode].prompt, answer);
uint32_t ms = millis() - t0;
free(jpg);
if (!ok) {
showAnswer("No answer - see the serial monitor.");
drawAnswerSide();
led(255, 0, 0);
return;
}
Serial.printf("AI (%lu ms): %s\n", (unsigned long)ms, answer.c_str());
showAnswer(answer);
drawAnswerSide();
#if SPEAK_REPLIES
led(0, 255, 40);
speak(answer);
#endif
led(0, 0, 0);
}
/* ===========================================================================
* SETUP
* =========================================================================== */
void setup() {
Serial.begin(115200);
delay(400);
Serial.println("\n=== 08 Draw + AI | Robojax.com ===");
pinMode(TFT_BLK, OUTPUT);
digitalWrite(TFT_BLK, LOW);
pinMode(SD_CS, OUTPUT);
digitalWrite(SD_CS, HIGH);
SPI.begin(TFT_SCLK, TFT_MISO, TFT_MOSI);
panel->begin();
panel->fillScreen(BLACK);
digitalWrite(TFT_BLK, HIGH);
if (!canvas->begin()) {
panel->setTextColor(RED);
panel->setTextSize(2);
panel->setCursor(10, 100);
panel->print("Canvas alloc failed!");
panel->setTextSize(1);
panel->setCursor(10, 130);
panel->print("Tools > PSRAM > OPI PSRAM must be set.");
while (1) delay(1000);
}
bbct.init(TOUCH_SDA, TOUCH_SCL, TOUCH_RST, TOUCH_INT);
delay(50);
rgb.begin();
rgb.setBrightness(LED_BRIGHTNESS);
led(0, 0, 0);
spkInit();
clearCanvas();
panel->setTextSize(1);
panel->setTextColor(YELLOW);
panel->setCursor(BTN_X + 2, 4);
panel->printf("WiFi...");
WiFi.mode(WIFI_STA);
WiFi.begin(WIFI_SSID, WIFI_PASS);
uint32_t t0 = millis();
while (WiFi.status() != WL_CONNECTED && millis() - t0 < 20000) delay(300);
Serial.println(WiFi.status() == WL_CONNECTED
? "WiFi ok" : "WiFi FAILED (2.4GHz only - check secrets.h)");
drawButtons();
Serial.println("Draw on the screen, then tap ASK. MODE cycles the question.");
}
/* ===========================================================================
* LOOP
* =========================================================================== */
void loop() {
/* edge-detected buttons: one action per tap, finger must lift first */
static bool btn_down = false;
static uint8_t misses = 0;
uint16_t ux, uy;
bool touched = getTouch(&ux, &uy);
int x = touched ? (int)ux : -1;
int y = touched ? (int)uy : -1;
if (touched && x >= BTN_X) {
misses = 0;
if (!btn_down) {
btn_down = true;
last_x = last_y = -1; // never draw from a button tap
if (y >= BTN_MODE_Y && y < BTN_MODE_Y + BTN_H) {
if (showing_answer) { // BACK TO DRAW
canvas->flush(); // repaint the drawing
drawButtons();
} else { // MODE
mode = (mode + 1) % N_MODES;
drawButtons();
Serial.printf("mode: %s %s\n", MODES[mode].l1, MODES[mode].l2);
}
} else if (y >= BTN_ASK_Y && y < BTN_ASK_Y + BTN_H) {
if (showing_answer) {
#if SPEAK_REPLIES
led(0, 255, 40); playLastAnswer(); led(0, 0, 0);
#endif
} else {
askAboutDrawing();
}
} else if (y >= BTN_CLEAR_Y && y < BTN_CLEAR_Y + BTN_H) {
clearCanvas();
drawButtons();
}
}
} else {
if (btn_down && ++misses >= 4) { btn_down = false; misses = 0; }
/* Draw only when no answer overlay is up and we are not mid-button-press. */
if (!btn_down && !showing_answer) handleDrawing(touched, x, y);
}
/* The WiFi meter repaints only when the pen has been up for a moment, so it
* can never steal SPI time in the middle of a stroke. */
static uint32_t last_wifi = 0;
if (last_x < 0 && millis() - last_wifi > 3000) { last_wifi = millis(); drawWifi(); }
/* Poll as fast as possible while the pen is down - every millisecond spent
* sleeping here is a touch sample missed and a gap in the line. */
if (last_x < 0) delay(5);
}
Nghĩ bạn có thể cần
-
KhácProduct page for MaTouch AI ESP32S3 2.8" TFT ST7789Vmakerfabs.com
Tài nguyên & tài liệu tham khảo
-
Tài liệuMakerfabs MaTouch ESP32-S3 2.8" Camera and Touchscreen: User's Manualwiki.makerfabs.com
-
Tài liệu
-
Tài liệuProduct page for MaTouch AI ESP32S3 2.8" TFT ST7789Vmakerfabs.com
-
Bên ngoàiMakerfabs websitemakerfabs.com
Tập tin📁
Mã Arduino (.ino)
-
makerfabs_ESP32S3_Draw_AI.zip Arduino sketchincludes the pin header and secrete header .h files
makerfabs_ESP32S3_Draw_AI.zip0.02 MB