I Drew a Circuit on This $40 ESP32 Board and AI Explained It
Sketch a circuit with your finger and have an AI explain it
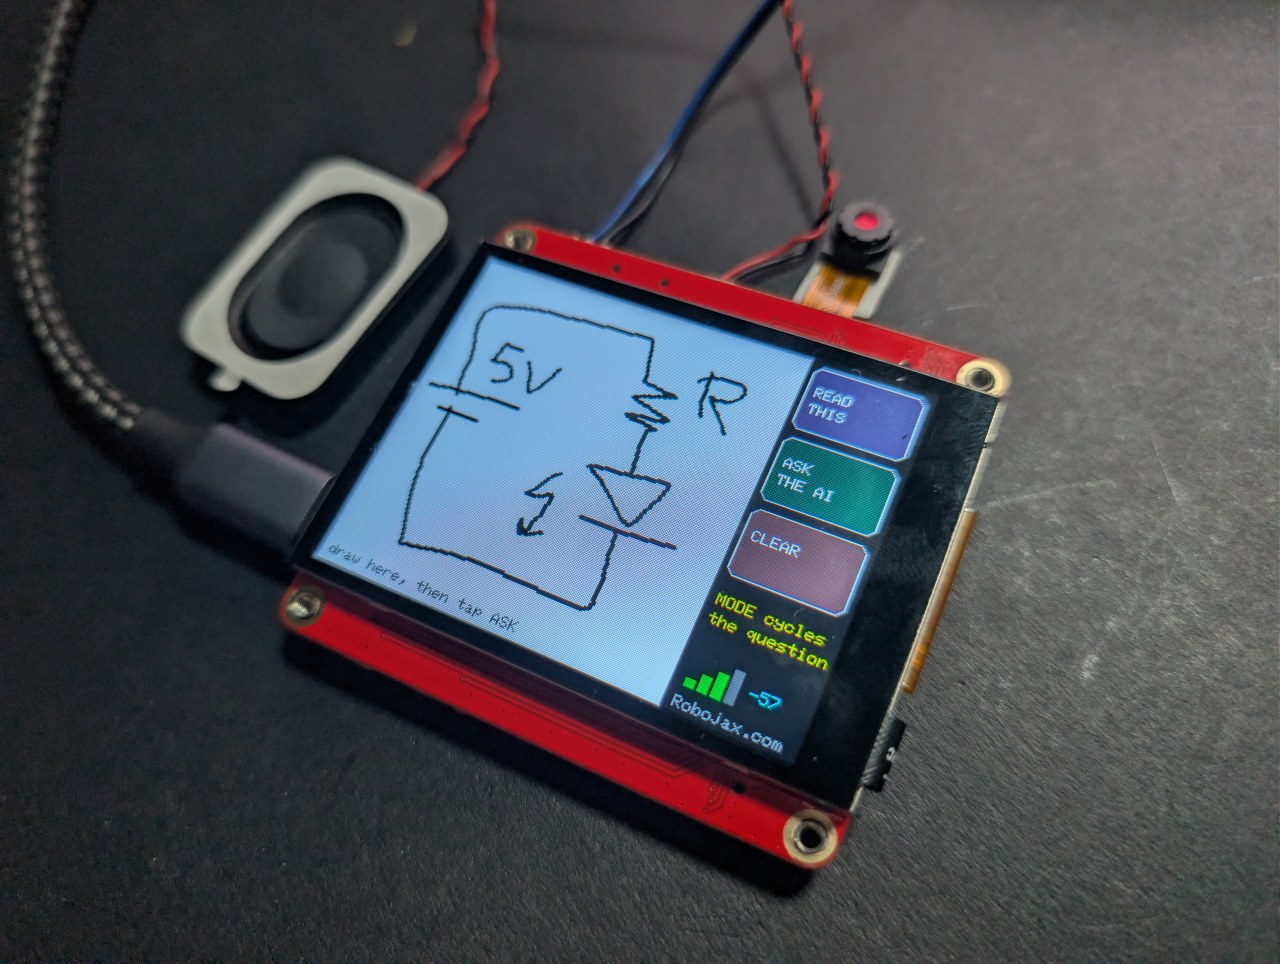
Draw or write on the touchscreen with your finger, tap ASK, and an AI tells you what you drew - on the screen and out loud. Three modes: name the shape, read the handwriting, or explain the hand-drawn circuit.
That last one is the interesting one. Sketch a battery, a resistor and an LED, and the board will name the components and tell you what the circuit does.
Robojax_Makerfab at checkout on the MaTouch AI ESP32-S3 product page. It costs you nothing to use, and it helps support the free code and tutorials here.The problem this project had to solve
You cannot read pixels back out of this display over SPI, and the graphics library normally draws straight to the panel with no copy in memory - so there is no screenshot to send anywhere. The solution is to never draw to the panel directly. This sketch draws into an Arduino_Canvas, which keeps a full framebuffer in PSRAM. That buffer is the image, so fmt2jpg() turns it straight into a JPEG.
Why the ink is black on white
Vision models read dark marks on a light background far more reliably than the reverse, and it looks like paper on camera. The buttons are drawn on the panel rather than into the canvas, so they are never part of the image the AI sees - it gets nothing but your drawing on a clean white field.
Making strokes look like strokes
Two things had to be right before drawing felt like a pen rather than a dot matrix:
- The canvas is not flushed to the screen on every touch sample - that pushes 115 KB over SPI each time and throttles everything. Each stroke is drawn into the canvas and painted on the panel separately, which costs almost nothing.
- A stroke only ends after the panel has been quiet for about 70 milliseconds. The touch controller does not return a point on every poll, and treating each empty poll as a lifted finger breaks the line into disconnected dots.
Three modes, one drawing
Your drawing survives underneath the answer, so you can tap BACK TO DRAW, change the mode, and ask a different question about the same sketch. As a picture it is lines and shapes; asked as an engineer, it becomes a circuit.
Tips for good results
- A cheap capacitive stylus works far better than a fingertip.
- Draw big - the canvas is 240×240, so a few large elements, not fine detail.
- There is no palm rejection. Keep your hand off the glass.
About the MaTouch AI ESP32-S3 2.8" board
Every project on this page runs on the MaTouch AI ESP32-S3 2.8" TFT ST7789V from Makerfabs. It is an all-in-one board: a colour touchscreen, a 3 megapixel camera, two microphones and a real speaker amplifier, all driven by an ESP32-S3 with 8 MB of PSRAM. That combination is what makes these AI projects possible on a single board with nothing else attached.
The 8 MB of PSRAM matters more than any other number here. It is what lets the board hold a camera frame, a few seconds of recorded audio, or a base64-encoded photo in memory at the same time - none of which fits in the ESP32’s normal RAM.
Manufacturer documentation: Makerfabs wiki page.
Key specifications
- Processor: ESP32-S3, dual core 240 MHz, WiFi 2.4 GHz + Bluetooth 5.0
- Memory: 16 MB flash, 8 MB PSRAM (required by nearly every project here)
- Display: 2.8" IPS, 320×240, ST7789V driver, SPI
- Touch: GT911 capacitive, tracks 5 fingers at once
- Camera: OV3660, 3 megapixel, up to 2048×1536
- Microphones: two INMP441 I2S digital mics (a genuine stereo pair)
- Speaker: MAX98357A class-D amplifier, 3.2 W into 4 Ω
- Storage: microSD card slot (SPI mode)
- Power: USB-C, JST battery connector, TP4056 charger, power switch
- Also on board: WS2812B RGB LED, PCF8563T battery-backed real-time clock, and a MAX17048 battery fuel gauge that is not listed in the official specifications
USB CDC On Boot to Disabled. Use the wrong port and audio will misbehave or uploads will fail.Powering it from a battery? The two USB-C sockets, the TP4056 charger and the power switch are explained in full, with the schematic, in the board test article — including which socket charges and whether the switch should be on or off.
Arduino IDE settings
These settings matter. Most problems people report with this board are one of these being wrong, and they reset when you change the core version, so check them again after any change.
| Setting | Value |
|---|---|
| Board | ESP32S3 Dev Module |
| ESP32 core version | 2.0.17 |
| PSRAM | OPI PSRAM |
| Flash Size | 16MB (128Mb) |
| Partition Scheme | 16M Flash (3MB APP/9.9MB FATFS) |
| USB CDC On Boot | Disabled |
| Upload Speed | 921600 |
| Erase All Flash Before Upload | Disabled |
| Port | the CH340K USB-C port |
Required libraries
This project needs every library in the table below - nothing more, nothing less. Most install straight from Tools → Manage Libraries in the Arduino IDE, but GFX Library for Arduino has to be installed from a ZIP file. The version numbers matter, so please use exactly the ones listed.
| Library | Version | Author | Install from |
|---|---|---|---|
| GFX Library for Arduino | 1.5.6 | moononournation | ZIP file - see below |
| bb_captouch | 1.3.1 | Larry Bank | Library Manager |
| ArduinoJson | 7.x | Benoit Blanchon | Library Manager |
| Adafruit NeoPixel | any recent | Adafruit | Library Manager |
Installing the GFX library from a ZIP file
- Download the ZIP. It is included in this project’s download, or you can get it from the Arduino_GFX repository - click the green Code button, then Download ZIP.
- Save it somewhere you can find it again. Do not unzip it.
- In the Arduino IDE, click Sketch → Include Library → Add .ZIP Library.
- Browse to the ZIP file you downloaded and click Open.
- The IDE installs it and confirms at the bottom of the window. If you already have a 1.6 version installed, delete that folder from
Documents/Arduino/librariesfirst, or the two will conflict.
Setting up secrets.h
Your WiFi details and any API keys go in secrets.h, which is included in the download with placeholder values. Open that tab in the Arduino IDE and replace them with your own.
secrets.h.Getting your API keys
This project talks to a cloud AI service, so you need your own key. If you have never done this before, do not worry - it is the same idea as a password that identifies your account to the service. It takes a few minutes, once.
OpenAI - the eyes
OpenAI provides the vision model that looks at pictures. Only projects that send an image need this one.
- Go to platform.openai.com/api-keys and sign in or create an account.
- Click Create new secret key, give it a name, and create it.
- Copy it immediately - it is shown only once.
- Open Billing and add a small amount of credit. The API is prepaid and separate from any ChatGPT subscription you may already have.
Put the key into secrets.h as OPENAI_KEY.
Microsoft Azure Speech - for listening and talking
Azure turns your speech into text and turns the answer back into a voice. The free tier is generous enough for everything on this page.
- Go to portal.azure.com and sign in with a Microsoft account (a free one is fine).
- If you have never used Azure before you will see a Welcome to Azure screen offering three choices. Pick Start with an Azure free trial - you need a subscription before Azure will let you create anything. (Students should choose Azure for Students instead: same result, no card required.) Ignore Manage Microsoft Entra ID, which is something else entirely.
- Click Create a resource, search for Speech, and choose Speech service published by Microsoft.
- Fill in the form: any resource group, any name, and pick a Region near you - write that region down exactly as it appears, for example
eastus. - For Pricing tier choose F0 (Free). That allows about five hours of speech-to-text and half a million characters of text-to-speech every month.
- Click Review + create, then Create. Wait about a minute, then click Go to resource.
- In the left-hand menu open Keys and Endpoint. Copy KEY 1 and the Location/Region.
Put those into secrets.h as AZURE_SPEECH_KEY and AZURE_REGION.
What it costs to run
Very little, but it is not free, and you should know roughly what you are spending before you leave a project running.
| Service | Rough cost |
|---|---|
| OpenAI vision | roughly a cent or two per picture, depending on the model |
| Azure Speech | free tier covers about 5 hours of listening and 0.5 M characters of speaking per month |
Prices change, so treat these as a guide rather than a quote. Every one of these services has a usage page where you can watch what you have spent, and all of them let you set a spending limit - which is worth doing on day one.
Troubleshooting
| Symptom | Cause and fix |
|---|---|
| Screen stays black | Wrong GFX library version (use 1.5.6) or wrong board settings. |
PSRAM alloc failed |
Tools → PSRAM is not set to OPI PSRAM. |
| Nothing uploads / no COM port | Wrong USB-C port, or the CH340 driver is not installed. |
Imagens
This code has not been parsed yet. Please return to the admin panel to parse it.Coisas que você pode precisar
-
Amazonas
-
OutroProduct page for MaTouch AI ESP32S3 2.8" TFT ST7789Vmakerfabs.com
Recursos e referências
-
DocumentaçãoMakerfabs MaTouch ESP32-S3 2.8" Camera and Touchscreen: user's manualwiki.makerfabs.com
-
Documentação
-
DocumentaçãoProduct page for MaTouch AI ESP32S3 2.8" TFT ST7789Vmakerfabs.com
-
ExternoSite da Makerfabsmakerfabs.com
Arquivos📁
Código Arduino (.ino)
-
makerfabs_ESP32S3_Draw_AI
makerfabs_ESP32S3_Draw_AI.zip0.02 MB