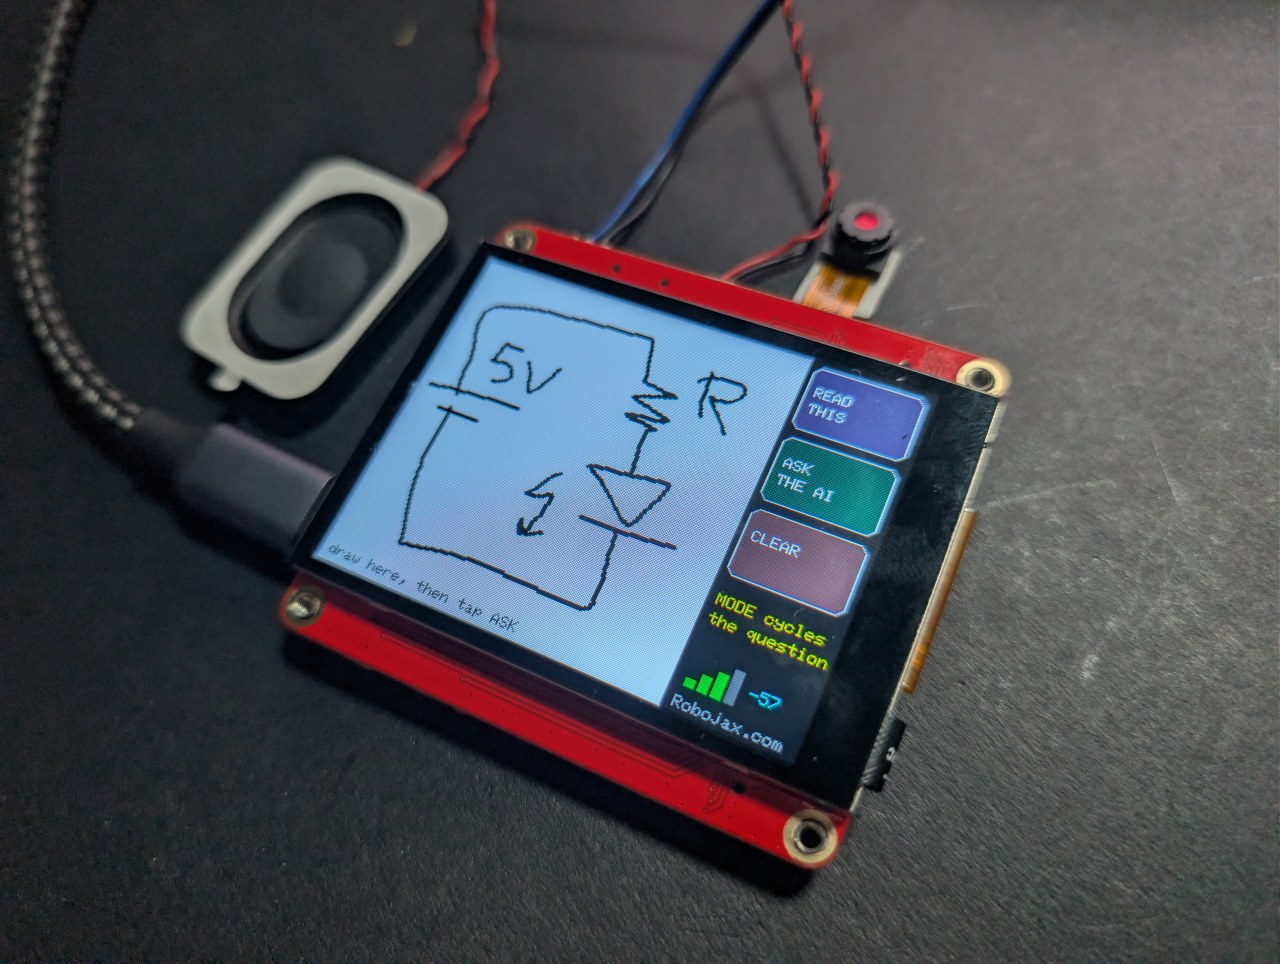
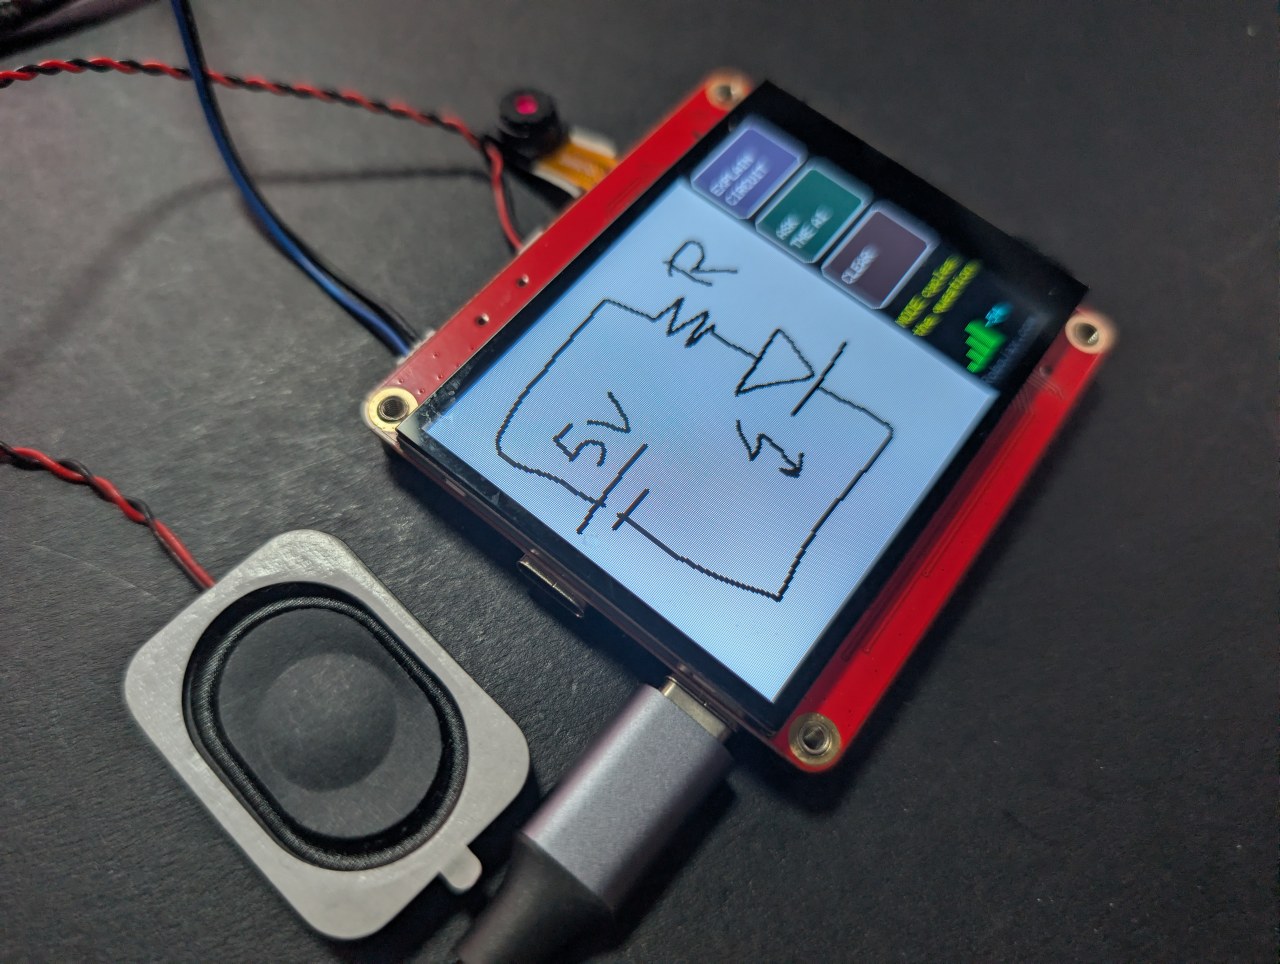
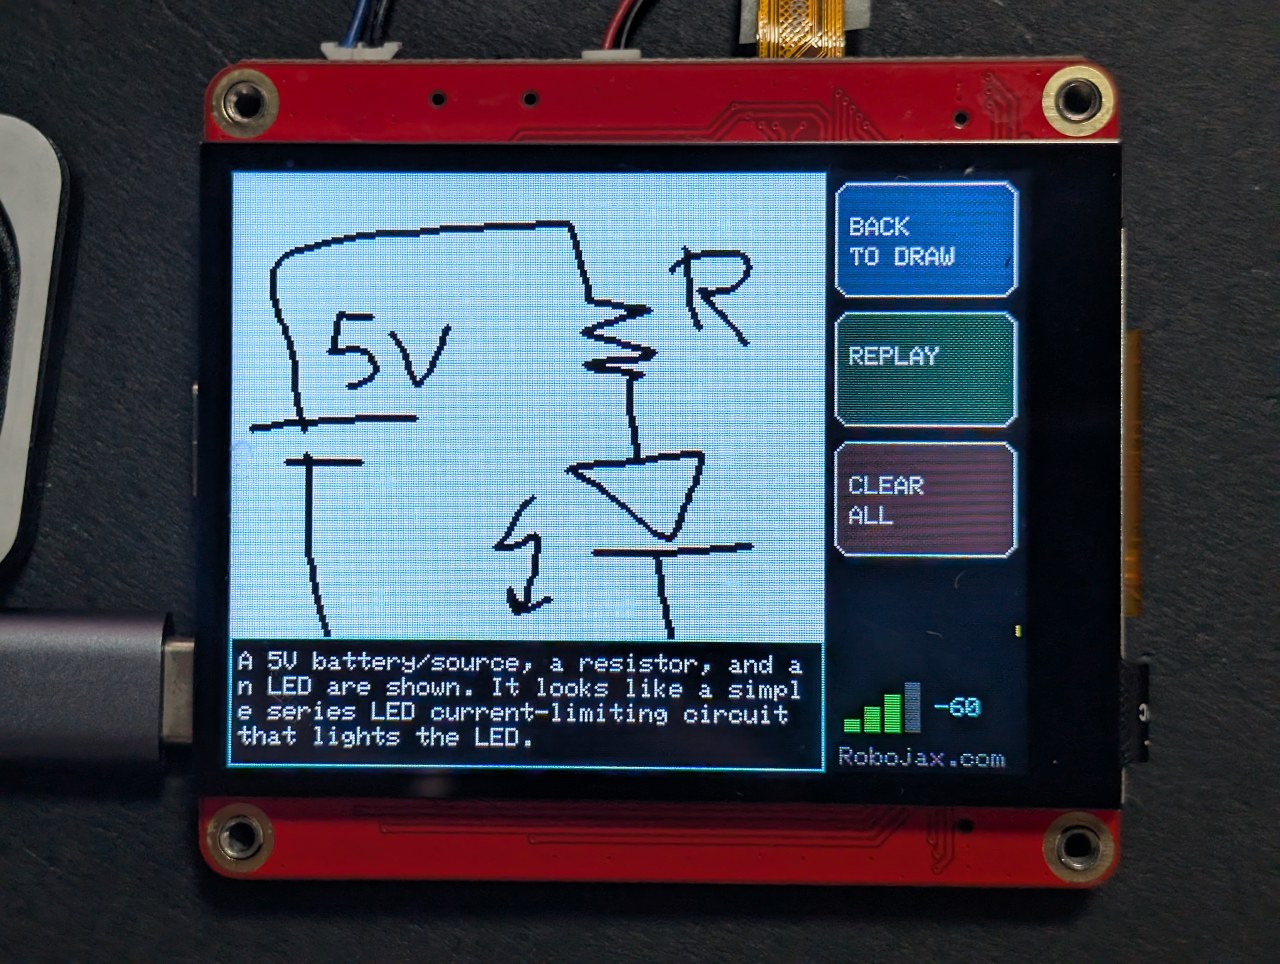
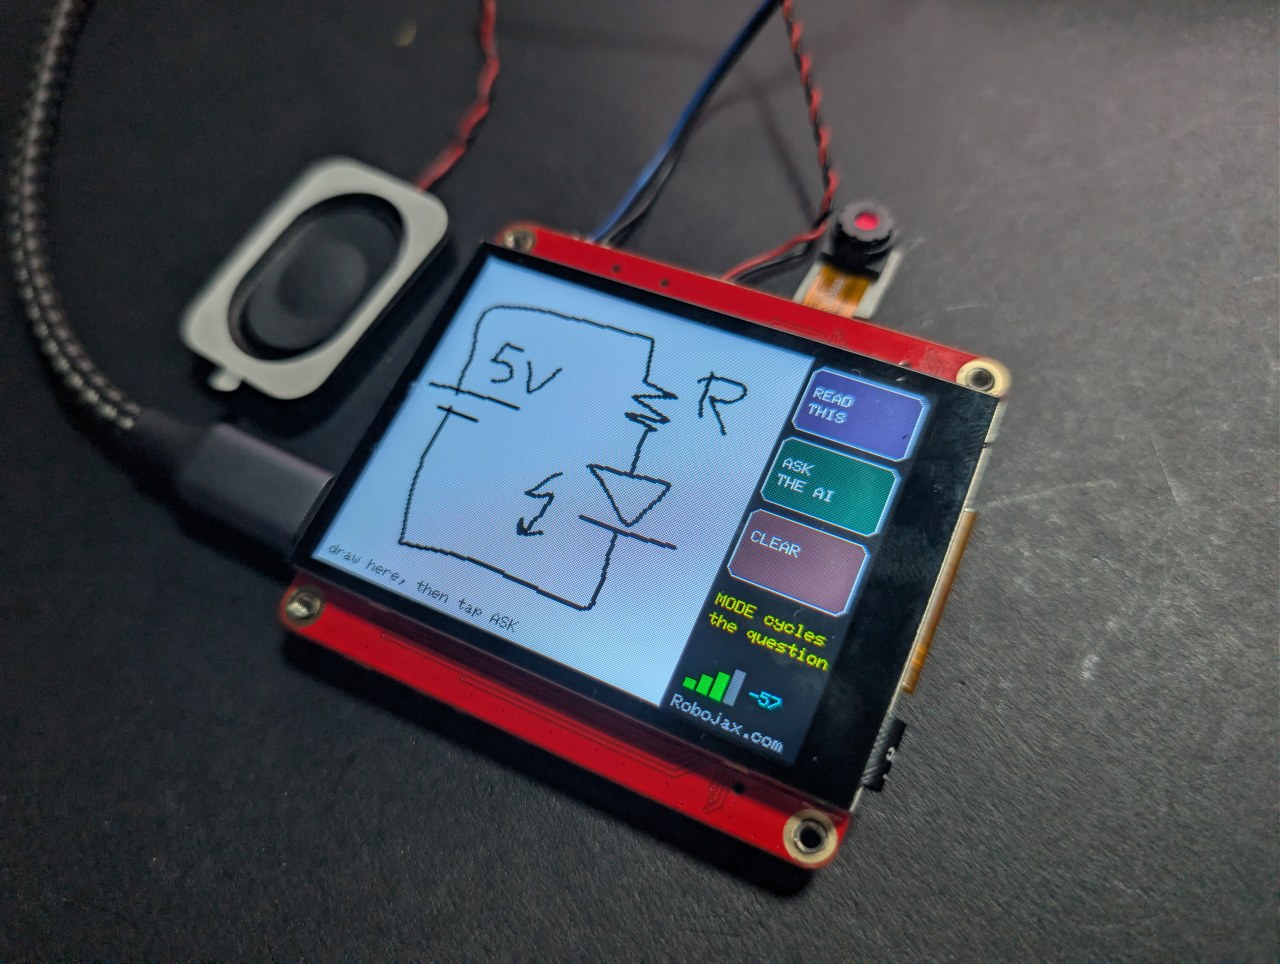
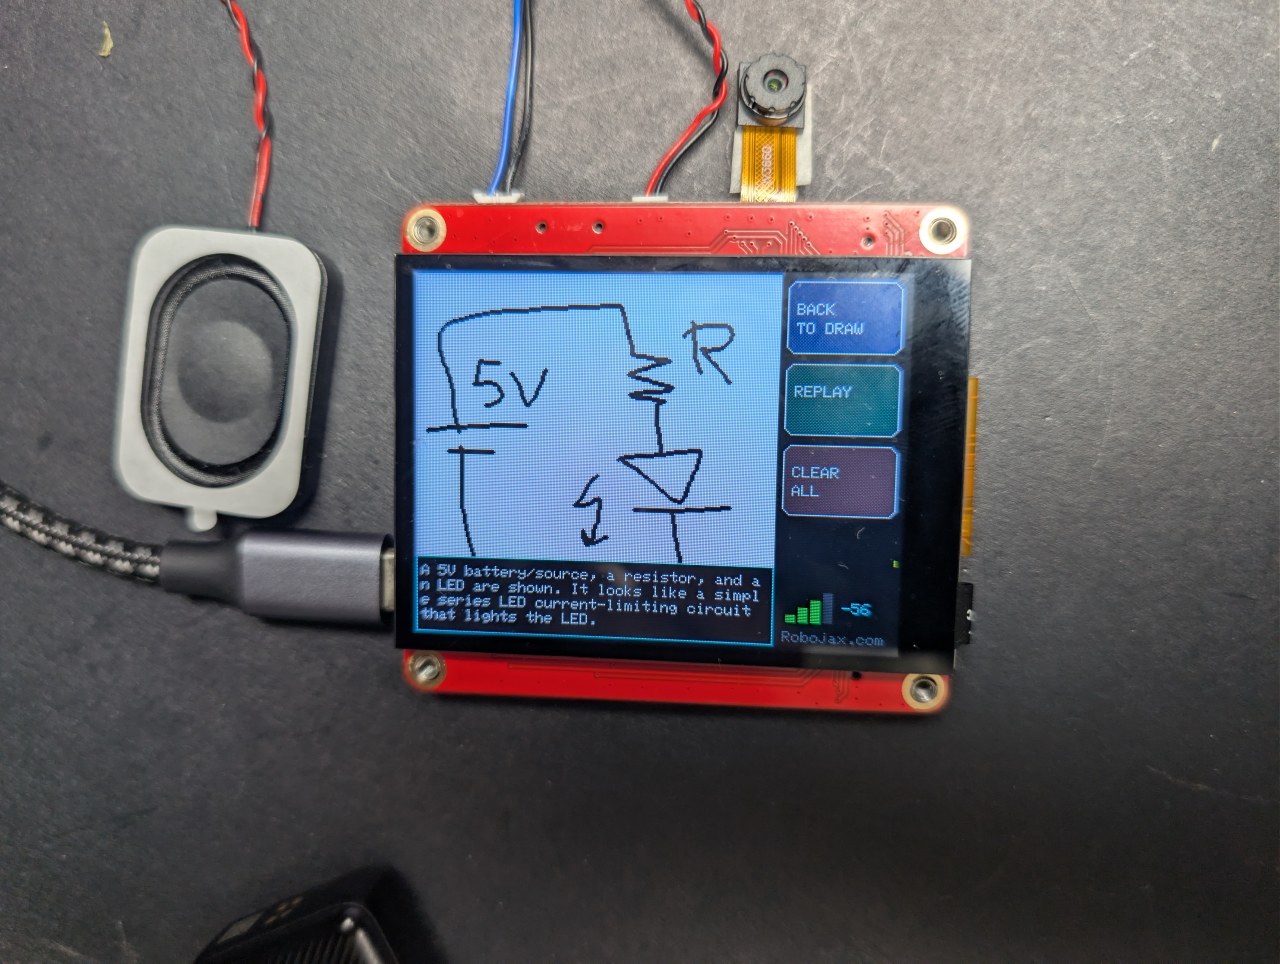
Narysowałem obwód na tej płycie ESP32 za 40 dolarów, a AI go wyjaśniło.
Naszkicuj obwód palcem, a AI go wyjaśni
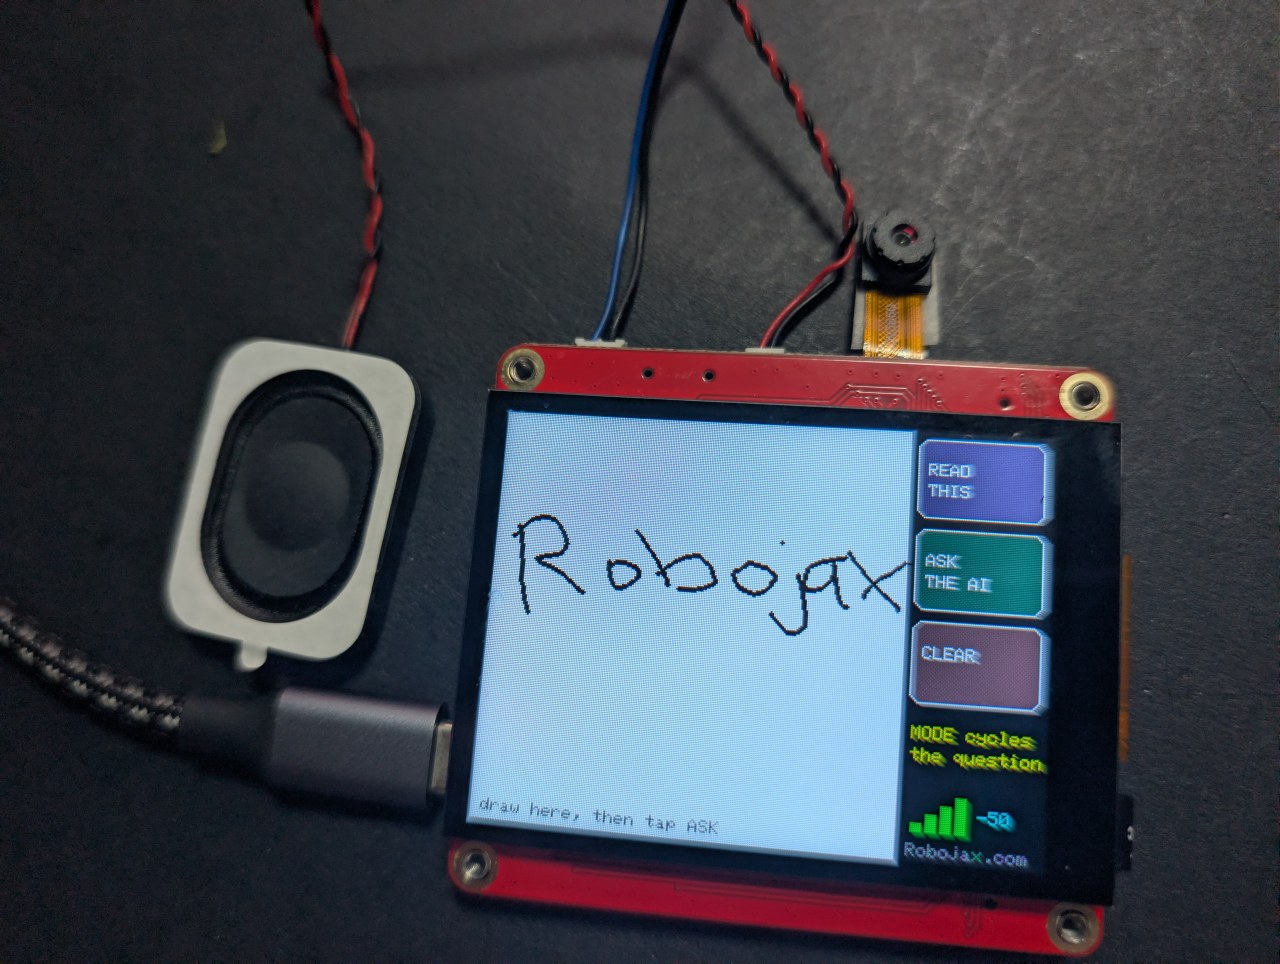
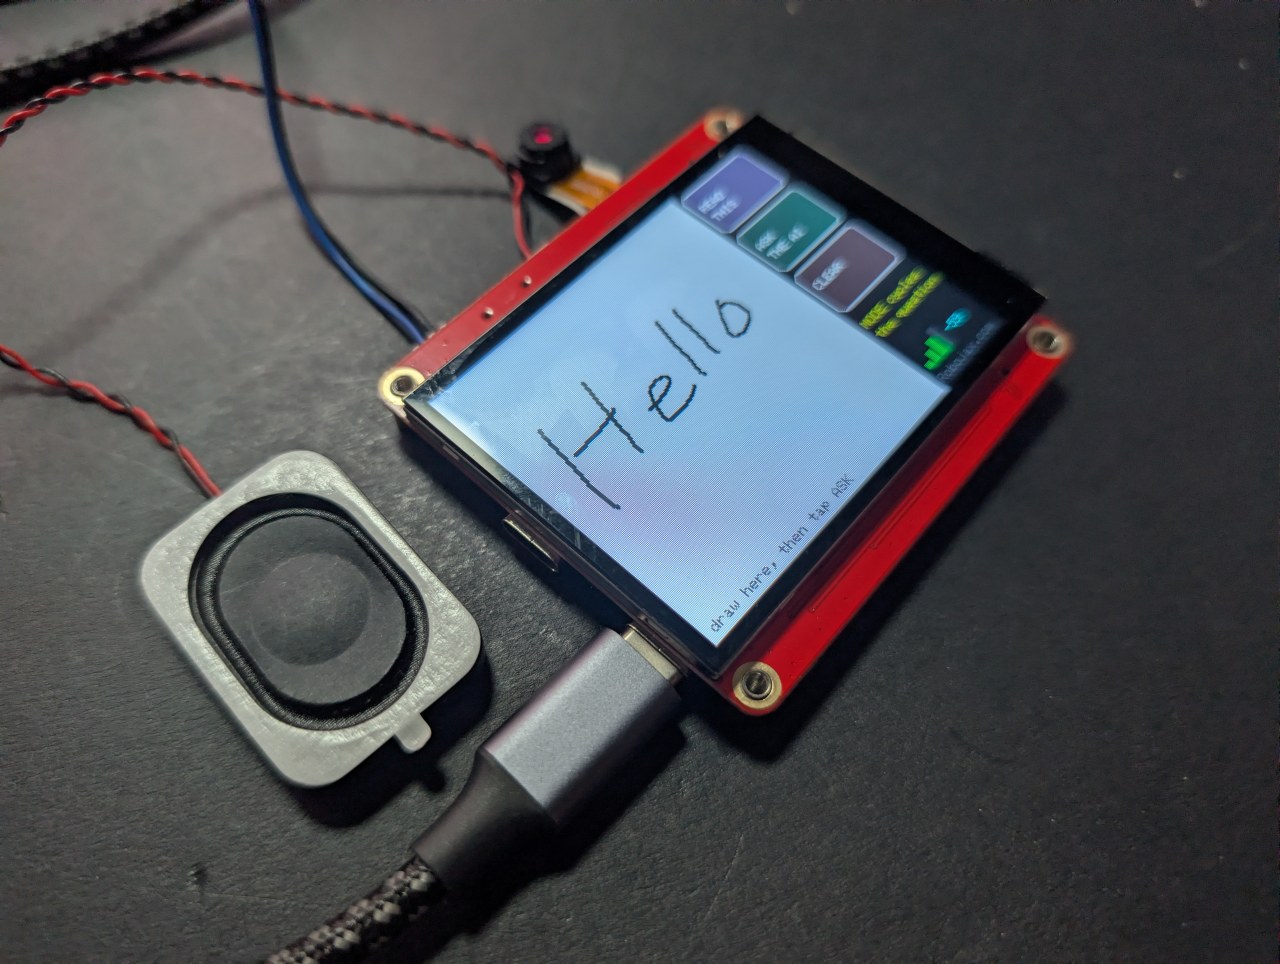
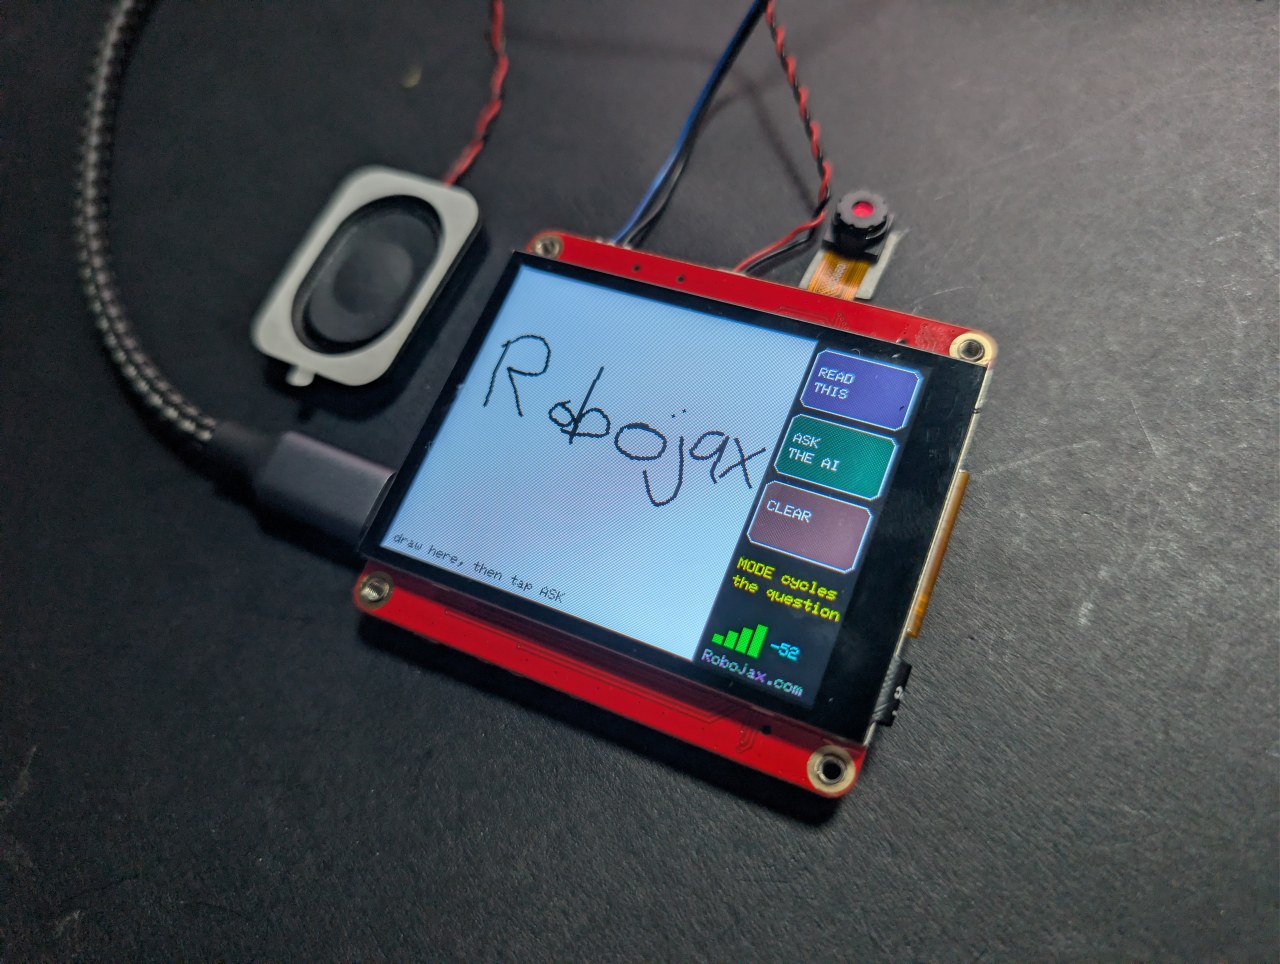
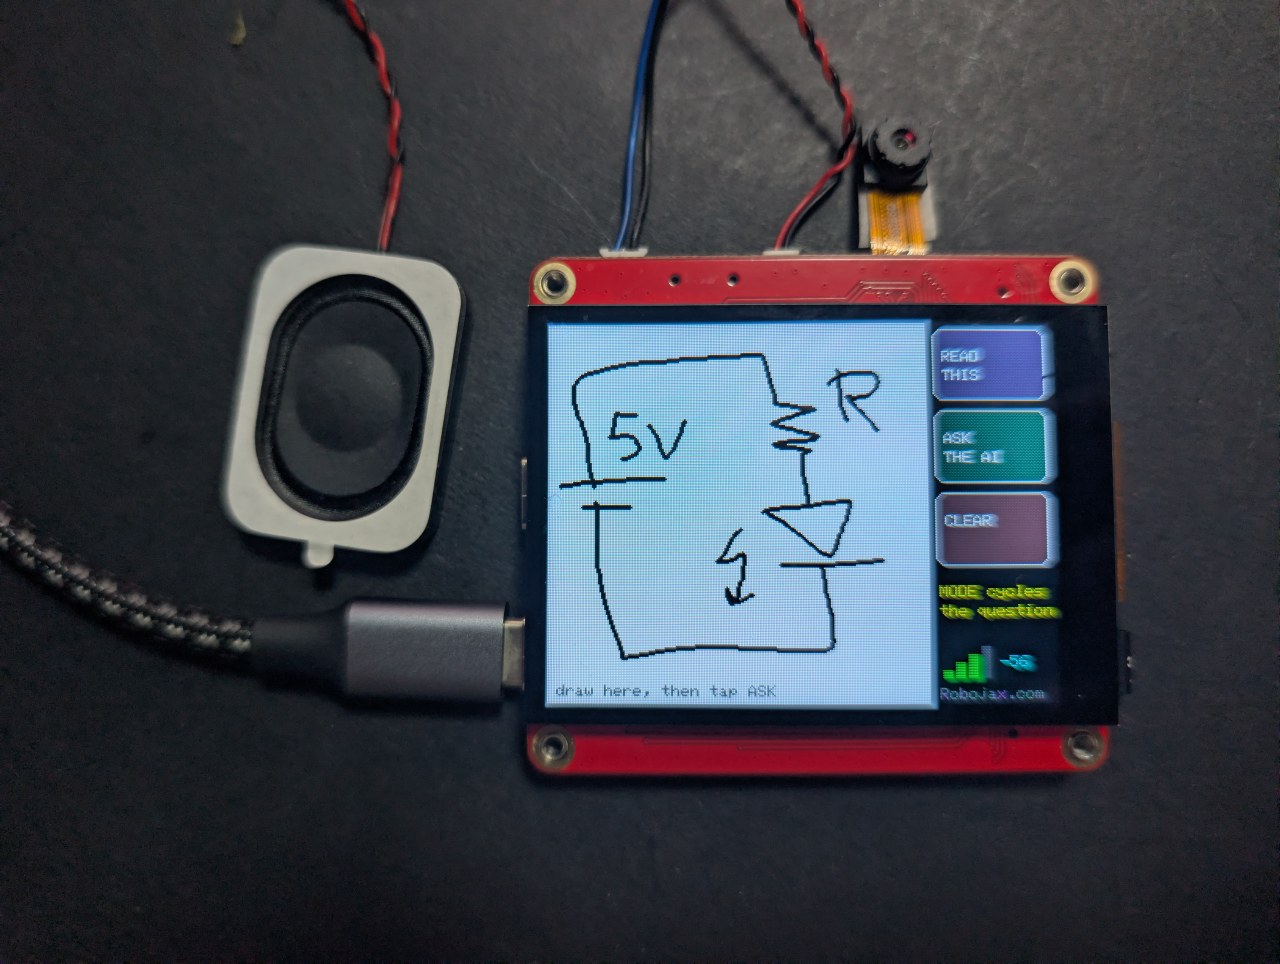
Rysuj lub pisz na ekranie dotykowym palcem, dotknij ASK, a AI powie Ci, co narysowałeś - na ekranie i na głos. Trzy tryby: nazwij kształt, odczytaj pismo odręczne lub wyjaśnij ręcznie narysowany obwód.
Ten ostatni jest najciekawszy. Naszkicuj baterię, rezystor i diodę LED, a płyta nazwie komponenty i powie Ci, co robi obwód.
Robojax_Makerfab przy kasie na stronie produktu MaTouch AI ESP32-S3. Ciebie to nic nie kosztuje, a pomaga wspierać darmowy kod i poradniki tutaj.Problem, który ten projekt musiał rozwiązać
Nie można odczytać pikseli z tego wyświetlacza przez SPI, a biblioteka graficzna zwykle rysuje bezpośrednio na panelu bez kopii w pamięci - więc nie ma zrzutu ekranu do wysłania gdziekolwiek. Rozwiązaniem jest nigdy nie rysować bezpośrednio na panelu. Ten szkic rysuje do Arduino_Canvas, który przechowuje pełny bufor ramki w PSRAM. Ten bufor jest obrazem, więc fmt2jpg() zamienia go bezpośrednio w JPEG.
Dlaczego atrament jest czarny na białym
Modele wizyjne czytają ciemne znaki na jasnym tle znacznie bardziej niezawodnie niż odwrotnie, a to wygląda jak papier na kamerze. Przyciski są rysowane na panelu, a nie w canvasie, więc nigdy nie są częścią obrazu, który widzi AI - dostaje ono tylko Twój rysunek na czystym białym polu.
Sprawianie, że pociągnięcia wyglądają jak pociągnięcia
Dwie rzeczy musiały być dopracowane, zanim rysowanie zaczęło przypominać długopis, a nie matrycę punktową:
- Canvas nie jest opróżniany na ekran przy każdej próbce dotyku - to wypycha 115 KB przez SPI za każdym razem i spowalnia wszystko. Każde pociągnięcie jest rysowane w canvasie i malowane na panelu osobno, co kosztuje prawie nic.
- Pociągnięcie kończy się dopiero po tym, jak panel był cichy przez około 70 milisekund. Kontroler dotyku nie zwraca punktu przy każdym odpytywaniu, a traktowanie każdego pustego odpytania jako uniesionego palca łamie linię na niepołączone kropki.
Trzy tryby, jeden rysunek
Twój rysunek pozostaje pod odpowiedzią, więc możesz dotknąć BACK TO DRAW, zmienić tryb i zadać inne pytanie o ten sam szkic. Jako obraz to linie i kształty; zapytany jako inżynier, staje się obwodem.
Wskazówki dla dobrych wyników
- Tani pojemnościowy rysik działa znacznie lepiej niż opuszka palca.
- Rysuj duże - canvas ma 240×240, więc kilka dużych elementów, a nie drobne szczegóły.
- Nie ma odrzucania dłoni. Trzymaj rękę z dala od szkła.
O płycie MaTouch AI ESP32-S3 2.8"
Każdy projekt na tej stronie działa na MaTouch AI ESP32-S3 2.8" TFT ST7789V od Makerfabs. To płyta typu wszystko-w-jednym: kolorowy ekran dotykowy, kamera 3 megapikseli, dwa mikrofony i prawdziwy wzmacniacz głośnikowy, wszystko napędzane przez ESP32-S3 z 8 MB PSRAM. Ta kombinacja umożliwia te projekty AI na jednej płycie bez niczego dodatkowego.
8 MB PSRAM ma większe znaczenie niż jakakolwiek inna liczba tutaj. To dzięki niemu płyta może przechowywać ramkę z kamery, kilka sekund nagranego dźwięku lub zakodowane w base64 zdjęcie w pamięci jednocześnie - żadne z nich nie mieści się w normalnej pamięci RAM ESP32.
Dokumentacja producenta: strona wiki Makerfabs.
Kluczowe specyfikacje
- Procesor: ESP32-S3, dwurdzeniowy 240 MHz, WiFi 2.4 GHz + Bluetooth 5.0
- Pamięć: 16 MB flash, 8 MB PSRAM (wymagane przez prawie każdy projekt tutaj)
- Wyświetlacz: 2.8" IPS, 320×240, sterownik ST7789V, SPI
- Dotyk: GT911 pojemnościowy, śledzi 5 palców jednocześnie
- Kamera: OV3660, 3 megapiksele, do 2048×1536
- Mikrofony: dwa cyfrowe mikrofony I2S INMP441 (prawdziwa para stereo)
- Głośnik: wzmacniacz klasy D MAX98357A, 3.2 W przy 4 Ω
- Pamięć masowa: gniazdo kart microSD (tryb SPI)
- Zasilanie: USB-C, złącze baterii JST, ładowarka TP4056, przełącznik zasilania
- Dodatkowo na płycie: dioda LED RGB WS2812B, zegar czasu rzeczywistego z baterią PCF8563T i miernik stanu baterii MAX17048, który nie jest wymieniony w oficjalnych specyfikacjach
USB CDC On Boot na Disabled. Użycie złego portu spowoduje problemy z dźwiękiem lub nieudane przesyłanie.Zasilanie z baterii? Dwa gniazda USB-C, ładowarka TP4056 i przełącznik zasilania są w pełni wyjaśnione, ze schematem, w artykule o testowaniu płyty — w tym które gniazdo ładuje i czy przełącznik powinien być włączony czy wyłączony.
Ustawienia Arduino IDE
Te ustawienia mają znaczenie. Większość problemów zgłaszanych przez ludzi z tą płytą to jeden z tych błędów, a one resetują się po zmianie wersji rdzenia, więc sprawdź je ponownie po każdej zmianie.
| Ustawienie | Wartość |
|---|---|
| Płyta | ESP32S3 Dev Module |
| Wersja rdzenia ESP32 | 2.0.17 |
| PSRAM | OPI PSRAM |
| Rozmiar flash | 16MB (128Mb) |
| Schemat partycji | 16M Flash (3MB APP/9.9MB FATFS) |
| USB CDC On Boot | Disabled |
| Prędkość przesyłania | 921600 |
| Wymaż całą flash przed przesyłaniem | Disabled |
| Port | port USB-C CH340K |
Wymagane biblioteki
Ten projekt potrzebuje każdej biblioteki z poniższej tabeli - nic więcej, nic mniej. Większość instaluje się bezpośrednio z Tools → Manage Libraries w Arduino IDE, ale GFX Library for Arduino musi być zainstalowana z pliku ZIP. Numery wersji mają znaczenie, więc użyj dokładnie tych wymienionych.
| Biblioteka | Wersja | Autor | Instalacja z |
|---|---|---|---|
| GFX Library for Arduino | 1.5.6 | moononournation | plik ZIP - patrz poniżej |
| bb_captouch | 1.3.1 | Larry Bank | Library Manager |
| ArduinoJson | 7.x | Benoit Blanchon | Library Manager |
| Adafruit NeoPixel | dowolna najnowsza | Adafruit | Library Manager |
Instalacja biblioteki GFX z pliku ZIP
- Pobierz ZIP. Jest on zawarty w pobieraniu tego projektu, lub możesz go pobrać z repozytorium Arduino_GFX - kliknij zielony przycisk Code, a następnie Download ZIP.
- Zapisz go w miejscu, gdzie go znajdziesz. Nie rozpakowuj go.
- W Arduino IDE kliknij Sketch → Include Library → Add .ZIP Library.
- Przejdź do pobranego pliku ZIP i kliknij Open.
- IDE instaluje go i potwierdza na dole okna. Jeśli masz już zainstalowaną wersję 1.6, usuń ten folder z
Documents/Arduino/librariesnajpierw, w przeciwnym razie będą konfliktować.
Konfigurowanie secrets.h
Twoje dane WiFi i wszelkie klucze API idą do secrets.h, który jest zawarty w pobieraniu z wartościami zastępczymi. Otwórz tę zakładkę w Arduino IDE i zastąp je własnymi.
secrets.h.Uzyskiwanie kluczy API
Ten projekt komunikuje się z chmurową usługą AI, więc potrzebujesz własnego klucza. Jeśli nigdy tego nie robiłeś, nie martw się - to ten sam pomysł co hasło identyfikujące Twoje konto w usłudze. Zajmuje to kilka minut, raz.
OpenAI - oczy
OpenAI dostarcza model wizyjny, który patrzy na obrazy. Tylko projekty wysyłające obraz potrzebują tego.
- Przejdź do platform.openai.com/api-keys i zaloguj się lub utwórz konto.
- Kliknij Create new secret key, nadaj mu nazwę i utwórz go.
- Skopiuj go natychmiast - jest pokazywany tylko raz.
- Otwórz Billing i dodaj niewielką kwotę kredytu. API jest przedpłacone i oddzielone od jakiejkolwiek subskrypcji ChatGPT, którą możesz już mieć.
Umieść klucz w secrets.h jako OPENAI_KEY.
Microsoft Azure Speech - do słuchania i mówienia
Azure zamienia Twoją mowę na tekst i zamienia odpowiedź z powrotem na głos. Darmowy poziom jest wystarczająco hojny dla wszystkiego na tej stronie.
- Przejdź do portal.azure.com i zaloguj się kontem Microsoft (darmowe jest w porządku).
- Jeśli nigdy nie używałeś Azure, zobaczysz ekran Welcome to Azure oferujący trzy opcje. Wybierz Start with an Azure free trial - potrzebujesz subskrypcji, zanim Azure pozwoli Ci cokolwiek utworzyć. (Studenci powinni wybrać Azure for Students zamiast tego: ten sam wynik, bez karty.) Zignoruj Manage Microsoft Entra ID, które jest czymś zupełnie innym.
- Kliknij Create a resource, wyszukaj Speech i wybierz Speech service opublikowane przez Microsoft.
- Wypełnij formularz: dowolna grupa zasobów, dowolna nazwa i wybierz Region blisko Ciebie - zapisz ten region dokładnie tak, jak się pojawia, na przykład
eastus. - Dla Pricing tier wybierz F0 (Free). To pozwala na około pięć godzin zamiany mowy na tekst i pół miliona znaków zamiany tekstu na mowę miesięcznie.
- Kliknij Review + create, a następnie Create. Poczekaj około minuty, a następnie kliknij Go to resource.
- W menu po lewej stronie otwórz Keys and Endpoint. Skopiuj KEY 1 i Location/Region.
Umieść je w secrets.h jako AZURE_SPEECH_KEY i AZURE_REGION.
Ile to kosztuje w działaniu
Bardzo mało, ale nie jest darmowe i powinieneś wiedzieć z grubsza, ile wydajesz, zanim zostawisz projekt działający.
| Usługa | Przybliżony koszt |
|---|---|
| OpenAI vision | mniej więcej cent lub dwa za obraz, w zależności od modelu |
| Azure Speech | darmowy poziom pokrywa około 5 godzin słuchania i 0.5 M znaków mówienia miesięcznie |
Ceny się zmieniają, więc traktuj je jako wskazówkę, a nie wycenę. Każda z tych usług ma stronę użycia, gdzie możesz obserwować, ile wydałeś, i wszystkie pozwalają ustawić limit wydatków - co warto zrobić pierwszego dnia.
Rozwiązywanie problemów
| Objaw | Przyczyna i rozwiązanie |
|---|---|
| Ekran pozostaje czarny | Zła wersja biblioteki GFX (użyj 1.5.6) lub złe ustawienia płyty. |
PSRAM alloc failed |
Tools → PSRAM nie jest ustawione na OPI PSRAM. |
| Nic się nie przesyła / brak portu COM | Zły port USB-C lub sterownik CH340 nie jest zainstalowany. |
Obrazy
/*
* ===========================================================================
* 08_Draw_AI — MaTouch AI ESP32-S3 2.8" TFT ST7789V
* ===========================================================================
*
* ---------------------------------------------------------------------------
* ROBOJAX.COM - MaTouch AI ESP32-S3 2.8" project series
*
* WATCH THE Introduction and face recognition VIDEO
* https://youtu.be/6AL3g3tC_Hk
* Video 2: Draw AI - https://youtu.be/FaIW1MVIsj4
*
* WRITTEN TUTORIALS - every project, with photos and full explanation
* Camera and touchscreen.... https://robojax.com/RTJ849
* Offline face recognition.. https://robojax.com/RTJ850
* AI voice assistant........ https://robojax.com/RTJ851
* AI vision................. https://robojax.com/RTJ852
* Draw AI ................. https://robojax.com/RTJ867 (this code)
*
* GET THE BOARD - SAVE $5 with coupon code: Robojax_Makerfab
* https://www.makerfabs.com/matouch-ai-esp32s3-2-8-tft-st7789v.html
* (enter the code at checkout)
*
* All of this code is free. If it helped you, a subscribe on YouTube is
* the best way to support more of it.
* ---------------------------------------------------------------------------
*
* Draw or write on the touchscreen with your finger, tap ASK, and an AI
* tells you what you drew - on the screen and out loud.
*
* THREE MODES (tap MODE to cycle):
*
* WHAT IS THIS? draw a house, a cat, a triangle -> it names it
* READ THIS write HELLO in big letters -> it reads it back
* EXPLAIN CIRCUIT sketch a battery, resistor and LED -> it tells you
* what the components are and what the circuit does
*
* That last mode is the interesting one: a hand-drawn schematic, explained
* by an AI, on a forty-dollar board with no computer attached.
*
* NO CAMERA IS USED by this sketch. That means the J1/J3 Mabee sockets are
* free GPIO here (see 07_GPIO_Test), and there is no camera/SD memory
* contention to worry about.
*
* ---------------------------------------------------------------------------
* HOW IT WORKS (the trick worth knowing)
*
* You cannot read pixels back out of the ST7789 over SPI, and Arduino_GFX
* normally draws straight to the panel with no copy in memory - so there is
* no "screenshot" to send anywhere. The fix: draw into an Arduino_Canvas,
* which keeps a full framebuffer in PSRAM and flushes it to the display.
* That buffer IS the image, so fmt2jpg() turns it straight into a JPEG and
* the rest of the path is identical to 05_Vision_AI.
*
* Black ink on a white canvas, deliberately: vision models read dark-on-light
* far more reliably than the reverse, and it looks like paper on camera.
*
* ---------------------------------------------------------------------------
* TIPS
* - A cheap capacitive stylus is MUCH better than a fingertip.
* - Write BIG. The canvas is 240x240 - a few large characters, not a
* sentence.
* - There is no palm rejection: only the first touch point is used, so
* keep your palm off the glass.
*
* ---------------------------------------------------------------------------
* FILL IN secrets.h BEFORE FLASHING (WIFI_* and OPENAI_*; AZURE_* only if
* SPEAK_REPLIES is 1).
*
* BOARD SETTINGS (Tools menu - EVERY line matters)
* Board : ESP32S3 Dev Module
* ESP32 core : 2.0.17
* PSRAM : OPI PSRAM <-- required, the canvas lives there
* Flash Size : 16MB (128Mb)
* Partition Scheme : 16M Flash (3MB APP/9.9MB FATFS)
* USB CDC On Boot : Disabled
* Upload Speed : 921600
* Port : the CH340K USB-C port (the one near RESET)
*
* LIBRARIES
* GFX Library for Arduino v1.5.6 (NOT 1.6.x - that pairs with core 3)
* bb_captouch v1.3.1
* ArduinoJson v7.x
* Adafruit NeoPixel any recent
*
* ---------------------------------------------------------------------------
* FUNCTIONS IN THIS SKETCH
* led(r,g,b) set the RGB status LED colour
* getTouch(&x,&y) read the touch panel, mapped to screen coordinates
* clearCanvas() wipe to white and redraw the hint
* drawStroke(...) one thick line segment, into the canvas AND the panel
* handleDrawing(...) turn touch samples into continuous strokes
* waitData()/readHttpResponse() robust HTTPS reply reader (de-chunking)
* canvasToJpeg(&len) RGB565 canvas -> JPEG in PSRAM
* askVision(...) send the drawing + prompt to OpenAI, get an answer
* spkInit()/speak()/playLastAnswer() Azure voice out, with free REPLAY
* drawButtons()/drawAnswerSide()/showAnswer()/drawWifi() the UI
* askAboutDrawing() one full cycle: encode -> ask -> show -> speak
* setup() / loop() boot + WiFi / drawing and button handling
*
* Robojax.com
* ===========================================================================
*/
#define SPEAK_REPLIES 1 // 1 = read the answer aloud with Azure TTS
#define LED_BRIGHTNESS 15 // WS2812 is on the power rail - 15 is plenty
#include <Arduino_GFX_Library.h>
#include <bb_captouch.h>
#include <Adafruit_NeoPixel.h>
#include <ArduinoJson.h>
#include <WiFi.h>
#include <WiFiClientSecure.h>
#include "mbedtls/base64.h"
#include "img_converters.h" // fmt2jpg()
#include "esp_camera.h" // for the pixformat_t enum used by fmt2jpg
#include "pins.h"
#include "secrets.h"
#if SPEAK_REPLIES
#include "driver/i2s.h"
#define WAV_HEADER_LEN 44
#endif
Arduino_HWSPI *bus = new Arduino_HWSPI(
TFT_DC, TFT_CS, TFT_SCLK, TFT_MOSI, TFT_MISO, &SPI, true);
Arduino_GFX *panel = new Arduino_ST7789(bus, TFT_RES, 1, true);
/* The canvas is what we actually draw into: a real framebuffer in PSRAM that
* we can both flush to the panel AND hand to the JPEG encoder. */
#define CANVAS_W 240
#define CANVAS_H 240
Arduino_Canvas *canvas = new Arduino_Canvas(CANVAS_W, CANVAS_H, panel, 0, 0);
BBCapTouch bbct;
Adafruit_NeoPixel rgb(RGB_LED_NUM, RGB_LED_PIN, NEO_GRB + NEO_KHZ800);
/* --- the three modes ------------------------------------------------------ */
struct DrawMode { const char *l1, *l2; const char *prompt; };
const DrawMode MODES[] = {
{"WHAT IS", "THIS?",
"This is a drawing made with a finger on a small touchscreen. Name the "
"shape or object in ONE short sentence of at most 15 words. Plain text only."},
{"READ", "THIS",
"This image contains handwriting drawn with a finger. Reply with ONLY the "
"text you can read, nothing else. If you cannot read it, say: cannot read it."},
{"EXPLAIN", "CIRCUIT",
"This is a hand-drawn electronic circuit diagram. In at most two short "
"sentences, name the components you can identify and say what the circuit "
"does. Plain text only. If it is not a circuit, say so."},
};
#define N_MODES 3
int mode = 0;
/* --- layout: 240 canvas on the left, buttons on the right ----------------- */
#define BTN_X 244
#define BTN_W 72
#define BTN_H 46
#define BTN_MODE_Y 4
#define BTN_ASK_Y 56
#define BTN_CLEAR_Y 108
bool showing_answer = false;
/* --- drawing state -------------------------------------------------------- */
int last_x = -1, last_y = -1;
bool has_ink = false;
/* --- kept audio for REPLAY ------------------------------------------------ */
uint8_t *last_audio = nullptr;
size_t last_audio_len = 0;
void led(uint8_t r, uint8_t g, uint8_t b) { rgb.setPixelColor(0, rgb.Color(r, g, b)); rgb.show(); }
void playLastAnswer();
void drawButtons();
/* ===========================================================================
* Touch
* =========================================================================== */
bool getTouch(uint16_t *x, uint16_t *y) {
TOUCHINFO ti;
if (!bbct.getSamples(&ti)) return false;
if (ti.count < 1) return false; // first point only - no palm rejection
*x = ti.y[0];
*y = (ti.x[0] > 240) ? 0 : (240 - ti.x[0]);
return true;
}
/* ===========================================================================
* Canvas / drawing
* =========================================================================== */
void clearCanvas() {
canvas->fillScreen(WHITE);
canvas->flush(); // one full push: paint it white
has_ink = false;
last_x = last_y = -1;
/* The hint goes on the PANEL, never into the canvas - anything drawn into
* the canvas becomes part of the image the AI sees, and it would happily
* read this text back to you. */
panel->setTextSize(1);
panel->setTextColor(panel->color565(170, 170, 170));
panel->setCursor(6, CANVAS_H - 12);
panel->print("draw here, then tap ASK");
}
/* One thick line segment, drawn into BOTH the canvas and the panel.
*
* Why both: the canvas is the image we will send to the AI, but flushing the
* whole 240x240 buffer to the screen costs ~115 KB of SPI. Doing that per
* touch sample throttled the loop so hard that most samples were missed -
* which is exactly what "it only draws dots" looks like. Painting the same
* few pixels directly to the panel is essentially free, so the canvas is only
* flushed when the screen genuinely has to be rebuilt. */
static const int8_t STROKE_OFFS[5][2] = {{0,0},{1,0},{-1,0},{0,1},{0,-1}};
void drawStroke(int x0, int y0, int x1, int y1) {
for (int i = 0; i < 5; i++) {
int ox = STROKE_OFFS[i][0], oy = STROKE_OFFS[i][1];
canvas->drawLine(x0 + ox, y0 + oy, x1 + ox, y1 + oy, BLACK);
panel->drawLine(x0 + ox, y0 + oy, x1 + ox, y1 + oy, BLACK);
}
}
/* Touch is read once per loop and handed in here.
*
* THE IMPORTANT BIT - why this is time-based rather than "no touch = lifted":
* the GT911 does not return a point on every poll. It reports when its own
* internal sample is ready, so a poll in between comes back empty even though
* your finger never left the glass. Treating each empty poll as a lift resets
* the stroke, and every real sample then lands as an isolated dot instead of
* a line joined to the previous one - which is exactly what "it only draws
* dots" looks like. So a stroke only ends after the panel has been quiet for
* LIFT_MS, which bridges the dropouts but is still far shorter than a genuine
* lift-and-reposition. */
#define LIFT_MS 70
void handleDrawing(bool touched, int x, int y) {
static uint32_t last_seen = 0;
if (touched && x >= 0 && x < CANVAS_W) {
if (last_x >= 0) drawStroke(last_x, last_y, x, y); // join to the last point
else drawStroke(x, y, x, y); // start of a stroke
last_x = x; last_y = y;
last_seen = millis();
has_ink = true;
} else if (last_x >= 0 && millis() - last_seen > LIFT_MS) {
last_x = last_y = -1; // really lifted now
}
}
/* ===========================================================================
* HTTP — the same robust reader proven in 04 and 05
* =========================================================================== */
static bool waitData(WiFiClientSecure &c, uint32_t ms) {
uint32_t t0 = millis();
while (!c.available()) {
if (!c.connected()) return false;
if (millis() - t0 > ms) return false;
delay(10);
}
return true;
}
static int readHttpResponse(WiFiClientSecure &client, String &body_out, uint32_t idle_ms) {
body_out = "";
if (!waitData(client, idle_ms)) { Serial.println("HTTP: no response at all"); return 0; }
String status_line = client.readStringUntil('\n');
int code = 0;
sscanf(status_line.c_str(), "HTTP/%*s %d", &code);
bool chunked = false;
while (waitData(client, idle_ms)) {
String h = client.readStringUntil('\n');
if (h == "\r" || h.length() <= 1) break;
h.toLowerCase();
if (h.startsWith("transfer-encoding:") && h.indexOf("chunked") >= 0) chunked = true;
}
if (chunked) {
int blanks = 0;
while (true) {
if (!waitData(client, idle_ms)) { Serial.println("HTTP: chunk timeout"); break; }
String szline = client.readStringUntil('\n');
szline.trim();
if (szline.length() == 0) { if (++blanks > 4) break; continue; }
blanks = 0;
long sz = strtol(szline.c_str(), NULL, 16);
if (sz <= 0) break;
long got = 0;
while (got < sz) {
if (!waitData(client, idle_ms)) break;
while (client.available() && got < sz) { body_out += (char)client.read(); got++; }
}
if (waitData(client, 3000)) client.readStringUntil('\n');
if (got < sz) break;
}
} else {
while (waitData(client, idle_ms))
while (client.available()) body_out += (char)client.read();
}
return code;
}
/* ===========================================================================
* Canvas -> JPEG
* The canvas framebuffer is plain RGB565, which fmt2jpg() accepts directly.
* =========================================================================== */
uint8_t *canvasToJpeg(size_t *len_out) {
*len_out = 0;
uint16_t *fb = canvas->getFramebuffer();
if (!fb) { Serial.println("no canvas framebuffer"); return nullptr; }
uint8_t *jpg = NULL;
size_t jpg_len = 0;
if (!fmt2jpg((uint8_t *)fb, (size_t)CANVAS_W * CANVAS_H * 2,
CANVAS_W, CANVAS_H, PIXFORMAT_RGB565, 90, &jpg, &jpg_len)) {
Serial.println("fmt2jpg failed");
return nullptr;
}
*len_out = jpg_len;
return jpg; // caller frees
}
/* ===========================================================================
* OpenAI vision — identical shape to 05_Vision_AI
* =========================================================================== */
bool askVision(const uint8_t *jpg, size_t jpg_len, const char *prompt, String &answer_out) {
size_t b64_cap = ((jpg_len + 2) / 3) * 4 + 16;
unsigned char *b64 = (unsigned char *)ps_malloc(b64_cap);
if (!b64) return false;
size_t b64_len = 0;
if (mbedtls_base64_encode(b64, b64_cap, &b64_len, jpg, jpg_len) != 0) { free(b64); return false; }
const char *head_fmt =
"{\"model\":\"%s\",\"max_completion_tokens\":%d,\"messages\":[{\"role\":\"user\","
"\"content\":[{\"type\":\"text\",\"text\":\"%s\"},"
"{\"type\":\"image_url\",\"image_url\":{\"url\":\"data:image/jpeg;base64,";
const char *tail = "\"}}]}]}";
char head[900];
int head_len = snprintf(head, sizeof(head), head_fmt, OPENAI_MODEL, LLM_MAX_TOKENS, prompt);
size_t body_len = head_len + b64_len + strlen(tail);
char *body = (char *)ps_malloc(body_len + 1);
if (!body) { free(b64); return false; }
memcpy(body, head, head_len);
memcpy(body + head_len, b64, b64_len);
strcpy(body + head_len + b64_len, tail);
free(b64);
WiFiClientSecure client;
client.setInsecure();
client.setTimeout(45);
if (!client.connect(OPENAI_HOST, 443)) {
Serial.println("Vision: TLS connect failed");
free(body);
return false;
}
client.print(String("POST /v1/chat/completions HTTP/1.1\r\n"
"Host: " OPENAI_HOST "\r\n"
"Authorization: Bearer " OPENAI_KEY "\r\n"
"Content-Type: application/json\r\n"
"Connection: close\r\n"
"Content-Length: ") + String(body_len) + "\r\n\r\n");
size_t sent = 0;
while (sent < body_len) {
size_t n = min((size_t)4096, body_len - sent);
size_t w = client.write((uint8_t *)body + sent, n);
if (w == 0) { delay(50); w = client.write((uint8_t *)body + sent, n); if (w == 0) break; }
sent += w;
yield();
}
free(body);
if (sent < body_len) { client.stop(); Serial.println("Vision: upload stalled"); return false; }
String resp;
int code = readHttpResponse(client, resp, 45000);
client.stop();
if (code != 200) { Serial.printf("Vision HTTP %d: %s\n", code, resp.c_str()); return false; }
JsonDocument doc;
if (deserializeJson(doc, resp)) {
Serial.printf("Vision: JSON parse failed, %u bytes\n", resp.length());
return false;
}
const char *content = doc["choices"][0]["message"]["content"];
if (!content) return false;
answer_out = String(content);
answer_out.trim();
return answer_out.length() > 0;
}
/* ===========================================================================
* Azure voice out — same de-chunked player as 04/05
* =========================================================================== */
#if SPEAK_REPLIES
void spkInit() {
i2s_config_t cfg = {
.mode = (i2s_mode_t)(I2S_MODE_MASTER | I2S_MODE_TX),
.sample_rate = 16000,
.bits_per_sample = I2S_BITS_PER_SAMPLE_16BIT,
.channel_format = I2S_CHANNEL_FMT_ONLY_LEFT,
.communication_format = I2S_COMM_FORMAT_STAND_I2S,
.intr_alloc_flags = ESP_INTR_FLAG_LEVEL1,
.dma_buf_count = 8,
.dma_buf_len = 256,
.use_apll = false,
.tx_desc_auto_clear = true,
.fixed_mclk = 0
};
i2s_pin_config_t pins = {
.mck_io_num = I2S_PIN_NO_CHANGE,
.bck_io_num = I2S_SPK_BCLK,
.ws_io_num = I2S_SPK_LRC,
.data_out_num = I2S_SPK_DOUT,
.data_in_num = I2S_PIN_NO_CHANGE
};
i2s_driver_install(I2S_SPK_PORT, &cfg, 0, NULL);
i2s_set_pin(I2S_SPK_PORT, &pins);
i2s_zero_dma_buffer(I2S_SPK_PORT);
}
void playLastAnswer() {
if (!last_audio || last_audio_len <= WAV_HEADER_LEN) return;
static const uint8_t lead_in[640] = {0};
size_t w = 0;
i2s_write(I2S_SPK_PORT, lead_in, sizeof(lead_in), &w, portMAX_DELAY);
i2s_write(I2S_SPK_PORT, last_audio + WAV_HEADER_LEN,
last_audio_len - WAV_HEADER_LEN, &w, portMAX_DELAY);
i2s_write(I2S_SPK_PORT, lead_in, sizeof(lead_in), &w, portMAX_DELAY);
delay(150);
i2s_zero_dma_buffer(I2S_SPK_PORT);
}
/* Read exactly n bytes into a raw buffer. BINARY SAFE - unlike the String
* based reader used for JSON, which cannot carry audio: PCM is full of 0x00
* bytes, and an Arduino String treats those as end-of-string. */
static size_t readExact(WiFiClientSecure &c, uint8_t *dst, size_t n) {
size_t got = 0;
uint32_t t0 = millis();
while (got < n && millis() - t0 < 10000) {
int r = c.read(dst + got, n - got);
if (r > 0) { got += r; t0 = millis(); }
else if (!c.connected() && !c.available()) break;
else delay(2);
}
return got;
}
void speak(const String &text) {
String safe = text;
safe.replace("&", "&"); safe.replace("<", "<"); safe.replace(">", ">");
String ssml = "<speak version='1.0' xml:lang='" AZURE_TTS_LANG "'>"
"<voice name='" AZURE_TTS_VOICE "'>" + safe + "</voice></speak>";
WiFiClientSecure client;
client.setInsecure();
client.setTimeout(30);
const char *host = AZURE_REGION ".tts.speech.microsoft.com";
if (!client.connect(host, 443)) { Serial.println("TTS: TLS connect failed"); return; }
client.print(String("POST /cognitiveservices/v1 HTTP/1.1\r\nHost: ") + host + "\r\n"
"Ocp-Apim-Subscription-Key: " AZURE_SPEECH_KEY "\r\n"
"Content-Type: application/ssml+xml\r\n"
"X-Microsoft-OutputFormat: riff-16khz-16bit-mono-pcm\r\n"
"User-Agent: MaTouchRobojax\r\nConnection: close\r\n"
"Content-Length: " + String(ssml.length()) + "\r\n\r\n");
client.print(ssml);
/* --- status line + headers (text, so String is fine here) --- */
if (!waitData(client, 30000)) { Serial.println("TTS: no response"); client.stop(); return; }
String status_line = client.readStringUntil('\n');
int code = 0;
sscanf(status_line.c_str(), "HTTP/%*s %d", &code);
bool chunked = false;
long content_len = -1;
while (waitData(client, 30000)) {
String h = client.readStringUntil('\n');
if (h == "\r" || h.length() <= 1) break;
h.toLowerCase();
if (h.startsWith("transfer-encoding:") && h.indexOf("chunked") >= 0) chunked = true;
if (h.startsWith("content-length:")) content_len = h.substring(15).toInt();
}
if (code != 200) { Serial.printf("TTS HTTP %d\n", code); client.stop(); return; }
/* --- body straight into PSRAM as raw bytes --- */
const size_t AUDIO_CAP = 1200 * 1024; // ~37 s of 16 kHz mono
uint8_t *audio = (uint8_t *)ps_malloc(AUDIO_CAP);
if (!audio) { Serial.println("TTS: PSRAM alloc failed"); client.stop(); return; }
size_t alen = 0;
if (chunked) {
int blanks = 0;
while (alen < AUDIO_CAP) {
if (!waitData(client, 15000)) break;
String szline = client.readStringUntil('\n');
szline.trim();
if (szline.length() == 0) { if (++blanks > 4) break; continue; }
blanks = 0;
long sz = strtol(szline.c_str(), NULL, 16);
if (sz <= 0) break; // final chunk
if ((size_t)sz > AUDIO_CAP - alen) sz = (long)(AUDIO_CAP - alen);
size_t got = readExact(client, audio + alen, (size_t)sz);
alen += got;
if (waitData(client, 3000)) client.readStringUntil('\n'); // CRLF
if (got < (size_t)sz) break;
}
} else if (content_len > 0) {
size_t want = (size_t)content_len < AUDIO_CAP ? (size_t)content_len : AUDIO_CAP;
alen = readExact(client, audio, want);
} else {
uint32_t idle = millis();
while (millis() - idle < 5000 && alen < AUDIO_CAP) {
int r = client.read(audio + alen, AUDIO_CAP - alen);
if (r > 0) { alen += r; idle = millis(); }
else if (!client.connected()) break;
else delay(5);
}
}
client.stop();
if (alen <= WAV_HEADER_LEN) { Serial.println("TTS: no audio"); free(audio); return; }
if (last_audio) free(last_audio);
last_audio = audio; // kept for REPLAY
last_audio_len = alen;
Serial.printf("TTS: %u KB clean audio (%s), playing\n",
(unsigned)(alen / 1024), chunked ? "de-chunked" : "plain");
playLastAnswer();
}
#else
void spkInit() {}
void speak(const String &t) { (void)t; }
void playLastAnswer() {}
#endif
/* ===========================================================================
* UI — right-hand button column (drawn on the PANEL, not the canvas, so
* it is never part of the image sent to the AI)
* =========================================================================== */
void drawWifi() {
panel->fillRect(BTN_X, 196, BTN_W, 44, BLACK);
bool up = (WiFi.status() == WL_CONNECTED);
long rssi = up ? WiFi.RSSI() : -100;
int bars = rssi > -55 ? 4 : rssi > -65 ? 3 : rssi > -75 ? 2 : rssi > -85 ? 1 : 0;
for (int b = 0; b < 4; b++) {
int bh = 5 + b * 5;
panel->fillRect(BTN_X + 4 + b * 8, 224 - bh, 6, bh,
(b < bars) ? GREEN : panel->color565(60, 60, 60));
}
panel->setTextSize(1);
panel->setCursor(BTN_X + 40, 210);
panel->setTextColor(up ? CYAN : RED);
if (up) panel->printf("%ld", rssi); else panel->print("--");
panel->setCursor(BTN_X + 2, 230);
panel->setTextColor(panel->color565(120, 120, 120));
panel->print("Robojax.com");
}
void drawButton(int y, const char *l1, const char *l2, uint16_t colour) {
panel->fillRoundRect(BTN_X, y, BTN_W, BTN_H, 6, colour);
panel->drawRoundRect(BTN_X, y, BTN_W, BTN_H, 6, WHITE);
panel->setTextSize(1);
panel->setTextColor(WHITE);
panel->setCursor(BTN_X + 6, y + 14);
panel->print(l1);
panel->setCursor(BTN_X + 6, y + 26);
panel->print(l2);
}
void drawButtons() {
panel->fillRect(BTN_X, 0, BTN_W, 196, BLACK);
drawButton(BTN_MODE_Y, MODES[mode].l1, MODES[mode].l2, panel->color565(90, 60, 140));
drawButton(BTN_ASK_Y, "ASK", "THE AI", panel->color565(0, 100, 60));
drawButton(BTN_CLEAR_Y, "CLEAR", "", panel->color565(110, 35, 35));
panel->setTextColor(YELLOW);
panel->setCursor(BTN_X + 2, 166);
panel->print("MODE cycles");
panel->setCursor(BTN_X + 2, 178);
panel->print("the question");
drawWifi();
showing_answer = false;
}
void drawAnswerSide() {
panel->fillRect(BTN_X, 0, BTN_W, 196, BLACK);
drawButton(BTN_MODE_Y, "BACK", "TO DRAW", panel->color565(0, 90, 160));
#if SPEAK_REPLIES
if (last_audio_len) drawButton(BTN_ASK_Y, "REPLAY", "", panel->color565(0, 110, 60));
#endif
drawButton(BTN_CLEAR_Y, "CLEAR", "ALL", panel->color565(110, 35, 35));
drawWifi();
showing_answer = true;
}
/* The answer is drawn on the PANEL over the canvas area, and stays until the
* user taps BACK or CLEAR - the canvas underneath is untouched. */
void showAnswer(const String &text) {
const int max_chars = 38;
int lines = (text.length() + max_chars - 1) / max_chars;
if (lines > 8) lines = 8;
int h = lines * 10 + 12;
int y = CANVAS_H - h;
panel->fillRect(0, y, CANVAS_W, h, BLACK);
panel->drawRect(0, y, CANVAS_W, h, CYAN);
panel->setTextSize(1);
panel->setTextColor(WHITE);
for (int i = 0; i < lines; i++) {
panel->setCursor(4, y + 6 + i * 10);
panel->print(text.substring(i * max_chars,
min((int)text.length(), (i + 1) * max_chars)));
}
}
/* ===========================================================================
* One full ask cycle
* =========================================================================== */
void askAboutDrawing() {
if (!has_ink) {
showAnswer("Draw something first, then tap ASK.");
drawAnswerSide();
return;
}
led(255, 120, 0); // amber: working
panel->fillRect(0, CANVAS_H - 22, CANVAS_W, 22, BLACK);
panel->setTextSize(1);
panel->setTextColor(YELLOW);
panel->setCursor(6, CANVAS_H - 15);
panel->printf("asking the AI (%s)...", MODES[mode].l1);
size_t jpg_len = 0;
uint8_t *jpg = canvasToJpeg(&jpg_len);
if (!jpg) {
showAnswer("Could not encode the drawing.");
drawAnswerSide();
led(255, 0, 0);
return;
}
Serial.printf("drawing encoded: %u KB\n", (unsigned)(jpg_len / 1024));
String answer;
uint32_t t0 = millis();
bool ok = askVision(jpg, jpg_len, MODES[mode].prompt, answer);
uint32_t ms = millis() - t0;
free(jpg);
if (!ok) {
showAnswer("No answer - see the serial monitor.");
drawAnswerSide();
led(255, 0, 0);
return;
}
Serial.printf("AI (%lu ms): %s\n", (unsigned long)ms, answer.c_str());
showAnswer(answer);
drawAnswerSide();
#if SPEAK_REPLIES
led(0, 255, 40);
speak(answer);
#endif
led(0, 0, 0);
}
/* ===========================================================================
* SETUP
* =========================================================================== */
void setup() {
Serial.begin(115200);
delay(400);
Serial.println("\n=== 08 Draw + AI | Robojax.com ===");
pinMode(TFT_BLK, OUTPUT);
digitalWrite(TFT_BLK, LOW);
pinMode(SD_CS, OUTPUT);
digitalWrite(SD_CS, HIGH);
SPI.begin(TFT_SCLK, TFT_MISO, TFT_MOSI);
panel->begin();
panel->fillScreen(BLACK);
digitalWrite(TFT_BLK, HIGH);
if (!canvas->begin()) {
panel->setTextColor(RED);
panel->setTextSize(2);
panel->setCursor(10, 100);
panel->print("Canvas alloc failed!");
panel->setTextSize(1);
panel->setCursor(10, 130);
panel->print("Tools > PSRAM > OPI PSRAM must be set.");
while (1) delay(1000);
}
bbct.init(TOUCH_SDA, TOUCH_SCL, TOUCH_RST, TOUCH_INT);
delay(50);
rgb.begin();
rgb.setBrightness(LED_BRIGHTNESS);
led(0, 0, 0);
spkInit();
clearCanvas();
panel->setTextSize(1);
panel->setTextColor(YELLOW);
panel->setCursor(BTN_X + 2, 4);
panel->printf("WiFi...");
WiFi.mode(WIFI_STA);
WiFi.begin(WIFI_SSID, WIFI_PASS);
uint32_t t0 = millis();
while (WiFi.status() != WL_CONNECTED && millis() - t0 < 20000) delay(300);
Serial.println(WiFi.status() == WL_CONNECTED
? "WiFi ok" : "WiFi FAILED (2.4GHz only - check secrets.h)");
drawButtons();
Serial.println("Draw on the screen, then tap ASK. MODE cycles the question.");
}
/* ===========================================================================
* LOOP
* =========================================================================== */
void loop() {
/* edge-detected buttons: one action per tap, finger must lift first */
static bool btn_down = false;
static uint8_t misses = 0;
uint16_t ux, uy;
bool touched = getTouch(&ux, &uy);
int x = touched ? (int)ux : -1;
int y = touched ? (int)uy : -1;
if (touched && x >= BTN_X) {
misses = 0;
if (!btn_down) {
btn_down = true;
last_x = last_y = -1; // never draw from a button tap
if (y >= BTN_MODE_Y && y < BTN_MODE_Y + BTN_H) {
if (showing_answer) { // BACK TO DRAW
canvas->flush(); // repaint the drawing
drawButtons();
} else { // MODE
mode = (mode + 1) % N_MODES;
drawButtons();
Serial.printf("mode: %s %s\n", MODES[mode].l1, MODES[mode].l2);
}
} else if (y >= BTN_ASK_Y && y < BTN_ASK_Y + BTN_H) {
if (showing_answer) {
#if SPEAK_REPLIES
led(0, 255, 40); playLastAnswer(); led(0, 0, 0);
#endif
} else {
askAboutDrawing();
}
} else if (y >= BTN_CLEAR_Y && y < BTN_CLEAR_Y + BTN_H) {
clearCanvas();
drawButtons();
}
}
} else {
if (btn_down && ++misses >= 4) { btn_down = false; misses = 0; }
/* Draw only when no answer overlay is up and we are not mid-button-press. */
if (!btn_down && !showing_answer) handleDrawing(touched, x, y);
}
/* The WiFi meter repaints only when the pen has been up for a moment, so it
* can never steal SPI time in the middle of a stroke. */
static uint32_t last_wifi = 0;
if (last_x < 0 && millis() - last_wifi > 3000) { last_wifi = millis(); drawWifi(); }
/* Poll as fast as possible while the pen is down - every millisecond spent
* sleeping here is a touch sample missed and a gap in the line. */
if (last_x < 0) delay(5);
}
Rzeczy, których możesz potrzebować
-
InnyProduct page for MaTouch AI ESP32S3 2.8" TFT ST7789Vmakerfabs.com
Zasoby i odniesienia
-
DokumentacjaMakerfabs MaTouch ESP32-S3 2.8" Camera and Touchscreen: user's manualwiki.makerfabs.com
-
Dokumentacja
-
DokumentacjaProduct page for MaTouch AI ESP32S3 2.8" TFT ST7789Vmakerfabs.com
-
ZewnętrznyMakerfabs websitemakerfabs.com
Pliki📁
Kod Arduino (.ino)
-
makerfabs_ESP32S3_Draw_AI.zip Arduino sketchincludes the pin header and secrete header .h files
makerfabs_ESP32S3_Draw_AI.zip0.02 MB