Controlling AC bulb from the Windows Command Line via USB
In this tutorial, we will learn how to control an AC bulb using a USS relay module via the Windows Command Line. This project will allow you to send commands from your computer to turn the light on and off using a USB connection. We will be using PowerShell scripts to achieve this functionality, which will communicate with the relay module connected to the computer.

To get started, you'll need to set up the hardware components and write the necessary scripts. The outcome will be a simple method to control your AC bulb remotely through your computer. For further clarification on the code and wiring, please refer to the video (in video at 02:15).
Hardware Explained
This project involves a relay module and a USB connection to your computer. The relay module acts as a switch that can control high-voltage devices like an AC bulb. It receives signals from the computer and opens or closes the circuit to turn the light on or off.
The relay module typically has a control pin that connects to a digital output pin on the microcontroller or computer. When the control pin receives a high signal, the relay activates, allowing current to flow to the bulb. This makes it a safe way to control AC devices without direct electrical contact.

Datasheet Details
| Manufacturer | Songle |
|---|---|
| Part number | SRD-05VDC-SL-C |
| Coil voltage | 5 VDC |
| Contact rating | 10 A / 250 VAC |
| Switching voltage | AC 250 V / DC 30 V |
| Switching current | 10 A max |
| Operating temperature | -10 to 60 °C |
| Package | PCB mount |
- Ensure proper heat dissipation when handling high currents.
- Use a fuse for additional safety against overload.
- Check relay specifications to match your AC bulb's power rating.
- Verify the relay wiring before powering on to prevent damage.
- Always use caution when working with AC voltages.
Wiring Instructions
To wire the relay module, start by connecting the VCC pin of the relay to the 5V pin on your Arduino or microcontroller. Connect the GND pin of the relay to the ground (GND) pin on the Arduino.
Next, connect the IN pin of the relay to a digital pin on the Arduino, for example, pin 7. This pin will be used to control the relay. Finally, connect the AC bulb to the relay's normally open (NO) terminal and the common (COM) terminal, ensuring the AC power source is properly connected to the relay. Always double-check your connections for safety.
Code to turn ON or OFF
Please watch the video for full details and demonstration.
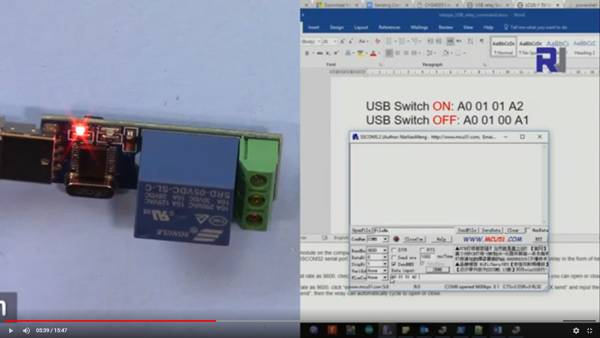
To turn ON send A0 01 01 A2
To turn OFF send A0 01 00 A1
Code Examples & Walkthrough
The following PowerShell script demonstrates how to turn the light off using a relay. The variable $powerOff contains the command sent to the relay to switch off the light.

[Byte[]] $powerOff = 0xA0, 0x01, 0x00, 0xA1
$robojax = new-Object System.IO.Ports.SerialPort COM8,9600,None,8,one
$robojax.Open()
$robojax.Write($powerOff, 0, $powerOff.Count)
$robojax.Close()
Here, the script initializes a new serial port connection on COM8 at a baud rate of 9600. It then sends the command to turn off the light and closes the connection.
Similarly, to turn the light on, you can use the following script. The variable $powerOn contains the command to activate the relay.
[Byte[]] $powerOn  = 0xA0, 0x01, 0x01, 0xA2
$robojax.Open()
$robojax.Write($powerOn, 0, $powerOn.Count)
$robojax.Close()
This script functions in the same way as the previous one, but it sends a different command to turn the light on. The sequence of commands allows you to control the AC bulb through your computer effectively.
Demonstration / What to Expect
When you run the scripts, you should see the AC bulb turn on or off accordingly. Ensure that the relay is properly wired and that the COM port is correctly specified in the script. If there are any issues, check the power supply and connections to the relay and the bulb.
Common pitfalls include incorrect COM port settings and faulty wiring. Always ensure that the relay is rated for the voltage and current of the bulb you are using to avoid any hazards.
图像


[Byte[]] $powerOn  = 0xA0, 0x01, 0x01, 0xA2
[Byte[]] $powerOff = 0xA0, 0x01, 0x00, 0xA1
$robojax = new-Object System.IO.Ports.SerialPort COM8,9600,None,8,one
$robojax.Open()
$robojax.Write($powerOff, 0, $powerOff.Count)
$robojax.Close()[Byte[]] $powerOn = 0xA0, 0x01, 0x01, 0xA2
[Byte[]] $powerOff = 0xA0, 0x01, 0x00, 0xA1
$robojax = new-Object System.IO.Ports.SerialPort COM8,9600,None,8,one
$robojax.Open()
$robojax.Write($powerOn, 0, $powerOn.Count)
$robojax.Close()|||您可能需要的东西
-
亚马逊从亚马逊购买USB继电器模块amzn.to
资源与参考
-
外部CH340 USB芯片数据手册(PDF)cdn.sparkfun.com
文件📁
其他文件
-
USB继电器PowerShell文件
robojax_USB_relay.zip
Windows 驱动程序
-
Sscom V3.2E USB命令工具
robojax_USB_relay_sscom32E.robojax.com.zip0.34 MB
其他文件
-
Arduino Pro Micro: Connecting an LED to a pin for the Blink program
https://robojax.com/products/files/arduino_robojax_ch341ser.zip