This tutorial is part of: ESP32-S3 RGB LED Matrix
Cool project to create for fun and practical applications using ESP32-S3 RGB Matrix module. Links to other videos are below this article.
ESP32-S3 RGB LED મેટ્રિક્સ Wi-Fi + NTP સમય ઘડિયાળ પ્રોજેક્ટ -1 મૂળભૂત ઘડિયાળ
ESP32-S3 ઇન્ટરનેટ ઘડિયાળ 8×8 નિયોમેટ્રિક્સ સાથે (Wi-Fi + NTP સમય)
આ પ્રોજેક્ટ ESP32-S3 અને 8×8 RGB નિયોમેટ્રિક્સ (NeoPixel/WS2812) ને નાની ઇન્ટરનેટ ઘડિયાળમાં ફેરવે છે. ESP32 Wi-Fi સાથે જોડાય છે, NTP સર્વરથી સ્થાનિક સમય સિંક્રનાઇઝ કરે છે, પછી સમયને HH:MM તરીકે 8×8 ડિસ્પ્લે પર સ્ક્રોલ કરે છે.
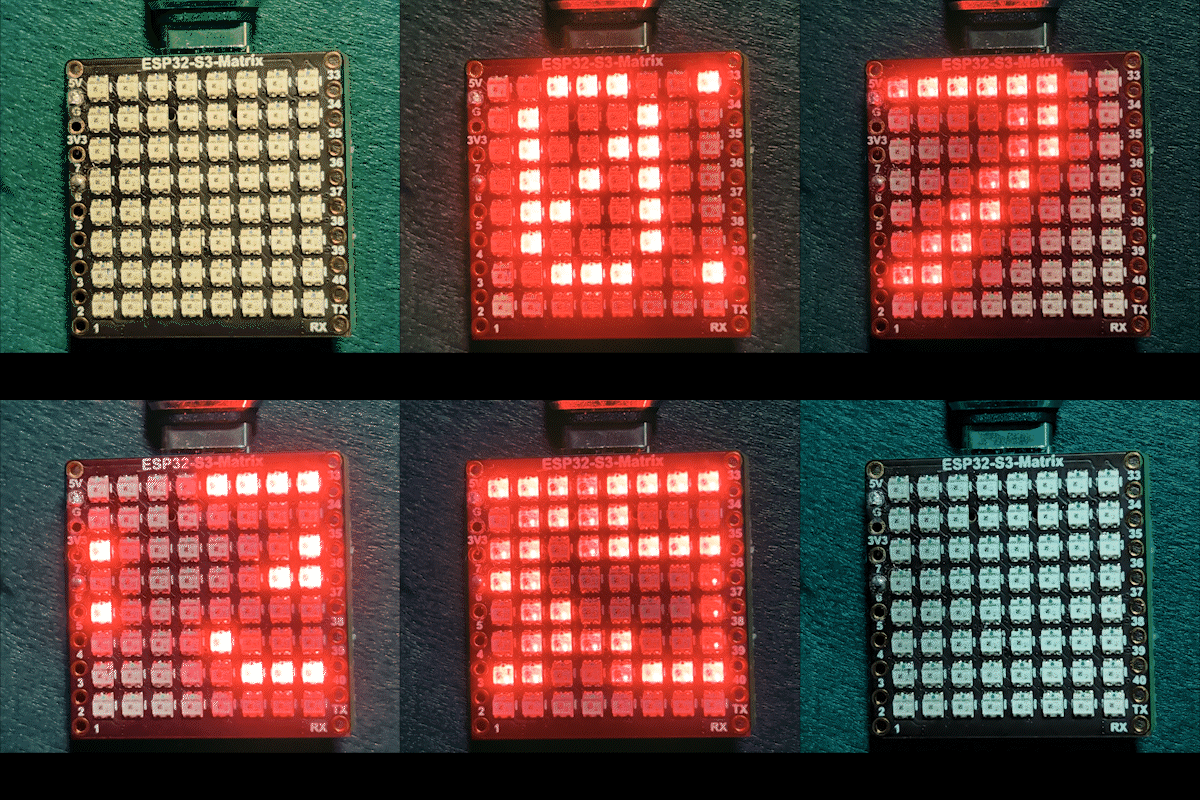

તે કેવી રીતે કામ કરે છે (ઉચ્ચ સ્તર)
1) ESP32-S3 <WiFi.h> નો ઉપયોગ કરીને તમારા રાઉટર સાથે જોડાય છે.
2) તે "time.h" અને configTime() નો ઉપયોગ કરીને NTP સર્વરથી સમય સિંક્રનાઇઝ કરે છે.
3) સમય HH:MM તરીકે ફોર્મેટ થાય છે અને નાના ટેક્સ્ટ બફરમાં સાચવવામાં આવે છે.
4) નિયોમેટ્રિક્સ ટેક્સ્ટ રેન્ડર કરે છે અને તેને 8×8 પેનલ પર સ્ક્રોલ કરે છે.
RGB રંગ
ઘડિયાળનો ટેક્સ્ટ રંગ RGB (લાલ, લીલો, વાદળી) મૂલ્યોનો ઉપયોગ કરીને નિયંત્રિત થાય છે, જ્યાં દરેક રંગ ચેનલ 0 થી 255 સુધી હોય છે અને વિવિધ સંયોજનો નિયોમેટ્રિક્સ પર વિવિધ રંગો બનાવે છે. color_RED, color_GREEN, અને color_BLUE ચલોને સમાયોજિત કરીને, તમે ઘડિયાળના દેખાવને તમને ગમે તે રંગમાં સરળતાથી કસ્ટમાઇઝ કરી શકો છો. ચોક્કસ રંગ માટે ચોક્કસ RGB મૂલ્યો ઝડપથી શોધવા માટે, તમે ઑનલાઇન RGB કલર પિકર કલર પિકર નો ઉપયોગ કરી શકો છો.
વપરાયેલી લાઇબ્રેરીઓ
આ ઇન્ક્લુડ્સ તમને બરાબર કહે છે કે સ્કેચ શેના પર આધાર રાખે છે:

#include <WiFi.h>
#include "time.h"
#include <Adafruit_GFX.h>
#include <Adafruit_NeoMatrix.h>
#include <Adafruit_NeoPixel.h>
Arduino લાઇબ્રેરી મેનેજરનો ઉપયોગ કરીને Adafruit NeoMatrix ઇન્સ્ટોલ કરો. તે Adafruit GFX Library અને Adafruit NeoPixel જેવી જરૂરી નિર્ભરતાઓ પણ ખેંચશે.
મહત્વપૂર્ણ વપરાશકર્તા સેટિંગ્સ જે તમારે સંપાદિત કરવી આવશ્યક છે
1) ટેક્સ્ટ રંગ (RGB)
0–255 મૂલ્યોનો ઉપયોગ કરીને તમારો ઘડિયાળ ટેક્સ્ટ રંગ સેટ કરો:
//લાલ, લીલા અને વાદળીથી બનેલા ડિસ્પ્લેનો રંગ સેટ કરો
unsigned int color_RED = 17;
unsigned int color_GREEN = 43;
unsigned int color_BLUE = 171;
આ મૂલ્યો અહીં ઉપયોગમાં લેવાય છે:
matrix.setTextColor(matrix.Color(color_RED, color_GREEN, color_BLUE));નોંધ: જો તમે બધા રંગો 0 (કાળો) પર સેટ કરો છો, તો ટેક્સ્ટ અદૃશ્ય બની જાય છે. સ્કેચમાં સલામતી તપાસ શામેલ છે:
// જો વપરાશકર્તાએ બધા રંગો 0 પર સેટ કર્યા હોય, તો ડિસ્પ્લે બંધ થઈ જશે તેથી તેને લીલો સેટ કરો
if (color_RED == 0 && color_GREEN == 0 && color_BLUE == 0) {
  color_GREEN = 200;
}
આ ખાતરી કરે છે કે મેટ્રિક્સ અદૃશ્ય રંગ સેટિંગને કારણે ક્યારેય “મૃત” ન દેખાય.
2) Wi-Fi SSID અને પાસવર્ડ
આને તમારા વાસ્તવિક Wi-Fi નામ અને પાસવર્ડથી બદલો:
const char* WIFI_SSID     = "WiFi";
const char* WIFI_PASSWORD = "passW0rd";
શરૂઆત દરમિયાન, ESP32 સિરિયલ મોનિટરમાં કનેક્શન પ્રગતિ છાપે છે અને લગભગ 15 સેકંડ પછી સમય સમાપ્ત થાય છે (30 રિટ્રાઇઝ × 500ms).
3) NTP સર્વર
ડિફોલ્ટ NTP સર્વર છે:
const char* ntpServer = "pool.ntp.org";તમે તેને જેમ છે તેમ રાખી શકો છો. જો તમે ક્યારેય સ્થાનિક સર્વરનો ઉપયોગ કરવા માંગો છો, તો હોસ્ટનામને તમારા પસંદીદા NTP સર્વરથી બદલો.
4) સમય ઝોન ઓફસેટ અને ડેલાઇટ સેવિંગ ઓફસેટ
આ બે સેટિંગ્સ સ્થાનિક સમયને નિયંત્રિત કરે છે:
// ટોરોન્ટો જેવું: UTC-5, વત્તા 1 કલાક DST
const long  gmtOffset_sec      = -5 * 3600;  // -5 કલાક
const int   daylightOffset_sec = 3600;       // DST માટે +1 કલાક
તેમને કેવી રીતે સેટ કરવું:
gmtOffset_sec= (UTC ઓફસેટ કલાકો) × 3600. ઉદાહરણ: UTC-5 →-5*3600, UTC+2 →2*3600.daylightOffset_sec=0જો તમે DST ગોઠવણ ન માંગતા હો, અથવા3600જો તમારો પ્રદેશ હાલમાં DST (+1 કલાક) અવલોકન કરી રહ્યો છે.
આ અહીં લાગુ કરવામાં આવે છે:
configTime(gmtOffset_sec, daylightOffset_sec, ntpServer);ડિસ્પ્લે રૂપરેખાંકન
મેટ્રિક્સ ડેટા પિન
ડેટા પિન અહીં વ્યાખ્યાયિત છે:
#define MATRIX_PIN 14જો તમારી વાયરિંગ અલગ GPIO નો ઉપયોગ કરે છે, તો આ સંખ્યાને મેળ ખાતી બદલો.
નિયોમેટ્રિક્સ લેઆઉટ + રંગ ક્રમ
તમારું મેટ્રિક્સ આ રીતે શરૂ થાય છે:
Adafruit_NeoMatrix matrix(8, 8, MATRIX_PIN,
  NEO_MATRIX_TOP    + NEO_MATRIX_LEFT +
  NEO_MATRIX_ROWS   + NEO_MATRIX_PROGRESSIVE,
  NEO_RGB           + NEO_KHZ800);
ડિસ્પ્લે “ખોટું” દેખાવાના બે સામાન્ય કારણો:
- પરિભ્રમણ / વાયરિંગ દિશા: જો ટેક્સ્ટ ઊંધું અથવા અરીસામાં દેખાય, તો
NEO_MATRIX_*ફ્લેગ્સ (TOP/BOTTOM, LEFT/RIGHT, ROWS/COLUMNS, PROGRESSIVE/ZIGZAG) સમાયોજિત કરો. - રંગ ક્રમ: આ કોડ
NEO_RGBનો ઉપયોગ કરે છે. કેટલીક પેનલNEO_GRBછે. જો લાલ/લીલો/વાદળી મેળ ન ખાતા હોય, તોNEO_RGBને યોગ્ય ક્રમમાં બદલો.
તેજ
તેજ initMatrix() માં સેટ થાય છે:
matrix.setBrightness(40);તેજસ્વી ડિસ્પ્લે માટે વધારો, ઓછી ગરમી અને પાવર ડ્રો માટે ઘટાડો.
સમય HH:MM તરીકે કેવી રીતે બનાવવામાં આવે છે
ઘડિયાળ ફોર્મેટ કરેલ સમયને 6-અક્ષરના બફરમાં સંગ્રહિત કરે છે:
char timeText[6] = "00:00";પછી updateTimeText() NTP-સિંક કરેલ સ્થાનિક સમય વાંચે છે અને ટેક્સ્ટ લખે છે:
// ફોર્મેટ HH:MM
snprintf(timeText, sizeof(timeText), "%02d:%02d",
         timeinfo.tm_hour,
         timeinfo.tm_min);
આ મુખ્ય લૂપમાં દર સેકન્ડે એક વાર અપડેટ થાય છે.
8×8 ડિસ્પ્લે પર સ્ક્રોલિંગ કેવી રીતે કામ કરે છે
8×8 મેટ્રિક્સ HH:MM એક સાથે બતાવવા માટે ખૂબ સાંકડું છે, તેથી સ્કેચ ટેક્સ્ટને સ્ક્રોલ કરે છે. તે સમયને બદલાતી X સ્થિતિ (scrollX) પર દોરે છે, પછી દરેક અપડેટ પર તેને એક પિક્સેલ ડાબી તરફ ખસેડે છે.
int16_t scrollX = 8;
const uint16_t scrollIntervalMs = 120;
દરેક સ્ક્રોલ પગલું:
matrix.fillScreen(0);
matrix.setCursor(scrollX, 0);
matrix.print(timeText);
matrix.show();
scrollX--;
જ્યારે ટેક્સ્ટ ડાબી બાજુથી સંપૂર્ણપણે બહાર નીકળી જાય છે, ત્યારે કોડ તેને જમણી ધારથી ફરી શરૂ કરવા માટે રીસેટ કરે છે:
int16_t textWidth = 30;
if (scrollX < -textWidth) {
  scrollX = matrix.width();
}
સીરિયલ મોનિટર આઉટપુટ (ડીબગિંગ)
આ સ્કેચ ઉપયોગી સંદેશાઓ છાપે છે:
- Wi-Fi કનેક્શન પ્રગતિ અને IP સરનામું
- સમય સિંક સફળ થયું કે નહીં
- ફોર્મેટ કરેલ સમય સ્ટ્રિંગ (દા.ત.,
Time text: 14:32)
જો ડિસ્પ્લે ખાલી હોય, તો Wi-Fi અને NTP કામ કરી રહ્યાં છે તે ચકાસવા માટે સીરિયલ મોનિટર એ પ્રથમ સ્થાન છે.
પ્રોજેક્ટ પ્રદર્શન
અપલોડ અને રીસેટ પછી:
- ESP32 Wi-Fi સાથે કનેક્ટ થાય છે
pool.ntp.orgથી સમય સિંક કરે છે- મેટ્રિક્સ પર ટૂંકમાં
OKબતાવે છે - વર્તમાન સમયને
HH:MMતરીકે સતત સ્ક્રોલ કરે છે
ડાઉનલોડ્સ અને લિંક્સ
સંપૂર્ણ કોડ આ લેખની નીચે આપેલ છે. ભાગો, સાધનો અને ડેટાશીટ્સ પણ આ લેખની નીચે લિંક કરેલ છે.
Images
This tutorial is part of: ESP32-S3 RGB LED Matrix
- ESP32-S3 RGB LED મેટ્રિક્સ પ્રોજેક્ટ 1- મૂળભૂત ડોટ
- ESP32-S3 RGB LED મેટ્રિક્સ પ્રોજેક્ટ 2 - સ્ક્રોલિંગ ટેક્સ્ટ
- ESP32-S3 RGB LED મેટ્રિક્સ પ્રોજેક્ટ 3 - મોબાઇલ ફોનમાંથી ટેક્સ્ટ
- ESP32-S3 RGB LED મેટ્રિક્સ પ્રોજેક્ટ 4 - ટિલ્ટ ડોટ
- ESP32-S3 RGB LED મેટ્રિક્સ પ્રોજેક્ટ 5 - તીર હંમેશા ઉપર
- ESP32-S3 RGB LED મેટ્રિક્સ પ્રોજેક્ટ 6 - સિબલે ગેમ
- ESP32-S3 RGB LED મેટ્રિક્સ ઇન્ટરનેટ ઘડિયાળ પ્રોજેક્ટ - 2 ઘડિયાળ બહુ રંગીન સમય અને તારીખ પ્રદર્શન
- ESP32-S3 RGB LED મેટ્રિક્સ ઇન્ટરનેટ ઘડિયાળ પ્રોજેક્ટ - તારીખ સાથે 3 રાત્રિ રંગ
- ESP32-S3 RGB LED મેટ્રિક્સ ઇન્ટરનેટ ઘડિયાળ પ્રોજેક્ટ - 5 મેઘધનુષ્ય રંગ
- ESP32-S3 RGB LED મેટ્રિક્સ ઇન્ટરનેટ ઘડિયાળ પ્રોજેક્ટ - 4 રેન્ડમ રંગ
- ESP32-S3 RGB LED Matrix test for RGB, GRB setting
/*
This is ESP32 sketch that connects to the internet, gets the time and displays it on the RGB matrix
you must set your WiFi correctly to make sure it gets connected.
 watch video https://youtube.com/shorts/4iWjLiD7fS8
 📚⬇️ Download and resource page https://robojax.com/RJT838
 * Author:  Ahmad Shamshiri (Robojax.com)
 * Date: 07 Jan 2026
www.Robojax.com
https://youTube.com/@robojax


*/
#include <WiFi.h>
#include "time.h"
#include <Adafruit_GFX.h>
#include <Adafruit_NeoMatrix.h>
#include <Adafruit_NeoPixel.h>

//set the color of diplay make of Red, Green and Blue
unsigned int color_RED = 17;
unsigned int color_GREEN = 43;
unsigned int color_BLUE = 171;

// 👇 REPLACE these with your real home WiFi name & password
const char* WIFI_SSID     = "WiFi";
const char* WIFI_PASSWORD = "passW0rd";


#define MATRIX_PIN 14

Adafruit_NeoMatrix matrix(8, 8, MATRIX_PIN,
  NEO_MATRIX_TOP    + NEO_MATRIX_LEFT +
  NEO_MATRIX_ROWS   + NEO_MATRIX_PROGRESSIVE,
  NEO_RGB           + NEO_KHZ800);

char timeText[6] = "00:00";
int16_t scrollX = 8;
unsigned long lastScrollMs = 0;
const uint16_t scrollIntervalMs = 120;

unsigned long lastTimeUpdateMs = 0;
const uint16_t timeUpdateIntervalMs = 1000;

//prototypes
bool updateTimeText();  // forward declaration
void scrollTime();      // forward declaration


// NTP (time) server
const char* ntpServer = "pool.ntp.org";

// Toronto-ish: UTC-5, plus 1 hour DST
const long  gmtOffset_sec     = -5 * 3600;  // -5 hours
const int   daylightOffset_sec = 3600;      // +1 hour for DST


bool updateTimeText() {
  struct tm timeinfo;
  if (!getLocalTime(&timeinfo)) {
    Serial.println("Failed to obtain time for display");
    return false;
  }

  // Format HH:MM
  snprintf(timeText, sizeof(timeText), "%02d:%02d",
           timeinfo.tm_hour,
           timeinfo.tm_min);

  Serial.print("Time text: ");
  Serial.println(timeText);
  return true;
}

void scrollTime() {
  matrix.fillScreen(0);
  matrix.setCursor(scrollX, 0);
  matrix.print(timeText);
  matrix.show();

  scrollX--;

  // Rough width: 5 characters ("HH:MM") × 6 pixels each ≈ 30 px
  int16_t textWidth = 30;
  if (scrollX < -textWidth) {
    scrollX = matrix.width();  // reset to right edge (8)
  }
}


void initMatrix() {
  matrix.begin();
  matrix.setBrightness(40);        // be careful with heat
  matrix.setTextWrap(false);
  matrix.setTextColor(matrix.Color(color_RED, color_GREEN, color_BLUE)); // color of text
}

void showMessage(const char* msg) {
  matrix.fillScreen(0);
  matrix.setCursor(0, 0);  // top-left
  matrix.print(msg);
  matrix.show();
}


void printLocalTime() {
  struct tm timeinfo;
  if (!getLocalTime(&timeinfo)) {
    Serial.println("Failed to obtain time");
    return;
  }
  // Format: 2025-11-18 14:35:12
  Serial.printf("%04d-%02d-%02d %02d:%02d:%02d\n",
                timeinfo.tm_year + 1900,
                timeinfo.tm_mon + 1,
                timeinfo.tm_mday,
                timeinfo.tm_hour,
                timeinfo.tm_min,
                timeinfo.tm_sec);
}

void setup() {
  Serial.begin(115200);
  delay(1000);
  Serial.println();
  Serial.println("ESP32-S3 Internet Clock - WiFi + NTP test");

  // Connect to WiFi
  Serial.print("Connecting to WiFi: ");
  Serial.println(WIFI_SSID);
  WiFi.mode(WIFI_STA);
  WiFi.begin(WIFI_SSID, WIFI_PASSWORD);

  int retries = 0;
  while (WiFi.status() != WL_CONNECTED && retries < 30) { // ~15s timeout
    delay(500);
    Serial.print(".");
    retries++;
  }
  Serial.println();

  if (WiFi.status() != WL_CONNECTED) {
    Serial.println("WiFi connection FAILED");
  } else {
    Serial.print("WiFi connected. IP: ");
    Serial.println(WiFi.localIP());
  }

// if user set all colors to 0, the dispaly will be turned off so set it green
  if(color_RED ==0 & color_GREEN ==0 && color_BLUE ==0)
  {
    color_GREEN = 200;
  }

  // Configure time via NTP
  configTime(gmtOffset_sec, daylightOffset_sec, ntpServer);
  Serial.println("Waiting for time...");
  delay(2000); // small wait for initial sync

  printLocalTime(); // print once at startup

    // NEW: init the LED matrix and show a test message
  initMatrix();
  showMessage("OK");
}

void loop() {
  unsigned long now = millis();

  // Update the time string "HH:MM" once per second
  if (now - lastTimeUpdateMs >= timeUpdateIntervalMs) {
    lastTimeUpdateMs = now;
    updateTimeText();  // fills timeText[], e.g. "14:32"
  }

  // Scroll the time across the 8×8 every scrollIntervalMs
  if (now - lastScrollMs >= scrollIntervalMs) {
    lastScrollMs = now;
    scrollTime();      // uses timeText and scrollX
  }
}
Things you might need
-
Amazon
-
eBay
-
AliExpressPurchase ESP32-S3 RGB Matrix from AliExpresss.click.aliexpress.com
-
AliExpressPurchase ESP32-S3 RGB Matrix from AliExpress (2)s.click.aliexpress.com
Resources & references
-
Video
Files📁
Fritzing File
-
esp32-S3-supermini-tht fritzing part
esp32-S3-supermini-tht.fzpz0.02 MB