This tutorial is part of: ESP32-S3 RGB LED Matrix
Cool project to create for fun and practical applications using ESP32-S3 RGB Matrix module. Links to other videos are below this article.

ESP32-S3 RGB LED Matrix Project 6 - Cible game
Project 6 – Target Game (Tilt the Board to Hit the Circle)
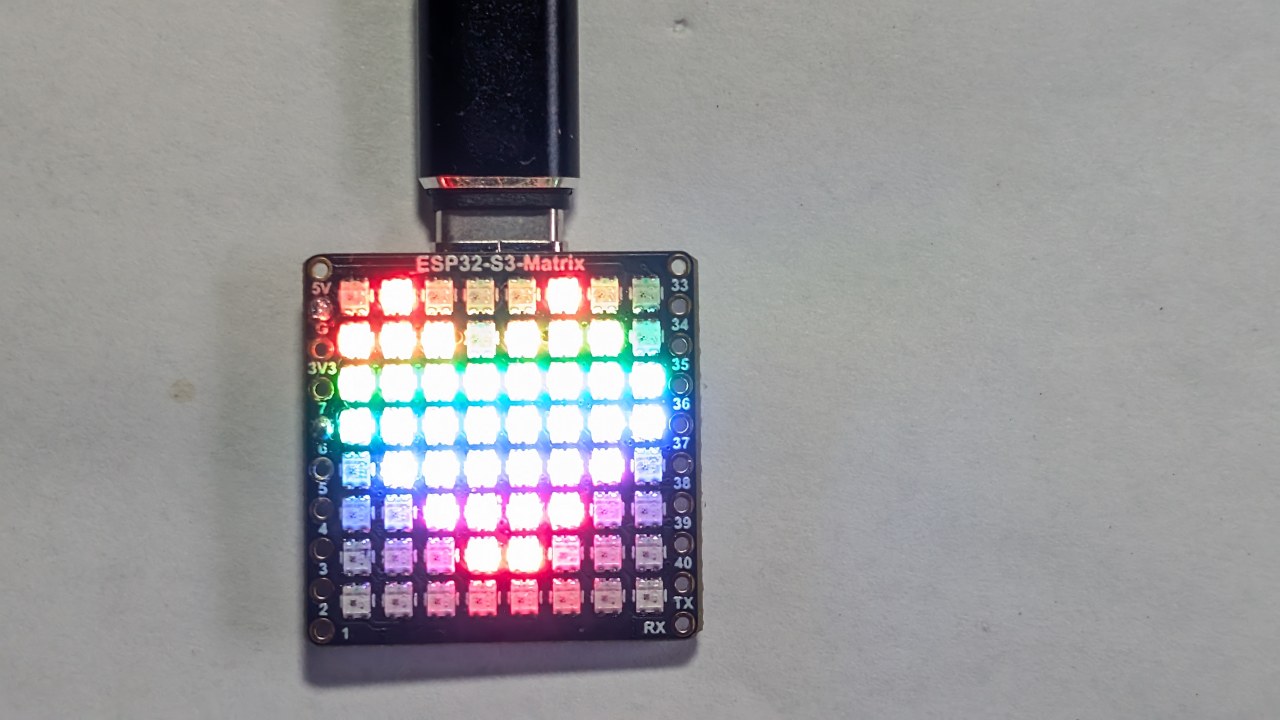
Project 6 is the final and most interactive project in this ESP32-S3 RGB LED Matrix series. Using the onboard QMI8658C motion sensor, you tilt the board to move a dot around the 8×8 matrix. A circular “target zone” sits in the middle of the display. When your dot touches the circle, the color changes and (optionally) a buzzer beeps. This creates a simple but surprisingly fun balance/coordination game.
All six projects are demonstrated in a single YouTube video (embedded on this page). The complete game code is loaded automatically below this article, and affiliate purchase links for the module appear under the code section.

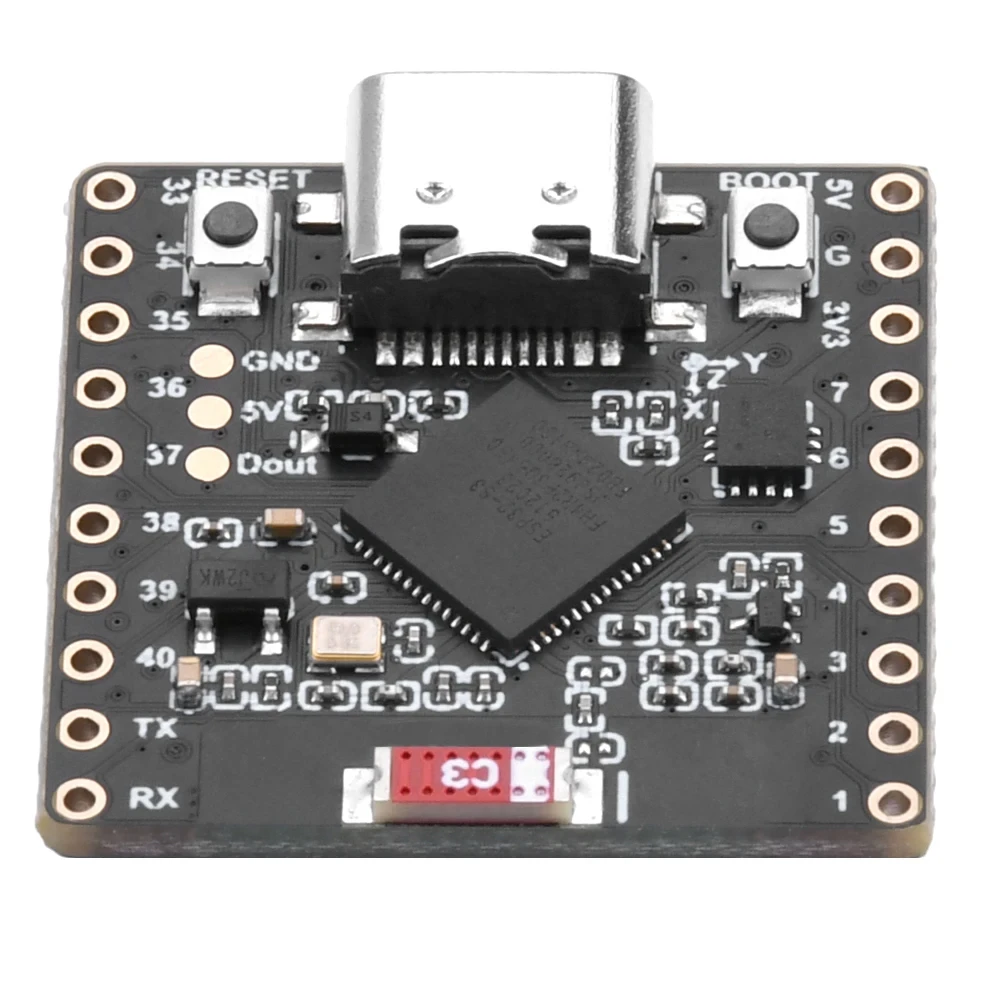
ESP32-S3 RGB LED Matrix Module Overview
This module includes:

- ESP32-S3 microcontroller (Wi-Fi + BLE)
- 8×8 RGB LED matrix (64 addressable LEDs)
- QMI8658C accelerometer for tilt and orientation sensing
- USB-C port for power and programming
- Boot / Reset buttons
- Available GPIO pins for add-ons like buzzers or sensors
For this game, the accelerometer is essential—it continuously reports X/Y tilt, allowing the dot to move smoothly based on board angle. The video section for this project clearly shows how the dot glides and reacts as you tilt the module left/right/forward/back.:contentReference[oaicite:0]{index=0}

Projects Covered in the Video (Timestamps)
- 00:00 – Introduction
- 02:01 – Installing ESP32 boards
- 03:32 – Installing libraries
- 05:32 – Project 1: Moving Dot
- 11:11 – Project 2: Text Scroll
- 12:59 – Project 3: HTTP Text
- 16:41 – Project 4: Tilt Dot
- 18:55 – Project 5: Arrow Up
- 20:02 – Project 6: Target Game (this project)
This portion of the video shows both the dot movement and the circle detection logic in action, making it easier to understand how the coordinates behave.:contentReference[oaicite:1]{index=1}

Installing ESP32 Boards in Arduino IDE
If you have already completed the earlier projects, board installation is done. Otherwise follow:
File > Preferences→ Add ESP32 board URL.Tools > Board > Boards Manager…→ Install “ESP32”.- Select the ESP32-S3 board under
Tools > Board. - Select the correct COM port under
Tools > Port.
Installing Required Libraries
This game uses:
Adafruit NeoMatrixAdafruit NeoPixelAdafruit GFXQMI8658(motion sensor)
Install them via:
Sketch > Include Library > Manage Libraries…- Search: NeoMatrix → Install
- Install dependencies (GFX + NeoPixel)
- Search and install QMI8658
How the Target Game Works
The QMI8658C accelerometer provides X and Y tilt values. These are mapped to LED coordinates (0–7 in both directions). Your dot moves across the matrix based on the board’s angle.
A circle (or ring) is drawn on the display as the “target area.” You win a “hit” whenever the dot overlaps the circle. At that moment:
- The target color changes (random or predefined)
- An optional buzzer beeps (if connected)
Since the matrix is small, the circle is drawn using a simple radius check. The game runs continuously, so you can tilt back and forth to hit the circle repeatedly.
Project 6 – Code Settings (Target Game)
Below are the main user-adjustable settings located at the top of the sketch. The full code is automatically included below this article.
Matrix Configuration
// Matrix configuration
const int MATRIX_PIN    = 14;
const int MATRIX_WIDTH  = 8;
const int MATRIX_HEIGHT = 8;
The RGB matrix is hard-wired to GPIO 14—do not change this.
Brightness
uint8_t matrixBrightness = 40; // 0–255
For indoor use, 30–60 is ideal.
Dot Color
// Dot color (R, G, B)
uint8_t dotRed   = 255;
uint8_t dotGreen = 255;
uint8_t dotBlue  = 255;
This is the dot you move by tilting the board.
Circle Color (Random or Fixed)
// Circle (target) color
uint8_t circleRed   = 0;
uint8_t circleGreen = 0;
uint8_t circleBlue  = 255;

// If true, choose a new random color each time the dot hits
bool randomCircleColor = true;
Set randomCircleColor = false; if you want a fixed color.
Circle Radius
// Target size (radius)
int targetRadius = 3;   // 3 fits well on 8×8 matrix
Larger radii make the game easier; smaller ones make it harder.
Tilt Sensitivity
// Sensitivity of tilt mapping
float tiltScale = 4.0f;   // increase = faster movement across screen
If the dot moves too fast or jumps, reduce this number.
Buzzer Settings (Optional)
// Buzzer pin (optional)
int buzzerPin = 6;      // connect buzzer + to pin 6, – to GND
bool useBuzzer = true;  // set false to disable sound
If you don’t connect a buzzer, simply set useBuzzer = false;
Summary
Project 6 combines everything learned from earlier projects: matrix drawing, accelerometer input, color control, movement smoothing, and optional sound. Tilting the board moves the dot, and hitting the circle changes its color and (optionally) triggers a beep. It’s a fun demonstration of motion-sensing on a compact RGB display.
The full “Target Game” code is displayed automatically below this article. You can also watch the Project 6 portion of the video to see how the dot moves and how hits are detected. If you’d like to build your own game, affiliate links for buying the ESP32-S3 RGB LED Matrix module appear under the code section.
Images
This tutorial is part of: ESP32-S3 RGB LED Matrix
- ESP32-S3 RGB LED Matrix Project 1- Basic Dot
- ESP32-S3 RGB LED Matrix Project 2 - Scrolling Text
- ESP32-S3 RGB LED Matrix Project 3 - Text from mobile phone
- ESP32-S3 RGB LED Matrix Project 4 - Tilt dot
- ESP32-S3 RGB LED Matrix Project 5 - Arrow always up
- ESP32-S3 RGB LED Matrix Wi-Fi + NTP Time Clock Project -1 Basic Clock
- ESP32-S3 RGB LED Matrix Internet Clock Project - 2 Clock multi color Time & Date Display
- ESP32-S3 RGB LED Matrix Internet Clock Project - 3 Night Color with Date
- ESP32-S3 RGB LED Matrix Internet Clock Project - 5 Rainbow color
- ESP32-S3 RGB LED Matrix Internet Clock Project - 4 Random color
- ESP32-S3 RGB LED Matrix test for RGB, GRB setting
/*
  Project 6: Tilt Circle Game – ESP32-S3 RGB LED Matrix (Waveshare)

  This sketch reads tilt from the QMI8658C IMU and smoothly moves a dot
  on the 8×8 RGB LED matrix based on board orientation.

  ▶️ Video Tutorial:
  https://youtu.be/JKLuYrRcLMI

  📚⬇️ Resources & Code Page:
  https://robojax.com/RJT829

  QMI8658_RGB_2
*/

#include <Arduino.h>
#include <math.h>

#include <Adafruit_GFX.h>
#include <Adafruit_NeoMatrix.h>
#include <Adafruit_NeoPixel.h>

#include <QMI8658.h>   // by Lahav Gahali

// -------- LED MATRIX SETUP --------
#define MATRIX_PIN    14
#define MATRIX_WIDTH  8
#define MATRIX_HEIGHT 8

// Buzzer pin – change this to your actual buzzer GPIO.
const int BUZZER_PIN = 6;   // TODO: set to your buzzer pin

// Matrix brightness (0–255)
const uint8_t MATRIX_BRIGHTNESS = 10;

Adafruit_NeoMatrix matrix = Adafruit_NeoMatrix(
  MATRIX_WIDTH, MATRIX_HEIGHT, MATRIX_PIN,
  NEO_MATRIX_TOP + NEO_MATRIX_LEFT +
  NEO_MATRIX_ROWS + NEO_MATRIX_PROGRESSIVE,
  NEO_GRB + NEO_KHZ800
);

// -------- IMU SETUP --------
QMI8658 imu;

// -------- GAME CONFIG --------

// How often the dot is allowed to move (ms).
// Bigger = slower movement.
const uint16_t MOVE_INTERVAL_MS = 150;   // try 120–250

// How much tilt (m/s^2) before the dot moves.
// Increase if it feels too sensitive.
const float ACC_TILT_THRESHOLD = 2.0f;   // about ~0.2 g

// Dot base color (RGB)
const uint8_t DOT_R = 255;
const uint8_t DOT_G = 255;
const uint8_t DOT_B = 255;


// Circle geometry (centered on 8x8)
const float CIRCLE_CENTER_X = (MATRIX_WIDTH - 1) / 2.0f;   // 3.5
const float CIRCLE_CENTER_Y = (MATRIX_HEIGHT - 1) / 2.0f;  // 3.5
const float CIRCLE_RADIUS   = 3.0f;
const float CIRCLE_THICKNESS = 0.8f; // +- thickness around radius

// -------- GAME STATE --------

// Dot position on the 8x8 grid (0..7)
int dotX = 3;
int dotY = 3;

// Colors (16-bit NeoMatrix colors)
uint16_t dotColor;
uint16_t circleColor;

// To detect “just touched circle” vs “still on circle”
bool wasOnCircle = false;

// Timer for rate-limiting movement
unsigned long lastMoveTime = 0;

// -------- HELPER FUNCTIONS --------

// Classic NeoPixel color wheel (0-255 -> rainbow)
uint16_t wheel(byte pos) {
  if (pos < 85) {
    return matrix.Color(pos * 3, 255 - pos * 3, 0);
  } else if (pos < 170) {
    pos -= 85;
    return matrix.Color(255 - pos * 3, 0, pos * 3);
  } else {
    pos -= 170;
    return matrix.Color(0, pos * 3, 255 - pos * 3);
  }
}

// Is a given pixel approximately on the circle?
bool isOnCircle(int x, int y) {
  float dx = x - CIRCLE_CENTER_X;
  float dy = y - CIRCLE_CENTER_Y;
  float d2 = dx * dx + dy * dy;

  float rMin = CIRCLE_RADIUS - CIRCLE_THICKNESS;
  float rMax = CIRCLE_RADIUS + CIRCLE_THICKNESS;

  return (d2 >= rMin * rMin) && (d2 <= rMax * rMax);
}

// Draw circle + dot
void drawScene() {
  matrix.fillScreen(0);

  // Draw circle
  for (int y = 0; y < MATRIX_HEIGHT; y++) {
    for (int x = 0; x < MATRIX_WIDTH; x++) {
      if (isOnCircle(x, y)) {
        matrix.drawPixel(x, y, circleColor);
      }
    }
  }

  // Draw dot (on top)
  matrix.drawPixel(dotX, dotY, dotColor);

  matrix.show();
}

// Simple blocking beep (short)
void buzzOnce() {
  digitalWrite(BUZZER_PIN, HIGH);
  delay(40);
  digitalWrite(BUZZER_PIN, LOW);
}

// Use accelerometer to decide dot movement
void updateDotFromTilt(float ax, float ay) {
  unsigned long now = millis();
  if (now - lastMoveTime < MOVE_INTERVAL_MS) {
    return; // too soon, wait
  }

  int dx = 0;
  int dy = 0;

  // On this board, Y tilt feels like "left/right" on the matrix,
  // and X tilt feels like "up/down" → so we swap.

  // --- Horizontal movement from AY (tilt left/right) ---
  if (ay > ACC_TILT_THRESHOLD) {
    dx = 1;   // tilt to the right → move dot to the right
  } else if (ay < -ACC_TILT_THRESHOLD) {
    dx = -1;  // tilt to the left → move dot to the left
  }

  // --- Vertical movement from AX (tilt forward/back) ---
  // This was inverted. We flip the signs:
  // ax >  threshold  = tilt "forward" (away)  → move dot UP  (dy = -1)
  // ax < -threshold  = tilt "back"    (toward)→ move dot DOWN(dy =  1)
  if (ax > ACC_TILT_THRESHOLD) {
    dy = -1;  // was +1 before
  } else if (ax < -ACC_TILT_THRESHOLD) {
    dy = 1;   // was -1 before
  }

  if (dx != 0 || dy != 0) {
    dotX = constrain(dotX + dx, 0, MATRIX_WIDTH  - 1);
    dotY = constrain(dotY + dy, 0, MATRIX_HEIGHT - 1);
    lastMoveTime = now;
  }
}


// -------- SETUP & LOOP --------

void setup() {
  Serial.begin(115200);
  delay(100);

  // Matrix init
  matrix.begin();
  matrix.setBrightness(MATRIX_BRIGHTNESS);
  matrix.fillScreen(0);
  matrix.show();

  // Buzzer init
  pinMode(BUZZER_PIN, OUTPUT);
  digitalWrite(BUZZER_PIN, LOW);

  // IMU init
if (!imu.begin(11, 12)) {
    Serial.println("Failed to initialize QMI8658!");
    while (1) {
      delay(100);
    }
  }

  // Use m/s^2 and dps (optional, but nice)
  imu.setAccelUnit_mps2(true);
  imu.setGyroUnit_dps(true);
  imu.setDisplayPrecision(3);

  Serial.println("QMI8658 initialized.");

  // Game initial state
  randomSeed((uint32_t)micros());

  dotX = MATRIX_WIDTH  / 2;
  dotY = MATRIX_HEIGHT / 2;

  dotColor    = matrix.Color(DOT_R, DOT_G, DOT_B);
  circleColor = wheel(random(256));

  drawScene();
}

void loop() {
  // Read accelerometer
  float ax, ay, az;
  if (imu.readAccelMPS2(ax, ay, az)) {
    // Debug if needed:
    // Serial.print("AX: "); Serial.print(ax);
    // Serial.print("  AY: "); Serial.print(ay);
    // Serial.print("  AZ: "); Serial.println(az);

    updateDotFromTilt(ax, ay);
  }

  // Check collision with circle
  bool onCircle = isOnCircle(dotX, dotY);
  if (onCircle && !wasOnCircle) {
    // Just touched circle: change color + beep
    circleColor = wheel(random(256));
    buzzOnce();
  }
  wasOnCircle = onCircle;

  // Redraw
  drawScene();

  // Small delay so we don’t hammer I2C too hard
  delay(10);
}
Things you might need
-
Amazon
-
eBay
-
AliExpressPurchase ESP32-S3 RGB Matrix from AliExpresss.click.aliexpress.com
-
AliExpressPurchase ESP32-S3 RGB Matrix from AliExpress (2)s.click.aliexpress.com
Resources & references
-
Internal🎨 Color picker Toolrobojax.com
Files📁
Fritzing File
-
esp32-S3-supermini-tht fritzing part
esp32-S3-supermini-tht.fzpz0.02 MB