This tutorial is part of: ESP32-S3 Matrice ya LED RGB
Projet cool pona ko créer pona ba applications ya esengo pe ya pratique en utilisant module ESP32-S3 RGB Matrix. Ba liens ya ba vidéos misusu ezali na se ya article oyo.
Mpɔ́ngɔ́ ya ESP32-S3 RGB LED Matrix 4 - Tilt dot
Projɛ́ 4 – Tilt Dot (Kokende Likuya na Kotilisa ESP32-S3 RGB LED Matrix)
Projɛ́ 4 elakisi moto ya mbala oyo ezali na kati ya module ya ESP32-S3 RGB LED Matrix. Na esika ya kokende ya likuya na ndenge ya auto (lokola Projɛ́ 1) to kokoma maloba na ndenge ya scrolling (Projɛ́ 2 na 3), projɛ́ oyo epesaka yo nguya ya ko contrôler esika ya likuya kaka na kotilisa board. Likuya ekendaka na ndenge ya pete likolo ya display ya 8×8 RGB kolandana na ba lectures ya QMI8658C accelerometer oyo ezali na nsima ya module.
Ba projɛ́ nyonso motoba ya série oyo emonisami na vidéo moko ya YouTube. Vidéo yango moko esili kotiama na lokasa oyo, mpo okoka komona ndenge likuya ekendaka na temps réel ntango board etilami. Code ya mobimba ya projɛ́ oyo eloadami automatiquement na nsé ya article, mpe ba liens ya achat ya module ezali na nsé ya code.


Vue générale ya Module ya ESP32-S3 RGB LED Matrix
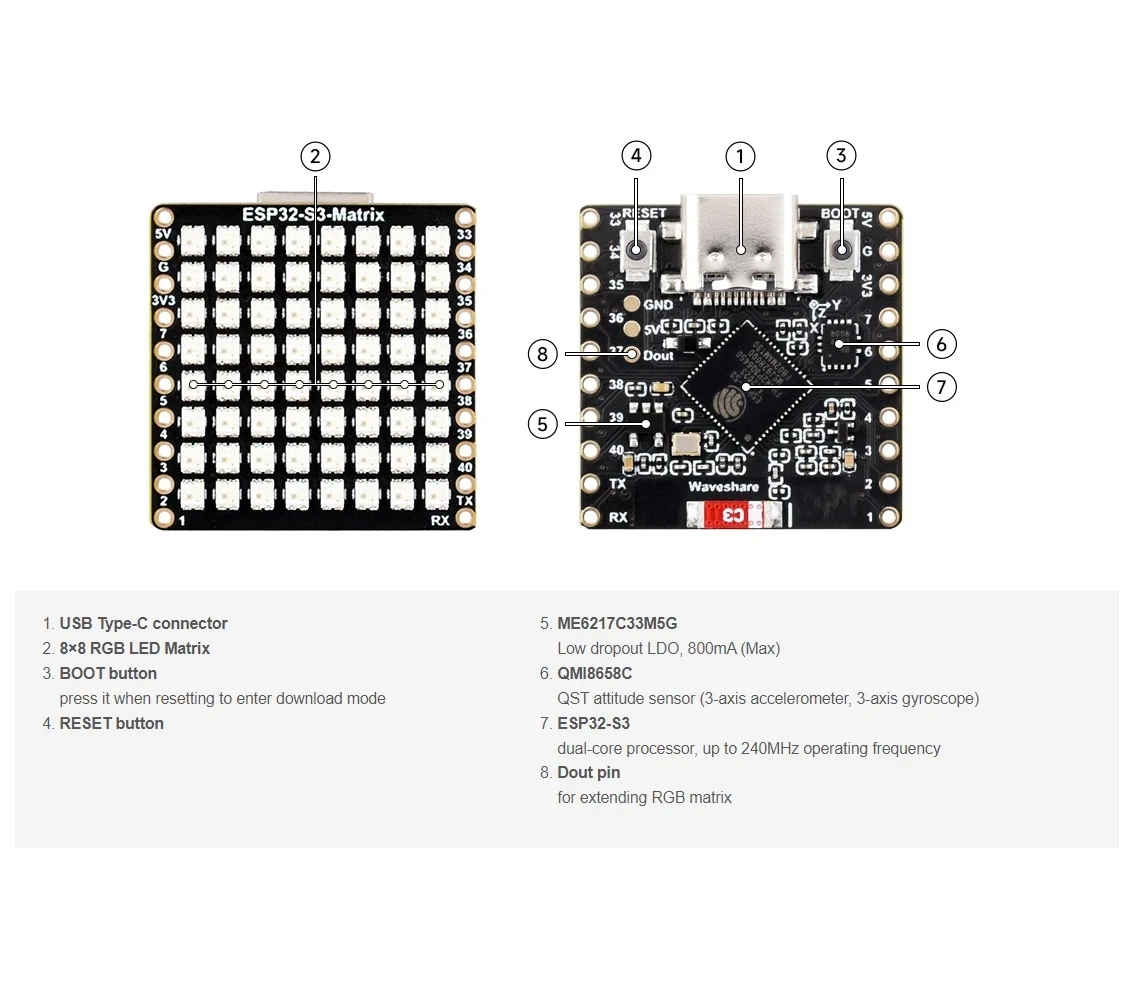
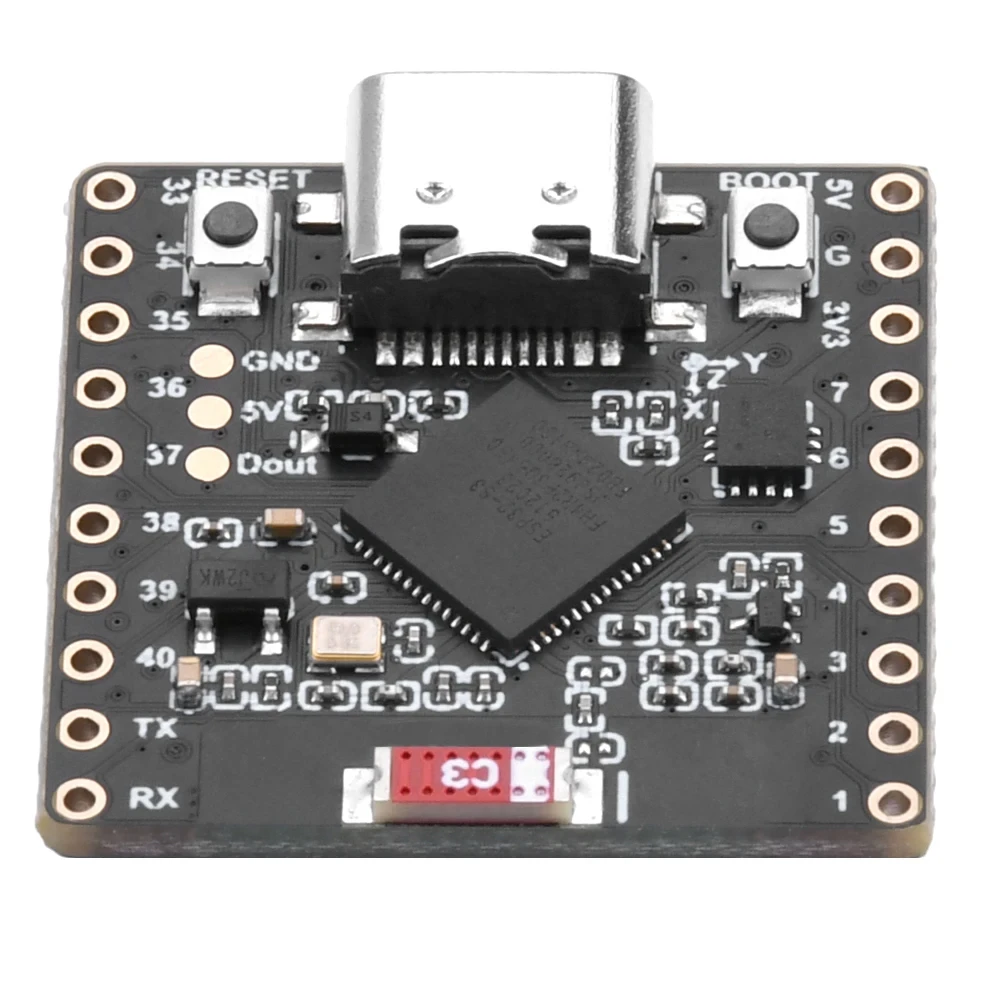
Projɛ́ oyo esalelaka module ya ESP32-S3 RGB LED Matrix, oyo ezali na:
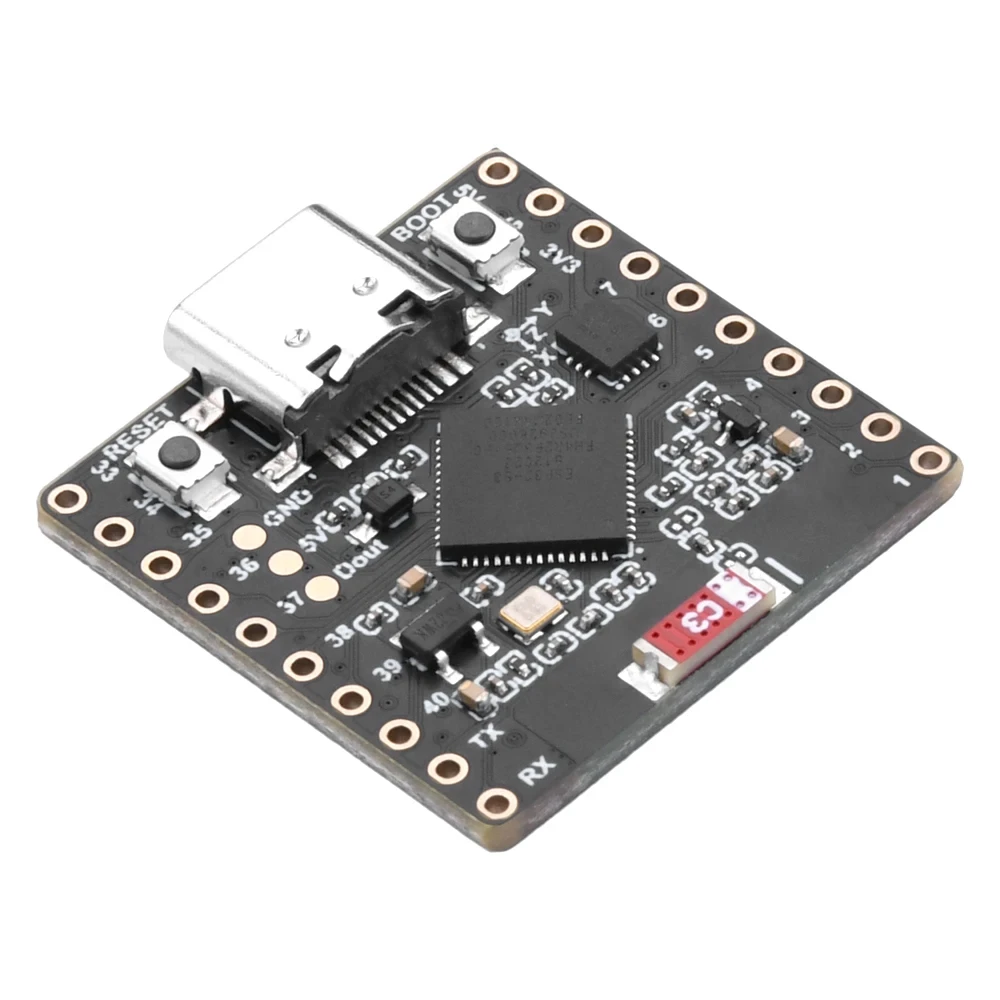
- Microcontrôleur ESP32-S3 na Wi-Fi mpe Bluetooth
- Matrice ya 8×8 RGB LED (ba LED 64 oyo bakoki ko adresser moko na moko)
- QMI8658C accelerometer na nsima mpo na koyeba kotilisa mpe mouvement
- Port USB mpo na programmation mpe courant
- Ba boutons Boot / Reset
- Ba GPIO pins oyo esalelami mpo na expansion na mikolo ekoya
Sensor ya QMI8658C yango etangaka ba valeurs ya X, Y, mpe Z ya accélération mpe orientation, mpo likuya ekoka kokende na likolo/na nsé/na loboko ya gauche/na loboko ya droite kolandana na ndenge board etilami.
Ba Projɛ́ oyo Emonisami na Vidéo (Ba Timestamps)
- 00:00 – Introduction
- 02:01 – Installation ya ba boards ya ESP32
- 03:32 – Installation ya ba bibliothèques
- 05:32 – Projɛ́ 1: Likuya oyo Ekendaka
- 11:11 – Projɛ́ 2: Scrolling ya Maloba
- 12:59 – Projɛ́ 3: HTTP Text
- 16:41 – Projɛ́ 4: Tilt Dot (projɛ́ oyo)
- 18:55 – Projɛ́ 5: Flèche na Likolo
- 20:02 – Projɛ́ 6: Jeu ya Cible
Kotala ndenge kotilisa emonisami na vidéo ezali malamu mingi, mpo okoka komona ndenge likuya eyanganaka na ndenge ya pete kolandana na orientation ya board.

Installation ya ba Boards ya ESP32 na Arduino IDE
Soki osilaki kosala projɛ́ mosusu liboso, support ya board esili kotiama. Soki te, landa ba étapes oyo:
- Fungola
File > Preferences→ Bakisa URL ya ba Boards ya ESP32. - Kende na
Tools > Board > Boards Manager…mpe installe ESP32. - Pona board na yo ya ESP32-S3 na
Tools > Board. - Pona port ya COM oyo ebongi na
Tools > Port.
Installation ya Ba Bibliothèques Oyo Esengeli
Projɛ́ oyo esengeli ba bibliothèques oyo:
Adafruit NeoMatrixAdafruit NeoPixelAdafruit GFX LibraryQMI8658(sensor ya mouvement)
Installe bango na Library Manager:
- Fungola
Sketch > Include Library > Manage Libraries…. - Luka Adafruit NeoMatrix → Installe.
- Pesa ndingisa ya installation automatique ya Adafruit GFX mpe Adafruit NeoPixel.
- Luka QMI8658 na moto oyo akomaki yango → Installe.
Ndenge Projɛ́ 4 Esalaka
Sensor ya QMI8658C ezali kopesa ba données ya accélération na ba axes X, Y, mpe Z na ndenge ya libela. Mpo na projɛ́ oyo, tosalelaka kaka ba axes X mpe Y mpo na kokatisa:
- Ndenge likuya esengeli kokende na loboko ya gauche to ya droite (axe X)
- Ndenge likuya esengeli kokende na likolo to na nsé (axe Y)
Ba valeurs ya sensor yango ekambami na intervalle ya coordonnées kolongwa na 0 kino na 7 (mpo na matrice ya 8×8 LED). Esika ya likuya ebongwanaka mbala ebele na seconde, mpo epesa effet ya glissement ya pete ntango otilisi module.
Projɛ́ 4 – Ba Paramètres ya Code (Tilt Dot)
Na nsé, ezali ba paramètres oyo moto akoki kobongola oyo ezali na likolo ya code ya projɛ́. Code ya mobimba emonisami na nsé ya article automatiquement.
Pin mpe Taille ya Matrice
// Configuration ya matrice ya 8×8 RGB
const int MATRIX_PIN    = 14;   // pin oyo ebongisami mpo na board oyo
const int MATRIX_WIDTH  = 8;
const int MATRIX_HEIGHT = 8;
Bombela MATRIX_PIN na 14. Ezali connecté na matrice ya board.
Luminosité
// Luminosité ya mobimba (0–255)
uint8_t matrixBrightness = 40;
Bakisa soki esengeli, kasi kotala te na luminosité ya makasi mingi soki ozali pembeni.
Couleur ya Likuya
// Couleur ya likuya (R, G, B)
uint8_t dotRed   = 0;
uint8_t dotGreen = 200;   // vert clair (défaut)
uint8_t dotBlue  = 0;
Bongola ba valeurs oyo mpo na kosala couleur nyonso. Bandakisa:
- Rouge:
(255, 0, 0) - Jaune:
(255, 255, 0) - Blanc:
(255, 255, 255)
Sensibilité ya Mouvement
Mpo na kopekisa ba sauts ya makasi, ba valeurs ya accéléromètre ekangamaka to ekitisamaka. Paramètre ya koyebana ezalaka:
// Ndenge kotilisa esalaka mouvement na makasi
float sensitivity = 4.0f;   // plus grand = mouvement ya mbangu na écran
Soki likuya ekendaka malembe mingi → bakisa valeur. Soki likuya ekendaka na ndenge ya mbangu mingi → kitisa yango.
Vitesse ya Mise à Jour (Taux de Rafraîchissement)
Okokaki, okokisa yango kati na ba ngɛ mokɛ́ mokɛ́ mpɔ na kosala ekomami ya malɛ́mba:
// Kozelisa kati na ba mise à jour (ms)
int refreshDelayMs = 20;   // mokɛ́ = malɛ́mba mpe eyano ya mbangu
Ba valeurs kati na 10–30 ms ezalaka na eyano ya malɛ́mba mpenza.
Liteya ya nsuká
Projet 4 epesaka bomoi na accéléromètre QMI8658C oyo ezali na kati ya ESP32-S3 na nzela ya kopesa yo nguya ya kokamba matrice ya LED na nzela ya mouvement ya nzoto. Kotengama mokɛ́ ya board ememaka dot na direction moko, mpe projet oyo ezali etape ya malamu mpo na ba projets ya “Arrow Up” mpe “Target Game” oyo ezali koleka.
Sketch ya Tilt Dot mobimba ekomami na nsé ya article oyo (لقاءلقاء). Mpo na kososola malamu, tala démonstration ya tilt na vidéo, epai okomona ndenge dot etambolaka malɛ́mba ntango board ezali kotengama. Ba liens mpo na kosomba module ya ESP32-S3 RGB LED Matrix ezali na nsé ya code.
Images
This tutorial is part of: ESP32-S3 Matrice ya LED RGB
- Projet ESP32-S3 Matrice LED RVB 1- Point de base
- Projet ESP32-S3 Matrice LED RVB 2 - Texte défilant
- Mokano ya ESP32-S3 RGB LED Matrix Projɛ́ 3 - Mokanda na phone ya mbɔ́kɔ
- Projet ESP32-S3 Matrice LED RVB 5 - Flèche toujours vers le haut
- Projet ESP32-S3 Matrice LED RVB 6 - Jeu Cible
- Mokano ya ESP32-S3 RGB LED Matrix Wi-Fi + NTP Time Clock -1 Saa ya Liboso
- Projet Horloge Internet à Matrice LED RGB ESP32-S3 - Affichage de l'Heure et de la Date en 2 Horloges Multicolores
- Projet ya Saa ya Intanɛti ya ESP32-S3 RGB LED Matrix - 3 Langi ya Butú elongo na Mokolo
- Projet ya Monganga ya Internet ya ESP32-S3 RGB LED Matrix - 5 Loni ya Rainbow
- Mosala ya ESP32-S3 RGB LED Matrix Internet Clock - Loni ya balabala ya 4
- ESP32-S3 RGB LED Matrix test for RGB, GRB setting
/*
  Project 4: Tilt Dot – ESP32-S3 RGB LED Matrix (Waveshare)

  This sketch reads tilt from the QMI8658C IMU and smoothly moves a dot
  on the 8×8 RGB LED matrix based on board orientation.

  ▶️ Video Tutorial:
  https://youtu.be/JKLuYrRcLMI

  📚⬇️ Resources & Code Page:
  https://robojax.com/RJT829

  QMI8658_RGB_2
*/

#include <Arduino.h>
#include <math.h>

#include <Adafruit_GFX.h>
#include <Adafruit_NeoMatrix.h>
#include <Adafruit_NeoPixel.h>

#include <QMI8658.h>   // by Lahav Gahali

// -------- LED MATRIX SETUP --------
#define MATRIX_PIN    14
#define MATRIX_WIDTH  8
#define MATRIX_HEIGHT 8

Adafruit_NeoMatrix matrix = Adafruit_NeoMatrix(
  MATRIX_WIDTH, MATRIX_HEIGHT, MATRIX_PIN,
  NEO_MATRIX_TOP + NEO_MATRIX_LEFT +
  NEO_MATRIX_ROWS + NEO_MATRIX_PROGRESSIVE,
  NEO_RGB + NEO_KHZ800
);

// -------- QMI8658 IMU SETUP --------
QMI8658 imu;
QMI8658_Data imuData;

// -------- USER SETTINGS --------

// true  -> dot on opposite side: USB↔OUSB, 34↔15
// false -> dot on same side as UP
bool useOppositeMapping = false;

// Dot color (0–255 each)
uint8_t dotRed   = 0;
uint8_t dotGreen = 100;
uint8_t dotBlue  = 0;

// Board sides
enum Side {
  SIDE_CENTER = 0,
  SIDE_USB,
  SIDE_OUSB,
  SIDE_15,
  SIDE_34
};

// Smooth dot position (in pixel coordinates, but kept as float for easing)
float dotPosX = 3.0f;   // start at center
float dotPosY = 3.0f;

// Smoothing factor: smaller = slower movement (0.1 very slow, 0.5 faster)
const float dotSmooth = 0.25f;


bool isFlat = false;

const char* sideName(Side s) {
  switch (s) {
    case SIDE_CENTER: return "CENTER";
    case SIDE_USB:    return "USB";
    case SIDE_OUSB:   return "OUSB";
    case SIDE_15:     return "15";
    case SIDE_34:     return "34";
    default:          return "?";
  }
}

// Detect which side is UP using calibrated axes:
// +X = USB, -X = OUSB, +Y = 34, -Y = 15
Side detectSideUp(float ax_g, float ay_g, float az_g) {
  // Flat detection
  const float flatThreshXY = 0.15f;
  const float flatThreshZ  = 0.15f;

  if (fabs(ax_g) < flatThreshXY &&
      fabs(ay_g) < flatThreshXY &&
      fabs(az_g - 1.0f) < flatThreshZ) {
    isFlat = true;
    return SIDE_CENTER;
  }
  isFlat = false;

  // Thresholds to say "this axis is really tilted"
  const float tiltThreshY = 0.5f;
  const float tiltThreshX = 0.5f;

  // 1) Prefer Y axis for 15 / 34 if it's clearly tilted
  if (fabs(ay_g) >= tiltThreshY) {
    if (ay_g > 0) {
      return SIDE_15;   // +Y = 34 up
    } else {
      return SIDE_34;   // -Y = 15 up
    }
  }

  // 2) Otherwise, check X axis for USB / OUSB
  if (fabs(ax_g) >= tiltThreshX) {
    if (ax_g > 0) {
      return SIDE_USB;  // +X = USB up
    } else {
      return SIDE_OUSB; // -X = OUSB up
    }
  }

  // 3) If nothing is strongly tilted, just call it CENTER
  return SIDE_CENTER;
}

// Map from UP side to where the dot should go
Side dotSideFromUpSide(Side upSide) {
  switch (upSide) {
    case SIDE_USB:
      return useOppositeMapping ? SIDE_OUSB : SIDE_USB;

    case SIDE_OUSB:
      return useOppositeMapping ? SIDE_USB : SIDE_OUSB;

    case SIDE_34:
      return useOppositeMapping ? SIDE_15 : SIDE_34;

    case SIDE_15:
      return useOppositeMapping ? SIDE_34 : SIDE_15;

    case SIDE_CENTER:
    default:
      return SIDE_CENTER;
  }
}

// Convert dot side to matrix coordinates
void getDotPixel(Side dotSide, int &px, int &py) {
  // Matrix (0,0) = top-left
  // top center:    (3,0) → USB
  // bottom center: (3,7) → OUSB
  // left center:   (0,3) → 15
  // right center:  (7,3) → 34
  // center:        (3,3)

  switch (dotSide) {
    case SIDE_USB:   px = 3; py = 0; break;
    case SIDE_OUSB:  px = 3; py = 7; break;
    case SIDE_15:    px = 0; py = 3; break;
    case SIDE_34:    px = 7; py = 3; break;
    case SIDE_CENTER:
    default:         px = 3; py = 3; break;
  }
}

void setup() {
  Serial.begin(115200);
  delay(500);

  matrix.begin();
  matrix.setBrightness(20);
  matrix.fillScreen(0);
  matrix.show();

  // IMU: SDA=11, SCL=12 for ESP32-S3-Matrix
  if (!imu.begin(11, 12)) {
    Serial.println("Failed to initialize QMI8658!");
    while (1) { delay(1000); }
  }

  imu.setAccelUnit_mg(true);
  imu.setGyroUnit_dps(true);
  imu.setDisplayPrecision(4);

  Serial.print("QMI8658 initialized. useOppositeMapping = ");
  Serial.println(useOppositeMapping ? "TRUE" : "FALSE");
}

void loop() {
  if (!imu.readSensorData(imuData)) {
    return;
  }

  float ax_g = imuData.accelX / 1000.0f;
  float ay_g = imuData.accelY / 1000.0f;
  float az_g = imuData.accelZ / 1000.0f;

  Side upSide  = detectSideUp(ax_g, ay_g, az_g);
  Side dotSide = dotSideFromUpSide(upSide);

  int targetX, targetY;
  getDotPixel(dotSide, targetX, targetY);

  // --- Smooth movement toward target ---
  dotPosX += (targetX - dotPosX) * dotSmooth;
  dotPosY += (targetY - dotPosY) * dotSmooth;

  // Convert to integer pixel coordinates
  int px = (int)round(dotPosX);
  int py = (int)round(dotPosY);

  // Clamp just in case
  if (px < 0) px = 0;
  if (px > 7) px = 7;
  if (py < 0) py = 0;
  if (py > 7) py = 7;

  // --- Draw dot ---
  matrix.fillScreen(0);
  uint16_t color = matrix.Color(dotRed, dotGreen, dotBlue);
  matrix.drawPixel(px, py, color);
  matrix.show();

  // Debug
  Serial.print("AX="); Serial.print(ax_g, 3);
  Serial.print(" AY="); Serial.print(ay_g, 3);
  Serial.print(" AZ="); Serial.print(az_g, 3);
  Serial.print(" | UP=");  Serial.print(sideName(upSide));
  Serial.print(" | DOT="); Serial.print(sideName(dotSide));
  Serial.print(" | px=");  Serial.print(px);
  Serial.print(" py=");    Serial.println(py);

  delay(80);
}
Nko o na nki.
-
Amazon
-
eBay
-
AliExpressPurchase ESP32-S3 RGB Matrix from AliExpresss.click.aliexpress.com
-
AliExpressPurchase ESP32-S3 RGB Matrix from AliExpress (2)s.click.aliexpress.com
Mokili na bisika
-
Interno🎨 Color picker Toolrobojax.com
Fichiers📁
Fritzing File
-
esp32-S3-supermini-tht fritzing part
esp32-S3-supermini-tht.fzpz0.02 MB