Этот учебник является частью: ESP32-S3 RGB LED матрица
Замечательный проект для создания развлекательных и практических приложений с использованием модуля RGB-матрицы ESP32-S3. Ссылки на другие видеоролики находятся ниже этой статьи.

Проект RGB LED матрицы ESP32-S3 3 - Текст с мобильного телефона
Проект 3 - Управляющая матрица Текста с Вашего телефона (HTTP Текст)
В этом проекте матрица RGB LED ESP32-S3 размещает небольшую веб-страницу, чтобы вы могли изменять прокручиваемый текст, цвет, направление и скорость напрямую с вашего телефона или компьютера. Вам не нужно отдельное приложение - просто веб-браузер. Это делает модуль крошечным Wi-Fi текстовым дисплеем, который вы можете обновлять в реальном времени.
Все шесть проектов в этой серии объяснены и продемонстрированы в одном видео на YouTube. То же видео встроено на эту страницу, так что вы можете увидеть, как выглядит веб-интерфейс и как текст мгновенно обновляется на матрице. Полный исходный код для этого проекта автоматически загружается под статьей, и вы можете приобрести модуль матрицы RGB LED ESP32-S3 в аффилированных магазинах, перечисленных в разделе кода.
В данной статье мы сосредоточимся на том, как работает сетевая логика (домашний Wi-Fi против точки доступа) и какие настройки вы можете изменить в коде для настройки поведения.


Обзор модуля RGB LED матрицы ESP32-S3
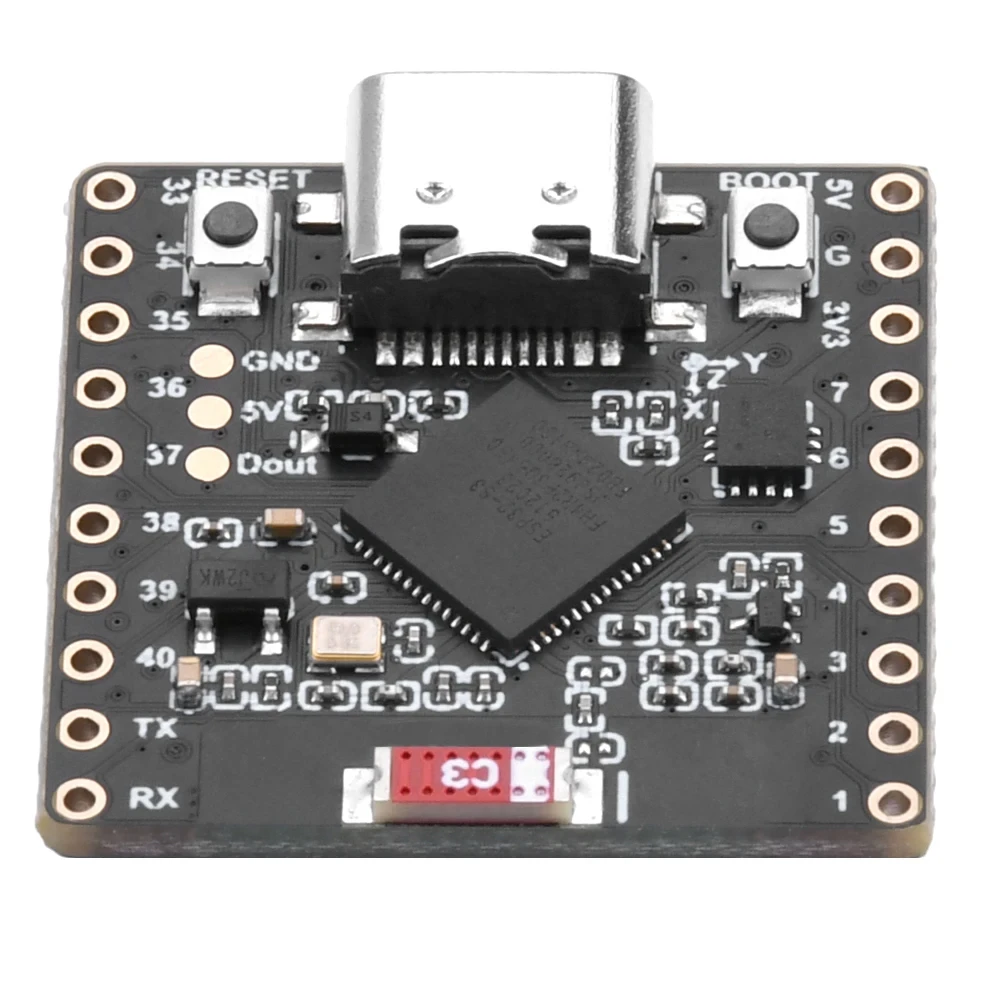
Аппаратное обеспечение такое же, как и для всех других проектов в этой серии: плата микроконтроллера ESP32-S3 с встроенной матрицей RGB LED 8×8 и датчиком движения QMI8658C сзади. Порт USB-C используется для питания и программирования, а контакты по краям все еще доступны для других операций ввода-вывода.:contentReference[oaicite:0]{index=0}

- ESP32-S3- Микроконтроллер с поддержкой Wi-Fi и Bluetooth.
- 8×8 RGB матрица- 64 адресуемых RGB светодиодов для текста и графики.
- QMI8658C акселерометр- использовался в проектах Tilt и Game.
- USB порт- питает плату и загружает эскизы из Arduino IDE.
- Оголённые контакты- разрешить добавление дополнительных датчиков или приводов, если это необходимо.
- Кнопки загрузки/сброса- для загрузки прошивки и перезапуска.
Для Проекта 3 самой важной особенностью является Wi-Fi модуля ESP32, который позволяет плате выступать в роли небольшого веб-сервера для страницы управления текстом.:contentReference[oaicite:1]{index=1}

Проекты, охваченные в видео (временные метки)
Одно видео для этой серии охватывает все шесть проектов. Для быстрого ознакомления:
- 00:00- Введение
- 02:01- Установка плат ESP32
- 03:32- Установка библиотек
- 05:32- Проект 1: Двигающаяся точка
- 11:11- Проект 2: Прокрутка текста
- 12:59-Проект 3: HTTP текст (этот проект)
- 16:41- Проект 4: Tilt Dot
- 18:55- Проект 5: Стрелка вверх
- 20:02- Проект 6: Игра-мишень
Рекомендуется посмотреть раздел HTTP Text в видео во время работы с этой статьей. В видео показано, как веб-страница генерируется с помощью ESP32 и как изменения текста, цвета и скорости мгновенно отображаются на светодиодной матрице.:contentReference[oaicite:2]{index=2}
Установка плат ESP32 в Arduino IDE
Если вы уже завершили проекты 1 или 2, настройка платы выполнена, и вы можете пропустить этот раздел. В противном случае выполните следующие шаги в Arduino IDE:
- Открыть
File > Preferencesи добавьте URL-адрес плат ESP32 в "Дополнительные URL-адреса менеджера плат". - Идите к
Tools > Board > Boards Manager…, ищитеESP32, и установите официальную пакет ESP32. - Выберите правильную плату RGB Matrix ESP32-S3 из
Tools > Board. - Подключите модуль через USB и выберите правильный последовательный порт в разделе
Tools > Port.
Без соответствующей поддержки платы ESP32 и правильного порта эскиз веб-сервера не загрузится.
Установка NeoMatrix и необходимых библиотек
Этот проект использует те же библиотеки, что и предыдущий проект прокрутки текста:
Adafruit NeoMatrixAdafruit NeoPixelAdafruit GFX Library
Установите через Диспетчер библиотек:
- Открыть
Sketch > Include Library > Manage Libraries…. - Поиск за
Adafruit NeoMatrixи нажмитеУстановить. - Примите установку зависимостей (
Adafruit GFXиAdafruit NeoPixel).
После установки вы должны увидеть примеры скетчей NeoMatrix и NeoPixel в разделеFile > Examples.
Два режима Wi-Fi в проекте 3
Самая важная концепция этого проекта заключается в том, что ESP32 может работать вдва разных режима:
- Режим станции (STA)ESP32 подключается к вашей существующей сети Wi-Fi в доме.
- Точка доступа (AP) режимESP32 создает свою собственную Wi-Fi сеть, если домашняя Wi-Fi сеть недоступна.
Оба режима используют один и тот же веб-интерфейс: HTML-страницу, обслуживаемую самим ESP32, где вы можете изменить текст, цвет, направление прокрутки и скорость.:contentReference[oaicite:3]{index=3}
Режим 1 - Подключение к домашней Wi-Fi сети (режим станции)
В режиме станции ESP32 подключается к вашей домашней или офисной Wi-Fi сети. Это предпочтительный режим, когда ваш маршрутизатор доступен, потому что:
- Ваш телефон и компьютер уже подключены к одной и той же Wi-Fi сети.
- Вы можете ввести IP-адрес ESP32 в браузере и управлять текстом с любого устройства в этой сети.
В разделе настроек скетча вы указываете свой SSID Wi-Fi и пароль:
// Home Wi-Fi credentials (Station mode)
const char* WIFI_SSID = "YourHomeWiFi";
const char* WIFI_PASS = "YourHomePassword";
После загрузки платы она пытается подключиться кWIFI_SSIDЕсли успешно, код выводит назначенный IP-адрес в Serial Monitor, например:
Connected to WiFi
IP address: 192.168.1.16
Чтобы контролировать текст:
- Убедитесь, что ваш телефон или ПК подключен к одной и той же Wi-Fi сети (например,
YourHomeWiFi). - Откройте браузер и введите напечатанный IP-адрес, такой как
http://192.168.1.16/. :contentReference[oaicite:4]{index=4} - Появится контрольная страница, позволяющая вам вводить текст, выбирать цвет, выбирать направление и настраивать скорость прокрутки.
Режим 2 - Автономная Точка Доступа (Режим AP)
Если ESP32 не может подключиться к вашей домашней Wi-Fi (неправильный пароль, сеть недоступна или вы используете модуль вне дома), скетч автоматически переключается в режим точки доступа. В режиме AP ESP32 сама становится Wi-Fi точкой доступа с собственным именем сети и паролем.
В этом проекте настройки точки доступа зафиксированы следующим образом:
// Access Point (AP) credentials (fallback mode)
const char* AP_SSID = "ESP32";
const char* AP_PASS = "password";
Когда режим станции не удаётся, модуль переключается на режим точки доступа и начинает транслировать сеть Wi-Fi, называемуюESP32. Чтобы контролировать матрицу:
- На вашем телефоне или компьютере откройте настройки Wi-Fi и подключитесь к сети.ESP32.
- Введите парольпароль(как определено в коде).
- После подключения откройте браузер и перейдите на
http://192.168.4.1/(стандартный IP для режима точки доступа ESP32). - Появляется та же контрольная страница, которая позволяет вам изменить текст, цвет, скорость и направление.
Это резервное поведение делает проект полезным в любом месте: дома, в лаборатории или в демонстрационной среде, где роутер недоступен.
Проект 3 - Основные настройки в коде
Полная схема HTTP Text загружена ниже в этой статье на сайте. Здесь мы документируем только самые важные параметры конфигурации, которые вы, вероятно, будете редактировать.
Настройки Wi-Fi и точки доступа
В верхней части эскиза вы найдете раздел конфигурации Wi-Fi. Измените только учетные данные для станции (домашний Wi-Fi); настройки AP обычно остаются по умолчанию:
// ---------- Wi-Fi SETTINGS ----------

// Home Wi-Fi (Station mode)
const char* WIFI_SSID = "YourHomeWiFi";      // put your router SSID here
const char* WIFI_PASS = "YourHomePassword";  // put your router password here

// Fallback Access Point (AP mode)
const char* AP_SSID = "ESP32";               // fixed AP name
const char* AP_PASS = "password";            // fixed AP password
Поведение:
- Если
WIFI_SSIDиWIFI_PASSверны, и сеть доступна → ESP32 подключается как обычное Wi-Fi устройство (режим станции). - Если соединение не удалось после таймаута → ESP32 запускает свою собственную точку доступа с использованием
AP_SSIDиAP_PASS.
Матрица Пин, Размер и Яркость
Эти настройки такие же, как в предыдущих проектах:
// Matrix configuration
const int MATRIX_PIN    = 14;   // RGB matrix data pin
const int MATRIX_WIDTH  = 8;
const int MATRIX_HEIGHT = 8;

// Overall display brightness (0–255)
uint8_t matrixBrightness = 40;  // adjust for your environment
СохранитьMATRIX_PINв14для этой платы. Вы можете увеличитьmatrixBrightnessЕсли вам нужно больше света, но более низкие значения более комфортны для просмотра вблизи.
Настройки текста по умолчанию и прокрутки
Когда плата запускается, она отображает начальное сообщение до тех пор, пока вы не откроете веб-страницу и не введете новое. Вы можете изменить текст по умолчанию в настройках:
// Default message shown at startup
String currentText = "Robojax";   // overwrite from web UI later
Остальное поведение прокрутки регулируется набором переменных, которые обновляются веб-интерфейсом:
// Scroll delay in milliseconds (lower = faster)
int scrollDelayMs = 50;

// Scroll direction: 0=left, 1=right, 2=up, 3=down
int scrollDirection = 0;   // default: scroll left
Веб-страница отправляет новые значения на основе выборов слайдера и кнопок. Со стороны Arduino вам нужно знать только следующее:
- Уменьшающийся
scrollDelayMsускоряет движение текста. - Увеличение
scrollDelayMsделает его движение медленнее. - Изменение
scrollDirectionпереключается между режимами прокрутки влево, вправо, вверх или вниз.
Цвет текста (управляется с веб-страницы)
Цвет текста контролируется тремя значениями от 0 до 255 (красный, зеленый, синий). Они обновляются каждый раз, когда вы выбираете новый цвет на веб-странице:
// Current text color (R, G, B)
uint8_t textRed   = 255;
uint8_t textGreen = 255;
uint8_t textBlue  = 255;
Когда вы выбираете цвет в браузере и нажимаете Применить, ESP32 анализирует значения RGB и обновляет эти три переменные; текст сразу меняет цвет на матрице. В видео это поведение демонстрируется с несколькими изменениями цвета, включая примеры красного, зеленого и синего.:contentReference[oaicite:5]{index=5}
Резюме
Проект 3 превращает ваш RGB LED-матрицу ESP32-S3 в полностью беспроводной текстовый дисплей, который вы можете управлять с любого устройства с веб-браузером. Скетч разработан с учетом надежности:
- Сначала он пытается подключиться к вашей домашней Wi-Fi сети, используя SSID и пароль, которые вы настроили.
- Если это не сработает, он автоматически станет точкой доступа с именем
ESP32и парольpassword. - В обоих режимах ввод правильного IP-адреса в браузере отображает одну и ту же страницу управления для текста, цвета, направления и скорости.
Полный код HTTP Text доступен ниже этой статьи (загружается автоматически на сайте). Для полного пошагового руководства и демонстрации в реальном времени того, как обновляется текст, обязательно посмотрите раздел Project 3 в видео. Если вы хотите создать проект сами, вы также можете приобрести модуль RGB LED Matrix ESP32-S3, используя ссылочные ссылки, указанные под кодом.
Изображения

Этот учебник является частью: ESP32-S3 RGB LED матрица
- Проект матрицы RGB LED ESP32-S3 1 - Основной штрих
- Проект RGB LED матрицы ESP32-S3 2 - Прокручиваемый текст
- Проект RGB LED матрицы ESP32-S3 4 - Наклоненная точка
- Проект матрицы RGB LED на ESP32-S3 5 - Стрелка всегда вверх
- Проект матрицы RGB LED ESP32-S3 6 - Игра цель
- ESP32-S3 RGB LED матрица Wi-Fi + NTP проект часы - 1 базовые часы
- ESP32-S3 RGB светодиодная матрица Интернет-часы - 2-часовой многоцветный дисплей времени и даты
- Проект интернет-часов на матрице RGB LED ESP32-S3 - 3 ночных цвета с датой
- Проект интернет-часов на матрице RGB LED ESP32-S3 - 5 радуга цветов
- Проект интернет-часы с матрицей RGB LED на ESP32-S3 - 4 случайных цвета
- Тест матрицы RGB LED ESP32-S3 для настройки RGB, GRB
/*
* Проект 4: HTTP Текстовая Прокрутка - RGB LED Матрица ESP32-S3 (Waveshare)
*
* - Подключается к вашему домашнему WiFi (режим станции с резервным AP).
* - Предоставляет веб-страницу, где вы можете настроить:
* Текст
* Цвет
* Включить/Выключить дисплей
* Направление прокрутки (Влево / Вправо / Вверх / Вниз)
* Задержка прокрутки (скорость)
* - Поддерживает 8×8 RGB LED матрицу с использованием Adafruit_NeoMatrix.
*
* ▶️ Видеоурок:
* https://youtu.be/JKLuYrRcLMI
*
* 📄 Ресурсы и страница кода:
* https://robojax.com/your-resources-page-here
*
* HTTP_Text_Scroll
*/
#include <Arduino.h>
#include <WiFi.h>
#include <WebServer.h>
#include <Adafruit_GFX.h>
#include <Adafruit_NeoMatrix.h>
#include <Adafruit_NeoPixel.h>
// ======================= НАСТРОЙКИ WIFI =========================
// Домашний WiFi (измените это на учетные данные вашего роутера)
const char* WIFI_SSID = "Biseem";
const char* WIFI_PASS = "wan9&Jang~";
// Точка доступа резервного копирования
const char* AP_SSID = "ESP32";
const char* AP_PASS = "password";
// ======================= НАСТРОЙКИ МАТРИЦЫ =======================
#define MATRIX_PIN 14
#define MATRIX_WIDTH 8
#define MATRIX_HEIGHT 8
// 0, 1, 2 или 3 - отрегулируйте, если ориентация текста неверна, с USB вверх
#define MATRIX_ROTATION 0
#define BRIGHTNESS 15
Adafruit_NeoMatrix matrix = Adafruit_NeoMatrix(
MATRIX_WIDTH, MATRIX_HEIGHT, MATRIX_PIN,
NEO_MATRIX_TOP + NEO_MATRIX_LEFT +
NEO_MATRIX_ROWS + NEO_MATRIX_PROGRESSIVE,
NEO_RGB + NEO_KHZ800
);
// ======================= СОСТОЯНИЕ ПРОКРУТКИ ==========================
enum ScrollDir {
DIR_LEFT = 0,
DIR_RIGHT,
DIR_UP,
DIR_DOWN
};
String scrollText = "Robojax";
uint16_t textColor = 0xFFFF; // по умолчанию белый
bool displayOn = true;
ScrollDir currentDir = DIR_LEFT;
// 1 шаг каждые столько мс (меньше = быстрее)
unsigned long scrollInterval = 80;
unsigned long lastScrollTime = 0;
// Положение горизонтального скролла
int scrollX = MATRIX_WIDTH;
int scrollY = 0; // верхний ряд
// Состояние для вертикальной прокрутки по букве
int vertCharIndex = 0; // какой символ строки
int vertY = MATRIX_HEIGHT; // вертикальное положение этого символа
// ======================= ВЕБ СЕРВЕР ============================
WebServer server(80);
// ======================= HTML СТРАНИЦА ============================
const char MAIN_page[] PROGMEM = R"rawliteral(
<!DOCTYPE html>
<html>
<head>
<meta charset="utf-8" />
<meta name="viewport" content="width=device-width, initial-scale=1.0" />
<title>ESP32 Text Scroll</title>
<style>
body {
font-family: Arial, sans-serif;
background: #111;
color: #eee;
text-align: center;
margin: 0;
padding: 10px;
}
.container {
max-width: 360px;
width: 100%%;
margin: 0 auto;
background: #222;
padding: 12px;
border-radius: 10px;
box-sizing: border-box;
}
input[type="text"] {
width: 100%%;
padding: 8px;
box-sizing: border-box;
border-radius: 5px;
border: 1px solid #444;
background: #111;
color: #eee;
margin-bottom: 10px;
}
.row {
margin: 10px 0;
}
.label {
display: block;
margin-bottom: 5px;
text-align: left;
}
.toggle {
display: inline-flex;
align-items: center;
gap: 8px;
}
.arrow-grid {
display: grid;
grid-template-columns: repeat(3, minmax(0, 1fr));
grid-template-rows: repeat(3, 50px);
gap: 8px;
justify-content: center;
margin-top: 10px;
}
.arrow-btn {
background: #333;
border: 1px solid #555;
color: #eee;
font-size: 18px;
border-radius: 10px;
cursor: pointer;
width: 100%%;
height: 100%%;
}
.arrow-btn.active {
background: #0a84ff;
}
.arrow-btn:disabled {
opacity: 0.5;
cursor: default;
}
button#applyBtn {
margin-top: 15px;
padding: 10px 20px;
border-radius: 8px;
border: none;
background: #0a84ff;
color: #fff;
font-size: 16px;
cursor: pointer;
}
button#applyBtn:active {
transform: scale(0.97);
}
</style>
</head>
<body>
<div class="container">
<h2>Robojax ESP32-S3 Matrix Text Scroll</h2>
<div class="row">
<span class="label">Text to scroll:</span>
<input type="text" id="text" value="Hello" />
</div>
<div class="row">
<span class="label">Color:</span>
<input type="color" id="color" value="#ffffff" />
</div>
<div class="row">
<span class="label">Scroll Delay (fast → slow):</span>
<input
type="range"
id="speed"
min="20"
max="300"
value="80"
oninput="document.getElementById('speedVal').innerText = this.value + ' ms';"
/>
<div id="speedVal" style="text-align:right;font-size:12px;margin-top:4px;">
80 ms
</div>
</div>
<div class="row">
<label class="toggle">
<input type="checkbox" id="power" checked />
<span>Display ON</span>
</label>
</div>
<div class="row">
<span class="label">Scroll Direction:</span>
<div class="arrow-grid">
<div></div>
<button class="arrow-btn" id="btnUp" onclick="setDir('up')">▲</button>
<div></div>
<button class="arrow-btn" id="btnLeft" onclick="setDir('left')">◀</button>
<div></div>
<button class="arrow-btn" id="btnRight" onclick="setDir('right')">▶</button>
<div></div>
<button class="arrow-btn" id="btnDown" onclick="setDir('down')">▼</button>
<div></div>
</div>
</div>
<button id="applyBtn" onclick="sendUpdate()">Apply</button>
<p id="status"></p>
</div>
<script>
let currentDir = 'left';
function setDir(dir) {
currentDir = dir;
document.querySelectorAll('.arrow-btn').forEach(b => b.classList.remove('active'));
if (dir === 'up') document.getElementById('btnUp').classList.add('active');
if (dir === 'down') document.getElementById('btnDown').classList.add('active');
if (dir === 'left') document.getElementById('btnLeft').classList.add('active');
if (dir === 'right') document.getElementById('btnRight').classList.add('active');
sendUpdate();
}
function sendUpdate() {
const text = document.getElementById('text').value;
const color = document.getElementById('color').value;
const power = document.getElementById('power').checked ? '1' : '0';
const speed = document.getElementById('speed').value;
const url = `/update?text=${encodeURIComponent(text)}&color=${encodeURIComponent(color)}&power=${power}&dir=${currentDir}&speed=${speed}`;
fetch(url)
.then(r => r.text())
.then(t => {
document.getElementById('status').innerText = t;
})
.catch(err => {
document.getElementById('status').innerText = 'Error sending update';
});
}
// Установить актив по умолчанию
setDir('left');
</script>
</body>
</html>
)rawliteral";
// ======================= ПОМОЩНИКИ ===============================
bool isHexChar(char c) {
return (c >= '0' && c <= '9') ||
(c >= 'a' && c <= 'f') ||
(c >= 'A' && c <= 'F');
}
String urlDecode(const String &src) {
String result;
result.reserve(src.length());
for (size_t i = 0; i < src.length(); i++) {
char c = src[i];
if (c == '+') {
result += ' ';
} else if (c == '%' && i + 2 < src.length()) {
char h1 = src[i + 1];
char h2 = src[i + 2];
if (isHexChar(h1) && isHexChar(h2)) {
char hex[3] = {h1, h2, 0};
int val = (int)strtol(hex, nullptr, 16);
result += (char)val;
i += 2;
} else {
result += c;
}
} else {
result += c;
}
}
return result;
}
uint16_t colorFromHex(const String &hex) {
// Ожидайте "#RRGGBB" или "RRGGBB"
String c = hex;
if (c.startsWith("#")) c.remove(0, 1);
if (c.length() != 6) {
// по умолчанию белый
return matrix.Color(255, 255, 255);
}
long value = strtol(c.c_str(), NULL, 16);
uint8_t r = (value >> 16) & 0xFF;
uint8_t g = (value >> 8) & 0xFF;
uint8_t b = (value) & 0xFF;
return matrix.Color(r, g, b);
}
void resetScrollPosition() {
int textWidth = scrollText.length() * 6; // шрифт по умолчанию ~6 пикселей на символ
int textHeight = 8; // Шрифт 5x7 помещается в 8
switch (currentDir) {
case DIR_LEFT:
// Начните прямо за правым краем
scrollX = MATRIX_WIDTH;
scrollY = 0;
break;
case DIR_RIGHT:
// Начните чуть снаружи левого края
scrollX = -textWidth;
scrollY = 0;
break;
case DIR_UP:
// Построчный вертикальный скроллинг, начиная с первого символа ниже матрицы
vertCharIndex = 0;
vertY = MATRIX_HEIGHT; // 8 → входит снизу
break;
case DIR_DOWN:
// Построчный вертикальный скроллинг, начиная с первого символа над матрицей
vertCharIndex = 0;
vertY = -textHeight; // -8 → входит сверху
break;
}
}
// ======================= HTTP ОБРАБОТЧИКИ =========================
void handleRoot() {
server.send_P(200, "text/html", MAIN_page);
}
void handleUpdate() {
if (server.hasArg("text")) {
String txt = urlDecode(server.arg("text"));
if (txt.length() == 0) {
scrollText = " ";
} else {
scrollText = txt;
}
}
if (server.hasArg("color")) {
String hex = server.arg("color");
textColor = colorFromHex(hex);
}
if (server.hasArg("power")) {
String p = server.arg("power");
displayOn = (p == "1");
}
if (server.hasArg("dir")) {
String d = server.arg("dir");
if (d == "left") currentDir = DIR_LEFT;
else if (d == "right") currentDir = DIR_RIGHT;
else if (d == "up") currentDir = DIR_UP;
else if (d == "down") currentDir = DIR_DOWN;
}
if (server.hasArg("speed")) {
String s = server.arg("speed");
int val = s.toInt();
// простой зажим безопасности
if (val < 10) val = 10; // очень быстро
if (val > 1000) val = 1000; // 1 секунда максимум
scrollInterval = (unsigned long)val;
// Скорость прокрутки установлена на
// Serial.print(scrollInterval);
// Serial.println(" мс");
}
resetScrollPosition();
server.send(200, "text/plain", "Updated");
}
// ======================= ЛОГИКА ПРОКРУТКИ ==========================
void drawScroll() {
if (!displayOn) {
matrix.fillScreen(0);
matrix.show();
return;
}
int textWidth = scrollText.length() * 6;
int textHeight = 8;
matrix.fillScreen(0);
matrix.setTextSize(1);
matrix.setTextWrap(false);
matrix.setTextColor(textColor);
// -------- ГОРИЗОНТАЛЬНАЯ ПРОКРУТКА (ВЛЕВО / ВПРАВО) --------
if (currentDir == DIR_LEFT || currentDir == DIR_RIGHT) {
matrix.setCursor(scrollX, 0);
matrix.print(scrollText);
matrix.show();
if (currentDir == DIR_LEFT) {
scrollX--;
if (scrollX < -textWidth) {
scrollX = MATRIX_WIDTH;
}
} else { // DIR_RIGHT
scrollX++;
if (scrollX > MATRIX_WIDTH) {
scrollX = -textWidth;
}
}
return;
}
// -------- ВЕРТИКАЛЬНЫЙ ПРОКРУТ (ВВЕРХ / ВНУТРЬ) - ПО БУКВЕ --------
if (scrollText.length() == 0) {
matrix.show();
return;
}
// Текущий персонаж
char c = scrollText[vertCharIndex];
int charWidth = 6;
int baseX = (MATRIX_WIDTH - charWidth) / 2; // центровать по горизонтали
matrix.setCursor(baseX, vertY);
matrix.print(c);
matrix.show();
if (currentDir == DIR_UP) {
// Передвинуть персонажа вверх
vertY--;
if (vertY < -textHeight) {
// Этот персонаж полностью пройден, переходите к следующему.
vertY = MATRIX_HEIGHT;
vertCharIndex++;
if (vertCharIndex >= scrollText.length()) {
vertCharIndex = 0; // вернуться к первому символу
}
}
} else if (currentDir == DIR_DOWN) {
// Переместите персонажа вниз
vertY++;
if (vertY > MATRIX_HEIGHT) {
// Этот персонаж полностью пройден, переходите к следующему.
vertY = -textHeight;
vertCharIndex++;
if (vertCharIndex >= scrollText.length()) {
vertCharIndex = 0; // циклический возврат
}
}
}
}
// ======================= ИНИЦИАЛИЗАЦИЯ WIFI =============================
void startAPFallback() {
Serial.println("Starting AP fallback...");
WiFi.mode(WIFI_AP);
bool apOk = WiFi.softAP(AP_SSID, AP_PASS);
if (apOk) {
Serial.print("AP started. SSID: ");
Serial.print(AP_SSID);
Serial.print(" IP: ");
Serial.println(WiFi.softAPIP());
} else {
Serial.println("Failed to start AP.");
}
}
void connectWiFi() {
WiFi.mode(WIFI_STA);
WiFi.begin(WIFI_SSID, WIFI_PASS);
Serial.print("Connecting to WiFi ");
Serial.print(WIFI_SSID);
unsigned long startAttempt = millis();
const unsigned long timeout = 10000; // 10с
while (WiFi.status() != WL_CONNECTED && (millis() - startAttempt) < timeout) {
Serial.print(".");
delay(500);
}
Serial.println();
if (WiFi.status() == WL_CONNECTED) {
Serial.print("Connected. IP address: ");
Serial.println(WiFi.localIP());
} else {
Serial.println("WiFi connect failed, starting AP fallback.");
startAPFallback();
}
}
// ======================= УСТАНОВКА И ЦИКЛ ==========================
void setup() {
Serial.begin(115200);
delay(500);
// Инициализация матрицы
matrix.begin();
matrix.setRotation(MATRIX_ROTATION);
matrix.setBrightness(BRIGHTNESS);
matrix.fillScreen(0);
matrix.show();
// ВайФай
connectWiFi();
// Маршруты веб-сервера
server.on("/", handleRoot);
server.on("/update", handleUpdate);
server.onNotFound([]() {
server.send(404, "text/plain", "Not found");
});
server.begin();
Serial.println("HTTP server started.");
resetScrollPosition();
}
void loop() {
server.handleClient();
unsigned long now = millis();
if (now - lastScrollTime >= scrollInterval) {
lastScrollTime = now;
drawScroll();
}
}
Вещи, которые могут вам понадобиться
-
Амазонка
-
eBay
-
АлиЭкспрессКупить ESP32-S3 RGB-матрицу на AliExpresss.click.aliexpress.com
-
АлиЭкспрессПриобретите ESP32-S3 RGB Matrix на AliExpress (2)s.click.aliexpress.com
Ресурсы и ссылки
-
Внутренний🎨 Инструмент выбора цветаrobojax.com
Файлы📁
Файл Fritzing
-
esp32-S3-supermini-tht часть фритзинга
esp32-S3-supermini-tht.fzpz0.02 MB