الگرو ACS758 کرنٹ سینسر کو Arduino کے ساتھ 50A سے 200A کے لیے کیسے استعمال کریں
زیادہ گنجائش والی ایپلیکیشنز میں موجودہ پیمائش چیلنجنگ ہو سکتی ہے، لیکن Allegro ACS758 کرنٹ سینسر اس کام کو آسان بناتا ہے۔ یہ سینسر 50A سے 200A تک کرنٹ کی سطح کو سنبھال سکتا ہے، جو مختلف پروجیکٹس کے لیے ایک قابل اعتماد حل فراہم کرتا ہے۔ اس ٹیوٹوریل میں، ہم دریافت کریں گے کہ ACS758 کو Arduino سے کیسے جوڑیں اور کرنٹ کی قدریں درست طریقے سے پڑھیں۔

ہارڈویئر کی وضاحت
اس پروجیکٹ کا مرکزی جزو Allegro ACS758 کرنٹ سینسر ہے۔ یہ سینسر ہال ایفیکٹ کے اصول پر کام کرتا ہے، جو اسے کنڈکٹر سے گزرنے والے کرنٹ سے پیدا ہونے والے مقناطیسی میدان کی پیمائش کرنے کی اجازت دیتا ہے۔ یہ کرنٹ کے متناسب آؤٹ پٹ وولٹیج پیدا کرتا ہے، جس سے Arduino ان اقدار کو پڑھ اور تشریح کر سکتا ہے۔ ACS758 کے کئی ورژن ہیں، جس میں "100B" اشارہ کرتا ہے کہ یہ 100A تک پیمائش کر سکتا ہے۔ اس میں دو طرفہ کرنٹ پیمائش کی خصوصیت ہے، جو کرنٹ کی سمت سے قطع نظر درست ریڈنگ کی اجازت دیتی ہے۔ سینسر کو 3.3V یا 5V کی بجلی کی فراہمی درکار ہوتی ہے، جو اس کے اندرونی سرکٹری کو طاقت دیتی ہے، بشمول ایک آپریشنل ایمپلیفائر جو ہال ایفیکٹ سگنل پر کارروائی کرتا ہے۔ڈیٹاشیٹ کی تفصیلات
| مینوفیکچرر | Allegro Microsystems |
|---|---|
| پارٹ نمبر | ACS758LCB-100B |
| لاجک/آئی او وولٹیج | 3.3 V / 5 V |
| سپلائی وولٹیج | 4.5 V - 5.5 V |
| آؤٹ پٹ کرنٹ (فی چینل) | 100 A |
| پیک کرنٹ (فی چینل) | 200 A |
| PWM فریکوئنسی رہنمائی | N/A |
| ان پٹ لاجک تھریشولڈز | TTL مطابقت رکھتا ہے |
| وولٹیج ڈراپ / RDS(on) / سیچوریشن | 0.1 V @ 100 A |
| تھرمل حدود | آپریٹنگ درجہ حرارت: -40 °C سے 125 °C |
| پیکیج | 5 پن پیکیج |
| نوٹس / ورژن | مختلف کرنٹ ریٹنگز میں دستیاب (50A، 100A، 150A، 200A) |
- مزاحمت کی وجہ سے وولٹیج ڈراپ سے بچنے کے لیے مناسب وائرنگ کو یقینی بنائیں۔
- زیادہ کرنٹ والی ایپلیکیشنز کے لیے مناسب گیج کی تار استعمال کریں تاکہ زیادہ گرمی سے بچا جا سکے۔
- درست ریڈنگ کے لیے سینسر کو مخصوص درجہ حرارت کی حدود میں رکھیں۔
- استعمال شدہ مخصوص ماڈل کی بنیاد پر سینسر آؤٹ پٹ کو کیلیبریٹ کریں۔
- اگر ضروری ہو تو ریڈنگ کو مستحکم کرنے کے لیے فلٹرنگ کیپسیٹرز استعمال کرنے پر غور کریں۔
وائرنگ ہدایات
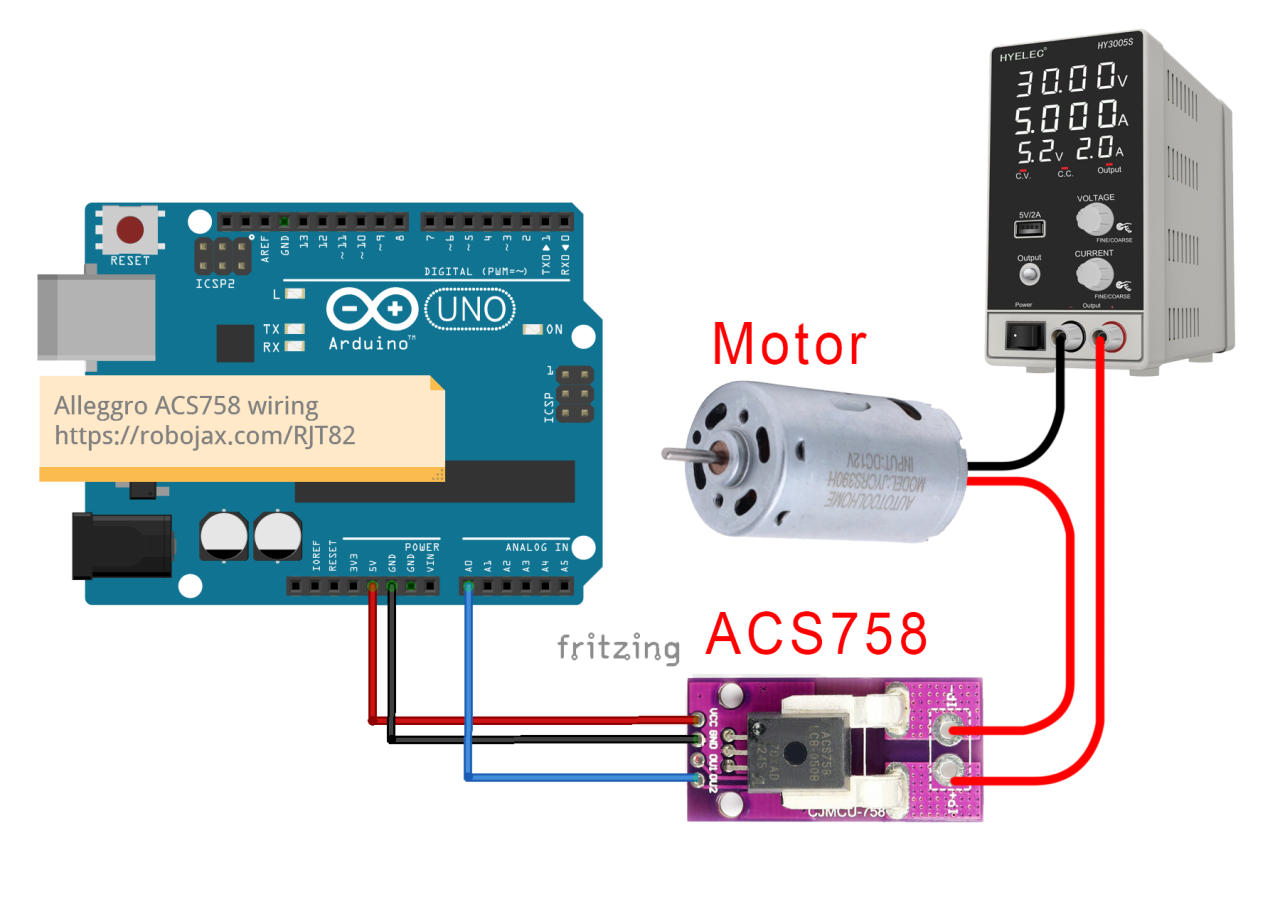
A0 کہا جاتا ہے۔
یقینی بنائیں کہ جس لوڈ کی پیمائش کرنا چاہتے ہیں وہ سینسر کے ساتھ سیریز میں جڑا ہوا ہے۔ کرنٹ کا راستہ سینسر سے گزرنا چاہیے تاکہ یہ اس میں سے گزرنے والے کرنٹ کی درست پیمائش کر سکے۔ سینسر میں دو کرنٹ ان پٹ پن ہیں؛ اپنے لوڈ کی مثبت تار کو ان پنوں میں سے ایک سے اور دوسرے پن کو اپنی بجلی کی فراہمی کے مثبت ٹرمینل سے جوڑیں۔ بجلی کی فراہمی کا منفی رخ لوڈ کے منفی ٹرمینل سے منسلک ہونا چاہیے۔ یہ سیٹ اپ سینسر کو لوڈ تک بہنے والے کرنٹ کی پیمائش کرنے کی اجازت دیتا ہے۔
کوڈ مثالیں اور واک تھرو
ACS758 سینسر سے اقدار پڑھنے کے لیے Arduino کوڈ سیدھا ہے۔ نیچے اعلی درجے کے کوڈ کا ایک اقتباس ہے جو سینسر کو ابتدائی شکل دیتا ہے اور وولٹیج پڑھتا ہے:
#define VIN A0 // Arduino پن A0 کو وولٹیج ان پٹ (V in) کے طور پر بیان کریں
const float VCC = 5.0; // سپلائی وولٹیج
const float FACTOR = 20.0 / 1000; // ACS758-100B کے لیے حساسیت
void loop() {
  float voltage_raw = (5.0 / 1023.0) * analogRead(VIN); // سینسر سے وولٹیج پڑھیں
  float current = (voltage_raw - (VCC * 0.5)) / FACTOR; // کرنٹ شمار کریں
  Serial.print("Current: ");
  Serial.println(current, 2); // کرنٹ کی قدر پرنٹ کریں
}
ڈیمونسٹریشن / کیا توقع کریں
ایک بار جب سب کچھ درست طریقے سے وائرڈ ہو جائے اور کوڈ اپ لوڈ ہو جائے، تو آپ کو سیریل مانیٹر پر کرنٹ کی قدریں ظاہر ہوتی نظر آئیں گی۔ ریڈنگ ہر آدھے سیکنڈ میں اپ ڈیٹ ہوں گی جیسا کہ کوڈ میں بیان کیا گیا ہے۔ اگر کرنٹ کوڈ میں مقرر کردہ کٹ آف حد سے کم ہے، تو آپ کو "No Current" کا پیغام نظر آئے گا۔ یہ کٹ آف شور اور کرنٹ ریڈنگ میں چھوٹی تبدیلیوں کو فلٹر کرنے میں مدد کرتا ہے۔ الٹی پولرٹی کنکشن سے محتاط رہیں، کیونکہ یہ سینسر کو نقصان پہنچا سکتا ہے۔ ہمیشہ یقینی بنائیں کہ سینسر لوڈ کے ساتھ سیریز میں درست طریقے سے وائرڈ ہے، اور درست ریڈنگ کی تصدیق کے لیے آؤٹ پٹ کی نگرانی کریں۔ ویڈیو اضافی سیاق و سباق اور ڈیمونسٹریشن فراہم کرتی ہے (ویڈیو میں 12:30 پر)۔
تصاویر

Allegro ACS758 Current Sensor with Arduino
Arduino-wiring-for-ACS758-Current-sensor
ACS758-sensor-0

ACS758-sensor-1

ACS758-sensor-3

ACS758-sensor-4
ACS758-sensor-5-schematic
100-Advanced Arduino code for the Allegro ACS758 current sensor
زبان: C++
/*
 *
 * Arduino Sketch for Allegro ACS758 Current Sensor (Advanced)
 * This sensor can measure current at a range of up to 200A.
 * It operates with 3.3V or 5V.
 * Please watch the video instruction and explanation for this code.
 *
 * Written by Ahmad Shamshiri on Saturday, May 27, 2018 at 13:19 in Ajax, Ontario, Canada
 * for Robojax.com
 * View the video instruction at
 * This code has been downloaded from Robojax.com
 */
#define VIN A0 // define the Arduino pin A0 as voltage input (V in)
const float VCC   = 5.0;// supply voltage 5V or 3.3V. If using PCB, set to 5V only.
const int model = 2;   // enter the model (see below)

float cutOffLimit = 1.00;// reading cutoff current. 1.00 is 1 Ampere

/*
          "ACS758LCB-050B",// for model use 0
          "ACS758LCB-050U",// for model use 1
          "ACS758LCB-100B",// for model use 2
          "ACS758LCB-100U",// for model use 3
          "ACS758KCB-150B",// for model use 4
          "ACS758KCB-150U",// for model use 5
          "ACS758ECB-200B",// for model use 6
          "ACS758ECB-200U"// for model use 7
          // sensitivity array is holding the sensitivity of the ACS758
          // current sensors. Do not change.
*/
float sensitivity[] ={
          40.0,// for ACS758LCB-050B
          60.0,// for ACS758LCB-050U
          20.0,// for ACS758LCB-100B
          40.0,// for ACS758LCB-100U
          13.3,// for ACS758KCB-150B
          16.7,// for ACS758KCB-150U
          10.0,// for ACS758ECB-200B
          20.0,// for ACS758ECB-200U
         };

/*
 *   Quiescent output voltage is a factor of VCC that appears at the output
 *   when the current is zero.
 *   For bidirectional sensors, it is 0.5 x VCC.
 *   For unidirectional sensors, it is 0.12 x VCC.
 *   For model ACS758LCB-050B, the B at the end represents Bidirectional (polarity doesn't matter).
 *   For model ACS758LCB-100U, the U at the end represents Unidirectional (polarity must match).
 *   Do not change.
 */
float quiescent_Output_voltage [] ={
          0.5,// for ACS758LCB-050B
          0.12,// for ACS758LCB-050U
          0.5,// for ACS758LCB-100B
          0.12,// for ACS758LCB-100U
          0.5,// for ACS758KCB-150B
          0.12,// for ACS758KCB-150U
          0.5,// for ACS758ECB-200B
          0.12,// for ACS758ECB-200U
          };
const float FACTOR = sensitivity[model]/1000;// set sensitivity for selected model
const float QOV =   quiescent_Output_voltage [model] * VCC;// set quiescent Output voltage for selected model
float voltage;// internal variable for voltage
float cutOff = FACTOR/cutOffLimit;// convert current cut off to mV

void setup() {
    //Robojax.com ACS758 Current Sensor
    Serial.begin(9600);// initialize serial monitor
    Serial.println("Robojax Tutorial");
    Serial.println("ACS758 Current Sensor");
}

void loop() {
  //Robojax.com ACS758 Current Sensor
  float voltage_raw =   (5.0 / 1023.0)* analogRead(VIN);// Read the voltage from sensor
  voltage =  voltage_raw - QOV + 0.007 ;// 0.007 is a value to make voltage zero when there is no current
  float current = voltage / FACTOR;
  if(abs(voltage) > cutOff ){
    Serial.print("V: ");
    Serial.print(voltage,3);// print voltage with 3 decimal places
    Serial.print("V, I: ");
    Serial.print(current,2); // print the current with 2 decimal places
    Serial.println("A");
  }else{
    Serial.println("No Current");
  }
  delay(500);
}101-Arduino code for Allegro ACS758 current sensor (basic)
زبان: C++
/*
 * Arduino Sketch for Allegro ACS758 Current Sensor (Basic Simple)
 * This sensor can measure current at a range of up to 200A.
 * It operates with 3.3V or 5V (the module works with 5V, the sensor can work with 3.3V or 5V).
 * Please watch the video instruction and explanation for this code.
 *
 * Written by Ahmad Shamshiri on Saturday, May 26, 2018 at 7:05 PM in Ajax, Ontario, Canada
 * for Robojax.com
 * View the video instruction at https://youtu.be/SiHfjzcqnU4
 * This code has been downloaded from Robojax.com
 */
#define VIN A0
const float vcc    = 5.00;// supply voltage 5V or 3.3V
const float factor = 0.02;// 20mV/A is the factor

float voltage;

void setup() {
    //Robojax.com ACS758 Current Sensor
    Serial.begin(9600);
    Serial.println("Robojax Tutorial");
    Serial.println("ACS758 Current Tester");
    Serial.println("Basic Simple Code");
}

void loop() {
  //Robojax.com ACS758 Current Sensor
  voltage =   (5.0 / 1023.0)* analogRead(VIN);// Read the voltage from sensor
  voltage =  voltage - (vcc * 0.5) + 0.007 ;// 0.007 is a value to make voltage zero when there is no current
  float current = voltage / factor;
  Serial.print("V: ");
  Serial.print(voltage,3);
  Serial.print("V, I: ");
  Serial.print(current,2); Serial.println("A");
  delay(500);
}102-Advanced Arduino code for four Allegro ACS758 current sensors
زبان: C++
/*
 *
 * Arduino Sketch for 4 modules Allegro ACS758 Current Sensor (Advanced)
 * This sensor can measure current at a range of up to 200A.
 * It operates with 3.3V or 5V.
 * Please watch the video instruction and explanation for this code.
 *
 * Written by Ahmad Shamshiri on August 4, 2018 at 13:19 in Ajax, Ontario, Canada
 * for Robojax.com in request from Ross M. from YouTube video https://youtu.be/SiHfjzcqnU4
 * View the video instruction at
 * This code has been downloaded from Robojax.com
 */
#define VIN1 A0 // define the Arduino pin A0 as voltage input (V in)
#define VIN2 A1
#define VIN3 A2
#define VIN4 A3

const float VCC   = 5.0;// supply voltage 5V or 3.3V. If using PCB, set to 5V only.
const int model = 2;   // enter the model (see below)

float cutOffLimit = 1.00;// reading cutoff current. 1.00 is 1 Amper

/*
          "ACS758LCB-050B",// for model use 0
          "ACS758LCB-050U",// for model use 1
          "ACS758LCB-100B",// for model use 2
          "ACS758LCB-100U",// for model use 3
          "ACS758KCB-150B",// for model use 4
          "ACS758KCB-150U",// for model use 5
          "ACS758ECB-200B",// for model use 6
          "ACS758ECB-200U"// for model use 7
sensitivity array is holding the sensitivity of the ACS758
current sensors. Do not change.
*/
float sensitivity[] ={
          40.0,// for ACS758LCB-050B
          60.0,// for ACS758LCB-050U
          20.0,// for ACS758LCB-100B
          40.0,// for ACS758LCB-100U
          13.3,// for ACS758KCB-150B
          16.7,// for ACS758KCB-150U
          10.0,// for ACS758ECB-200B
          20.0,// for ACS758ECB-200U
         };

/*
 *   Quiescent output voltage is a factor of VCC that appears at the output
 *   when the current is zero.
 *   For bidirectional sensors it is 0.5 x VCC
 *   For unidirectional sensors it is 0.12 x VCC
 *   For model ACS758LCB-050B, the B at the end represents bidirectional (polarity doesn't matter).
 *   For model ACS758LCB-100U, the U at the end represents unidirectional (polarity must match).
 *   Do not change.
 */
float quiescent_Output_voltage [] ={
          0.5,// for ACS758LCB-050B
          0.12,// for ACS758LCB-050U
          0.5,// for ACS758LCB-100B
          0.12,// for ACS758LCB-100U
          0.5,// for ACS758KCB-150B
          0.12,// for ACS758KCB-150U
          0.5,// for ACS758ECB-200B
          0.12,// for ACS758ECB-200U
          };
const float FACTOR = sensitivity[model]/1000;// set sensitivity for selected model
const float QOV =   quiescent_Output_voltage [model] * VCC;// set quiescent Output voltage for selected model
float voltage1;// internal variable for voltage1
float voltage2;// internal variable for voltage2
float voltage3;// internal variable for voltage3
float voltage4;// internal variable for voltage4

float cutOff = FACTOR/cutOffLimit;// convert current cut off to mV

void setup() {
    //Robojax.com ACS758 Current Sensor
    Serial.begin(9600);// initialize serial monitor
    Serial.println("Robojax Tutorial");
    Serial.println("Four ACS758 Current Sensors");
}

void loop() {
  //Robojax.com ACS758 Current Sensor
  float voltage_raw1 =   (5.0 / 1023.0)* analogRead(VIN1);// Read the voltage from sensor
  float voltage_raw2 =   (5.0 / 1023.0)* analogRead(VIN2);// Read the voltage from sensor
  float voltage_raw3 =   (5.0 / 1023.0)* analogRead(VIN3);// Read the voltage from sensor
  float voltage_raw4 =   (5.0 / 1023.0)* analogRead(VIN4);// Read the voltage from sensor

  voltage1 =  voltage_raw1 - QOV + 0.007 ;// 0.007 is a value to make voltage zero when there is no current
  voltage2 =  voltage_raw2 - QOV + 0.007 ;// 0.007 is a value to make voltage zero when there is no current
  voltage3 =  voltage_raw3 - QOV + 0.007 ;// 0.007 is a value to make voltage zero when there is no current
  voltage4 =  voltage_raw4 - QOV + 0.007 ;// 0.007 is a value to make voltage zero when there is no current

  float current1 = voltage1 / FACTOR;
  float current2 = voltage2 / FACTOR;
  float current3 = voltage3 / FACTOR;
  float current4 = voltage4 / FACTOR;

  if(abs(voltage1) > cutOff ){ //Corrected abs(voltage) to abs(voltage1)

    Serial.print("I1: ");
    Serial.print(current1,2); // print the current with 2 decimal places
    Serial.println("A");

    Serial.print("I2: ");
    Serial.print(current2,2); // print the current with 2 decimal places
    Serial.println("A");

    Serial.print("I3: ");
    Serial.print(current3,2); // print the current with 2 decimal places
    Serial.println("A");

    Serial.print("I4: ");
    Serial.print(current4,2); // print the current with 2 decimal places
    Serial.println("A");

  }else{
    Serial.println("No Current");
  }
  delay(500);
}
آپ کو جن چیزوں کی ضرورت ہو سکتی ہے
-
ایمیزونACS758 current sensor on Amazonamzn.to
-
ایمیزون
-
ایمیزون
-
ای بے
-
علی ایکسپریسPurchase Allegro ACS758 Current Sensor from AliExpresss.click.aliexpress.com
وسائل اور حوالہ جات
ابھی تک کوئی وسائل نہیں۔
فائلیں📁
دیگر فائلیں
-
ایڈافروٹ PCA9685 16-چینل سروو ڈرائیور
robojax_PCA9685_extra_learning.pdf -
Alegro ACS Current LibraryArduino library for Allegro ACS current sensor modules. Provides functions to read current measurements from ACS712 and similar sensors.
robojax_Alegro_ACS_Current_library.zip0.02 MB