د الیګرو ACS758 د اوسني سینسر کارولو څرنګوالی د آردوینو سره د 50A څخه تر 200A پورې
په لوړ ظرفیت لرونکو غوښتنلیکونو کې اوسنی اندازه کول ننګونکي کېدای شي، مګر د Allegro ACS758 اوسنی سینسر دا دنده ساده کوي. دا سینسر کولی شي د 50A څخه تر 200A پورې د اوسني کچې اداره کړي، چې د مختلفو پروژو لپاره د باور وړ حل چمتو کوي. په دې ټیوټوریل کې، موږ به وپلټو چې څنګه ACS758 د Arduino سره وصل کړو او د اوسني ارزښتونه په سمه توګه ولولئ.

هارډویر تشریح شوی
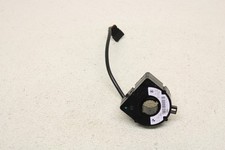
د دې پروژې اصلي برخه د Allegro ACS758 اوسنی سینسر دی. دا سینسر د هال اغیزې په اصل کار کوي، کوم چې دا توان ورکوي چې د کنډکټر له لارې د تېرېدونکي اوسني لخوا رامینځته شوی مقناطیسي ساحه اندازه کړي. دا د اوسني سره متناسب د تولید ولتاژ تولیدوي، چې Arduino ته دا وړتیا ورکوي چې دا ارزښتونه ولولي او تشریح کړي. ACS758 څو ډولونه لري، چې "100B" په دې معنی دی چې دا کولی شي تر 100A پورې اندازه کړي. دا د دوه اړخیز اوسني اندازه کولو ځانګړتیا لري، چې د اوسني لوري ته په پام پرته دقیق لوستل ممکن کوي. سینسر د 3.3V یا 5V بریښنا رسولو ته اړتیا لري، کوم چې د هغې داخلي سرکټري ځواک ورکوي، پشمول د عملیاتي امپلیفیر چې د هال اغیزې سیګنال پروسس کوي.ډیټاشیټ تفصیلات
| جوړونکی | Allegro Microsystems |
|---|---|
| د برخې شمېره | ACS758LCB-100B |
| منطق/IO ولتاژ | 3.3 V / 5 V |
| د بریښنا رسولو ولتاژ | 4.5 V - 5.5 V |
| د تولید اوسنی (په هر چینل) | 100 A |
| د لوړ اوسني کچه (په هر چینل) | 200 A |
| د PWM فریکونسي لارښود | N/A |
| د ننوتلو منطق حدونه | TTL سره مطابقت لري |
| د ولتاژ کمښت / RDS(on) / سنتریشن | 0.1 V @ 100 A |
| حرارتي حدونه | د عملیاتو تودوخه: -40 °C څخه تر 125 °C |
| بسته | 5-پن بسته |
| یادښتونه / ډولونه | په مختلفو اوسنیو درجو کې شتون لري (50A، 100A، 150A، 200A) |
- د مقاومت له امله د ولتاژ کمښت څخه مخنیوي لپاره سم تارونه ډاډمن کړئ.
- د لوړ اوسني غوښتنلیکونو لپاره د تودوخې مخنیوي لپاره مناسب ګیج تار وکاروئ.
- د دقیق لوستلو لپاره سینسر په ټاکل شوي حرارتي حدونو کې وساتئ.
- د کارول شوي ځانګړي ماډل پر بنسټ د سینسر تولید کیلیبریټ کړئ.
- که اړتیا وي د لوستلو ثبات لپاره د فلټر کولو کیپاسیټرونو کارولو ته پام وکړئ.
د تارونو لارښوونې
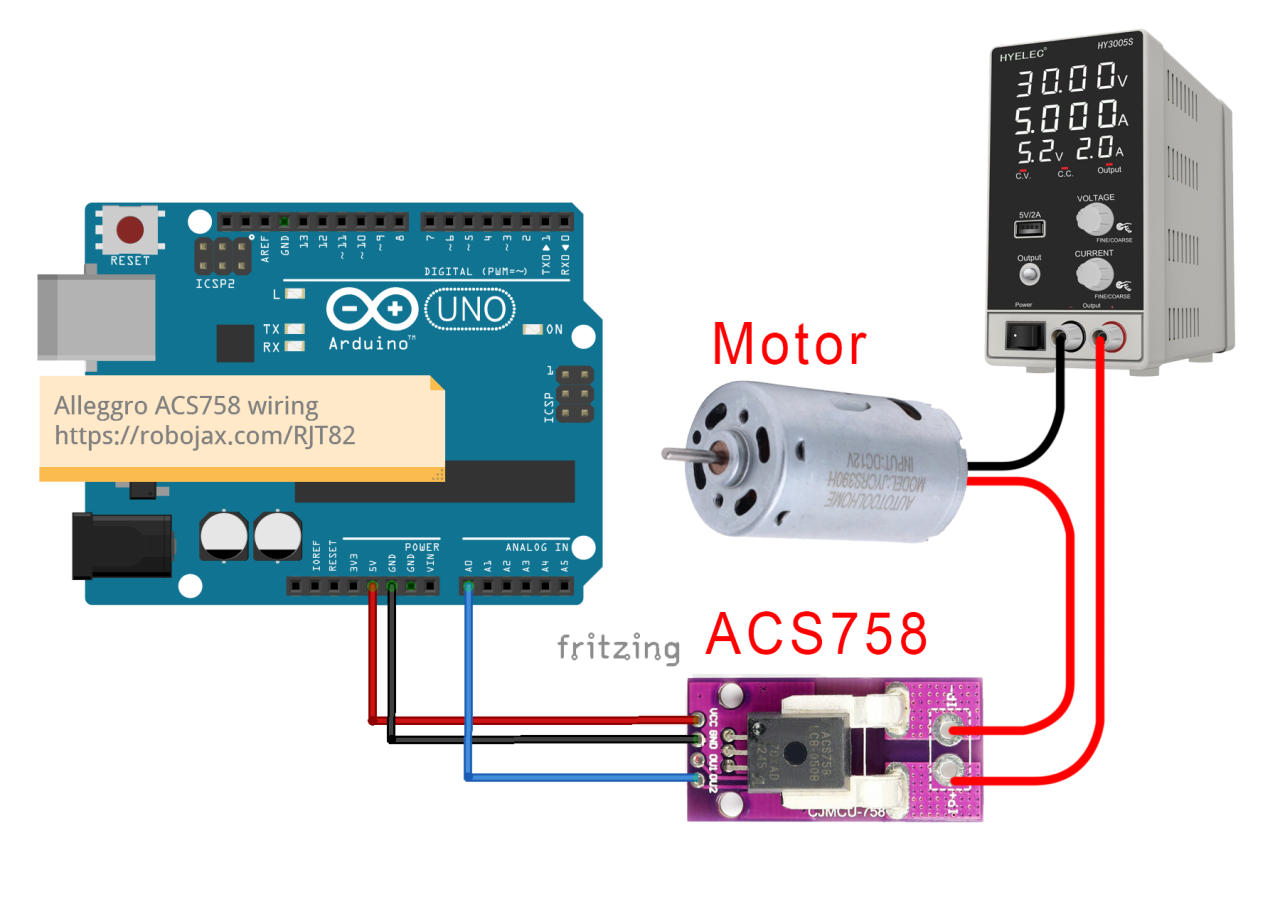
A0 په توګه نښه شوی.
ډاډ ترلاسه کړئ چې هغه بار چې تاسو یې اندازه کول غواړئ د سینسر سره په لړۍ کې وصل دی. د اوسني لاره باید د سینسر له لارې تېره شي ترڅو دا په سمه توګه د هغې څخه تېرېدونکی اوسنی اندازه کړي. سینسر دوه د اوسني ننوتلو پنونه لري؛ خپل د بار مثبت تار د دې پنونو څخه یو سره وصل کړئ او بل پن د خپل بریښنا رسولو مثبت ترمینل سره وصل کړئ. د بریښنا رسولو منفي اړخ باید د بار منفي ترمینل سره وصل شي. دا ترتیب سینسر ته اجازه ورکوي چې بار ته تېرېدونکی اوسنی اندازه کړي.
د کوډ مثالونه او واک ترو
د ACS758 سینسر څخه د ارزښتونو لوستلو لپاره د Arduino کوډ مستقیم دی. لاندې د پرمختللي کوډ څخه یوه برخه ده چې سینسر پیل کوي او ولتاژ لولي:
#define VIN A0 // د Arduino پن A0 د ولتاژ ننوتلو په توګه تعریف کړئ (V in)
const float VCC = 5.0; // د بریښنا رسولو ولتاژ
const float FACTOR = 20.0 / 1000; // د ACS758-100B لپاره حساسیت
void loop() {
  float voltage_raw = (5.0 / 1023.0) * analogRead(VIN); // د سینسر څخه ولتاژ ولولئ
  float current = (voltage_raw - (VCC * 0.5)) / FACTOR; // اوسنی محاسبه کړئ
  Serial.print("Current: ");
  Serial.println(current, 2); // د اوسني ارزښت چاپ کړئ
}
ډیمونسټریشن / څه تمه وکړو
یوځل چې هرڅه په سمه توګه تار شي او کوډ اپلوډ شي، تاسو باید په سیریل مانیټر کې د اوسني ارزښتونه وګورئ. لوستل به په هر نیم ثانیه کې تازه شي لکه څنګه چې په کوډ کې تعریف شوي. که اوسنی د کوډ کې ټاکل شوي حد څخه ټیټ وي، تاسو به د "No Current" پیغام وګورئ. دا حد د اوسني لوستلو کې د شور او کوچنیو تغیراتو فلټر کولو کې مرسته کوي. د قطبيت د بیرته راګرځولو اړیکو څخه محتاط اوسئ، ځکه چې دا کولی شي سینسر ته زیان ورسوي. تل ډاډ ترلاسه کړئ چې سینسر د بار سره په لړۍ کې په سمه توګه تار شوی، او د دقیق لوستلو تصدیق کولو لپاره محصول وڅارئ. ویډیو اضافي شرایط او ډیمونسټریشنونه چمتو کوي (په ویډیو کې په 12:30 کې).
انځورونه

Allegro ACS758 Current Sensor with Arduino
Arduino-wiring-for-ACS758-Current-sensor
ACS758-sensor-0

ACS758-sensor-1

ACS758-sensor-3

ACS758-sensor-4
ACS758-sensor-5-schematic
100-Advanced Arduino code for the Allegro ACS758 current sensor
ژبه: C++
/*
 *
 * Arduino Sketch for Allegro ACS758 Current Sensor (Advanced)
 * This sensor can measure current at a range of up to 200A.
 * It operates with 3.3V or 5V.
 * Please watch the video instruction and explanation for this code.
 *
 * Written by Ahmad Shamshiri on Saturday, May 27, 2018 at 13:19 in Ajax, Ontario, Canada
 * for Robojax.com
 * View the video instruction at
 * This code has been downloaded from Robojax.com
 */
#define VIN A0 // define the Arduino pin A0 as voltage input (V in)
const float VCC   = 5.0;// supply voltage 5V or 3.3V. If using PCB, set to 5V only.
const int model = 2;   // enter the model (see below)

float cutOffLimit = 1.00;// reading cutoff current. 1.00 is 1 Ampere

/*
          "ACS758LCB-050B",// for model use 0
          "ACS758LCB-050U",// for model use 1
          "ACS758LCB-100B",// for model use 2
          "ACS758LCB-100U",// for model use 3
          "ACS758KCB-150B",// for model use 4
          "ACS758KCB-150U",// for model use 5
          "ACS758ECB-200B",// for model use 6
          "ACS758ECB-200U"// for model use 7
          // sensitivity array is holding the sensitivity of the ACS758
          // current sensors. Do not change.
*/
float sensitivity[] ={
          40.0,// for ACS758LCB-050B
          60.0,// for ACS758LCB-050U
          20.0,// for ACS758LCB-100B
          40.0,// for ACS758LCB-100U
          13.3,// for ACS758KCB-150B
          16.7,// for ACS758KCB-150U
          10.0,// for ACS758ECB-200B
          20.0,// for ACS758ECB-200U
         };

/*
 *   Quiescent output voltage is a factor of VCC that appears at the output
 *   when the current is zero.
 *   For bidirectional sensors, it is 0.5 x VCC.
 *   For unidirectional sensors, it is 0.12 x VCC.
 *   For model ACS758LCB-050B, the B at the end represents Bidirectional (polarity doesn't matter).
 *   For model ACS758LCB-100U, the U at the end represents Unidirectional (polarity must match).
 *   Do not change.
 */
float quiescent_Output_voltage [] ={
          0.5,// for ACS758LCB-050B
          0.12,// for ACS758LCB-050U
          0.5,// for ACS758LCB-100B
          0.12,// for ACS758LCB-100U
          0.5,// for ACS758KCB-150B
          0.12,// for ACS758KCB-150U
          0.5,// for ACS758ECB-200B
          0.12,// for ACS758ECB-200U
          };
const float FACTOR = sensitivity[model]/1000;// set sensitivity for selected model
const float QOV =   quiescent_Output_voltage [model] * VCC;// set quiescent Output voltage for selected model
float voltage;// internal variable for voltage
float cutOff = FACTOR/cutOffLimit;// convert current cut off to mV

void setup() {
    //Robojax.com ACS758 Current Sensor
    Serial.begin(9600);// initialize serial monitor
    Serial.println("Robojax Tutorial");
    Serial.println("ACS758 Current Sensor");
}

void loop() {
  //Robojax.com ACS758 Current Sensor
  float voltage_raw =   (5.0 / 1023.0)* analogRead(VIN);// Read the voltage from sensor
  voltage =  voltage_raw - QOV + 0.007 ;// 0.007 is a value to make voltage zero when there is no current
  float current = voltage / FACTOR;
  if(abs(voltage) > cutOff ){
    Serial.print("V: ");
    Serial.print(voltage,3);// print voltage with 3 decimal places
    Serial.print("V, I: ");
    Serial.print(current,2); // print the current with 2 decimal places
    Serial.println("A");
  }else{
    Serial.println("No Current");
  }
  delay(500);
}101-Arduino code for Allegro ACS758 current sensor (basic)
ژبه: C++
/*
 * Arduino Sketch for Allegro ACS758 Current Sensor (Basic Simple)
 * This sensor can measure current at a range of up to 200A.
 * It operates with 3.3V or 5V (the module works with 5V, the sensor can work with 3.3V or 5V).
 * Please watch the video instruction and explanation for this code.
 *
 * Written by Ahmad Shamshiri on Saturday, May 26, 2018 at 7:05 PM in Ajax, Ontario, Canada
 * for Robojax.com
 * View the video instruction at https://youtu.be/SiHfjzcqnU4
 * This code has been downloaded from Robojax.com
 */
#define VIN A0
const float vcc    = 5.00;// supply voltage 5V or 3.3V
const float factor = 0.02;// 20mV/A is the factor

float voltage;

void setup() {
    //Robojax.com ACS758 Current Sensor
    Serial.begin(9600);
    Serial.println("Robojax Tutorial");
    Serial.println("ACS758 Current Tester");
    Serial.println("Basic Simple Code");
}

void loop() {
  //Robojax.com ACS758 Current Sensor
  voltage =   (5.0 / 1023.0)* analogRead(VIN);// Read the voltage from sensor
  voltage =  voltage - (vcc * 0.5) + 0.007 ;// 0.007 is a value to make voltage zero when there is no current
  float current = voltage / factor;
  Serial.print("V: ");
  Serial.print(voltage,3);
  Serial.print("V, I: ");
  Serial.print(current,2); Serial.println("A");
  delay(500);
}102-Advanced Arduino code for four Allegro ACS758 current sensors
ژبه: C++
/*
 *
 * Arduino Sketch for 4 modules Allegro ACS758 Current Sensor (Advanced)
 * This sensor can measure current at a range of up to 200A.
 * It operates with 3.3V or 5V.
 * Please watch the video instruction and explanation for this code.
 *
 * Written by Ahmad Shamshiri on August 4, 2018 at 13:19 in Ajax, Ontario, Canada
 * for Robojax.com in request from Ross M. from YouTube video https://youtu.be/SiHfjzcqnU4
 * View the video instruction at
 * This code has been downloaded from Robojax.com
 */
#define VIN1 A0 // define the Arduino pin A0 as voltage input (V in)
#define VIN2 A1
#define VIN3 A2
#define VIN4 A3

const float VCC   = 5.0;// supply voltage 5V or 3.3V. If using PCB, set to 5V only.
const int model = 2;   // enter the model (see below)

float cutOffLimit = 1.00;// reading cutoff current. 1.00 is 1 Amper

/*
          "ACS758LCB-050B",// for model use 0
          "ACS758LCB-050U",// for model use 1
          "ACS758LCB-100B",// for model use 2
          "ACS758LCB-100U",// for model use 3
          "ACS758KCB-150B",// for model use 4
          "ACS758KCB-150U",// for model use 5
          "ACS758ECB-200B",// for model use 6
          "ACS758ECB-200U"// for model use 7
sensitivity array is holding the sensitivity of the ACS758
current sensors. Do not change.
*/
float sensitivity[] ={
          40.0,// for ACS758LCB-050B
          60.0,// for ACS758LCB-050U
          20.0,// for ACS758LCB-100B
          40.0,// for ACS758LCB-100U
          13.3,// for ACS758KCB-150B
          16.7,// for ACS758KCB-150U
          10.0,// for ACS758ECB-200B
          20.0,// for ACS758ECB-200U
         };

/*
 *   Quiescent output voltage is a factor of VCC that appears at the output
 *   when the current is zero.
 *   For bidirectional sensors it is 0.5 x VCC
 *   For unidirectional sensors it is 0.12 x VCC
 *   For model ACS758LCB-050B, the B at the end represents bidirectional (polarity doesn't matter).
 *   For model ACS758LCB-100U, the U at the end represents unidirectional (polarity must match).
 *   Do not change.
 */
float quiescent_Output_voltage [] ={
          0.5,// for ACS758LCB-050B
          0.12,// for ACS758LCB-050U
          0.5,// for ACS758LCB-100B
          0.12,// for ACS758LCB-100U
          0.5,// for ACS758KCB-150B
          0.12,// for ACS758KCB-150U
          0.5,// for ACS758ECB-200B
          0.12,// for ACS758ECB-200U
          };
const float FACTOR = sensitivity[model]/1000;// set sensitivity for selected model
const float QOV =   quiescent_Output_voltage [model] * VCC;// set quiescent Output voltage for selected model
float voltage1;// internal variable for voltage1
float voltage2;// internal variable for voltage2
float voltage3;// internal variable for voltage3
float voltage4;// internal variable for voltage4

float cutOff = FACTOR/cutOffLimit;// convert current cut off to mV

void setup() {
    //Robojax.com ACS758 Current Sensor
    Serial.begin(9600);// initialize serial monitor
    Serial.println("Robojax Tutorial");
    Serial.println("Four ACS758 Current Sensors");
}

void loop() {
  //Robojax.com ACS758 Current Sensor
  float voltage_raw1 =   (5.0 / 1023.0)* analogRead(VIN1);// Read the voltage from sensor
  float voltage_raw2 =   (5.0 / 1023.0)* analogRead(VIN2);// Read the voltage from sensor
  float voltage_raw3 =   (5.0 / 1023.0)* analogRead(VIN3);// Read the voltage from sensor
  float voltage_raw4 =   (5.0 / 1023.0)* analogRead(VIN4);// Read the voltage from sensor

  voltage1 =  voltage_raw1 - QOV + 0.007 ;// 0.007 is a value to make voltage zero when there is no current
  voltage2 =  voltage_raw2 - QOV + 0.007 ;// 0.007 is a value to make voltage zero when there is no current
  voltage3 =  voltage_raw3 - QOV + 0.007 ;// 0.007 is a value to make voltage zero when there is no current
  voltage4 =  voltage_raw4 - QOV + 0.007 ;// 0.007 is a value to make voltage zero when there is no current

  float current1 = voltage1 / FACTOR;
  float current2 = voltage2 / FACTOR;
  float current3 = voltage3 / FACTOR;
  float current4 = voltage4 / FACTOR;

  if(abs(voltage1) > cutOff ){ //Corrected abs(voltage) to abs(voltage1)

    Serial.print("I1: ");
    Serial.print(current1,2); // print the current with 2 decimal places
    Serial.println("A");

    Serial.print("I2: ");
    Serial.print(current2,2); // print the current with 2 decimal places
    Serial.println("A");

    Serial.print("I3: ");
    Serial.print(current3,2); // print the current with 2 decimal places
    Serial.println("A");

    Serial.print("I4: ");
    Serial.print(current4,2); // print the current with 2 decimal places
    Serial.println("A");

  }else{
    Serial.println("No Current");
  }
  delay(500);
}
هغه شیان چې تاسو ورته اړتیا لرئ
-
امازونACS758 current sensor on Amazonamzn.to
-
امازون
-
امازون
-
ای بی
-
علی ایکسپریسPurchase Allegro ACS758 Current Sensor from AliExpresss.click.aliexpress.com
سرچینې او حوالې
تر اوسه هیڅ سرچینې نشته.
فایلونه📁
نور فایلونه
-
Adafruit PCA9685 16-Channel Servo Driver
robojax_PCA9685_extra_learning.pdf -
Alegro ACS Current LibraryArduino library for Allegro ACS current sensor modules. Provides functions to read current measurements from ACS712 and similar sensors.
robojax_Alegro_ACS_Current_library.zip0.02 MB