Jak używać czujnika prądu Allegro ACS758 z Arduino dla zakresu od 50A do 200A
Pomiar prądu w aplikacjach o dużej wydajności może być wyzwaniem, ale czujnik prądu Allegro ACS758 upraszcza to zadanie. Czujnik ten może obsługiwać poziomy prądu od 50A do 200A, zapewniając niezawodne rozwiązanie dla różnych projektów. W tym samouczku omówimy, jak podłączyć ACS758 do Arduino i dokładnie odczytywać wartości prądu.

Wyjaśnienie Sprzętu
Głównym elementem tego projektu jest czujnik prądu Allegro ACS758. Czujnik ten działa na zasadzie efektu Halla, który pozwala mu mierzyć pole magnetyczne generowane przez prąd przepływający przez przewodnik. Generuje on napięcie wyjściowe proporcjonalne do prądu, umożliwiając Arduino odczyt i interpretację tych wartości. ACS758 ma kilka wariantów, gdzie "100B" oznacza, że może mierzyć do 100A. Posiada dwukierunkowy pomiar prądu, co pozwala na dokładne odczyty niezależnie od kierunku prądu. Czujnik wymaga zasilania 3,3 V lub 5 V, które zasila jego wewnętrzne obwody, w tym wzmacniacz operacyjny przetwarzający sygnał z efektu Halla.Szczegóły z Karty Katalogowej
| Producent | Allegro Microsystems |
|---|---|
| Numer części | ACS758LCB-100B |
| Napięcie logiczne/IO | 3,3 V / 5 V |
| Napięcie zasilania | 4,5 V - 5,5 V |
| Prąd wyjściowy (na kanał) | 100 A |
| Prąd szczytowy (na kanał) | 200 A |
| Zalecenia dotyczące częstotliwości PWM | Nie dotyczy |
| Progi logiczne wejściowe | Zgodne z TTL |
| Spadek napięcia / RDS(on) / nasycenie | 0,1 V @ 100 A |
| Limity termiczne | Temperatura pracy: -40 °C do 125 °C |
| Obudowa | Obudowa 5-pinowa |
| Uwagi / warianty | Dostępny w różnych zakresach prądu (50A, 100A, 150A, 200A) |
- Zapewnij prawidłowe okablowanie, aby uniknąć spadku napięcia spowodowanego rezystancją.
- Użyj przewodów o odpowiednim przekroju do aplikacji o wysokim prądzie, aby zapobiec przegrzewaniu.
- Utrzymuj czujnik w określonych limitach temperatury, aby zapewnić dokładne odczyty.
- Skalibruj wyjście czujnika w zależności od używanego modelu.
- Rozważ użycie kondensatorów filtrujących w celu stabilizacji odczytów, jeśli to konieczne.
Instrukcje Okablowania
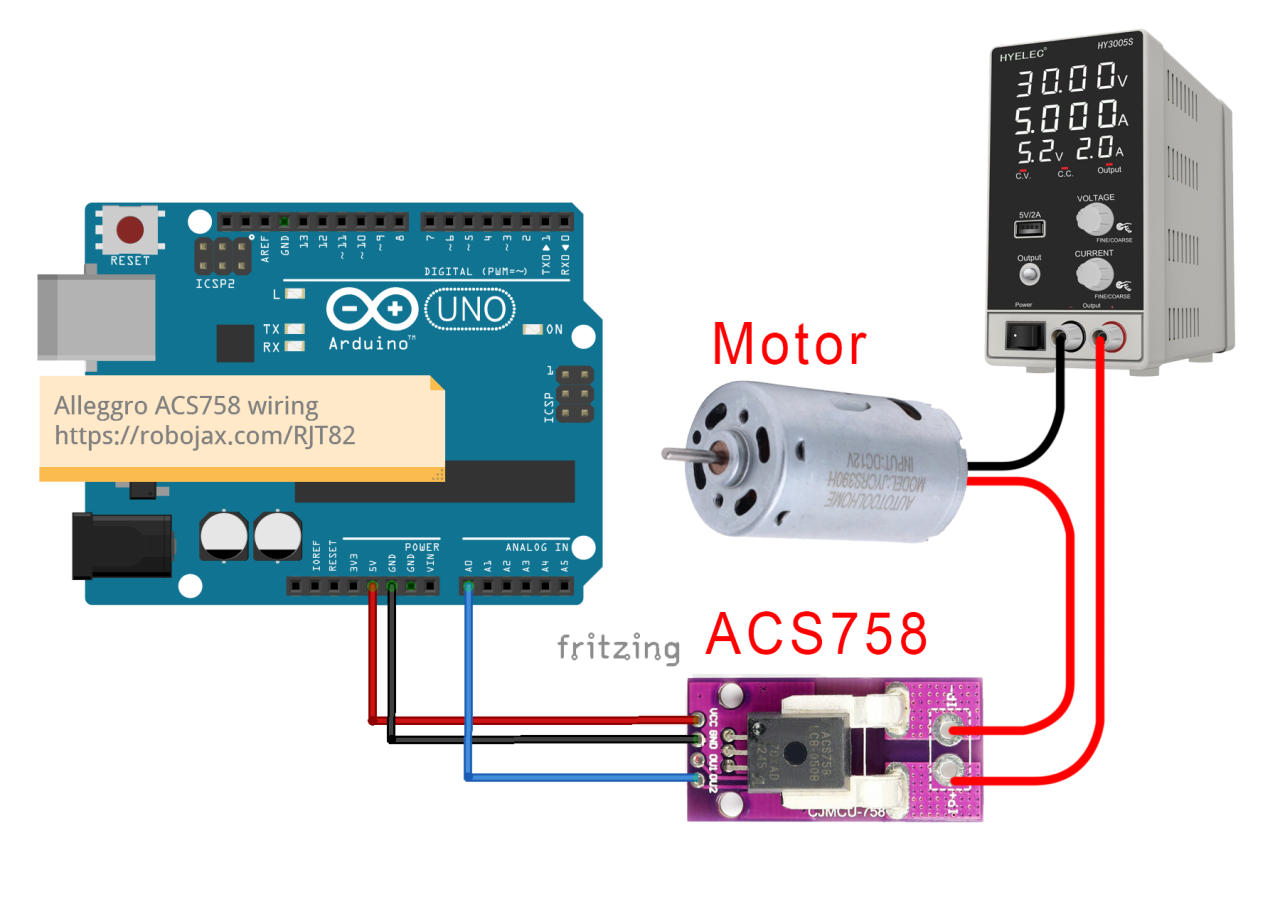
A0.
Upewnij się, że obciążenie, które chcesz mierzyć, jest podłączone szeregowo z czujnikiem. Ścieżka prądu powinna przepływać przez czujnik, aby mógł on dokładnie zmierzyć przepływający przez niego prąd. Czujnik ma dwa piny wejściowe prądu; podłącz dodatni przewód obciążenia do jednego z tych pinów, a drugi pin do dodatniego zacisku zasilacza. Ujemna strona zasilacza powinna być podłączona do ujemnego zacisku obciążenia. Taka konfiguracja pozwala czujnikowi mierzyć prąd płynący do obciążenia.
Przykłady Kodów i Omówienie
Kod Arduino do odczytu wartości z czujnika ACS758 jest prosty. Poniżej znajduje się fragment zaawansowanego kodu, który inicjalizuje czujnik i odczytuje napięcie:
#define VIN A0 // zdefiniuj pin Arduino A0 jako wejście napięcia (V in)
const float VCC = 5.0; // napięcie zasilania
const float FACTOR = 20.0 / 1000; // czułość dla ACS758-100B
void loop() {
  float voltage_raw = (5.0 / 1023.0) * analogRead(VIN); // Odczytaj napięcie z czujnika
  float current = (voltage_raw - (VCC * 0.5)) / FACTOR; // Oblicz prąd
  Serial.print("Prąd: ");
  Serial.println(current, 2); // Wydrukuj wartość prądu
}
Demonstracja / Czego Się Spodziewać
Po prawidłowym podłączeniu wszystkiego i wgraniu kodu powinieneś zobaczyć wartości prądu wyświetlane na monitorze szeregowym. Odczyty będą aktualizowane co pół sekundy, zgodnie z definicją w kodzie. Jeśli prąd jest poniżej progu odcięcia ustawionego w kodzie, zobaczysz komunikat "Brak Prądu". Ten próg odcięcia pomaga filtrować szumy i małe wahania odczytów prądu. Zachowaj ostrożność w przypadku odwróconej polaryzacji połączeń, ponieważ może to uszkodzić czujnik. Zawsze upewnij się, że czujnik jest prawidłowo podłączony szeregowo z obciążeniem i monitoruj wyjście, aby potwierdzić dokładne odczyty. Wideo zapewnia dodatkowy kontekst i demonstracje (na wideo o 12:30).
Obrazy

Allegro ACS758 Current Sensor with Arduino
Arduino-wiring-for-ACS758-Current-sensor
ACS758-sensor-0

ACS758-sensor-1

ACS758-sensor-3

ACS758-sensor-4
ACS758-sensor-5-schematic
100-Advanced Arduino code for the Allegro ACS758 current sensor
Język: C++
/*
 *
 * Arduino Sketch for Allegro ACS758 Current Sensor (Advanced)
 * This sensor can measure current at a range of up to 200A.
 * It operates with 3.3V or 5V.
 * Please watch the video instruction and explanation for this code.
 *
 * Written by Ahmad Shamshiri on Saturday, May 27, 2018 at 13:19 in Ajax, Ontario, Canada
 * for Robojax.com
 * View the video instruction at
 * This code has been downloaded from Robojax.com
 */
#define VIN A0 // define the Arduino pin A0 as voltage input (V in)
const float VCC   = 5.0;// supply voltage 5V or 3.3V. If using PCB, set to 5V only.
const int model = 2;   // enter the model (see below)

float cutOffLimit = 1.00;// reading cutoff current. 1.00 is 1 Ampere

/*
          "ACS758LCB-050B",// for model use 0
          "ACS758LCB-050U",// for model use 1
          "ACS758LCB-100B",// for model use 2
          "ACS758LCB-100U",// for model use 3
          "ACS758KCB-150B",// for model use 4
          "ACS758KCB-150U",// for model use 5
          "ACS758ECB-200B",// for model use 6
          "ACS758ECB-200U"// for model use 7
          // sensitivity array is holding the sensitivity of the ACS758
          // current sensors. Do not change.
*/
float sensitivity[] ={
          40.0,// for ACS758LCB-050B
          60.0,// for ACS758LCB-050U
          20.0,// for ACS758LCB-100B
          40.0,// for ACS758LCB-100U
          13.3,// for ACS758KCB-150B
          16.7,// for ACS758KCB-150U
          10.0,// for ACS758ECB-200B
          20.0,// for ACS758ECB-200U
         };

/*
 *   Quiescent output voltage is a factor of VCC that appears at the output
 *   when the current is zero.
 *   For bidirectional sensors, it is 0.5 x VCC.
 *   For unidirectional sensors, it is 0.12 x VCC.
 *   For model ACS758LCB-050B, the B at the end represents Bidirectional (polarity doesn't matter).
 *   For model ACS758LCB-100U, the U at the end represents Unidirectional (polarity must match).
 *   Do not change.
 */
float quiescent_Output_voltage [] ={
          0.5,// for ACS758LCB-050B
          0.12,// for ACS758LCB-050U
          0.5,// for ACS758LCB-100B
          0.12,// for ACS758LCB-100U
          0.5,// for ACS758KCB-150B
          0.12,// for ACS758KCB-150U
          0.5,// for ACS758ECB-200B
          0.12,// for ACS758ECB-200U
          };
const float FACTOR = sensitivity[model]/1000;// set sensitivity for selected model
const float QOV =   quiescent_Output_voltage [model] * VCC;// set quiescent Output voltage for selected model
float voltage;// internal variable for voltage
float cutOff = FACTOR/cutOffLimit;// convert current cut off to mV

void setup() {
    //Robojax.com ACS758 Current Sensor
    Serial.begin(9600);// initialize serial monitor
    Serial.println("Robojax Tutorial");
    Serial.println("ACS758 Current Sensor");
}

void loop() {
  //Robojax.com ACS758 Current Sensor
  float voltage_raw =   (5.0 / 1023.0)* analogRead(VIN);// Read the voltage from sensor
  voltage =  voltage_raw - QOV + 0.007 ;// 0.007 is a value to make voltage zero when there is no current
  float current = voltage / FACTOR;
  if(abs(voltage) > cutOff ){
    Serial.print("V: ");
    Serial.print(voltage,3);// print voltage with 3 decimal places
    Serial.print("V, I: ");
    Serial.print(current,2); // print the current with 2 decimal places
    Serial.println("A");
  }else{
    Serial.println("No Current");
  }
  delay(500);
}101-Arduino code for Allegro ACS758 current sensor (basic)
Język: C++
/*
 * Arduino Sketch for Allegro ACS758 Current Sensor (Basic Simple)
 * This sensor can measure current at a range of up to 200A.
 * It operates with 3.3V or 5V (the module works with 5V, the sensor can work with 3.3V or 5V).
 * Please watch the video instruction and explanation for this code.
 *
 * Written by Ahmad Shamshiri on Saturday, May 26, 2018 at 7:05 PM in Ajax, Ontario, Canada
 * for Robojax.com
 * View the video instruction at https://youtu.be/SiHfjzcqnU4
 * This code has been downloaded from Robojax.com
 */
#define VIN A0
const float vcc    = 5.00;// supply voltage 5V or 3.3V
const float factor = 0.02;// 20mV/A is the factor

float voltage;

void setup() {
    //Robojax.com ACS758 Current Sensor
    Serial.begin(9600);
    Serial.println("Robojax Tutorial");
    Serial.println("ACS758 Current Tester");
    Serial.println("Basic Simple Code");
}

void loop() {
  //Robojax.com ACS758 Current Sensor
  voltage =   (5.0 / 1023.0)* analogRead(VIN);// Read the voltage from sensor
  voltage =  voltage - (vcc * 0.5) + 0.007 ;// 0.007 is a value to make voltage zero when there is no current
  float current = voltage / factor;
  Serial.print("V: ");
  Serial.print(voltage,3);
  Serial.print("V, I: ");
  Serial.print(current,2); Serial.println("A");
  delay(500);
}102-Advanced Arduino code for four Allegro ACS758 current sensors
Język: C++
/*
 *
 * Arduino Sketch for 4 modules Allegro ACS758 Current Sensor (Advanced)
 * This sensor can measure current at a range of up to 200A.
 * It operates with 3.3V or 5V.
 * Please watch the video instruction and explanation for this code.
 *
 * Written by Ahmad Shamshiri on August 4, 2018 at 13:19 in Ajax, Ontario, Canada
 * for Robojax.com in request from Ross M. from YouTube video https://youtu.be/SiHfjzcqnU4
 * View the video instruction at
 * This code has been downloaded from Robojax.com
 */
#define VIN1 A0 // define the Arduino pin A0 as voltage input (V in)
#define VIN2 A1
#define VIN3 A2
#define VIN4 A3

const float VCC   = 5.0;// supply voltage 5V or 3.3V. If using PCB, set to 5V only.
const int model = 2;   // enter the model (see below)

float cutOffLimit = 1.00;// reading cutoff current. 1.00 is 1 Amper

/*
          "ACS758LCB-050B",// for model use 0
          "ACS758LCB-050U",// for model use 1
          "ACS758LCB-100B",// for model use 2
          "ACS758LCB-100U",// for model use 3
          "ACS758KCB-150B",// for model use 4
          "ACS758KCB-150U",// for model use 5
          "ACS758ECB-200B",// for model use 6
          "ACS758ECB-200U"// for model use 7
sensitivity array is holding the sensitivity of the ACS758
current sensors. Do not change.
*/
float sensitivity[] ={
          40.0,// for ACS758LCB-050B
          60.0,// for ACS758LCB-050U
          20.0,// for ACS758LCB-100B
          40.0,// for ACS758LCB-100U
          13.3,// for ACS758KCB-150B
          16.7,// for ACS758KCB-150U
          10.0,// for ACS758ECB-200B
          20.0,// for ACS758ECB-200U
         };

/*
 *   Quiescent output voltage is a factor of VCC that appears at the output
 *   when the current is zero.
 *   For bidirectional sensors it is 0.5 x VCC
 *   For unidirectional sensors it is 0.12 x VCC
 *   For model ACS758LCB-050B, the B at the end represents bidirectional (polarity doesn't matter).
 *   For model ACS758LCB-100U, the U at the end represents unidirectional (polarity must match).
 *   Do not change.
 */
float quiescent_Output_voltage [] ={
          0.5,// for ACS758LCB-050B
          0.12,// for ACS758LCB-050U
          0.5,// for ACS758LCB-100B
          0.12,// for ACS758LCB-100U
          0.5,// for ACS758KCB-150B
          0.12,// for ACS758KCB-150U
          0.5,// for ACS758ECB-200B
          0.12,// for ACS758ECB-200U
          };
const float FACTOR = sensitivity[model]/1000;// set sensitivity for selected model
const float QOV =   quiescent_Output_voltage [model] * VCC;// set quiescent Output voltage for selected model
float voltage1;// internal variable for voltage1
float voltage2;// internal variable for voltage2
float voltage3;// internal variable for voltage3
float voltage4;// internal variable for voltage4

float cutOff = FACTOR/cutOffLimit;// convert current cut off to mV

void setup() {
    //Robojax.com ACS758 Current Sensor
    Serial.begin(9600);// initialize serial monitor
    Serial.println("Robojax Tutorial");
    Serial.println("Four ACS758 Current Sensors");
}

void loop() {
  //Robojax.com ACS758 Current Sensor
  float voltage_raw1 =   (5.0 / 1023.0)* analogRead(VIN1);// Read the voltage from sensor
  float voltage_raw2 =   (5.0 / 1023.0)* analogRead(VIN2);// Read the voltage from sensor
  float voltage_raw3 =   (5.0 / 1023.0)* analogRead(VIN3);// Read the voltage from sensor
  float voltage_raw4 =   (5.0 / 1023.0)* analogRead(VIN4);// Read the voltage from sensor

  voltage1 =  voltage_raw1 - QOV + 0.007 ;// 0.007 is a value to make voltage zero when there is no current
  voltage2 =  voltage_raw2 - QOV + 0.007 ;// 0.007 is a value to make voltage zero when there is no current
  voltage3 =  voltage_raw3 - QOV + 0.007 ;// 0.007 is a value to make voltage zero when there is no current
  voltage4 =  voltage_raw4 - QOV + 0.007 ;// 0.007 is a value to make voltage zero when there is no current

  float current1 = voltage1 / FACTOR;
  float current2 = voltage2 / FACTOR;
  float current3 = voltage3 / FACTOR;
  float current4 = voltage4 / FACTOR;

  if(abs(voltage1) > cutOff ){ //Corrected abs(voltage) to abs(voltage1)

    Serial.print("I1: ");
    Serial.print(current1,2); // print the current with 2 decimal places
    Serial.println("A");

    Serial.print("I2: ");
    Serial.print(current2,2); // print the current with 2 decimal places
    Serial.println("A");

    Serial.print("I3: ");
    Serial.print(current3,2); // print the current with 2 decimal places
    Serial.println("A");

    Serial.print("I4: ");
    Serial.print(current4,2); // print the current with 2 decimal places
    Serial.println("A");

  }else{
    Serial.println("No Current");
  }
  delay(500);
}
Rzeczy, których możesz potrzebować
-
AmazonACS758 Current Sensor on Amazonamzn.to
-
Amazon
-
Amazon
-
Allegro
-
AliExpressPurchase Allegro ACS758 Current Sensor from AliExpresss.click.aliexpress.com
Zasoby i odniesienia
Brak zasobów.
Pliki📁
Inne pliki
-
Adafruit PCA9685 16-kanałowy sterownik serwomechanizmów
robojax_PCA9685_extra_learning.pdf -
Alegro ACS Current LibraryArduino library for Allegro ACS current sensor modules. Provides functions to read current measurements from ACS712 and similar sensors.
robojax_Alegro_ACS_Current_library.zip0.02 MB