Hoe een Allegro ACS758 Stroomsensor met Arduino te gebruiken voor 50A tot 200A
Het meten van stroom in toepassingen met hoge capaciteit kan uitdagend zijn, maar de Allegro ACS758 stroomsensor vereenvoudigt deze taak. Deze sensor kan stroomniveaus van 50A tot 200A verwerken en biedt een betrouwbare oplossing voor diverse projecten. In deze tutorial verkennen we hoe je de ACS758 op een Arduino aansluit en stroomwaarden nauwkeurig uitleest.

Hardware Uitgelegd
Het belangrijkste onderdeel in dit project is de Allegro ACS758 stroomsensor. Deze sensor werkt op basis van het Hall-effect, waardoor hij het magnetische veld kan meten dat wordt gegenereerd door de stroom die door een geleider vloeit. Hij produceert een uitgangsspanning die evenredig is met de stroom, waardoor de Arduino deze waarden kan uitlezen en interpreteren. De ACS758 heeft verschillende varianten, waarbij "100B" aangeeft dat hij tot 100A kan meten. Hij beschikt over bidirectionele stroommeting, waardoor nauwkeurige metingen mogelijk zijn ongeacht de stroomrichting. De sensor vereist een voedingsspanning van 3,3V of 5V, die de interne circuits van stroom voorziet, inclusief een operationele versterker die het Hall-effect-signaal verwerkt.Datasheet Details
| Fabrikant | Allegro Microsystems |
|---|---|
| Onderdeelnummer | ACS758LCB-100B |
| Logica/IO-spanning | 3,3 V / 5 V |
| Voedingsspanning | 4,5 V - 5,5 V |
| Uitgangsstroom (per kanaal) | 100 A |
| Piekstroom (per kanaal) | 200 A |
| PWM-frequentierichtlijn | N/B |
| Ingangslogische drempels | TTL-compatibel |
| Spanningsval / RDS(on) / verzadiging | 0,1 V @ 100 A |
| Thermische limieten | Bedrijfstemperatuur: -40 °C tot 125 °C |
| Behuizing | 5-pins behuizing |
| Opmerkingen / varianten | Beschikbaar in verschillende stroomwaarden (50A, 100A, 150A, 200A) |
- Zorg voor correcte bedrading om spanningsval door weerstand te voorkomen.
- Gebruik geschikte draaddikte voor toepassingen met hoge stroom om oververhitting te voorkomen.
- Houd de sensor binnen de gespecificeerde temperatuurlimieten voor nauwkeurige metingen.
- Kalibreer de sensoruitgang op basis van het specifieke gebruikte model.
- Overweeg het gebruik van filtercondensatoren om metingen indien nodig te stabiliseren.
Bedradingsinstructies
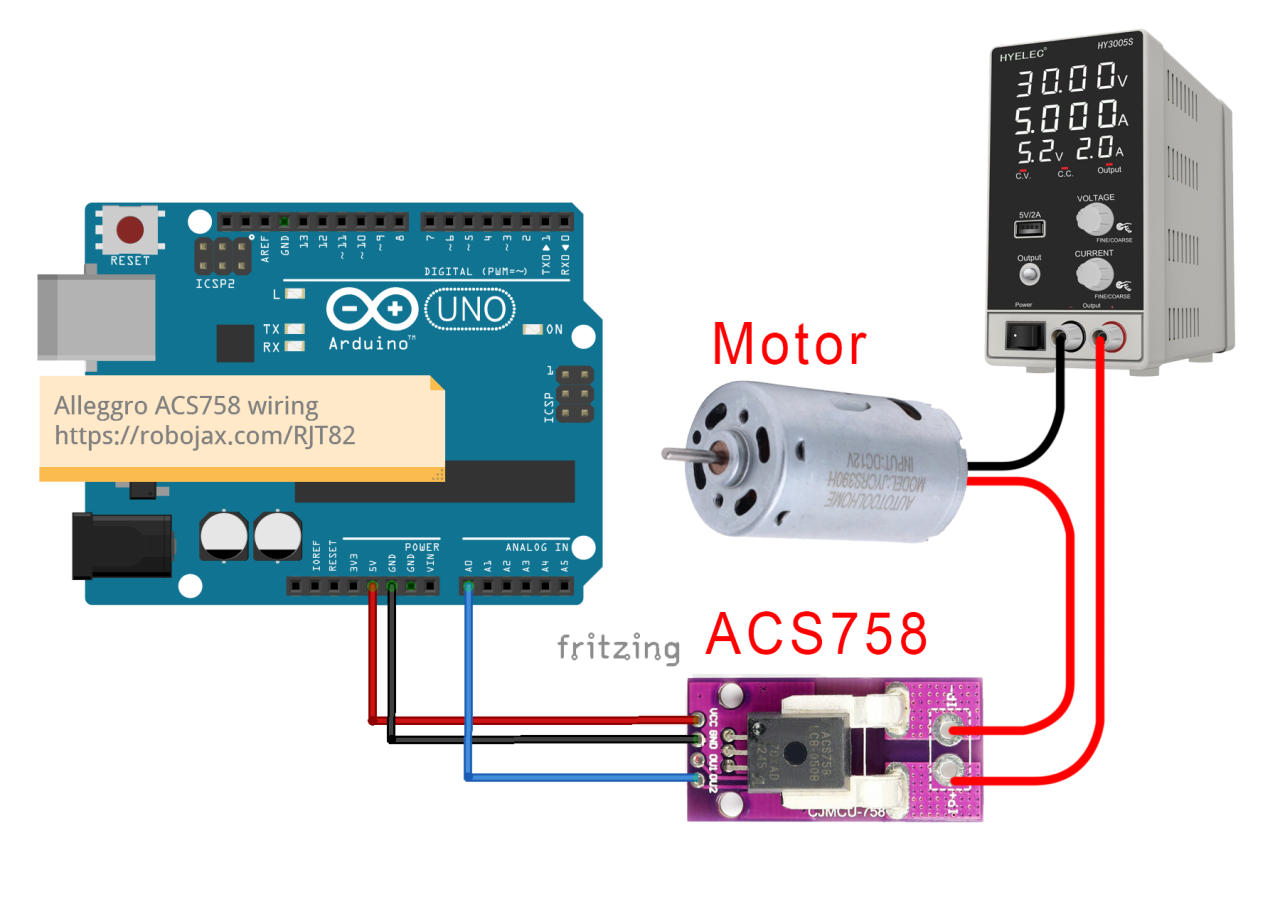
A0.
Zorg ervoor dat de belasting die je wilt meten in serie is verbonden met de sensor. Het stroompad moet door de sensor vloeien, zodat hij de stroom die erdoorheen gaat nauwkeurig kan meten. De sensor heeft twee stroomingangspinnen; verbind de positieve draad van je belasting met een van deze pinnen en de andere pin met de positieve aansluiting van je voeding. De negatieve kant van de voeding moet worden verbonden met de negatieve aansluiting van de belasting. Deze opstelling stelt de sensor in staat om de stroom naar de belasting te meten.
Codevoorbeelden & Uitleg
De Arduino-code voor het uitlezen van waarden van de ACS758-sensor is eenvoudig. Hieronder staat een fragment uit de geavanceerde code die de sensor initialiseert en de spanning uitleest:
#define VIN A0 // definieer de Arduino-pin A0 als spanningsingang (V in)
const float VCC = 5.0; // voedingsspanning
const float FACTOR = 20.0 / 1000; // gevoeligheid voor de ACS758-100B
void loop() {
  float voltage_raw = (5.0 / 1023.0) * analogRead(VIN); // Lees de spanning van de sensor
  float current = (voltage_raw - (VCC * 0.5)) / FACTOR; // Bereken de stroom
  Serial.print("Stroom: ");
  Serial.println(current, 2); // Print de stroomwaarde
}
Demonstratie / Wat te Verwachten
Zodra alles correct is bedraad en de code is geüpload, zou je stroomwaarden op de seriële monitor moeten zien verschijnen. De metingen worden elke halve seconde bijgewerkt, zoals gedefinieerd in de code. Als de stroom onder de in de code ingestelde afkapgrens ligt, zie je een "Geen Stroom"-bericht verschijnen. Deze afkapgrens helpt ruis en kleine variaties in stroommetingen te filteren. Wees voorzichtig met omgekeerde polariteitsaansluitingen, omdat dit de sensor kan beschadigen. Zorg er altijd voor dat de sensor correct in serie met de belasting is bedraad en controleer de uitgang om nauwkeurige metingen te bevestigen. De video biedt extra context en demonstraties (in video op 12:30).
Afbeeldingen

Allegro ACS758 Current Sensor with Arduino
Arduino-wiring-for-ACS758-Current-sensor
ACS758-sensor-0

ACS758-sensor-1

ACS758-sensor-3

ACS758-sensor-4
ACS758-sensor-5-schematic
100-Advanced Arduino code for the Allegro ACS758 current sensor
Taal: C++
/*
 *
 * Arduino Sketch for Allegro ACS758 Current Sensor (Advanced)
 * This sensor can measure current at a range of up to 200A.
 * It operates with 3.3V or 5V.
 * Please watch the video instruction and explanation for this code.
 *
 * Written by Ahmad Shamshiri on Saturday, May 27, 2018 at 13:19 in Ajax, Ontario, Canada
 * for Robojax.com
 * View the video instruction at
 * This code has been downloaded from Robojax.com
 */
#define VIN A0 // define the Arduino pin A0 as voltage input (V in)
const float VCC   = 5.0;// supply voltage 5V or 3.3V. If using PCB, set to 5V only.
const int model = 2;   // enter the model (see below)

float cutOffLimit = 1.00;// reading cutoff current. 1.00 is 1 Ampere

/*
          "ACS758LCB-050B",// for model use 0
          "ACS758LCB-050U",// for model use 1
          "ACS758LCB-100B",// for model use 2
          "ACS758LCB-100U",// for model use 3
          "ACS758KCB-150B",// for model use 4
          "ACS758KCB-150U",// for model use 5
          "ACS758ECB-200B",// for model use 6
          "ACS758ECB-200U"// for model use 7
          // sensitivity array is holding the sensitivity of the ACS758
          // current sensors. Do not change.
*/
float sensitivity[] ={
          40.0,// for ACS758LCB-050B
          60.0,// for ACS758LCB-050U
          20.0,// for ACS758LCB-100B
          40.0,// for ACS758LCB-100U
          13.3,// for ACS758KCB-150B
          16.7,// for ACS758KCB-150U
          10.0,// for ACS758ECB-200B
          20.0,// for ACS758ECB-200U
         };

/*
 *   Quiescent output voltage is a factor of VCC that appears at the output
 *   when the current is zero.
 *   For bidirectional sensors, it is 0.5 x VCC.
 *   For unidirectional sensors, it is 0.12 x VCC.
 *   For model ACS758LCB-050B, the B at the end represents Bidirectional (polarity doesn't matter).
 *   For model ACS758LCB-100U, the U at the end represents Unidirectional (polarity must match).
 *   Do not change.
 */
float quiescent_Output_voltage [] ={
          0.5,// for ACS758LCB-050B
          0.12,// for ACS758LCB-050U
          0.5,// for ACS758LCB-100B
          0.12,// for ACS758LCB-100U
          0.5,// for ACS758KCB-150B
          0.12,// for ACS758KCB-150U
          0.5,// for ACS758ECB-200B
          0.12,// for ACS758ECB-200U
          };
const float FACTOR = sensitivity[model]/1000;// set sensitivity for selected model
const float QOV =   quiescent_Output_voltage [model] * VCC;// set quiescent Output voltage for selected model
float voltage;// internal variable for voltage
float cutOff = FACTOR/cutOffLimit;// convert current cut off to mV

void setup() {
    //Robojax.com ACS758 Current Sensor
    Serial.begin(9600);// initialize serial monitor
    Serial.println("Robojax Tutorial");
    Serial.println("ACS758 Current Sensor");
}

void loop() {
  //Robojax.com ACS758 Current Sensor
  float voltage_raw =   (5.0 / 1023.0)* analogRead(VIN);// Read the voltage from sensor
  voltage =  voltage_raw - QOV + 0.007 ;// 0.007 is a value to make voltage zero when there is no current
  float current = voltage / FACTOR;
  if(abs(voltage) > cutOff ){
    Serial.print("V: ");
    Serial.print(voltage,3);// print voltage with 3 decimal places
    Serial.print("V, I: ");
    Serial.print(current,2); // print the current with 2 decimal places
    Serial.println("A");
  }else{
    Serial.println("No Current");
  }
  delay(500);
}101-Arduino code for Allegro ACS758 current sensor (basic)
Taal: C++
/*
 * Arduino Sketch for Allegro ACS758 Current Sensor (Basic Simple)
 * This sensor can measure current at a range of up to 200A.
 * It operates with 3.3V or 5V (the module works with 5V, the sensor can work with 3.3V or 5V).
 * Please watch the video instruction and explanation for this code.
 *
 * Written by Ahmad Shamshiri on Saturday, May 26, 2018 at 7:05 PM in Ajax, Ontario, Canada
 * for Robojax.com
 * View the video instruction at https://youtu.be/SiHfjzcqnU4
 * This code has been downloaded from Robojax.com
 */
#define VIN A0
const float vcc    = 5.00;// supply voltage 5V or 3.3V
const float factor = 0.02;// 20mV/A is the factor

float voltage;

void setup() {
    //Robojax.com ACS758 Current Sensor
    Serial.begin(9600);
    Serial.println("Robojax Tutorial");
    Serial.println("ACS758 Current Tester");
    Serial.println("Basic Simple Code");
}

void loop() {
  //Robojax.com ACS758 Current Sensor
  voltage =   (5.0 / 1023.0)* analogRead(VIN);// Read the voltage from sensor
  voltage =  voltage - (vcc * 0.5) + 0.007 ;// 0.007 is a value to make voltage zero when there is no current
  float current = voltage / factor;
  Serial.print("V: ");
  Serial.print(voltage,3);
  Serial.print("V, I: ");
  Serial.print(current,2); Serial.println("A");
  delay(500);
}102-Advanced Arduino code for four Allegro ACS758 current sensors
Taal: C++
/*
 *
 * Arduino Sketch for 4 modules Allegro ACS758 Current Sensor (Advanced)
 * This sensor can measure current at a range of up to 200A.
 * It operates with 3.3V or 5V.
 * Please watch the video instruction and explanation for this code.
 *
 * Written by Ahmad Shamshiri on August 4, 2018 at 13:19 in Ajax, Ontario, Canada
 * for Robojax.com in request from Ross M. from YouTube video https://youtu.be/SiHfjzcqnU4
 * View the video instruction at
 * This code has been downloaded from Robojax.com
 */
#define VIN1 A0 // define the Arduino pin A0 as voltage input (V in)
#define VIN2 A1
#define VIN3 A2
#define VIN4 A3

const float VCC   = 5.0;// supply voltage 5V or 3.3V. If using PCB, set to 5V only.
const int model = 2;   // enter the model (see below)

float cutOffLimit = 1.00;// reading cutoff current. 1.00 is 1 Amper

/*
          "ACS758LCB-050B",// for model use 0
          "ACS758LCB-050U",// for model use 1
          "ACS758LCB-100B",// for model use 2
          "ACS758LCB-100U",// for model use 3
          "ACS758KCB-150B",// for model use 4
          "ACS758KCB-150U",// for model use 5
          "ACS758ECB-200B",// for model use 6
          "ACS758ECB-200U"// for model use 7
sensitivity array is holding the sensitivity of the ACS758
current sensors. Do not change.
*/
float sensitivity[] ={
          40.0,// for ACS758LCB-050B
          60.0,// for ACS758LCB-050U
          20.0,// for ACS758LCB-100B
          40.0,// for ACS758LCB-100U
          13.3,// for ACS758KCB-150B
          16.7,// for ACS758KCB-150U
          10.0,// for ACS758ECB-200B
          20.0,// for ACS758ECB-200U
         };

/*
 *   Quiescent output voltage is a factor of VCC that appears at the output
 *   when the current is zero.
 *   For bidirectional sensors it is 0.5 x VCC
 *   For unidirectional sensors it is 0.12 x VCC
 *   For model ACS758LCB-050B, the B at the end represents bidirectional (polarity doesn't matter).
 *   For model ACS758LCB-100U, the U at the end represents unidirectional (polarity must match).
 *   Do not change.
 */
float quiescent_Output_voltage [] ={
          0.5,// for ACS758LCB-050B
          0.12,// for ACS758LCB-050U
          0.5,// for ACS758LCB-100B
          0.12,// for ACS758LCB-100U
          0.5,// for ACS758KCB-150B
          0.12,// for ACS758KCB-150U
          0.5,// for ACS758ECB-200B
          0.12,// for ACS758ECB-200U
          };
const float FACTOR = sensitivity[model]/1000;// set sensitivity for selected model
const float QOV =   quiescent_Output_voltage [model] * VCC;// set quiescent Output voltage for selected model
float voltage1;// internal variable for voltage1
float voltage2;// internal variable for voltage2
float voltage3;// internal variable for voltage3
float voltage4;// internal variable for voltage4

float cutOff = FACTOR/cutOffLimit;// convert current cut off to mV

void setup() {
    //Robojax.com ACS758 Current Sensor
    Serial.begin(9600);// initialize serial monitor
    Serial.println("Robojax Tutorial");
    Serial.println("Four ACS758 Current Sensors");
}

void loop() {
  //Robojax.com ACS758 Current Sensor
  float voltage_raw1 =   (5.0 / 1023.0)* analogRead(VIN1);// Read the voltage from sensor
  float voltage_raw2 =   (5.0 / 1023.0)* analogRead(VIN2);// Read the voltage from sensor
  float voltage_raw3 =   (5.0 / 1023.0)* analogRead(VIN3);// Read the voltage from sensor
  float voltage_raw4 =   (5.0 / 1023.0)* analogRead(VIN4);// Read the voltage from sensor

  voltage1 =  voltage_raw1 - QOV + 0.007 ;// 0.007 is a value to make voltage zero when there is no current
  voltage2 =  voltage_raw2 - QOV + 0.007 ;// 0.007 is a value to make voltage zero when there is no current
  voltage3 =  voltage_raw3 - QOV + 0.007 ;// 0.007 is a value to make voltage zero when there is no current
  voltage4 =  voltage_raw4 - QOV + 0.007 ;// 0.007 is a value to make voltage zero when there is no current

  float current1 = voltage1 / FACTOR;
  float current2 = voltage2 / FACTOR;
  float current3 = voltage3 / FACTOR;
  float current4 = voltage4 / FACTOR;

  if(abs(voltage1) > cutOff ){ //Corrected abs(voltage) to abs(voltage1)

    Serial.print("I1: ");
    Serial.print(current1,2); // print the current with 2 decimal places
    Serial.println("A");

    Serial.print("I2: ");
    Serial.print(current2,2); // print the current with 2 decimal places
    Serial.println("A");

    Serial.print("I3: ");
    Serial.print(current3,2); // print the current with 2 decimal places
    Serial.println("A");

    Serial.print("I4: ");
    Serial.print(current4,2); // print the current with 2 decimal places
    Serial.println("A");

  }else{
    Serial.println("No Current");
  }
  delay(500);
}
Dingen die je misschien nodig hebt
-
AmazonACS758 Current Sensor on Amazonamzn.to
-
Amazon
-
Amazon
-
eBay
-
AliExpressPurchase Allegro ACS758 Current Sensor from AliExpresss.click.aliexpress.com
Hulpmiddelen en referenties
Nog geen middelen.
Bestanden📁
Andere bestanden
-
Adafruit PCA9685 16-kanaals servo driver
robojax_PCA9685_extra_learning.pdf -
Alegro ACS Current LibraryArduino library for Allegro ACS current sensor modules. Provides functions to read current measurements from ACS712 and similar sensors.
robojax_Alegro_ACS_Current_library.zip0.02 MB