Како да користите Allegro ACS758 сензор за струја со Arduino за 50A до 200A
Мерењето на струја во апликации со висок капацитет може да биде предизвикувачко, но сензорот за струја Allegro ACS758 ја поедноставува оваа задача. Овој сензор може да обработи нивоа на струја од 50A до 200A, обезбедувајќи сигурно решение за различни проекти. Во ова упатство, ќе истражиме како да го поврземе ACS758 со Arduino и точно да ги читаме вредностите на струјата.

Објаснување на хардверот
Главната компонента во овој проект е сензорот за струја Allegro ACS758. Овој сензор работи на принципот на Холовиот ефект, што му овозможува да го мери магнетното поле генерирано од струјата што тече низ проводник. Тој произведува излезен напон пропорционален на струјата, овозможувајќи му на Arduino да ги чита и интерпретира овие вредности. ACS758 има неколку варијанти, при што „100B“ означува дека може да мери до 100A. Има двосмерно мерење на струја, што овозможува точни читања без оглед на насоката на струјата. Сензорот бара напојување од 3.3V или 5V, што ги напојува неговите внатрешни кола, вклучувајќи оперативен засилувач што го обработува сигналот од Холовиот ефект.Детали од техничката спецификација
| Производител | Allegro Microsystems |
|---|---|
| Број на дел | ACS758LCB-100B |
| Логички/IO напон | 3.3 V / 5 V |
| Напон на напојување | 4.5 V - 5.5 V |
| Излезна струја (по канал) | 100 A |
| Врвна струја (по канал) | 200 A |
| Насоки за PWM фреквенција | Н/П |
| Прагови на влезна логика | Компатибилно со TTL |
| Пад на напон / RDS(on) / заситување | 0.1 V @ 100 A |
| Термички граници | Работна температура: -40 °C до 125 °C |
| Пакет | Пакет со 5 пина |
| Белешки / варијанти | Достапно во различни оценки на струја (50A, 100A, 150A, 200A) |
- Обезбедете правилно поврзување за да избегнете пад на напон поради отпор.
- Користете жица со соодветна дебелина за апликации со висока струја за да спречите прегревање.
- Чувајте го сензорот во наведените температурни граници за точни читања.
- Калибрирајте го излезот на сензорот врз основа на специфичниот модел што се користи.
- Размислете за користење на филтрирачки кондензатори за стабилизирање на читањата ако е потребно.
Инструкции за поврзување
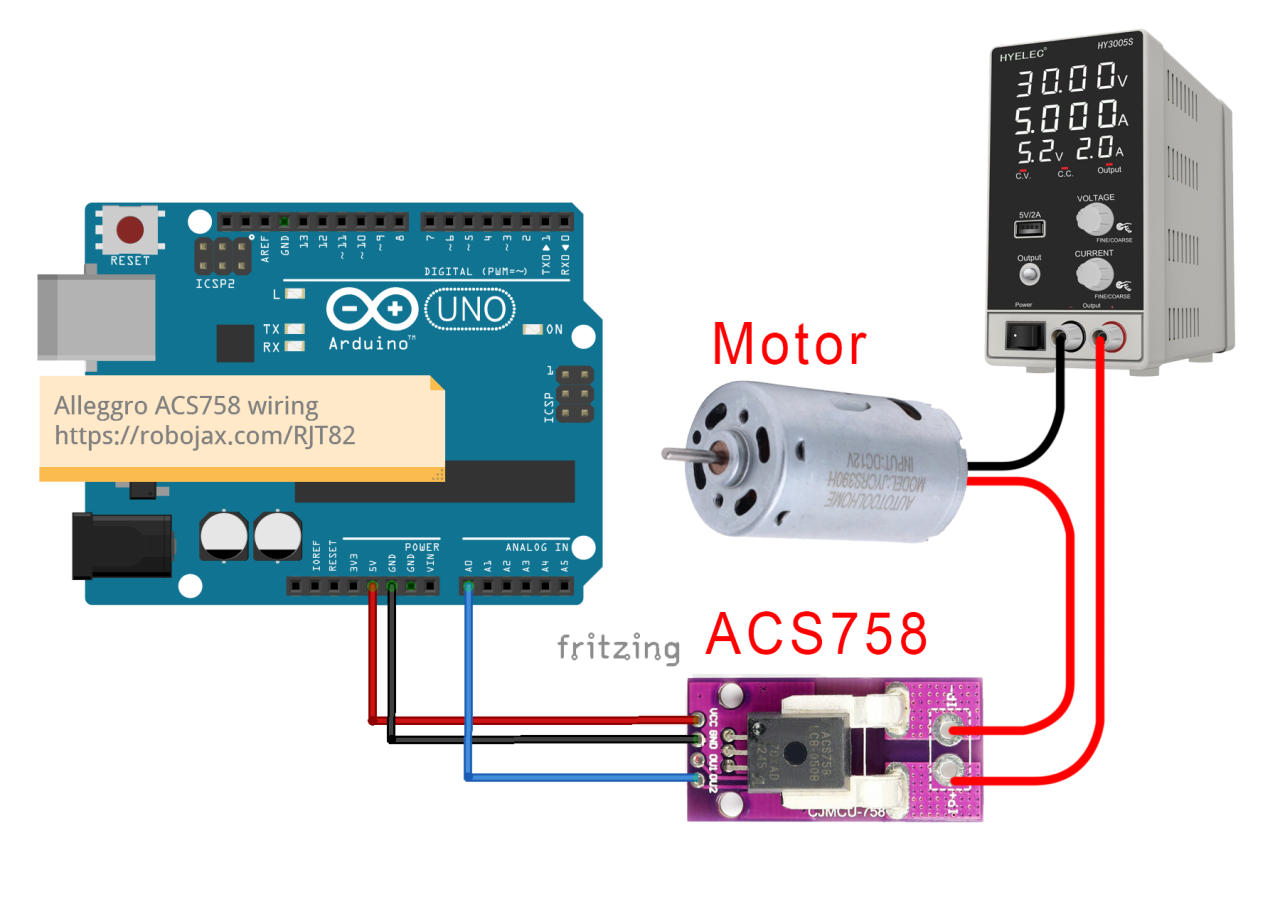
A0.
Осигурете се дека оптоварувањето што сакате да го измерите е поврзано во серија со сензорот. Патеката на струјата треба да тече низ сензорот за тој точно да ја измери струјата што поминува низ него. Сензорот има два пина за влез на струја; поврзете ја позитивната жица на вашето оптоварување на еден од овие пинови, а другиот пин на позитивниот терминал на вашето напојување. Негативната страна на напојувањето треба да се поврзе со негативниот терминал на оптоварувањето. Оваа поставка му овозможува на сензорот да ја измери струјата што тече кон оптоварувањето.
Примери на код и објаснување
Arduino кодот за читање вредности од сензорот ACS758 е едноставен. Подолу е извадок од напредниот код што го иницијализира сензорот и го чита напонот:
#define VIN A0 // дефинирај го пинот A0 на Arduino како влез за напон (V in)
const float VCC = 5.0; // напон на напојување
const float FACTOR = 20.0 / 1000; // чувствителност за ACS758-100B
void loop() {
  float voltage_raw = (5.0 / 1023.0) * analogRead(VIN); // Читај го напонот од сензорот
  float current = (voltage_raw - (VCC * 0.5)) / FACTOR; // Пресметај ја струјата
  Serial.print("Струја: ");
  Serial.println(current, 2); // Печати ја вредноста на струјата
}
Демонстрација / Што да очекувате
Откако сè е правилно поврзано и кодот е поставен, треба да видите вредности на струја прикажани на серискиот монитор. Читањата ќе се ажурираат на секоја половина секунда како што е дефинирано во кодот. Ако струјата е под границата на исклучување поставена во кодот, ќе видите порака „Нема струја“ прикажана. Оваа граница помага да се филтрира шумот и малите варијации во читањата на струјата. Бидете внимателни со обратна поларизација на врските, бидејќи тоа може да го оштети сензорот. Секогаш осигурувајте се дека сензорот е правилно поврзан во серија со оптоварувањето и следете го излезот за да потврдите точни читања. Видеото обезбедува дополнителен контекст и демонстрации (во видеото на 12:30).
Слики

Allegro ACS758 Current Sensor with Arduino
Arduino-wiring-for-ACS758-Current-sensor
ACS758-sensor-0

ACS758-sensor-1

ACS758-sensor-3

ACS758-sensor-4
ACS758-sensor-5-schematic
100-Advanced Arduino code for the Allegro ACS758 current sensor
Јазик: C++
/*
 *
 * Arduino Sketch for Allegro ACS758 Current Sensor (Advanced)
 * This sensor can measure current at a range of up to 200A.
 * It operates with 3.3V or 5V.
 * Please watch the video instruction and explanation for this code.
 *
 * Written by Ahmad Shamshiri on Saturday, May 27, 2018 at 13:19 in Ajax, Ontario, Canada
 * for Robojax.com
 * View the video instruction at
 * This code has been downloaded from Robojax.com
 */
#define VIN A0 // define the Arduino pin A0 as voltage input (V in)
const float VCC   = 5.0;// supply voltage 5V or 3.3V. If using PCB, set to 5V only.
const int model = 2;   // enter the model (see below)

float cutOffLimit = 1.00;// reading cutoff current. 1.00 is 1 Ampere

/*
          "ACS758LCB-050B",// for model use 0
          "ACS758LCB-050U",// for model use 1
          "ACS758LCB-100B",// for model use 2
          "ACS758LCB-100U",// for model use 3
          "ACS758KCB-150B",// for model use 4
          "ACS758KCB-150U",// for model use 5
          "ACS758ECB-200B",// for model use 6
          "ACS758ECB-200U"// for model use 7
          // sensitivity array is holding the sensitivity of the ACS758
          // current sensors. Do not change.
*/
float sensitivity[] ={
          40.0,// for ACS758LCB-050B
          60.0,// for ACS758LCB-050U
          20.0,// for ACS758LCB-100B
          40.0,// for ACS758LCB-100U
          13.3,// for ACS758KCB-150B
          16.7,// for ACS758KCB-150U
          10.0,// for ACS758ECB-200B
          20.0,// for ACS758ECB-200U
         };

/*
 *   Quiescent output voltage is a factor of VCC that appears at the output
 *   when the current is zero.
 *   For bidirectional sensors, it is 0.5 x VCC.
 *   For unidirectional sensors, it is 0.12 x VCC.
 *   For model ACS758LCB-050B, the B at the end represents Bidirectional (polarity doesn't matter).
 *   For model ACS758LCB-100U, the U at the end represents Unidirectional (polarity must match).
 *   Do not change.
 */
float quiescent_Output_voltage [] ={
          0.5,// for ACS758LCB-050B
          0.12,// for ACS758LCB-050U
          0.5,// for ACS758LCB-100B
          0.12,// for ACS758LCB-100U
          0.5,// for ACS758KCB-150B
          0.12,// for ACS758KCB-150U
          0.5,// for ACS758ECB-200B
          0.12,// for ACS758ECB-200U
          };
const float FACTOR = sensitivity[model]/1000;// set sensitivity for selected model
const float QOV =   quiescent_Output_voltage [model] * VCC;// set quiescent Output voltage for selected model
float voltage;// internal variable for voltage
float cutOff = FACTOR/cutOffLimit;// convert current cut off to mV

void setup() {
    //Robojax.com ACS758 Current Sensor
    Serial.begin(9600);// initialize serial monitor
    Serial.println("Robojax Tutorial");
    Serial.println("ACS758 Current Sensor");
}

void loop() {
  //Robojax.com ACS758 Current Sensor
  float voltage_raw =   (5.0 / 1023.0)* analogRead(VIN);// Read the voltage from sensor
  voltage =  voltage_raw - QOV + 0.007 ;// 0.007 is a value to make voltage zero when there is no current
  float current = voltage / FACTOR;
  if(abs(voltage) > cutOff ){
    Serial.print("V: ");
    Serial.print(voltage,3);// print voltage with 3 decimal places
    Serial.print("V, I: ");
    Serial.print(current,2); // print the current with 2 decimal places
    Serial.println("A");
  }else{
    Serial.println("No Current");
  }
  delay(500);
}101-Arduino code for Allegro ACS758 current sensor (basic)
Јазик: C++
/*
 * Arduino Sketch for Allegro ACS758 Current Sensor (Basic Simple)
 * This sensor can measure current at a range of up to 200A.
 * It operates with 3.3V or 5V (the module works with 5V, the sensor can work with 3.3V or 5V).
 * Please watch the video instruction and explanation for this code.
 *
 * Written by Ahmad Shamshiri on Saturday, May 26, 2018 at 7:05 PM in Ajax, Ontario, Canada
 * for Robojax.com
 * View the video instruction at https://youtu.be/SiHfjzcqnU4
 * This code has been downloaded from Robojax.com
 */
#define VIN A0
const float vcc    = 5.00;// supply voltage 5V or 3.3V
const float factor = 0.02;// 20mV/A is the factor

float voltage;

void setup() {
    //Robojax.com ACS758 Current Sensor
    Serial.begin(9600);
    Serial.println("Robojax Tutorial");
    Serial.println("ACS758 Current Tester");
    Serial.println("Basic Simple Code");
}

void loop() {
  //Robojax.com ACS758 Current Sensor
  voltage =   (5.0 / 1023.0)* analogRead(VIN);// Read the voltage from sensor
  voltage =  voltage - (vcc * 0.5) + 0.007 ;// 0.007 is a value to make voltage zero when there is no current
  float current = voltage / factor;
  Serial.print("V: ");
  Serial.print(voltage,3);
  Serial.print("V, I: ");
  Serial.print(current,2); Serial.println("A");
  delay(500);
}102-Advanced Arduino code for four Allegro ACS758 current sensors
Јазик: C++
/*
 *
 * Arduino Sketch for 4 modules Allegro ACS758 Current Sensor (Advanced)
 * This sensor can measure current at a range of up to 200A.
 * It operates with 3.3V or 5V.
 * Please watch the video instruction and explanation for this code.
 *
 * Written by Ahmad Shamshiri on August 4, 2018 at 13:19 in Ajax, Ontario, Canada
 * for Robojax.com in request from Ross M. from YouTube video https://youtu.be/SiHfjzcqnU4
 * View the video instruction at
 * This code has been downloaded from Robojax.com
 */
#define VIN1 A0 // define the Arduino pin A0 as voltage input (V in)
#define VIN2 A1
#define VIN3 A2
#define VIN4 A3

const float VCC   = 5.0;// supply voltage 5V or 3.3V. If using PCB, set to 5V only.
const int model = 2;   // enter the model (see below)

float cutOffLimit = 1.00;// reading cutoff current. 1.00 is 1 Amper

/*
          "ACS758LCB-050B",// for model use 0
          "ACS758LCB-050U",// for model use 1
          "ACS758LCB-100B",// for model use 2
          "ACS758LCB-100U",// for model use 3
          "ACS758KCB-150B",// for model use 4
          "ACS758KCB-150U",// for model use 5
          "ACS758ECB-200B",// for model use 6
          "ACS758ECB-200U"// for model use 7
sensitivity array is holding the sensitivity of the ACS758
current sensors. Do not change.
*/
float sensitivity[] ={
          40.0,// for ACS758LCB-050B
          60.0,// for ACS758LCB-050U
          20.0,// for ACS758LCB-100B
          40.0,// for ACS758LCB-100U
          13.3,// for ACS758KCB-150B
          16.7,// for ACS758KCB-150U
          10.0,// for ACS758ECB-200B
          20.0,// for ACS758ECB-200U
         };

/*
 *   Quiescent output voltage is a factor of VCC that appears at the output
 *   when the current is zero.
 *   For bidirectional sensors it is 0.5 x VCC
 *   For unidirectional sensors it is 0.12 x VCC
 *   For model ACS758LCB-050B, the B at the end represents bidirectional (polarity doesn't matter).
 *   For model ACS758LCB-100U, the U at the end represents unidirectional (polarity must match).
 *   Do not change.
 */
float quiescent_Output_voltage [] ={
          0.5,// for ACS758LCB-050B
          0.12,// for ACS758LCB-050U
          0.5,// for ACS758LCB-100B
          0.12,// for ACS758LCB-100U
          0.5,// for ACS758KCB-150B
          0.12,// for ACS758KCB-150U
          0.5,// for ACS758ECB-200B
          0.12,// for ACS758ECB-200U
          };
const float FACTOR = sensitivity[model]/1000;// set sensitivity for selected model
const float QOV =   quiescent_Output_voltage [model] * VCC;// set quiescent Output voltage for selected model
float voltage1;// internal variable for voltage1
float voltage2;// internal variable for voltage2
float voltage3;// internal variable for voltage3
float voltage4;// internal variable for voltage4

float cutOff = FACTOR/cutOffLimit;// convert current cut off to mV

void setup() {
    //Robojax.com ACS758 Current Sensor
    Serial.begin(9600);// initialize serial monitor
    Serial.println("Robojax Tutorial");
    Serial.println("Four ACS758 Current Sensors");
}

void loop() {
  //Robojax.com ACS758 Current Sensor
  float voltage_raw1 =   (5.0 / 1023.0)* analogRead(VIN1);// Read the voltage from sensor
  float voltage_raw2 =   (5.0 / 1023.0)* analogRead(VIN2);// Read the voltage from sensor
  float voltage_raw3 =   (5.0 / 1023.0)* analogRead(VIN3);// Read the voltage from sensor
  float voltage_raw4 =   (5.0 / 1023.0)* analogRead(VIN4);// Read the voltage from sensor

  voltage1 =  voltage_raw1 - QOV + 0.007 ;// 0.007 is a value to make voltage zero when there is no current
  voltage2 =  voltage_raw2 - QOV + 0.007 ;// 0.007 is a value to make voltage zero when there is no current
  voltage3 =  voltage_raw3 - QOV + 0.007 ;// 0.007 is a value to make voltage zero when there is no current
  voltage4 =  voltage_raw4 - QOV + 0.007 ;// 0.007 is a value to make voltage zero when there is no current

  float current1 = voltage1 / FACTOR;
  float current2 = voltage2 / FACTOR;
  float current3 = voltage3 / FACTOR;
  float current4 = voltage4 / FACTOR;

  if(abs(voltage1) > cutOff ){ //Corrected abs(voltage) to abs(voltage1)

    Serial.print("I1: ");
    Serial.print(current1,2); // print the current with 2 decimal places
    Serial.println("A");

    Serial.print("I2: ");
    Serial.print(current2,2); // print the current with 2 decimal places
    Serial.println("A");

    Serial.print("I3: ");
    Serial.print(current3,2); // print the current with 2 decimal places
    Serial.println("A");

    Serial.print("I4: ");
    Serial.print(current4,2); // print the current with 2 decimal places
    Serial.println("A");

  }else{
    Serial.println("No Current");
  }
  delay(500);
}
Работи што можеби ќе ви требаат
-
AmazonACS758 current sensor on Amazonamzn.to
-
Amazon
-
Amazon
-
eBay
-
AliExpressPurchase Allegro ACS758 Current Sensor from AliExpresss.click.aliexpress.com
Ресурси и референци
Сè уште нема ресурси.
Датотеки📁
Други датотеки
-
Adafruit PCA9685 16-Channel Servo Driver
robojax_PCA9685_extra_learning.pdf -
Alegro ACS Current LibraryArduino library for Allegro ACS current sensor modules. Provides functions to read current measurements from ACS712 and similar sensors.
robojax_Alegro_ACS_Current_library.zip0.02 MB