Аллегро ACS758 ток сенсорын Arduino-мен 50A-дан 200A-ға дейін қалай пайдалану керек
Жоғары қуатты қолданбалардағы токты өлшеу қиын болуы мүмкін, бірақ Allegro ACS758 ток сенсоры бұл тапсырманы жеңілдетеді. Бұл сенсор 50A-дан 200A-ға дейінгі ток деңгейлерін өңдей алады, әртүрлі жобалар үшін сенімді шешім ұсынады. Осы оқулықта біз ACS758-ді Arduino-ға қалай қосуға және ток мәндерін дәл оқуға болатынын қарастырамыз.

Аппараттық құрал түсіндірмесі
Бұл жобаның негізгі компоненті - Allegro ACS758 ток сенсоры. Бұл сенсор Холл эффектісі принципі бойынша жұмыс істейді, бұл оған өткізгіш арқылы өтетін ток тудыратын магнит өрісін өлшеуге мүмкіндік береді. Ол токқа пропорционалды шығыс кернеуін шығарады, бұл Arduino-ға осы мәндерді оқуға және түсіндіруге мүмкіндік береді. ACS758 бірнеше нұсқалары бар, "100B" оның 100A-ға дейін өлшей алатынын көрсетеді. Ол екі бағытты ток өлшеуді қамтиды, бұл ток бағытына қарамастан дәл көрсеткіштерге мүмкіндік береді. Сенсор 3.3V немесе 5V қуат көзін қажет етеді, ол оның ішкі тізбегін, соның ішінде Холл эффектісі сигналын өңдейтін операциялық күшейткішті қоректендіреді.Деректер парағының мәліметтері
| Өндіруші | Allegro Microsystems |
|---|---|
| Бөлшек нөмірі | ACS758LCB-100B |
| Логика/IO кернеуі | 3.3 В / 5 В |
| Қоректендіру кернеуі | 4.5 В - 5.5 В |
| Шығыс тогы (арна үшін) | 100 А |
| Шың тогы (арна үшін) | 200 А |
| PWM жиілігі бойынша нұсқау | Жоқ |
| Кіріс логикалық шектері | TTL үйлесімді |
| Кернеу төмендеуі / RDS(on) / қанығу | 0.1 В @ 100 А |
| Жылулық шектер | Жұмыс температурасы: -40 °C - 125 °C |
| Қаптама | 5 түйреуішті қаптама |
| Ескертулер / нұсқалар | Әртүрлі ток көрсеткіштерінде қолжетімді (50A, 100A, 150A, 200A) |
- Кедергіге байланысты кернеу төмендеуін болдырмау үшін дұрыс қосылымды қамтамасыз етіңіз.
- Қызып кетуді болдырмау үшін жоғары ток қолданбаларында тиісті қалыңдықтағы сымды пайдаланыңыз.
- Дәл көрсеткіштер алу үшін сенсорды белгіленген температура шектерінде ұстаңыз.
- Пайдаланылған нақты модельге негізделген сенсор шығысын калибрлеңіз.
- Қажет болса, көрсеткіштерді тұрақтандыру үшін сүзгі конденсаторларын пайдалануды қарастырыңыз.
Қосылым нұсқаулары
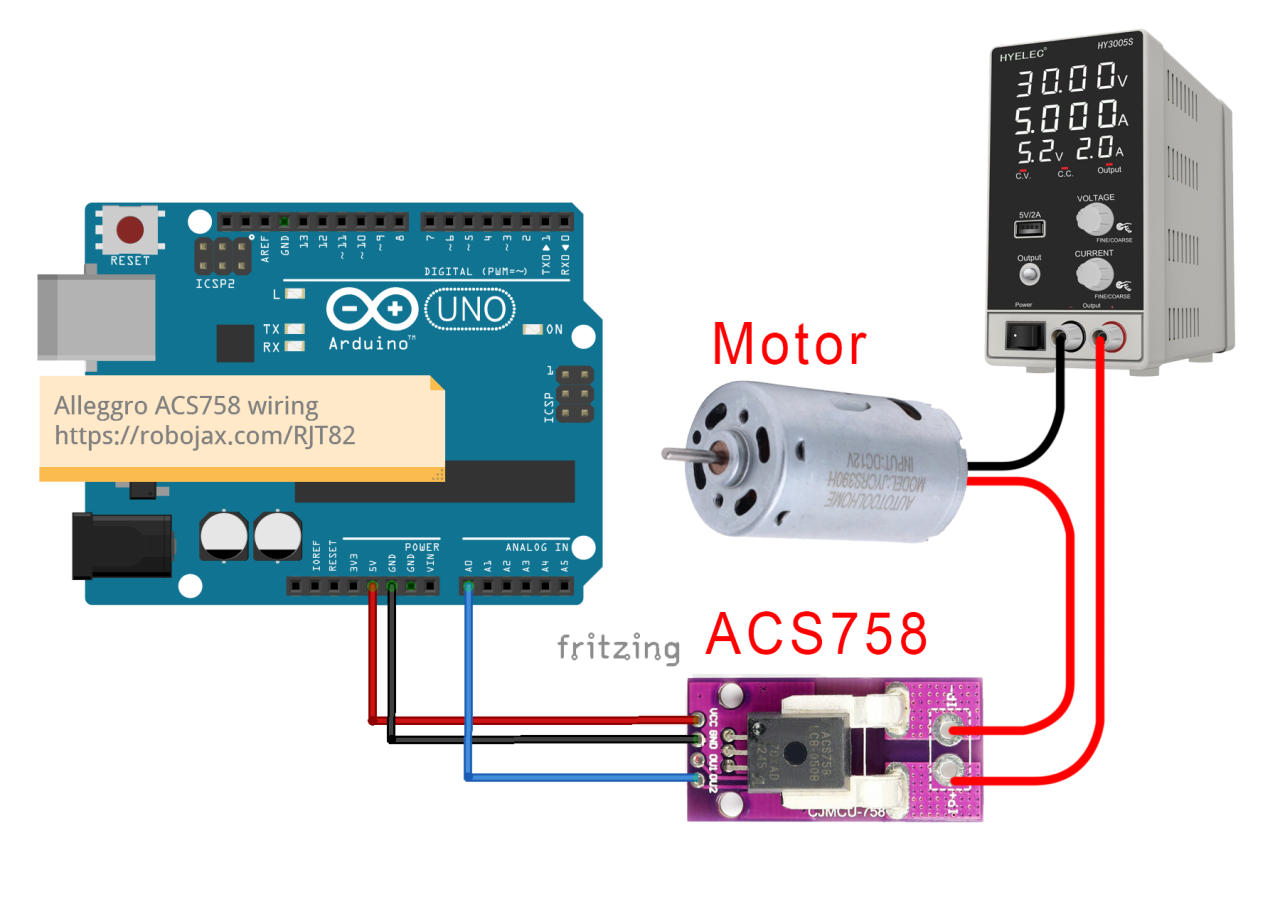
A0 деп белгіленеді.
Өлшегіңіз келетін жүктеменің сенсормен тізбектей қосылғанын қамтамасыз етіңіз. Ток жолы сенсор арқылы өтуі керек, сонда ол арқылы өтетін токты дәл өлшей алады. Сенсорда екі ток кіріс түйреуіші бар; жүктеменің оң сымын осы түйреуіштердің біріне, ал екінші түйреуішті қуат көзінің оң терминалына қосыңыз. Қуат көзінің теріс жағы жүктеменің теріс терминалына қосылуы керек. Бұл орнату сенсорға жүктемеге өтетін токты өлшеуге мүмкіндік береді.
Код мысалдары және түсіндірме
ACS758 сенсорынан мәндерді оқуға арналған Arduino коды қарапайым. Төменде сенсорды инициализациялайтын және кернеуді оқитын кеңейтілген кодтан үзінді берілген:
#define VIN A0 // Arduino A0 түйреуішін кернеу кірісі ретінде анықтау (V in)
const float VCC = 5.0; // қоректендіру кернеуі
const float FACTOR = 20.0 / 1000; // ACS758-100B үшін сезімталдық
void loop() {
  float voltage_raw = (5.0 / 1023.0) * analogRead(VIN); // Сенсордан кернеуді оқу
  float current = (voltage_raw - (VCC * 0.5)) / FACTOR; // Токты есептеу
  Serial.print("Ток: ");
  Serial.println(current, 2); // Ток мәнін басып шығару
}
Демонстрация / Не күтуге болады
Барлығы дұрыс қосылғаннан және код жүктелгеннен кейін сериялық мониторда ток мәндерінің көрсетілгенін көруіңіз керек. Көрсеткіштер кодта анықталғандай әр жарты секунд сайын жаңартылады. Егер ток кодта орнатылған шекті мәннен төмен болса, "Ток жоқ" хабары көрсетіледі. Бұл шектеу шуды және ток көрсеткіштеріндегі шамалы өзгерістерді сүзуге көмектеседі. Полярлықтың қайта қосылуына абай болыңыз, себебі бұл сенсорды зақымдауы мүмкін. Әрқашан сенсордың жүктемеге тізбектей дұрыс қосылғанын қамтамасыз етіңіз және дәл көрсеткіштерді растау үшін шығысты бақылаңыз. Бейне қосымша контекст пен демонстрацияларды ұсынады (бейнеде 12:30).
Суреттер

Allegro ACS758 Current Sensor with Arduino
Arduino-wiring-for-ACS758-Current-sensor
ACS758-sensor-0

ACS758-sensor-1

ACS758-sensor-3

ACS758-sensor-4
ACS758-sensor-5-schematic
100-Advanced Arduino code for the Allegro ACS758 current sensor
Тіл: C++
/*
 *
 * Arduino Sketch for Allegro ACS758 Current Sensor (Advanced)
 * This sensor can measure current at a range of up to 200A.
 * It operates with 3.3V or 5V.
 * Please watch the video instruction and explanation for this code.
 *
 * Written by Ahmad Shamshiri on Saturday, May 27, 2018 at 13:19 in Ajax, Ontario, Canada
 * for Robojax.com
 * View the video instruction at
 * This code has been downloaded from Robojax.com
 */
#define VIN A0 // define the Arduino pin A0 as voltage input (V in)
const float VCC   = 5.0;// supply voltage 5V or 3.3V. If using PCB, set to 5V only.
const int model = 2;   // enter the model (see below)

float cutOffLimit = 1.00;// reading cutoff current. 1.00 is 1 Ampere

/*
          "ACS758LCB-050B",// for model use 0
          "ACS758LCB-050U",// for model use 1
          "ACS758LCB-100B",// for model use 2
          "ACS758LCB-100U",// for model use 3
          "ACS758KCB-150B",// for model use 4
          "ACS758KCB-150U",// for model use 5
          "ACS758ECB-200B",// for model use 6
          "ACS758ECB-200U"// for model use 7
          // sensitivity array is holding the sensitivity of the ACS758
          // current sensors. Do not change.
*/
float sensitivity[] ={
          40.0,// for ACS758LCB-050B
          60.0,// for ACS758LCB-050U
          20.0,// for ACS758LCB-100B
          40.0,// for ACS758LCB-100U
          13.3,// for ACS758KCB-150B
          16.7,// for ACS758KCB-150U
          10.0,// for ACS758ECB-200B
          20.0,// for ACS758ECB-200U
         };

/*
 *   Quiescent output voltage is a factor of VCC that appears at the output
 *   when the current is zero.
 *   For bidirectional sensors, it is 0.5 x VCC.
 *   For unidirectional sensors, it is 0.12 x VCC.
 *   For model ACS758LCB-050B, the B at the end represents Bidirectional (polarity doesn't matter).
 *   For model ACS758LCB-100U, the U at the end represents Unidirectional (polarity must match).
 *   Do not change.
 */
float quiescent_Output_voltage [] ={
          0.5,// for ACS758LCB-050B
          0.12,// for ACS758LCB-050U
          0.5,// for ACS758LCB-100B
          0.12,// for ACS758LCB-100U
          0.5,// for ACS758KCB-150B
          0.12,// for ACS758KCB-150U
          0.5,// for ACS758ECB-200B
          0.12,// for ACS758ECB-200U
          };
const float FACTOR = sensitivity[model]/1000;// set sensitivity for selected model
const float QOV =   quiescent_Output_voltage [model] * VCC;// set quiescent Output voltage for selected model
float voltage;// internal variable for voltage
float cutOff = FACTOR/cutOffLimit;// convert current cut off to mV

void setup() {
    //Robojax.com ACS758 Current Sensor
    Serial.begin(9600);// initialize serial monitor
    Serial.println("Robojax Tutorial");
    Serial.println("ACS758 Current Sensor");
}

void loop() {
  //Robojax.com ACS758 Current Sensor
  float voltage_raw =   (5.0 / 1023.0)* analogRead(VIN);// Read the voltage from sensor
  voltage =  voltage_raw - QOV + 0.007 ;// 0.007 is a value to make voltage zero when there is no current
  float current = voltage / FACTOR;
  if(abs(voltage) > cutOff ){
    Serial.print("V: ");
    Serial.print(voltage,3);// print voltage with 3 decimal places
    Serial.print("V, I: ");
    Serial.print(current,2); // print the current with 2 decimal places
    Serial.println("A");
  }else{
    Serial.println("No Current");
  }
  delay(500);
}101-Arduino code for Allegro ACS758 current sensor (basic)
Тіл: C++
/*
 * Arduino Sketch for Allegro ACS758 Current Sensor (Basic Simple)
 * This sensor can measure current at a range of up to 200A.
 * It operates with 3.3V or 5V (the module works with 5V, the sensor can work with 3.3V or 5V).
 * Please watch the video instruction and explanation for this code.
 *
 * Written by Ahmad Shamshiri on Saturday, May 26, 2018 at 7:05 PM in Ajax, Ontario, Canada
 * for Robojax.com
 * View the video instruction at https://youtu.be/SiHfjzcqnU4
 * This code has been downloaded from Robojax.com
 */
#define VIN A0
const float vcc    = 5.00;// supply voltage 5V or 3.3V
const float factor = 0.02;// 20mV/A is the factor

float voltage;

void setup() {
    //Robojax.com ACS758 Current Sensor
    Serial.begin(9600);
    Serial.println("Robojax Tutorial");
    Serial.println("ACS758 Current Tester");
    Serial.println("Basic Simple Code");
}

void loop() {
  //Robojax.com ACS758 Current Sensor
  voltage =   (5.0 / 1023.0)* analogRead(VIN);// Read the voltage from sensor
  voltage =  voltage - (vcc * 0.5) + 0.007 ;// 0.007 is a value to make voltage zero when there is no current
  float current = voltage / factor;
  Serial.print("V: ");
  Serial.print(voltage,3);
  Serial.print("V, I: ");
  Serial.print(current,2); Serial.println("A");
  delay(500);
}102-Advanced Arduino code for four Allegro ACS758 current sensors
Тіл: C++
/*
 *
 * Arduino Sketch for 4 modules Allegro ACS758 Current Sensor (Advanced)
 * This sensor can measure current at a range of up to 200A.
 * It operates with 3.3V or 5V.
 * Please watch the video instruction and explanation for this code.
 *
 * Written by Ahmad Shamshiri on August 4, 2018 at 13:19 in Ajax, Ontario, Canada
 * for Robojax.com in request from Ross M. from YouTube video https://youtu.be/SiHfjzcqnU4
 * View the video instruction at
 * This code has been downloaded from Robojax.com
 */
#define VIN1 A0 // define the Arduino pin A0 as voltage input (V in)
#define VIN2 A1
#define VIN3 A2
#define VIN4 A3

const float VCC   = 5.0;// supply voltage 5V or 3.3V. If using PCB, set to 5V only.
const int model = 2;   // enter the model (see below)

float cutOffLimit = 1.00;// reading cutoff current. 1.00 is 1 Amper

/*
          "ACS758LCB-050B",// for model use 0
          "ACS758LCB-050U",// for model use 1
          "ACS758LCB-100B",// for model use 2
          "ACS758LCB-100U",// for model use 3
          "ACS758KCB-150B",// for model use 4
          "ACS758KCB-150U",// for model use 5
          "ACS758ECB-200B",// for model use 6
          "ACS758ECB-200U"// for model use 7
sensitivity array is holding the sensitivity of the ACS758
current sensors. Do not change.
*/
float sensitivity[] ={
          40.0,// for ACS758LCB-050B
          60.0,// for ACS758LCB-050U
          20.0,// for ACS758LCB-100B
          40.0,// for ACS758LCB-100U
          13.3,// for ACS758KCB-150B
          16.7,// for ACS758KCB-150U
          10.0,// for ACS758ECB-200B
          20.0,// for ACS758ECB-200U
         };

/*
 *   Quiescent output voltage is a factor of VCC that appears at the output
 *   when the current is zero.
 *   For bidirectional sensors it is 0.5 x VCC
 *   For unidirectional sensors it is 0.12 x VCC
 *   For model ACS758LCB-050B, the B at the end represents bidirectional (polarity doesn't matter).
 *   For model ACS758LCB-100U, the U at the end represents unidirectional (polarity must match).
 *   Do not change.
 */
float quiescent_Output_voltage [] ={
          0.5,// for ACS758LCB-050B
          0.12,// for ACS758LCB-050U
          0.5,// for ACS758LCB-100B
          0.12,// for ACS758LCB-100U
          0.5,// for ACS758KCB-150B
          0.12,// for ACS758KCB-150U
          0.5,// for ACS758ECB-200B
          0.12,// for ACS758ECB-200U
          };
const float FACTOR = sensitivity[model]/1000;// set sensitivity for selected model
const float QOV =   quiescent_Output_voltage [model] * VCC;// set quiescent Output voltage for selected model
float voltage1;// internal variable for voltage1
float voltage2;// internal variable for voltage2
float voltage3;// internal variable for voltage3
float voltage4;// internal variable for voltage4

float cutOff = FACTOR/cutOffLimit;// convert current cut off to mV

void setup() {
    //Robojax.com ACS758 Current Sensor
    Serial.begin(9600);// initialize serial monitor
    Serial.println("Robojax Tutorial");
    Serial.println("Four ACS758 Current Sensors");
}

void loop() {
  //Robojax.com ACS758 Current Sensor
  float voltage_raw1 =   (5.0 / 1023.0)* analogRead(VIN1);// Read the voltage from sensor
  float voltage_raw2 =   (5.0 / 1023.0)* analogRead(VIN2);// Read the voltage from sensor
  float voltage_raw3 =   (5.0 / 1023.0)* analogRead(VIN3);// Read the voltage from sensor
  float voltage_raw4 =   (5.0 / 1023.0)* analogRead(VIN4);// Read the voltage from sensor

  voltage1 =  voltage_raw1 - QOV + 0.007 ;// 0.007 is a value to make voltage zero when there is no current
  voltage2 =  voltage_raw2 - QOV + 0.007 ;// 0.007 is a value to make voltage zero when there is no current
  voltage3 =  voltage_raw3 - QOV + 0.007 ;// 0.007 is a value to make voltage zero when there is no current
  voltage4 =  voltage_raw4 - QOV + 0.007 ;// 0.007 is a value to make voltage zero when there is no current

  float current1 = voltage1 / FACTOR;
  float current2 = voltage2 / FACTOR;
  float current3 = voltage3 / FACTOR;
  float current4 = voltage4 / FACTOR;

  if(abs(voltage1) > cutOff ){ //Corrected abs(voltage) to abs(voltage1)

    Serial.print("I1: ");
    Serial.print(current1,2); // print the current with 2 decimal places
    Serial.println("A");

    Serial.print("I2: ");
    Serial.print(current2,2); // print the current with 2 decimal places
    Serial.println("A");

    Serial.print("I3: ");
    Serial.print(current3,2); // print the current with 2 decimal places
    Serial.println("A");

    Serial.print("I4: ");
    Serial.print(current4,2); // print the current with 2 decimal places
    Serial.println("A");

  }else{
    Serial.println("No Current");
  }
  delay(500);
}
Сізге қажет болуы мүмкін нәрселер
-
АмазонкаACS758 current sensor on Amazonamzn.to
-
Амазонка
-
Амазонка
-
eBay
-
AliExpressPurchase Allegro ACS758 Current Sensor from AliExpresss.click.aliexpress.com
Ресурстар мен сілтемелер
Әлі ресурстар жоқ.
Файлдар📁
Басқа файлдар
-
Adafruit PCA9685 16-арналы сервопривод драйвері
robojax_PCA9685_extra_learning.pdf -
Alegro ACS Current LibraryArduino library for Allegro ACS current sensor modules. Provides functions to read current measurements from ACS712 and similar sensors.
robojax_Alegro_ACS_Current_library.zip0.02 MB