알레그로 ACS758 전류 센서를 아두이노와 함께 50A에서 200A까지 사용하는 방법
고용량 애플리케이션에서의 전류 측정은 까다로울 수 있지만, Allegro ACS758 전류 센서는 이 작업을 간소화합니다. 이 센서는 50A에서 200A까지의 전류 레벨을 처리할 수 있어 다양한 프로젝트에 신뢰할 수 있는 솔루션을 제공합니다. 이 튜토리얼에서는 ACS758을 Arduino에 연결하고 전류 값을 정확하게 읽는 방법을 살펴보겠습니다.

하드웨어 설명
이 프로젝트의 주요 구성 요소는 Allegro ACS758 전류 센서입니다. 이 센서는 홀 효과 원리를 기반으로 작동하며, 도체를 통해 흐르는 전류에 의해 생성된 자기장을 측정할 수 있습니다. 전류에 비례하는 출력 전압을 생성하여 Arduino가 이러한 값을 읽고 해석할 수 있게 합니다. ACS758에는 여러 변형이 있으며, "100B"는 최대 100A까지 측정할 수 있음을 나타냅니다. 양방향 전류 측정 기능을 갖추고 있어 전류 방향에 관계없이 정확한 판독이 가능합니다. 이 센서는 3.3V 또는 5V 전원 공급이 필요하며, 이 전원은 홀 효과 신호를 처리하는 연산 증폭기를 포함한 내부 회로에 전력을 공급합니다.데이터시트 세부 정보
| 제조업체 | Allegro Microsystems |
|---|---|
| 부품 번호 | ACS758LCB-100B |
| 로직/IO 전압 | 3.3 V / 5 V |
| 공급 전압 | 4.5 V - 5.5 V |
| 출력 전류(채널당) | 100 A |
| 피크 전류(채널당) | 200 A |
| PWM 주파수 가이드 | 해당 없음 |
| 입력 로직 임계값 | TTL 호환 |
| 전압 강하 / RDS(on) / 포화 | 0.1 V @ 100 A |
| 열 제한 | 작동 온도: -40 °C ~ 125 °C |
| 패키지 | 5핀 패키지 |
| 참고 사항 / 변형 | 다양한 전류 정격(50A, 100A, 150A, 200A)으로 제공 |
- 저항으로 인한 전압 강하를 방지하려면 배선을 올바르게 하세요.
- 과열을 방지하려면 고전류 애플리케이션에 적절한 굵기의 와이어를 사용하세요.
- 정확한 판독을 위해 센서를 지정된 온도 범위 내에서 유지하세요.
- 사용된 특정 모델에 따라 센서 출력을 보정하세요.
- 필요한 경우 판독값을 안정화하기 위해 필터링 커패시터 사용을 고려하세요.
배선 지침
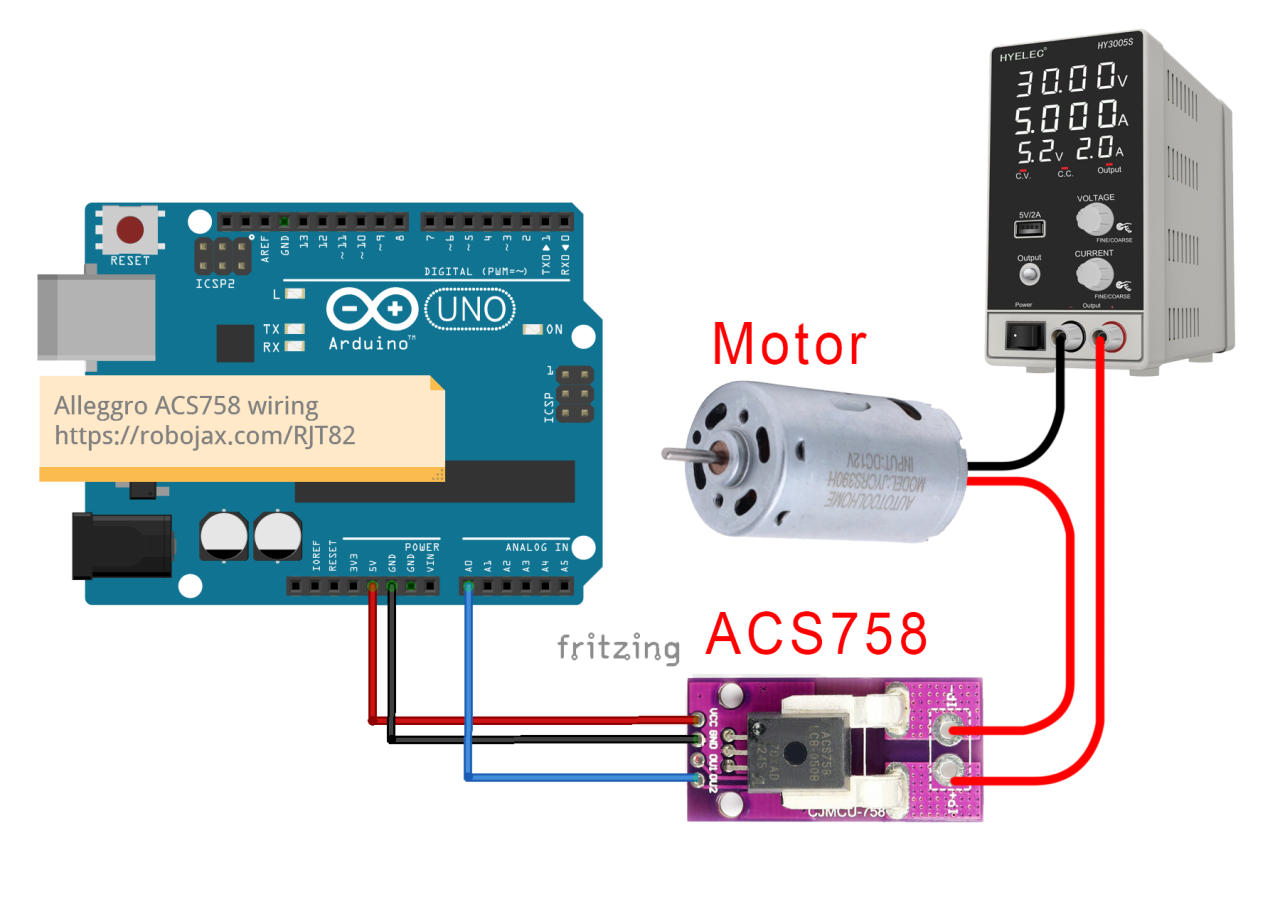
A0으로 표시된 Arduino의 아날로그 입력 핀에 연결할 수 있습니다.
측정하려는 부하가 센서와 직렬로 연결되어 있는지 확인하세요. 전류 경로가 센서를 통과해야 센서가 통과하는 전류를 정확하게 측정할 수 있습니다. 센서에는 두 개의 전류 입력 핀이 있습니다. 부하의 양극 와이어를 이 핀 중 하나에 연결하고 다른 핀을 전원 공급 장치의 양극 단자에 연결하세요. 전원 공급 장치의 음극 측은 부하의 음극 단자에 연결해야 합니다. 이 설정을 통해 센서가 부하로 흐르는 전류를 측정할 수 있습니다.
코드 예제 및 설명
ACS758 센서에서 값을 읽기 위한 Arduino 코드는 간단합니다. 아래는 센서를 초기화하고 전압을 읽는 고급 코드의 일부입니다:
#define VIN A0 // Arduino 핀 A0을 전압 입력(V in)으로 정의
const float VCC = 5.0; // 공급 전압
const float FACTOR = 20.0 / 1000; // ACS758-100B의 감도
void loop() {
  float voltage_raw = (5.0 / 1023.0) * analogRead(VIN); // 센서에서 전압 읽기
  float current = (voltage_raw - (VCC * 0.5)) / FACTOR; // 전류 계산
  Serial.print("Current: ");
  Serial.println(current, 2); // 전류 값 출력
}
데모 / 기대 효과
모든 것이 올바르게 배선되고 코드가 업로드되면 시리얼 모니터에 전류 값이 표시되는 것을 볼 수 있습니다. 판독값은 코드에 정의된 대로 0.5초마다 업데이트됩니다. 전류가 코드에 설정된 차단 한계보다 낮으면 "No Current" 메시지가 표시됩니다. 이 차단 기능은 노이즈와 전류 판독값의 작은 변동을 필터링하는 데 도움이 됩니다. 극성이 반대로 연결되면 센서가 손상될 수 있으므로 주의하세요. 센서가 부하와 직렬로 올바르게 배선되었는지 항상 확인하고 출력을 모니터링하여 정확한 판독을 확인하세요. 비디오는 추가적인 맥락과 데모를 제공합니다(비디오 12:30 부분).
이미지

Allegro ACS758 Current Sensor with Arduino
Arduino-wiring-for-ACS758-Current-sensor
ACS758-sensor-0

ACS758-sensor-1

ACS758-sensor-3

ACS758-sensor-4
ACS758-sensor-5-schematic
100-Advanced Arduino code for the Allegro ACS758 current sensor
언어: C++
/*
 *
 * Arduino Sketch for Allegro ACS758 Current Sensor (Advanced)
 * This sensor can measure current at a range of up to 200A.
 * It operates with 3.3V or 5V.
 * Please watch the video instruction and explanation for this code.
 *
 * Written by Ahmad Shamshiri on Saturday, May 27, 2018 at 13:19 in Ajax, Ontario, Canada
 * for Robojax.com
 * View the video instruction at
 * This code has been downloaded from Robojax.com
 */
#define VIN A0 // define the Arduino pin A0 as voltage input (V in)
const float VCC   = 5.0;// supply voltage 5V or 3.3V. If using PCB, set to 5V only.
const int model = 2;   // enter the model (see below)

float cutOffLimit = 1.00;// reading cutoff current. 1.00 is 1 Ampere

/*
          "ACS758LCB-050B",// for model use 0
          "ACS758LCB-050U",// for model use 1
          "ACS758LCB-100B",// for model use 2
          "ACS758LCB-100U",// for model use 3
          "ACS758KCB-150B",// for model use 4
          "ACS758KCB-150U",// for model use 5
          "ACS758ECB-200B",// for model use 6
          "ACS758ECB-200U"// for model use 7
          // sensitivity array is holding the sensitivity of the ACS758
          // current sensors. Do not change.
*/
float sensitivity[] ={
          40.0,// for ACS758LCB-050B
          60.0,// for ACS758LCB-050U
          20.0,// for ACS758LCB-100B
          40.0,// for ACS758LCB-100U
          13.3,// for ACS758KCB-150B
          16.7,// for ACS758KCB-150U
          10.0,// for ACS758ECB-200B
          20.0,// for ACS758ECB-200U
         };

/*
 *   Quiescent output voltage is a factor of VCC that appears at the output
 *   when the current is zero.
 *   For bidirectional sensors, it is 0.5 x VCC.
 *   For unidirectional sensors, it is 0.12 x VCC.
 *   For model ACS758LCB-050B, the B at the end represents Bidirectional (polarity doesn't matter).
 *   For model ACS758LCB-100U, the U at the end represents Unidirectional (polarity must match).
 *   Do not change.
 */
float quiescent_Output_voltage [] ={
          0.5,// for ACS758LCB-050B
          0.12,// for ACS758LCB-050U
          0.5,// for ACS758LCB-100B
          0.12,// for ACS758LCB-100U
          0.5,// for ACS758KCB-150B
          0.12,// for ACS758KCB-150U
          0.5,// for ACS758ECB-200B
          0.12,// for ACS758ECB-200U
          };
const float FACTOR = sensitivity[model]/1000;// set sensitivity for selected model
const float QOV =   quiescent_Output_voltage [model] * VCC;// set quiescent Output voltage for selected model
float voltage;// internal variable for voltage
float cutOff = FACTOR/cutOffLimit;// convert current cut off to mV

void setup() {
    //Robojax.com ACS758 Current Sensor
    Serial.begin(9600);// initialize serial monitor
    Serial.println("Robojax Tutorial");
    Serial.println("ACS758 Current Sensor");
}

void loop() {
  //Robojax.com ACS758 Current Sensor
  float voltage_raw =   (5.0 / 1023.0)* analogRead(VIN);// Read the voltage from sensor
  voltage =  voltage_raw - QOV + 0.007 ;// 0.007 is a value to make voltage zero when there is no current
  float current = voltage / FACTOR;
  if(abs(voltage) > cutOff ){
    Serial.print("V: ");
    Serial.print(voltage,3);// print voltage with 3 decimal places
    Serial.print("V, I: ");
    Serial.print(current,2); // print the current with 2 decimal places
    Serial.println("A");
  }else{
    Serial.println("No Current");
  }
  delay(500);
}101-Arduino code for Allegro ACS758 current sensor (basic)
언어: C++
/*
 * Arduino Sketch for Allegro ACS758 Current Sensor (Basic Simple)
 * This sensor can measure current at a range of up to 200A.
 * It operates with 3.3V or 5V (the module works with 5V, the sensor can work with 3.3V or 5V).
 * Please watch the video instruction and explanation for this code.
 *
 * Written by Ahmad Shamshiri on Saturday, May 26, 2018 at 7:05 PM in Ajax, Ontario, Canada
 * for Robojax.com
 * View the video instruction at https://youtu.be/SiHfjzcqnU4
 * This code has been downloaded from Robojax.com
 */
#define VIN A0
const float vcc    = 5.00;// supply voltage 5V or 3.3V
const float factor = 0.02;// 20mV/A is the factor

float voltage;

void setup() {
    //Robojax.com ACS758 Current Sensor
    Serial.begin(9600);
    Serial.println("Robojax Tutorial");
    Serial.println("ACS758 Current Tester");
    Serial.println("Basic Simple Code");
}

void loop() {
  //Robojax.com ACS758 Current Sensor
  voltage =   (5.0 / 1023.0)* analogRead(VIN);// Read the voltage from sensor
  voltage =  voltage - (vcc * 0.5) + 0.007 ;// 0.007 is a value to make voltage zero when there is no current
  float current = voltage / factor;
  Serial.print("V: ");
  Serial.print(voltage,3);
  Serial.print("V, I: ");
  Serial.print(current,2); Serial.println("A");
  delay(500);
}102-Advanced Arduino code for four Allegro ACS758 current sensors
언어: C++
/*
 *
 * Arduino Sketch for 4 modules Allegro ACS758 Current Sensor (Advanced)
 * This sensor can measure current at a range of up to 200A.
 * It operates with 3.3V or 5V.
 * Please watch the video instruction and explanation for this code.
 *
 * Written by Ahmad Shamshiri on August 4, 2018 at 13:19 in Ajax, Ontario, Canada
 * for Robojax.com in request from Ross M. from YouTube video https://youtu.be/SiHfjzcqnU4
 * View the video instruction at
 * This code has been downloaded from Robojax.com
 */
#define VIN1 A0 // define the Arduino pin A0 as voltage input (V in)
#define VIN2 A1
#define VIN3 A2
#define VIN4 A3

const float VCC   = 5.0;// supply voltage 5V or 3.3V. If using PCB, set to 5V only.
const int model = 2;   // enter the model (see below)

float cutOffLimit = 1.00;// reading cutoff current. 1.00 is 1 Amper

/*
          "ACS758LCB-050B",// for model use 0
          "ACS758LCB-050U",// for model use 1
          "ACS758LCB-100B",// for model use 2
          "ACS758LCB-100U",// for model use 3
          "ACS758KCB-150B",// for model use 4
          "ACS758KCB-150U",// for model use 5
          "ACS758ECB-200B",// for model use 6
          "ACS758ECB-200U"// for model use 7
sensitivity array is holding the sensitivity of the ACS758
current sensors. Do not change.
*/
float sensitivity[] ={
          40.0,// for ACS758LCB-050B
          60.0,// for ACS758LCB-050U
          20.0,// for ACS758LCB-100B
          40.0,// for ACS758LCB-100U
          13.3,// for ACS758KCB-150B
          16.7,// for ACS758KCB-150U
          10.0,// for ACS758ECB-200B
          20.0,// for ACS758ECB-200U
         };

/*
 *   Quiescent output voltage is a factor of VCC that appears at the output
 *   when the current is zero.
 *   For bidirectional sensors it is 0.5 x VCC
 *   For unidirectional sensors it is 0.12 x VCC
 *   For model ACS758LCB-050B, the B at the end represents bidirectional (polarity doesn't matter).
 *   For model ACS758LCB-100U, the U at the end represents unidirectional (polarity must match).
 *   Do not change.
 */
float quiescent_Output_voltage [] ={
          0.5,// for ACS758LCB-050B
          0.12,// for ACS758LCB-050U
          0.5,// for ACS758LCB-100B
          0.12,// for ACS758LCB-100U
          0.5,// for ACS758KCB-150B
          0.12,// for ACS758KCB-150U
          0.5,// for ACS758ECB-200B
          0.12,// for ACS758ECB-200U
          };
const float FACTOR = sensitivity[model]/1000;// set sensitivity for selected model
const float QOV =   quiescent_Output_voltage [model] * VCC;// set quiescent Output voltage for selected model
float voltage1;// internal variable for voltage1
float voltage2;// internal variable for voltage2
float voltage3;// internal variable for voltage3
float voltage4;// internal variable for voltage4

float cutOff = FACTOR/cutOffLimit;// convert current cut off to mV

void setup() {
    //Robojax.com ACS758 Current Sensor
    Serial.begin(9600);// initialize serial monitor
    Serial.println("Robojax Tutorial");
    Serial.println("Four ACS758 Current Sensors");
}

void loop() {
  //Robojax.com ACS758 Current Sensor
  float voltage_raw1 =   (5.0 / 1023.0)* analogRead(VIN1);// Read the voltage from sensor
  float voltage_raw2 =   (5.0 / 1023.0)* analogRead(VIN2);// Read the voltage from sensor
  float voltage_raw3 =   (5.0 / 1023.0)* analogRead(VIN3);// Read the voltage from sensor
  float voltage_raw4 =   (5.0 / 1023.0)* analogRead(VIN4);// Read the voltage from sensor

  voltage1 =  voltage_raw1 - QOV + 0.007 ;// 0.007 is a value to make voltage zero when there is no current
  voltage2 =  voltage_raw2 - QOV + 0.007 ;// 0.007 is a value to make voltage zero when there is no current
  voltage3 =  voltage_raw3 - QOV + 0.007 ;// 0.007 is a value to make voltage zero when there is no current
  voltage4 =  voltage_raw4 - QOV + 0.007 ;// 0.007 is a value to make voltage zero when there is no current

  float current1 = voltage1 / FACTOR;
  float current2 = voltage2 / FACTOR;
  float current3 = voltage3 / FACTOR;
  float current4 = voltage4 / FACTOR;

  if(abs(voltage1) > cutOff ){ //Corrected abs(voltage) to abs(voltage1)

    Serial.print("I1: ");
    Serial.print(current1,2); // print the current with 2 decimal places
    Serial.println("A");

    Serial.print("I2: ");
    Serial.print(current2,2); // print the current with 2 decimal places
    Serial.println("A");

    Serial.print("I3: ");
    Serial.print(current3,2); // print the current with 2 decimal places
    Serial.println("A");

    Serial.print("I4: ");
    Serial.print(current4,2); // print the current with 2 decimal places
    Serial.println("A");

  }else{
    Serial.println("No Current");
  }
  delay(500);
}
필요할 수 있는 것들
-
아마존ACS758 current sensor on Amazonamzn.to
-
아마존
-
이베이
-
알리익스프레스Purchase Allegro ACS758 Current Sensor from AliExpresss.click.aliexpress.com
자원 및 참고자료
아직 자원이 없습니다.
파일📁
다른 파일들
-
Adafruit PCA9685 16채널 서보 드라이버
robojax_PCA9685_extra_learning.pdf -
Alegro ACS Current LibraryArduino library for Allegro ACS current sensor modules. Provides functions to read current measurements from ACS712 and similar sensors.
robojax_Alegro_ACS_Current_library.zip0.02 MB