Cara Menggunakan Sensor Arus Allegro ACS758 dengan Arduino untuk 50A hingga 200A
Pengukuran arus pada aplikasi berkapasitas tinggi bisa menjadi tantangan, tetapi sensor arus Allegro ACS758 menyederhanakan tugas ini. Sensor ini dapat menangani tingkat arus dari 50A hingga 200A, memberikan solusi yang andal untuk berbagai proyek. Dalam tutorial ini, kita akan menjelajahi cara menghubungkan ACS758 ke Arduino dan membaca nilai arus secara akurat.

Penjelasan Perangkat Keras
Komponen utama dalam proyek ini adalah sensor arus Allegro ACS758. Sensor ini bekerja berdasarkan prinsip efek Hall, yang memungkinkannya mengukur medan magnet yang dihasilkan oleh arus yang mengalir melalui konduktor. Sensor ini menghasilkan tegangan keluaran yang proporsional dengan arus, memungkinkan Arduino untuk membaca dan menafsirkan nilai-nilai ini. ACS758 memiliki beberapa varian, dengan "100B" menunjukkan bahwa ia dapat mengukur hingga 100A. Sensor ini memiliki pengukuran arus dua arah, memungkinkan pembacaan yang akurat terlepas dari arah arus. Sensor memerlukan catu daya 3.3V atau 5V, yang memberi daya pada sirkuit internalnya, termasuk penguat operasional yang memproses sinyal efek Hall.Detail Datasheet
| Produsen | Allegro Microsystems |
|---|---|
| Nomor bagian | ACS758LCB-100B |
| Tegangan logika/IO | 3.3 V / 5 V |
| Tegangan suplai | 4.5 V - 5.5 V |
| Arus keluaran (per saluran) | 100 A |
| Arus puncak (per saluran) | 200 A |
| Panduan frekuensi PWM | Tidak berlaku |
| Ambang logika masukan | Kompatibel TTL |
| Penurunan tegangan / RDS(on) / saturasi | 0.1 V @ 100 A |
| Batas termal | Suhu operasi: -40 °C hingga 125 °C |
| Kemasan | Kemasan 5 pin |
| Catatan / varian | Tersedia dalam berbagai peringkat arus (50A, 100A, 150A, 200A) |
- Pastikan kabel terpasang dengan benar untuk menghindari penurunan tegangan akibat resistansi.
- Gunakan kabel dengan ukuran yang sesuai untuk aplikasi arus tinggi untuk mencegah panas berlebih.
- Jaga sensor dalam batas suhu yang ditentukan untuk pembacaan yang akurat.
- Kalibrasi keluaran sensor berdasarkan model spesifik yang digunakan.
- Pertimbangkan untuk menggunakan kapasitor penyaring untuk menstabilkan pembacaan jika diperlukan.
Instruksi Pengkabelan
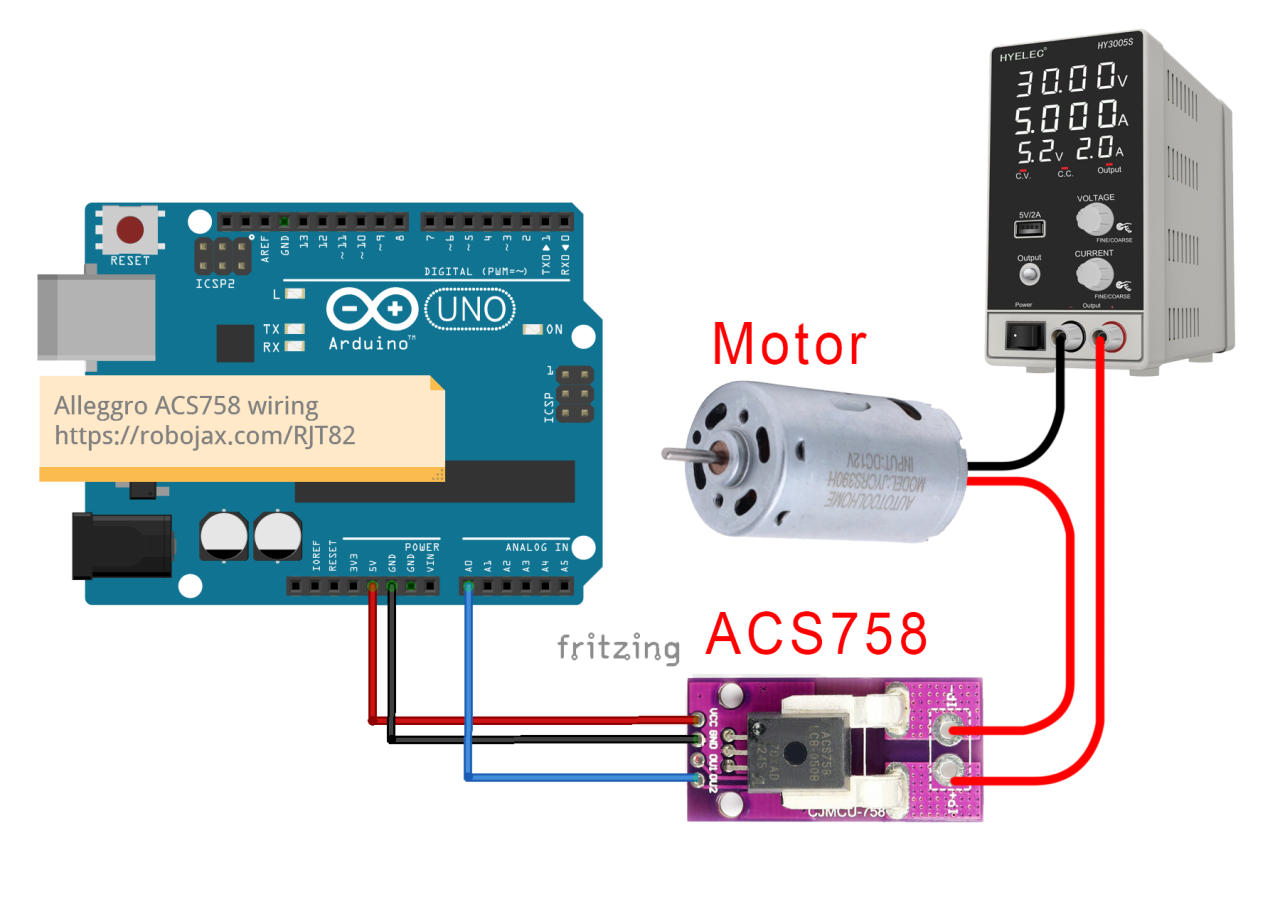
A0.
Pastikan beban yang ingin Anda ukur terhubung secara seri dengan sensor. Jalur arus harus mengalir melalui sensor sehingga dapat mengukur arus yang melewatinya secara akurat. Sensor memiliki dua pin masukan arus; hubungkan kabel positif beban Anda ke salah satu pin ini dan pin lainnya ke terminal positif catu daya Anda. Sisi negatif catu daya harus terhubung ke terminal negatif beban. Pengaturan ini memungkinkan sensor mengukur arus yang mengalir ke beban.
Contoh Kode & Penjelasan
Kode Arduino untuk membaca nilai dari sensor ACS758 cukup sederhana. Di bawah ini adalah kutipan dari kode lanjutan yang menginisialisasi sensor dan membaca tegangan:
#define VIN A0 // mendefinisikan pin Arduino A0 sebagai masukan tegangan (V in)
const float VCC = 5.0; // tegangan suplai
const float FACTOR = 20.0 / 1000; // sensitivitas untuk ACS758-100B
void loop() {
  float voltage_raw = (5.0 / 1023.0) * analogRead(VIN); // Baca tegangan dari sensor
  float current = (voltage_raw - (VCC * 0.5)) / FACTOR; // Hitung arus
  Serial.print("Arus: ");
  Serial.println(current, 2); // Cetak nilai arus
}
Demonstrasi / Apa yang Diharapkan
Setelah semuanya terhubung dengan benar dan kode diunggah, Anda akan melihat nilai arus ditampilkan di monitor serial. Pembacaan akan diperbarui setiap setengah detik seperti yang ditentukan dalam kode. Jika arus di bawah batas pemotongan yang ditetapkan dalam kode, Anda akan melihat pesan "Tidak Ada Arus" ditampilkan. Pemotongan ini membantu menyaring noise dan variasi kecil dalam pembacaan arus. Berhati-hatilah dengan koneksi polaritas terbalik, karena ini dapat merusak sensor. Selalu pastikan sensor terhubung dengan benar secara seri dengan beban, dan pantau keluaran untuk mengonfirmasi pembacaan yang akurat. Video menyediakan konteks tambahan dan demonstrasi (di video pada 12:30).
Gambar

Allegro ACS758 Current Sensor with Arduino
Arduino-wiring-for-ACS758-Current-sensor
ACS758-sensor-0

ACS758-sensor-1

ACS758-sensor-3

ACS758-sensor-4
ACS758-sensor-5-schematic
100-Advanced Arduino code for the Allegro ACS758 current sensor
Bahasa: C++
/*
 *
 * Arduino Sketch for Allegro ACS758 Current Sensor (Advanced)
 * This sensor can measure current at a range of up to 200A.
 * It operates with 3.3V or 5V.
 * Please watch the video instruction and explanation for this code.
 *
 * Written by Ahmad Shamshiri on Saturday, May 27, 2018 at 13:19 in Ajax, Ontario, Canada
 * for Robojax.com
 * View the video instruction at
 * This code has been downloaded from Robojax.com
 */
#define VIN A0 // define the Arduino pin A0 as voltage input (V in)
const float VCC   = 5.0;// supply voltage 5V or 3.3V. If using PCB, set to 5V only.
const int model = 2;   // enter the model (see below)

float cutOffLimit = 1.00;// reading cutoff current. 1.00 is 1 Ampere

/*
          "ACS758LCB-050B",// for model use 0
          "ACS758LCB-050U",// for model use 1
          "ACS758LCB-100B",// for model use 2
          "ACS758LCB-100U",// for model use 3
          "ACS758KCB-150B",// for model use 4
          "ACS758KCB-150U",// for model use 5
          "ACS758ECB-200B",// for model use 6
          "ACS758ECB-200U"// for model use 7
          // sensitivity array is holding the sensitivity of the ACS758
          // current sensors. Do not change.
*/
float sensitivity[] ={
          40.0,// for ACS758LCB-050B
          60.0,// for ACS758LCB-050U
          20.0,// for ACS758LCB-100B
          40.0,// for ACS758LCB-100U
          13.3,// for ACS758KCB-150B
          16.7,// for ACS758KCB-150U
          10.0,// for ACS758ECB-200B
          20.0,// for ACS758ECB-200U
         };

/*
 *   Quiescent output voltage is a factor of VCC that appears at the output
 *   when the current is zero.
 *   For bidirectional sensors, it is 0.5 x VCC.
 *   For unidirectional sensors, it is 0.12 x VCC.
 *   For model ACS758LCB-050B, the B at the end represents Bidirectional (polarity doesn't matter).
 *   For model ACS758LCB-100U, the U at the end represents Unidirectional (polarity must match).
 *   Do not change.
 */
float quiescent_Output_voltage [] ={
          0.5,// for ACS758LCB-050B
          0.12,// for ACS758LCB-050U
          0.5,// for ACS758LCB-100B
          0.12,// for ACS758LCB-100U
          0.5,// for ACS758KCB-150B
          0.12,// for ACS758KCB-150U
          0.5,// for ACS758ECB-200B
          0.12,// for ACS758ECB-200U
          };
const float FACTOR = sensitivity[model]/1000;// set sensitivity for selected model
const float QOV =   quiescent_Output_voltage [model] * VCC;// set quiescent Output voltage for selected model
float voltage;// internal variable for voltage
float cutOff = FACTOR/cutOffLimit;// convert current cut off to mV

void setup() {
    //Robojax.com ACS758 Current Sensor
    Serial.begin(9600);// initialize serial monitor
    Serial.println("Robojax Tutorial");
    Serial.println("ACS758 Current Sensor");
}

void loop() {
  //Robojax.com ACS758 Current Sensor
  float voltage_raw =   (5.0 / 1023.0)* analogRead(VIN);// Read the voltage from sensor
  voltage =  voltage_raw - QOV + 0.007 ;// 0.007 is a value to make voltage zero when there is no current
  float current = voltage / FACTOR;
  if(abs(voltage) > cutOff ){
    Serial.print("V: ");
    Serial.print(voltage,3);// print voltage with 3 decimal places
    Serial.print("V, I: ");
    Serial.print(current,2); // print the current with 2 decimal places
    Serial.println("A");
  }else{
    Serial.println("No Current");
  }
  delay(500);
}101-Arduino code for Allegro ACS758 current sensor (basic)
Bahasa: C++
/*
 * Arduino Sketch for Allegro ACS758 Current Sensor (Basic Simple)
 * This sensor can measure current at a range of up to 200A.
 * It operates with 3.3V or 5V (the module works with 5V, the sensor can work with 3.3V or 5V).
 * Please watch the video instruction and explanation for this code.
 *
 * Written by Ahmad Shamshiri on Saturday, May 26, 2018 at 7:05 PM in Ajax, Ontario, Canada
 * for Robojax.com
 * View the video instruction at https://youtu.be/SiHfjzcqnU4
 * This code has been downloaded from Robojax.com
 */
#define VIN A0
const float vcc    = 5.00;// supply voltage 5V or 3.3V
const float factor = 0.02;// 20mV/A is the factor

float voltage;

void setup() {
    //Robojax.com ACS758 Current Sensor
    Serial.begin(9600);
    Serial.println("Robojax Tutorial");
    Serial.println("ACS758 Current Tester");
    Serial.println("Basic Simple Code");
}

void loop() {
  //Robojax.com ACS758 Current Sensor
  voltage =   (5.0 / 1023.0)* analogRead(VIN);// Read the voltage from sensor
  voltage =  voltage - (vcc * 0.5) + 0.007 ;// 0.007 is a value to make voltage zero when there is no current
  float current = voltage / factor;
  Serial.print("V: ");
  Serial.print(voltage,3);
  Serial.print("V, I: ");
  Serial.print(current,2); Serial.println("A");
  delay(500);
}102-Advanced Arduino code for four Allegro ACS758 current sensors
Bahasa: C++
/*
 *
 * Arduino Sketch for 4 modules Allegro ACS758 Current Sensor (Advanced)
 * This sensor can measure current at a range of up to 200A.
 * It operates with 3.3V or 5V.
 * Please watch the video instruction and explanation for this code.
 *
 * Written by Ahmad Shamshiri on August 4, 2018 at 13:19 in Ajax, Ontario, Canada
 * for Robojax.com in request from Ross M. from YouTube video https://youtu.be/SiHfjzcqnU4
 * View the video instruction at
 * This code has been downloaded from Robojax.com
 */
#define VIN1 A0 // define the Arduino pin A0 as voltage input (V in)
#define VIN2 A1
#define VIN3 A2
#define VIN4 A3

const float VCC   = 5.0;// supply voltage 5V or 3.3V. If using PCB, set to 5V only.
const int model = 2;   // enter the model (see below)

float cutOffLimit = 1.00;// reading cutoff current. 1.00 is 1 Amper

/*
          "ACS758LCB-050B",// for model use 0
          "ACS758LCB-050U",// for model use 1
          "ACS758LCB-100B",// for model use 2
          "ACS758LCB-100U",// for model use 3
          "ACS758KCB-150B",// for model use 4
          "ACS758KCB-150U",// for model use 5
          "ACS758ECB-200B",// for model use 6
          "ACS758ECB-200U"// for model use 7
sensitivity array is holding the sensitivity of the ACS758
current sensors. Do not change.
*/
float sensitivity[] ={
          40.0,// for ACS758LCB-050B
          60.0,// for ACS758LCB-050U
          20.0,// for ACS758LCB-100B
          40.0,// for ACS758LCB-100U
          13.3,// for ACS758KCB-150B
          16.7,// for ACS758KCB-150U
          10.0,// for ACS758ECB-200B
          20.0,// for ACS758ECB-200U
         };

/*
 *   Quiescent output voltage is a factor of VCC that appears at the output
 *   when the current is zero.
 *   For bidirectional sensors it is 0.5 x VCC
 *   For unidirectional sensors it is 0.12 x VCC
 *   For model ACS758LCB-050B, the B at the end represents bidirectional (polarity doesn't matter).
 *   For model ACS758LCB-100U, the U at the end represents unidirectional (polarity must match).
 *   Do not change.
 */
float quiescent_Output_voltage [] ={
          0.5,// for ACS758LCB-050B
          0.12,// for ACS758LCB-050U
          0.5,// for ACS758LCB-100B
          0.12,// for ACS758LCB-100U
          0.5,// for ACS758KCB-150B
          0.12,// for ACS758KCB-150U
          0.5,// for ACS758ECB-200B
          0.12,// for ACS758ECB-200U
          };
const float FACTOR = sensitivity[model]/1000;// set sensitivity for selected model
const float QOV =   quiescent_Output_voltage [model] * VCC;// set quiescent Output voltage for selected model
float voltage1;// internal variable for voltage1
float voltage2;// internal variable for voltage2
float voltage3;// internal variable for voltage3
float voltage4;// internal variable for voltage4

float cutOff = FACTOR/cutOffLimit;// convert current cut off to mV

void setup() {
    //Robojax.com ACS758 Current Sensor
    Serial.begin(9600);// initialize serial monitor
    Serial.println("Robojax Tutorial");
    Serial.println("Four ACS758 Current Sensors");
}

void loop() {
  //Robojax.com ACS758 Current Sensor
  float voltage_raw1 =   (5.0 / 1023.0)* analogRead(VIN1);// Read the voltage from sensor
  float voltage_raw2 =   (5.0 / 1023.0)* analogRead(VIN2);// Read the voltage from sensor
  float voltage_raw3 =   (5.0 / 1023.0)* analogRead(VIN3);// Read the voltage from sensor
  float voltage_raw4 =   (5.0 / 1023.0)* analogRead(VIN4);// Read the voltage from sensor

  voltage1 =  voltage_raw1 - QOV + 0.007 ;// 0.007 is a value to make voltage zero when there is no current
  voltage2 =  voltage_raw2 - QOV + 0.007 ;// 0.007 is a value to make voltage zero when there is no current
  voltage3 =  voltage_raw3 - QOV + 0.007 ;// 0.007 is a value to make voltage zero when there is no current
  voltage4 =  voltage_raw4 - QOV + 0.007 ;// 0.007 is a value to make voltage zero when there is no current

  float current1 = voltage1 / FACTOR;
  float current2 = voltage2 / FACTOR;
  float current3 = voltage3 / FACTOR;
  float current4 = voltage4 / FACTOR;

  if(abs(voltage1) > cutOff ){ //Corrected abs(voltage) to abs(voltage1)

    Serial.print("I1: ");
    Serial.print(current1,2); // print the current with 2 decimal places
    Serial.println("A");

    Serial.print("I2: ");
    Serial.print(current2,2); // print the current with 2 decimal places
    Serial.println("A");

    Serial.print("I3: ");
    Serial.print(current3,2); // print the current with 2 decimal places
    Serial.println("A");

    Serial.print("I4: ");
    Serial.print(current4,2); // print the current with 2 decimal places
    Serial.println("A");

  }else{
    Serial.println("No Current");
  }
  delay(500);
}
Hal-hal yang mungkin Anda butuhkan
-
AmazonACS758 Current Sensor on Amazonamzn.to
-
Amazon
-
Amazon
-
eBay
-
AliExpressPurchase Allegro ACS758 Current Sensor from AliExpresss.click.aliexpress.com
Sumber daya & referensi
Belum ada sumber daya.
Berkas📁
File lainnya
-
Adafruit PCA9685 Pengendali Servo 16-Kanal
robojax_PCA9685_extra_learning.pdf -
Alegro ACS Current LibraryArduino library for Allegro ACS current sensor modules. Provides functions to read current measurements from ACS712 and similar sensors.
robojax_Alegro_ACS_Current_library.zip0.02 MB