50A থেকে 200A-এর জন্য Arduino-এর সাথে Allegro ACS758 কারেন্ট সেন্সর কীভাবে ব্যবহার করবেন
উচ্চ-ক্ষমতাসম্পন্ন অ্যাপ্লিকেশনে বর্তমান পরিমাপ চ্যালেঞ্জিং হতে পারে, তবে অ্যালেগ্রো ACS758 কারেন্ট সেন্সর এই কাজটি সহজ করে দেয়। এই সেন্সরটি 50A থেকে 200A পর্যন্ত কারেন্টের মাত্রা পরিচালনা করতে পারে, যা বিভিন্ন প্রকল্পের জন্য একটি নির্ভরযোগ্য সমাধান প্রদান করে। এই টিউটোরিয়ালে, আমরা ACS758-কে একটি Arduino-এর সাথে কীভাবে সংযোগ করতে হয় এবং সঠিকভাবে কারেন্টের মান পড়তে হয় তা অন্বেষণ করব।

হার্ডওয়্যার ব্যাখ্যা
এই প্রকল্পের প্রধান উপাদান হলো অ্যালেগ্রো ACS758 কারেন্ট সেন্সর। এই সেন্সরটি হল ইফেক্টের নীতিতে কাজ করে, যা এটিকে একটি পরিবাহীর মধ্য দিয়ে প্রবাহিত কারেন্ট দ্বারা উৎপন্ন চৌম্বক ক্ষেত্র পরিমাপ করতে সক্ষম করে। এটি কারেন্টের সমানুপাতিক একটি আউটপুট ভোল্টেজ উৎপন্ন করে, যা Arduino-কে এই মানগুলি পড়তে এবং ব্যাখ্যা করতে সক্ষম করে। ACS758-এর বেশ কয়েকটি ভেরিয়েন্ট রয়েছে, যেখানে "100B" নির্দেশ করে যে এটি 100A পর্যন্ত পরিমাপ করতে পারে। এটি দ্বি-দিকনির্দেশক কারেন্ট পরিমাপের বৈশিষ্ট্য রয়েছে, যা কারেন্টের দিক নির্বিশেষে সঠিক রিডিং নিশ্চিত করে। সেন্সরটির জন্য 3.3V বা 5V পাওয়ার সাপ্লাই প্রয়োজন, যা এর অভ্যন্তরীণ সার্কিট্রি চালায়, যার মধ্যে একটি অপারেশনাল অ্যামপ্লিফায়ার রয়েছে যা হল ইফেক্ট সিগন্যাল প্রক্রিয়া করে।ডেটাশিট বিবরণ
| নির্মাতা | অ্যালেগ্রো মাইক্রোসিস্টেমস |
|---|---|
| পার্ট নম্বর | ACS758LCB-100B |
| লজিক/আইও ভোল্টেজ | 3.3 V / 5 V |
| সাপ্লাই ভোল্টেজ | 4.5 V - 5.5 V |
| আউটপুট কারেন্ট (প্রতি চ্যানেল) | 100 A |
| পিক কারেন্ট (প্রতি চ্যানেল) | 200 A |
| PWM ফ্রিকোয়েন্সি নির্দেশিকা | প্রযোজ্য নয় |
| ইনপুট লজিক থ্রেশহোল্ড | TTL সামঞ্জস্যপূর্ণ |
| ভোল্টেজ ড্রপ / RDS(on) / স্যাচুরেশন | 0.1 V @ 100 A |
| থার্মাল সীমা | অপারেটিং তাপমাত্রা: -40 °C থেকে 125 °C |
| প্যাকেজ | 5-পিন প্যাকেজ |
| নোট / ভেরিয়েন্ট | বিভিন্ন কারেন্ট রেটিংয়ে উপলব্ধ (50A, 100A, 150A, 200A) |
- প্রতিরোধের কারণে ভোল্টেজ ড্রপ এড়াতে সঠিক ওয়্যারিং নিশ্চিত করুন।
- উচ্চ কারেন্ট অ্যাপ্লিকেশনের জন্য অতিরিক্ত গরম হওয়া রোধ করতে উপযুক্ত গেজের তার ব্যবহার করুন।
- সঠিক রিডিংয়ের জন্য সেন্সরটিকে নির্দিষ্ট তাপমাত্রার সীমার মধ্যে রাখুন।
- ব্যবহৃত নির্দিষ্ট মডেলের উপর ভিত্তি করে সেন্সর আউটপুট ক্যালিব্রেট করুন।
- প্রয়োজনে রিডিং স্থিতিশীল করতে ফিল্টারিং ক্যাপাসিটর ব্যবহার করার কথা বিবেচনা করুন।
ওয়্যারিং নির্দেশাবলী
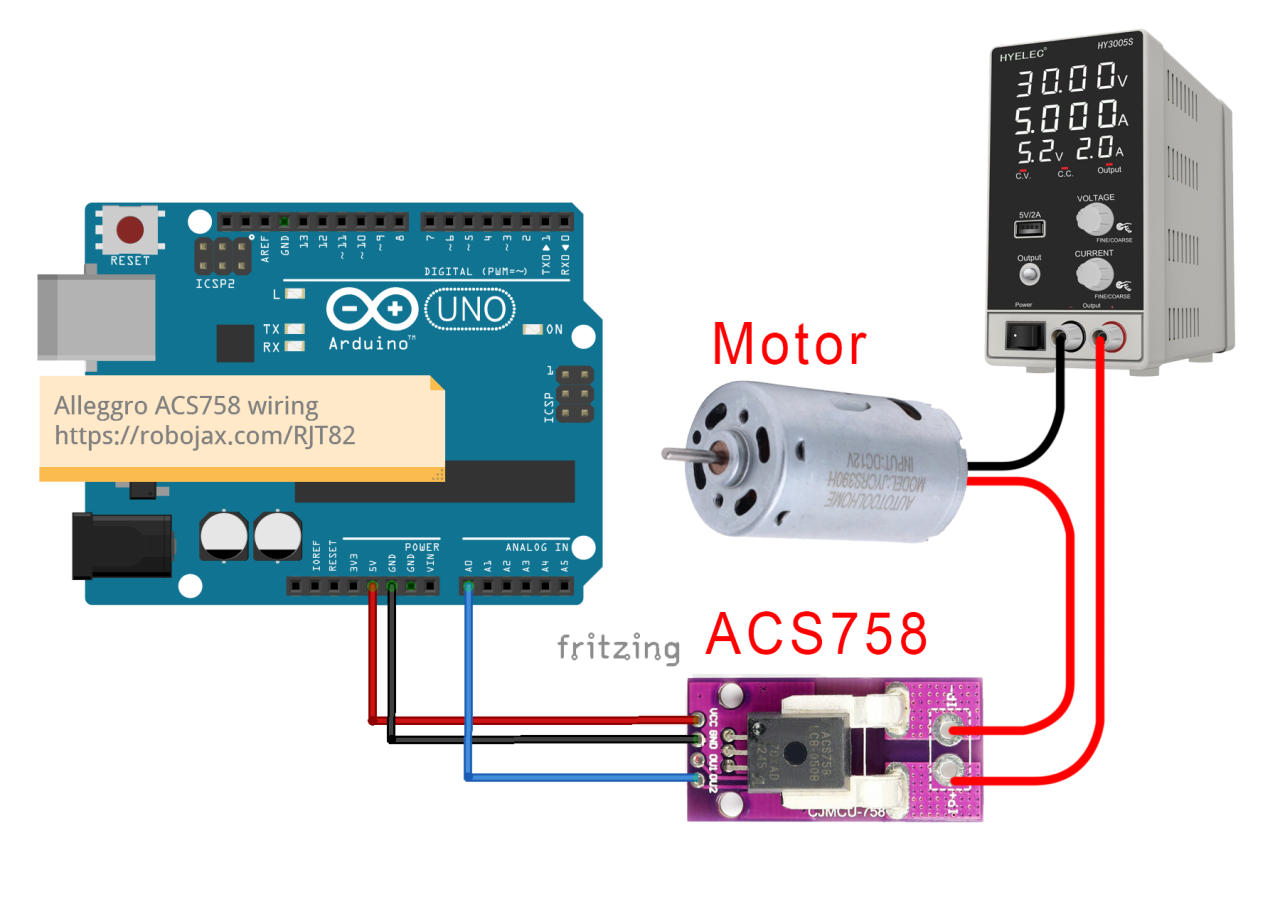
A0 হিসাবে চিহ্নিত।
নিশ্চিত করুন যে আপনি যে লোডটি পরিমাপ করতে চান তা সেন্সরের সাথে সিরিজে সংযুক্ত। কারেন্টের পথটি সেন্সরের মধ্য দিয়ে প্রবাহিত হওয়া উচিত যাতে এটি এর মধ্য দিয়ে যাওয়া কারেন্ট সঠিকভাবে পরিমাপ করতে পারে। সেন্সরের দুটি কারেন্ট ইনপুট পিন রয়েছে; আপনার লোডের পজিটিভ তারটি এই পিনগুলির একটিতে এবং অন্য পিনটি আপনার পাওয়ার সাপ্লাইয়ের পজিটিভ টার্মিনালে সংযুক্ত করুন। পাওয়ার সাপ্লাইয়ের নেগেটিভ দিকটি লোডের নেগেটিভ টার্মিনালের সাথে সংযুক্ত হওয়া উচিত। এই সেটআপটি সেন্সরকে লোডে প্রবাহিত কারেন্ট পরিমাপ করতে সক্ষম করে।
কোড উদাহরণ ও ব্যাখ্যা
ACS758 সেন্সর থেকে মান পড়ার জন্য Arduino কোডটি সহজবোধ্য। নিচে উন্নত কোডের একটি অংশ দেওয়া হলো যা সেন্সরটি আরম্ভ করে এবং ভোল্টেজ পড়ে:
#define VIN A0 // Arduino পিন A0-কে ভোল্টেজ ইনপুট হিসাবে সংজ্ঞায়িত করুন (V in)
const float VCC = 5.0; // সাপ্লাই ভোল্টেজ
const float FACTOR = 20.0 / 1000; // ACS758-100B-এর জন্য সংবেদনশীলতা
void loop() {
  float voltage_raw = (5.0 / 1023.0) * analogRead(VIN); // সেন্সর থেকে ভোল্টেজ পড়ুন
  float current = (voltage_raw - (VCC * 0.5)) / FACTOR; // কারেন্ট গণনা করুন
  Serial.print("Current: ");
  Serial.println(current, 2); // কারেন্টের মান প্রিন্ট করুন
}
প্রদর্শন / কী আশা করবেন
একবার সবকিছু সঠিকভাবে ওয়্যার করা এবং কোড আপলোড করা হলে, আপনি সিরিয়াল মনিটরে কারেন্টের মান প্রদর্শিত দেখতে পাবেন। কোডে সংজ্ঞায়িত হিসাবে রিডিং প্রতি অর্ধ সেকেন্ডে আপডেট হবে। যদি কারেন্ট কোডে সেট করা কাটঅফ সীমার নীচে থাকে, তাহলে আপনি "No Current" বার্তা প্রদর্শিত দেখতে পাবেন। এই কাটঅফটি শব্দ এবং কারেন্ট রিডিংয়ের ছোট পরিবর্তনগুলি ফিল্টার করতে সহায়তা করে। বিপরীত পোলারিটি সংযোগ সম্পর্কে সতর্ক থাকুন, কারণ এটি সেন্সরটিকে ক্ষতি করতে পারে। সর্বদা নিশ্চিত করুন যে সেন্সরটি লোডের সাথে সিরিজে সঠিকভাবে ওয়্যার করা আছে এবং সঠিক রিডিং নিশ্চিত করতে আউটপুট পর্যবেক্ষণ করুন। ভিডিওটি অতিরিক্ত প্রসঙ্গ এবং প্রদর্শন প্রদান করে (ভিডিওতে 12:30 সময়ে)।
ছবি

Allegro ACS758 Current Sensor with Arduino
Arduino-wiring-for-ACS758-Current-sensor
ACS758-sensor-0

ACS758-sensor-1

ACS758-sensor-3

ACS758-sensor-4
ACS758-sensor-5-schematic
100-Advanced Arduino code for the Allegro ACS758 current sensor
ভাষা: C++
/*
 *
 * Arduino Sketch for Allegro ACS758 Current Sensor (Advanced)
 * This sensor can measure current at a range of up to 200A.
 * It operates with 3.3V or 5V.
 * Please watch the video instruction and explanation for this code.
 *
 * Written by Ahmad Shamshiri on Saturday, May 27, 2018 at 13:19 in Ajax, Ontario, Canada
 * for Robojax.com
 * View the video instruction at
 * This code has been downloaded from Robojax.com
 */
#define VIN A0 // define the Arduino pin A0 as voltage input (V in)
const float VCC   = 5.0;// supply voltage 5V or 3.3V. If using PCB, set to 5V only.
const int model = 2;   // enter the model (see below)

float cutOffLimit = 1.00;// reading cutoff current. 1.00 is 1 Ampere

/*
          "ACS758LCB-050B",// for model use 0
          "ACS758LCB-050U",// for model use 1
          "ACS758LCB-100B",// for model use 2
          "ACS758LCB-100U",// for model use 3
          "ACS758KCB-150B",// for model use 4
          "ACS758KCB-150U",// for model use 5
          "ACS758ECB-200B",// for model use 6
          "ACS758ECB-200U"// for model use 7
          // sensitivity array is holding the sensitivity of the ACS758
          // current sensors. Do not change.
*/
float sensitivity[] ={
          40.0,// for ACS758LCB-050B
          60.0,// for ACS758LCB-050U
          20.0,// for ACS758LCB-100B
          40.0,// for ACS758LCB-100U
          13.3,// for ACS758KCB-150B
          16.7,// for ACS758KCB-150U
          10.0,// for ACS758ECB-200B
          20.0,// for ACS758ECB-200U
         };

/*
 *   Quiescent output voltage is a factor of VCC that appears at the output
 *   when the current is zero.
 *   For bidirectional sensors, it is 0.5 x VCC.
 *   For unidirectional sensors, it is 0.12 x VCC.
 *   For model ACS758LCB-050B, the B at the end represents Bidirectional (polarity doesn't matter).
 *   For model ACS758LCB-100U, the U at the end represents Unidirectional (polarity must match).
 *   Do not change.
 */
float quiescent_Output_voltage [] ={
          0.5,// for ACS758LCB-050B
          0.12,// for ACS758LCB-050U
          0.5,// for ACS758LCB-100B
          0.12,// for ACS758LCB-100U
          0.5,// for ACS758KCB-150B
          0.12,// for ACS758KCB-150U
          0.5,// for ACS758ECB-200B
          0.12,// for ACS758ECB-200U
          };
const float FACTOR = sensitivity[model]/1000;// set sensitivity for selected model
const float QOV =   quiescent_Output_voltage [model] * VCC;// set quiescent Output voltage for selected model
float voltage;// internal variable for voltage
float cutOff = FACTOR/cutOffLimit;// convert current cut off to mV

void setup() {
    //Robojax.com ACS758 Current Sensor
    Serial.begin(9600);// initialize serial monitor
    Serial.println("Robojax Tutorial");
    Serial.println("ACS758 Current Sensor");
}

void loop() {
  //Robojax.com ACS758 Current Sensor
  float voltage_raw =   (5.0 / 1023.0)* analogRead(VIN);// Read the voltage from sensor
  voltage =  voltage_raw - QOV + 0.007 ;// 0.007 is a value to make voltage zero when there is no current
  float current = voltage / FACTOR;
  if(abs(voltage) > cutOff ){
    Serial.print("V: ");
    Serial.print(voltage,3);// print voltage with 3 decimal places
    Serial.print("V, I: ");
    Serial.print(current,2); // print the current with 2 decimal places
    Serial.println("A");
  }else{
    Serial.println("No Current");
  }
  delay(500);
}101-Arduino code for Allegro ACS758 current sensor (basic)
ভাষা: C++
/*
 * Arduino Sketch for Allegro ACS758 Current Sensor (Basic Simple)
 * This sensor can measure current at a range of up to 200A.
 * It operates with 3.3V or 5V (the module works with 5V, the sensor can work with 3.3V or 5V).
 * Please watch the video instruction and explanation for this code.
 *
 * Written by Ahmad Shamshiri on Saturday, May 26, 2018 at 7:05 PM in Ajax, Ontario, Canada
 * for Robojax.com
 * View the video instruction at https://youtu.be/SiHfjzcqnU4
 * This code has been downloaded from Robojax.com
 */
#define VIN A0
const float vcc    = 5.00;// supply voltage 5V or 3.3V
const float factor = 0.02;// 20mV/A is the factor

float voltage;

void setup() {
    //Robojax.com ACS758 Current Sensor
    Serial.begin(9600);
    Serial.println("Robojax Tutorial");
    Serial.println("ACS758 Current Tester");
    Serial.println("Basic Simple Code");
}

void loop() {
  //Robojax.com ACS758 Current Sensor
  voltage =   (5.0 / 1023.0)* analogRead(VIN);// Read the voltage from sensor
  voltage =  voltage - (vcc * 0.5) + 0.007 ;// 0.007 is a value to make voltage zero when there is no current
  float current = voltage / factor;
  Serial.print("V: ");
  Serial.print(voltage,3);
  Serial.print("V, I: ");
  Serial.print(current,2); Serial.println("A");
  delay(500);
}102-Advanced Arduino code for four Allegro ACS758 current sensors
ভাষা: C++
/*
 *
 * Arduino Sketch for 4 modules Allegro ACS758 Current Sensor (Advanced)
 * This sensor can measure current at a range of up to 200A.
 * It operates with 3.3V or 5V.
 * Please watch the video instruction and explanation for this code.
 *
 * Written by Ahmad Shamshiri on August 4, 2018 at 13:19 in Ajax, Ontario, Canada
 * for Robojax.com in request from Ross M. from YouTube video https://youtu.be/SiHfjzcqnU4
 * View the video instruction at
 * This code has been downloaded from Robojax.com
 */
#define VIN1 A0 // define the Arduino pin A0 as voltage input (V in)
#define VIN2 A1
#define VIN3 A2
#define VIN4 A3

const float VCC   = 5.0;// supply voltage 5V or 3.3V. If using PCB, set to 5V only.
const int model = 2;   // enter the model (see below)

float cutOffLimit = 1.00;// reading cutoff current. 1.00 is 1 Amper

/*
          "ACS758LCB-050B",// for model use 0
          "ACS758LCB-050U",// for model use 1
          "ACS758LCB-100B",// for model use 2
          "ACS758LCB-100U",// for model use 3
          "ACS758KCB-150B",// for model use 4
          "ACS758KCB-150U",// for model use 5
          "ACS758ECB-200B",// for model use 6
          "ACS758ECB-200U"// for model use 7
sensitivity array is holding the sensitivity of the ACS758
current sensors. Do not change.
*/
float sensitivity[] ={
          40.0,// for ACS758LCB-050B
          60.0,// for ACS758LCB-050U
          20.0,// for ACS758LCB-100B
          40.0,// for ACS758LCB-100U
          13.3,// for ACS758KCB-150B
          16.7,// for ACS758KCB-150U
          10.0,// for ACS758ECB-200B
          20.0,// for ACS758ECB-200U
         };

/*
 *   Quiescent output voltage is a factor of VCC that appears at the output
 *   when the current is zero.
 *   For bidirectional sensors it is 0.5 x VCC
 *   For unidirectional sensors it is 0.12 x VCC
 *   For model ACS758LCB-050B, the B at the end represents bidirectional (polarity doesn't matter).
 *   For model ACS758LCB-100U, the U at the end represents unidirectional (polarity must match).
 *   Do not change.
 */
float quiescent_Output_voltage [] ={
          0.5,// for ACS758LCB-050B
          0.12,// for ACS758LCB-050U
          0.5,// for ACS758LCB-100B
          0.12,// for ACS758LCB-100U
          0.5,// for ACS758KCB-150B
          0.12,// for ACS758KCB-150U
          0.5,// for ACS758ECB-200B
          0.12,// for ACS758ECB-200U
          };
const float FACTOR = sensitivity[model]/1000;// set sensitivity for selected model
const float QOV =   quiescent_Output_voltage [model] * VCC;// set quiescent Output voltage for selected model
float voltage1;// internal variable for voltage1
float voltage2;// internal variable for voltage2
float voltage3;// internal variable for voltage3
float voltage4;// internal variable for voltage4

float cutOff = FACTOR/cutOffLimit;// convert current cut off to mV

void setup() {
    //Robojax.com ACS758 Current Sensor
    Serial.begin(9600);// initialize serial monitor
    Serial.println("Robojax Tutorial");
    Serial.println("Four ACS758 Current Sensors");
}

void loop() {
  //Robojax.com ACS758 Current Sensor
  float voltage_raw1 =   (5.0 / 1023.0)* analogRead(VIN1);// Read the voltage from sensor
  float voltage_raw2 =   (5.0 / 1023.0)* analogRead(VIN2);// Read the voltage from sensor
  float voltage_raw3 =   (5.0 / 1023.0)* analogRead(VIN3);// Read the voltage from sensor
  float voltage_raw4 =   (5.0 / 1023.0)* analogRead(VIN4);// Read the voltage from sensor

  voltage1 =  voltage_raw1 - QOV + 0.007 ;// 0.007 is a value to make voltage zero when there is no current
  voltage2 =  voltage_raw2 - QOV + 0.007 ;// 0.007 is a value to make voltage zero when there is no current
  voltage3 =  voltage_raw3 - QOV + 0.007 ;// 0.007 is a value to make voltage zero when there is no current
  voltage4 =  voltage_raw4 - QOV + 0.007 ;// 0.007 is a value to make voltage zero when there is no current

  float current1 = voltage1 / FACTOR;
  float current2 = voltage2 / FACTOR;
  float current3 = voltage3 / FACTOR;
  float current4 = voltage4 / FACTOR;

  if(abs(voltage1) > cutOff ){ //Corrected abs(voltage) to abs(voltage1)

    Serial.print("I1: ");
    Serial.print(current1,2); // print the current with 2 decimal places
    Serial.println("A");

    Serial.print("I2: ");
    Serial.print(current2,2); // print the current with 2 decimal places
    Serial.println("A");

    Serial.print("I3: ");
    Serial.print(current3,2); // print the current with 2 decimal places
    Serial.println("A");

    Serial.print("I4: ");
    Serial.print(current4,2); // print the current with 2 decimal places
    Serial.println("A");

  }else{
    Serial.println("No Current");
  }
  delay(500);
}
আপনাকে যা প্রয়োজন হতে পারে
-
অ্যামাজনACS758 current sensor on Amazonamzn.to
-
অ্যামাজন
-
অ্যামাজন
-
ইবে
-
অলি এক্সপ্রেসPurchase Allegro ACS758 Current Sensor from AliExpresss.click.aliexpress.com
সম্পদ ও রেফারেন্সসমূহ
এখনো কোনো সম্পদ নেই।
ফাইলসমূহ📁
অন্যান্য ফাইলগুলি
-
অ্যাডাফ্রুট পিসিএ9685 ১৬-চ্যানেল সার্ভো ড্রাইভার
robojax_PCA9685_extra_learning.pdf -
Alegro ACS Current LibraryArduino library for Allegro ACS current sensor modules. Provides functions to read current measurements from ACS712 and similar sensors.
robojax_Alegro_ACS_Current_library.zip0.02 MB