Hoe om 'n Allegro ACS758-stroomsensor met Arduino vir 50A tot 200A te gebruik
Huidige meting in hoëkapasiteit-toepassings kan uitdagend wees, maar die Allegro ACS758-stroomsensor vereenvoudig hierdie taak. Hierdie sensor kan stroomvlakke van 50A tot 200A hanteer en bied 'n betroubare oplossing vir verskeie projekte. In hierdie tutoriaal sal ons ondersoek hoe om die ACS758 aan 'n Arduino te koppel en stroomwaardes akkuraat te lees.

Hardeware Verduidelik
Die hoofkomponent in hierdie projek is die Allegro ACS758-stroomsensor. Hierdie sensor werk op die beginsel van die Hall-effek, wat dit in staat stel om die magnetiese veld wat deur die stroom wat deur 'n geleier vloei, te meet. Dit produseer 'n uitsetspanning wat proporsioneel is aan die stroom, wat die Arduino in staat stel om hierdie waardes te lees en te interpreteer. Die ACS758 het verskeie variante, met die "100B" wat aandui dat dit tot 100A kan meet. Dit beskik oor tweerigting-stroommeting, wat akkurate lesings moontlik maak ongeag die stroomrigting. Die sensor benodig 'n kragtoevoer van 3.3V of 5V, wat sy interne stroombane aandryf, insluitend 'n operasionele versterker wat die Hall-effek-sein verwerk.Datablad Besonderhede
| Vervaardiger | Allegro Microsystems |
|---|---|
| Deelnommer | ACS758LCB-100B |
| Logika/IO-spanning | 3.3 V / 5 V |
| Toevoerspanning | 4.5 V - 5.5 V |
| Uitsetstroom (per kanaal) | 100 A |
| Piekstroom (per kanaal) | 200 A |
| PWM-frekwensie-riglyne | N/A |
| Inset-logikadrumpels | TTL-versoenbaar |
| Spanningsval / RDS(on) / versadiging | 0.1 V @ 100 A |
| Termiese limiete | Werkingstemperatuur: -40 °C tot 125 °C |
| Pakket | 5-pen-pakket |
| Notas / variante | Beskikbaar in verskillende stroomgraderings (50A, 100A, 150A, 200A) |
- Verseker behoorlike bedrading om spanningsval as gevolg van weerstand te vermy.
- Gebruik toepaslike draadmeter vir hoëstroomtoepassings om oorverhitting te voorkom.
- Hou die sensor binne gespesifiseerde temperatuurlimiete vir akkurate lesings.
- Kalibreer die sensoruitset gebaseer op die spesifieke model wat gebruik word.
- Oorweeg die gebruik van filterkapasitors om lesings te stabiliseer indien nodig.
Bedradingsinstruksies
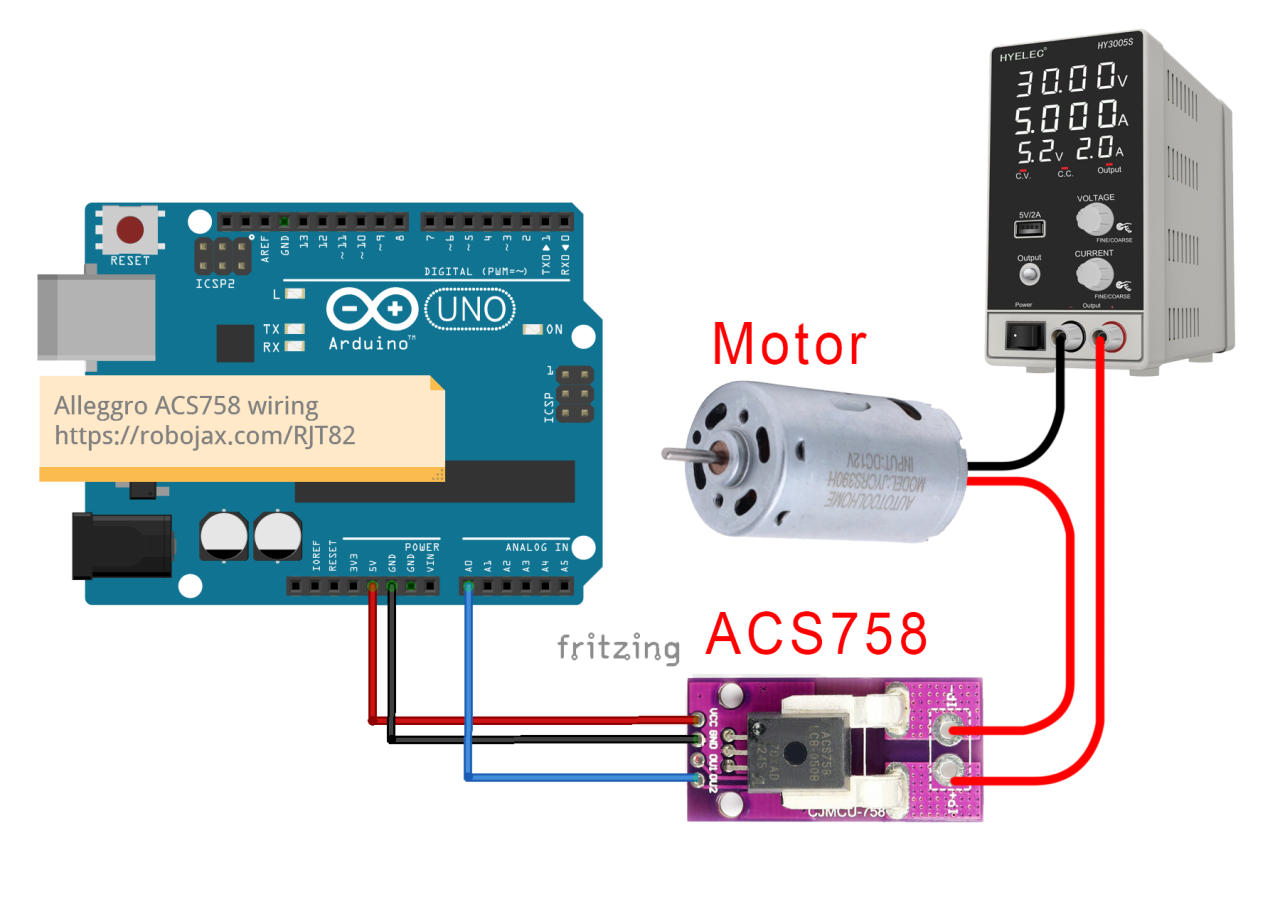
A0.
Verseker dat die las wat jy wil meet in serie met die sensor gekoppel is. Die stroompad moet deur die sensor vloei sodat dit die stroom wat daardeur gaan akkuraat kan meet. Die sensor het twee stroominsetpenne; koppel jou las se positiewe draad aan een van hierdie penne en die ander pen aan jou kragtoevoer se positiewe terminaal. Die negatiewe kant van die kragtoevoer moet aan die las se negatiewe terminaal koppel. Hierdie opstelling laat die sensor toe om die stroom wat na die las vloei te meet.
Kode Voorbeelde & Deurloop
Die Arduino-kode vir die lees van waardes van die ACS758-sensor is eenvoudig. Hieronder is 'n uittreksel uit die gevorderde kode wat die sensor initialiseer en die spanning lees:
#define VIN A0 // definieer die Arduino-pen A0 as spanningsinset (V in)
const float VCC = 5.0; // toevoerspanning
const float FACTOR = 20.0 / 1000; // sensitiwiteit vir die ACS758-100B
void loop() {
  float voltage_raw = (5.0 / 1023.0) * analogRead(VIN); // Lees die spanning van sensor
  float current = (voltage_raw - (VCC * 0.5)) / FACTOR; // Bereken stroom
  Serial.print("Stroom: ");
  Serial.println(current, 2); // Druk stroomwaarde
}
Demonstrasie / Wat om te Verwag
Sodra alles korrek bedraad is en die kode opgelaai is, behoort jy stroomwaardes op die reeksmonitor te sien vertoon. Die lesings sal elke halwe sekonde opdateer soos in die kode gedefinieer. As die stroom onder die afsnyperk is wat in die kode gestel is, sal jy 'n "Geen Stroom"-boodskap sien vertoon. Hierdie afsnyperk help om geraas en klein variasies in stroomlesings uit te filter. Wees versigtig met omgekeerde polariteitsverbindings, aangesien dit die sensor kan beskadig. Verseker altyd dat die sensor korrek in serie met die las bedraad is, en monitor die uitset om akkurate lesings te bevestig. Die video verskaf bykomende konteks en demonstrasies (in video by 12:30).
Beelde

Allegro ACS758 Current Sensor with Arduino
Arduino-wiring-for-ACS758-Current-sensor
ACS758-sensor-0

ACS758-sensor-1

ACS758-sensor-3

ACS758-sensor-4
ACS758-sensor-5-schematic
100-Advanced Arduino code for the Allegro ACS758 current sensor
Taal: C++
/*
 *
 * Arduino Sketch for Allegro ACS758 Current Sensor (Advanced)
 * This sensor can measure current at a range of up to 200A.
 * It operates with 3.3V or 5V.
 * Please watch the video instruction and explanation for this code.
 *
 * Written by Ahmad Shamshiri on Saturday, May 27, 2018 at 13:19 in Ajax, Ontario, Canada
 * for Robojax.com
 * View the video instruction at
 * This code has been downloaded from Robojax.com
 */
#define VIN A0 // define the Arduino pin A0 as voltage input (V in)
const float VCC   = 5.0;// supply voltage 5V or 3.3V. If using PCB, set to 5V only.
const int model = 2;   // enter the model (see below)

float cutOffLimit = 1.00;// reading cutoff current. 1.00 is 1 Ampere

/*
          "ACS758LCB-050B",// for model use 0
          "ACS758LCB-050U",// for model use 1
          "ACS758LCB-100B",// for model use 2
          "ACS758LCB-100U",// for model use 3
          "ACS758KCB-150B",// for model use 4
          "ACS758KCB-150U",// for model use 5
          "ACS758ECB-200B",// for model use 6
          "ACS758ECB-200U"// for model use 7
          // sensitivity array is holding the sensitivity of the ACS758
          // current sensors. Do not change.
*/
float sensitivity[] ={
          40.0,// for ACS758LCB-050B
          60.0,// for ACS758LCB-050U
          20.0,// for ACS758LCB-100B
          40.0,// for ACS758LCB-100U
          13.3,// for ACS758KCB-150B
          16.7,// for ACS758KCB-150U
          10.0,// for ACS758ECB-200B
          20.0,// for ACS758ECB-200U
         };

/*
 *   Quiescent output voltage is a factor of VCC that appears at the output
 *   when the current is zero.
 *   For bidirectional sensors, it is 0.5 x VCC.
 *   For unidirectional sensors, it is 0.12 x VCC.
 *   For model ACS758LCB-050B, the B at the end represents Bidirectional (polarity doesn't matter).
 *   For model ACS758LCB-100U, the U at the end represents Unidirectional (polarity must match).
 *   Do not change.
 */
float quiescent_Output_voltage [] ={
          0.5,// for ACS758LCB-050B
          0.12,// for ACS758LCB-050U
          0.5,// for ACS758LCB-100B
          0.12,// for ACS758LCB-100U
          0.5,// for ACS758KCB-150B
          0.12,// for ACS758KCB-150U
          0.5,// for ACS758ECB-200B
          0.12,// for ACS758ECB-200U
          };
const float FACTOR = sensitivity[model]/1000;// set sensitivity for selected model
const float QOV =   quiescent_Output_voltage [model] * VCC;// set quiescent Output voltage for selected model
float voltage;// internal variable for voltage
float cutOff = FACTOR/cutOffLimit;// convert current cut off to mV

void setup() {
    //Robojax.com ACS758 Current Sensor
    Serial.begin(9600);// initialize serial monitor
    Serial.println("Robojax Tutorial");
    Serial.println("ACS758 Current Sensor");
}

void loop() {
  //Robojax.com ACS758 Current Sensor
  float voltage_raw =   (5.0 / 1023.0)* analogRead(VIN);// Read the voltage from sensor
  voltage =  voltage_raw - QOV + 0.007 ;// 0.007 is a value to make voltage zero when there is no current
  float current = voltage / FACTOR;
  if(abs(voltage) > cutOff ){
    Serial.print("V: ");
    Serial.print(voltage,3);// print voltage with 3 decimal places
    Serial.print("V, I: ");
    Serial.print(current,2); // print the current with 2 decimal places
    Serial.println("A");
  }else{
    Serial.println("No Current");
  }
  delay(500);
}101-Arduino code for Allegro ACS758 current sensor (basic)
Taal: C++
/*
 * Arduino Sketch for Allegro ACS758 Current Sensor (Basic Simple)
 * This sensor can measure current at a range of up to 200A.
 * It operates with 3.3V or 5V (the module works with 5V, the sensor can work with 3.3V or 5V).
 * Please watch the video instruction and explanation for this code.
 *
 * Written by Ahmad Shamshiri on Saturday, May 26, 2018 at 7:05 PM in Ajax, Ontario, Canada
 * for Robojax.com
 * View the video instruction at https://youtu.be/SiHfjzcqnU4
 * This code has been downloaded from Robojax.com
 */
#define VIN A0
const float vcc    = 5.00;// supply voltage 5V or 3.3V
const float factor = 0.02;// 20mV/A is the factor

float voltage;

void setup() {
    //Robojax.com ACS758 Current Sensor
    Serial.begin(9600);
    Serial.println("Robojax Tutorial");
    Serial.println("ACS758 Current Tester");
    Serial.println("Basic Simple Code");
}

void loop() {
  //Robojax.com ACS758 Current Sensor
  voltage =   (5.0 / 1023.0)* analogRead(VIN);// Read the voltage from sensor
  voltage =  voltage - (vcc * 0.5) + 0.007 ;// 0.007 is a value to make voltage zero when there is no current
  float current = voltage / factor;
  Serial.print("V: ");
  Serial.print(voltage,3);
  Serial.print("V, I: ");
  Serial.print(current,2); Serial.println("A");
  delay(500);
}102-Advanced Arduino code for four Allegro ACS758 current sensors
Taal: C++
/*
 *
 * Arduino Sketch for 4 modules Allegro ACS758 Current Sensor (Advanced)
 * This sensor can measure current at a range of up to 200A.
 * It operates with 3.3V or 5V.
 * Please watch the video instruction and explanation for this code.
 *
 * Written by Ahmad Shamshiri on August 4, 2018 at 13:19 in Ajax, Ontario, Canada
 * for Robojax.com in request from Ross M. from YouTube video https://youtu.be/SiHfjzcqnU4
 * View the video instruction at
 * This code has been downloaded from Robojax.com
 */
#define VIN1 A0 // define the Arduino pin A0 as voltage input (V in)
#define VIN2 A1
#define VIN3 A2
#define VIN4 A3

const float VCC   = 5.0;// supply voltage 5V or 3.3V. If using PCB, set to 5V only.
const int model = 2;   // enter the model (see below)

float cutOffLimit = 1.00;// reading cutoff current. 1.00 is 1 Amper

/*
          "ACS758LCB-050B",// for model use 0
          "ACS758LCB-050U",// for model use 1
          "ACS758LCB-100B",// for model use 2
          "ACS758LCB-100U",// for model use 3
          "ACS758KCB-150B",// for model use 4
          "ACS758KCB-150U",// for model use 5
          "ACS758ECB-200B",// for model use 6
          "ACS758ECB-200U"// for model use 7
sensitivity array is holding the sensitivity of the ACS758
current sensors. Do not change.
*/
float sensitivity[] ={
          40.0,// for ACS758LCB-050B
          60.0,// for ACS758LCB-050U
          20.0,// for ACS758LCB-100B
          40.0,// for ACS758LCB-100U
          13.3,// for ACS758KCB-150B
          16.7,// for ACS758KCB-150U
          10.0,// for ACS758ECB-200B
          20.0,// for ACS758ECB-200U
         };

/*
 *   Quiescent output voltage is a factor of VCC that appears at the output
 *   when the current is zero.
 *   For bidirectional sensors it is 0.5 x VCC
 *   For unidirectional sensors it is 0.12 x VCC
 *   For model ACS758LCB-050B, the B at the end represents bidirectional (polarity doesn't matter).
 *   For model ACS758LCB-100U, the U at the end represents unidirectional (polarity must match).
 *   Do not change.
 */
float quiescent_Output_voltage [] ={
          0.5,// for ACS758LCB-050B
          0.12,// for ACS758LCB-050U
          0.5,// for ACS758LCB-100B
          0.12,// for ACS758LCB-100U
          0.5,// for ACS758KCB-150B
          0.12,// for ACS758KCB-150U
          0.5,// for ACS758ECB-200B
          0.12,// for ACS758ECB-200U
          };
const float FACTOR = sensitivity[model]/1000;// set sensitivity for selected model
const float QOV =   quiescent_Output_voltage [model] * VCC;// set quiescent Output voltage for selected model
float voltage1;// internal variable for voltage1
float voltage2;// internal variable for voltage2
float voltage3;// internal variable for voltage3
float voltage4;// internal variable for voltage4

float cutOff = FACTOR/cutOffLimit;// convert current cut off to mV

void setup() {
    //Robojax.com ACS758 Current Sensor
    Serial.begin(9600);// initialize serial monitor
    Serial.println("Robojax Tutorial");
    Serial.println("Four ACS758 Current Sensors");
}

void loop() {
  //Robojax.com ACS758 Current Sensor
  float voltage_raw1 =   (5.0 / 1023.0)* analogRead(VIN1);// Read the voltage from sensor
  float voltage_raw2 =   (5.0 / 1023.0)* analogRead(VIN2);// Read the voltage from sensor
  float voltage_raw3 =   (5.0 / 1023.0)* analogRead(VIN3);// Read the voltage from sensor
  float voltage_raw4 =   (5.0 / 1023.0)* analogRead(VIN4);// Read the voltage from sensor

  voltage1 =  voltage_raw1 - QOV + 0.007 ;// 0.007 is a value to make voltage zero when there is no current
  voltage2 =  voltage_raw2 - QOV + 0.007 ;// 0.007 is a value to make voltage zero when there is no current
  voltage3 =  voltage_raw3 - QOV + 0.007 ;// 0.007 is a value to make voltage zero when there is no current
  voltage4 =  voltage_raw4 - QOV + 0.007 ;// 0.007 is a value to make voltage zero when there is no current

  float current1 = voltage1 / FACTOR;
  float current2 = voltage2 / FACTOR;
  float current3 = voltage3 / FACTOR;
  float current4 = voltage4 / FACTOR;

  if(abs(voltage1) > cutOff ){ //Corrected abs(voltage) to abs(voltage1)

    Serial.print("I1: ");
    Serial.print(current1,2); // print the current with 2 decimal places
    Serial.println("A");

    Serial.print("I2: ");
    Serial.print(current2,2); // print the current with 2 decimal places
    Serial.println("A");

    Serial.print("I3: ");
    Serial.print(current3,2); // print the current with 2 decimal places
    Serial.println("A");

    Serial.print("I4: ");
    Serial.print(current4,2); // print the current with 2 decimal places
    Serial.println("A");

  }else{
    Serial.println("No Current");
  }
  delay(500);
}
Goedere wat jy dalk nodig het
-
AmazonACS758 Current Sensor on Amazonamzn.to
-
Amazon
-
Amazon
-
eBay
-
AliExpressPurchase Allegro ACS758 Current Sensor from AliExpresss.click.aliexpress.com
Hulpbronne en verwysings
Geen hulpbronne nog.
Lêers📁
Ander lêers
-
Adafruit PCA9685 16-Channel Servo Driver
robojax_PCA9685_extra_learning.pdf -
Alegro ACS Current LibraryArduino library for Allegro ACS current sensor modules. Provides functions to read current measurements from ACS712 and similar sensors.
robojax_Alegro_ACS_Current_library.zip0.02 MB