نحوه استفاده از شیلد پروتوتایپینگ با برد بورد برای آردوینو
این راهنمای پروژه نحوه استفاده از یک سپر پروتوتایپینگ با یک نوار بورد برای آردوینو را نشان میدهد. این سپر پروتوتایپینگ را با فراهم کردن پورتهای اضافی، یک نوار بورد داخلی و اجزای در دسترس مانند LEDها و دکمههای فشاری ساده میکند. این بهویژه برای پروژههایی که به تعداد کمی از اجزا نیاز دارند مفید است و امکان راهاندازی و آزمایش سریع را فراهم میآورد. همچنین راهحلی مناسب برای پروژههایی که به اجزای دائمی نیاز دارند ارائه میدهد، زیرا این اجزا میتوانند بهطور مستقیم به سپر لحیم شوند.

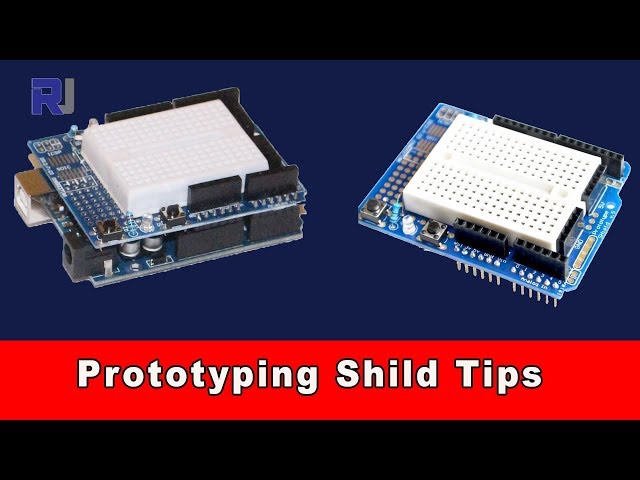
سختافزار/قطعات
این پروژه از یک شیلد پروتوتایپینگ آردوینو استفاده میکند که شامل:
- یک صفحه نان مینی برای قرار دادن آسان قطعات (در ویدیو در ۰۰:۲۵).
- چندین پایه 5 ولت و زمین برای راحتی بیشتر (در ویدیو در دقیقه 01:08).
- یک دکمه بازنشانی به راحتی قابل دسترسی (در ویدیو در ۰۱:۲۸).
- دو LED با مقاومتهای داخلی (در ویدیو در 01:43).
- یک دکمه فشار با پایه اختصاصی (در ویدیو در دقیقه 01:38).
- نقاط نصب برای ICهای سطحی سوار شده (در ویدیو در 03:32).
- فضای اضافی برای لحیمکاری هدرها (در ویدیو در ساعت 04:37).
راهنمای سیمکشی
نصب سیمکشی ساده است. LEDها دارای مقاومتهای داخلی هستند و به زمین پیشسیمکشی شدهاند. به سادگی پایانههای مثبت LEDها را به پایههای آردوینو که انتخاب کردهاید متصل کنید (در ویدیو در ۰۲:۰۱). دکمه فشار نیز پیشسیمکشی شده است؛ یک سمت را به یک پایه روی آردوینو و سمت دیگر را به زمین متصل کنید (در ویدیو در ۰۲:۵۰).
پروژه زنده/نمایشگاه
ویدئو عملکرد سپر نمونهسازی را نشان میدهد. این ویدئو نشان میدهد که چگونه بهراحتی میتوان اجزا را به بورد نانویی متصل کرد و از LEDهای داخلی و دکمه فشار استفاده کرد. ارائهدهنده راحتی داشتن پایههای قدرت و زمین اضافی را که بهراحتی در دسترس هستند، برجسته میکند و نیاز به سیمکشی اضافی را از بین میبرد (:08). او همچنین استفاده از دکمه ریست را نشان میدهد و نحوه اتصال ICهای نصب شده روی سطح را به سپر نشان میدهد (:32).
فصلها
- :00 مقدمه
- بررسی اجمالی سپر پروتوتایپینگ
- مزایا و ویژگیها
- پورتهای اضافه و دکمه بازنشانی
- [۰۱:۳۸] الایدیها و دکمه فشار
- دکمه بازنشانی اتصال :45
- [03:09] تخته نان کوچک و چسبی
- اتصالات IC سطح نصب
- [04:37] فضای اضافی هدر
مواردی که ممکن است به آنها نیاز داشته باشید
-
ایبی
-
علیاکسپرسخرید سپر پروتوتایپ برای آردوینو UNO از علیاکسپرسs.click.aliexpress.com
منابع و مراجع
هنوز هیچ منبعی موجود نیست.
فایلها📁
هیچ فایلی موجود نیست.
![Arduino Uno REV3 [A000066] - ATmega328P Microcontroller, 16MHz, 14 Digital I/O Pins, 6 Analog Inputs, 32KB Flash, USB Connectivity, Compatible with Arduino IDE for DIY Projects and Prototyping](https://m.media-amazon.com/images/I/515P6aYSP4L._SL75_.jpg)