第47課:用K型MAX6675配合繼電器做恆溫器 | Arduino逐步教學課程
呢個項目會引導你由零開始,用Arduino、MAX6675 K型熱電偶同繼電器整一個溫度控制系統。呢個系統可以維持一個你想要嘅溫度範圍,適合好多唔同嘅應用。你可以用佢嚟整:
- 一個溫度受控嘅培養箱,用嚟做精密實驗或者育苗。
- 一個自動化釀造系統,用嚟維持穩定嘅麥芽汁溫度。
- 一個氣候受控嘅飼養箱,用嚟養爬蟲類或者其他對溫度敏感嘅動物。
- 一個簡單嘅加熱或冷卻系統,用喺細空間度。
-
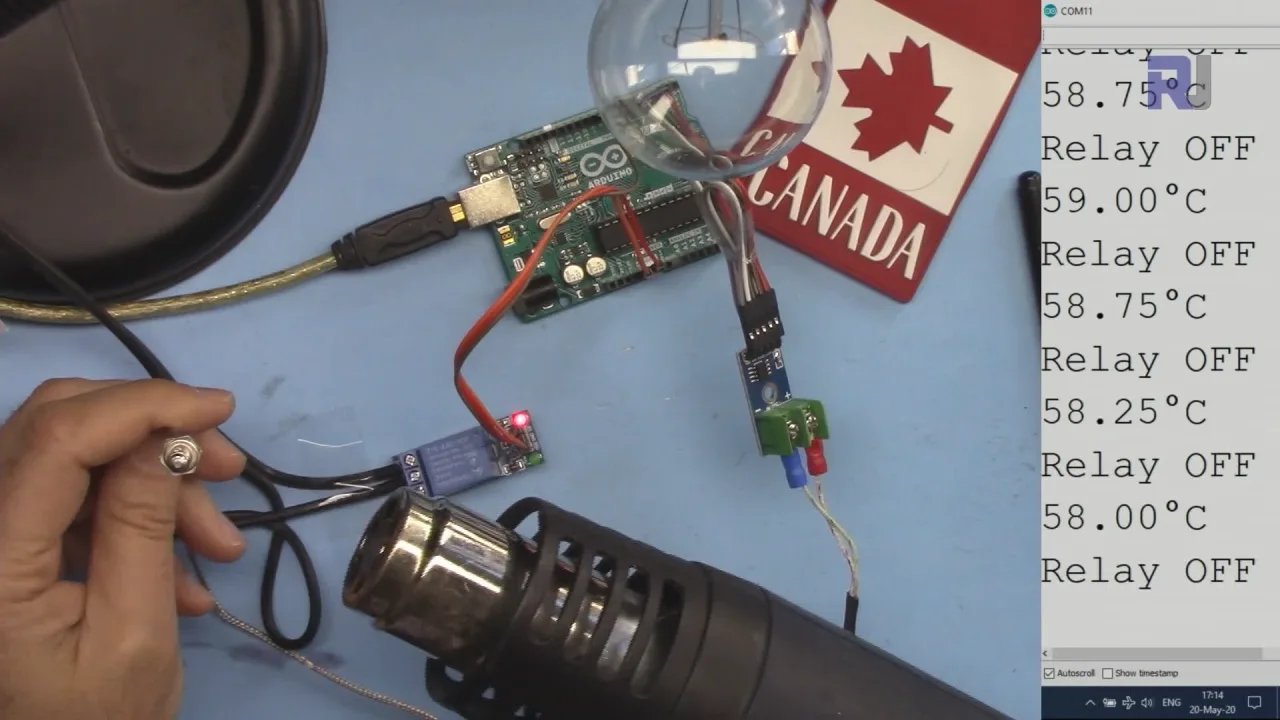
robojax_course_47_MAX6675_temperature-0
呢個系統用MAX6675嚟讀取K型熱電偶嘅溫度,喺好闊嘅範圍內提供準確嘅溫度讀數(視乎熱電偶類型,最高可以去到1000°C或以上)。Arduino處理呢啲讀數,然後控制一個繼電器去開關加熱或冷卻元件,令溫度維持喺用戶設定嘅範圍之內。(喺影片00:32)
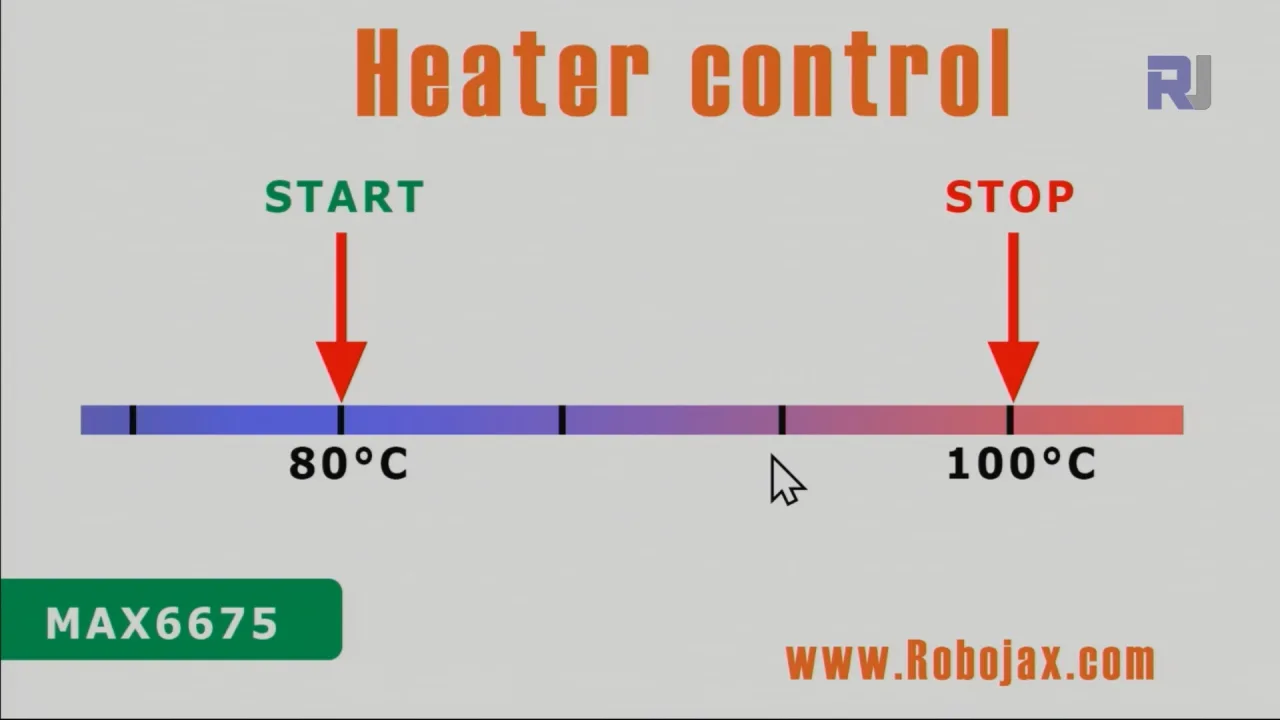
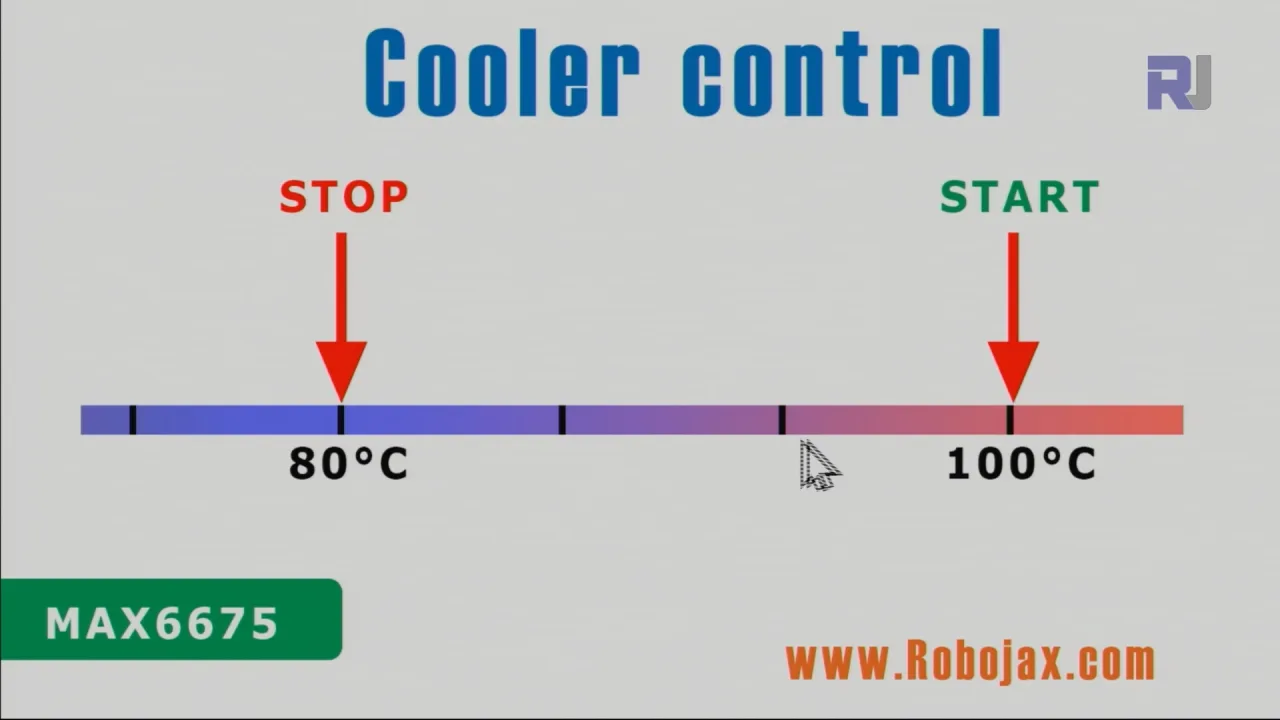
硬件/零件
要整呢個項目,你需要以下零件:
- Arduino板(Uno、Nano等)
- MAX6675熱電偶放大器
- K型熱電偶
- 繼電器模組
- AC燈膽(或者其他負載,例如風扇或加熱器)
- 杜邦線
- 麵包板(可選,但建議用)
接線指南
接線嘅詳細步驟喺影片入面有解釋。(喺影片03:28)請參考影片睇視覺化指南。主要嘅連接包括將MAX6675連接到Arduino(針腳2-6)、將繼電器模組連接到Arduino(針腳8同電源),以及將繼電器模組連接到AC負載。一個好重要嘅位係要正確識別你AC負載嘅火線同中線,先至好連接到繼電器。接線錯誤可能會導致危險情況。
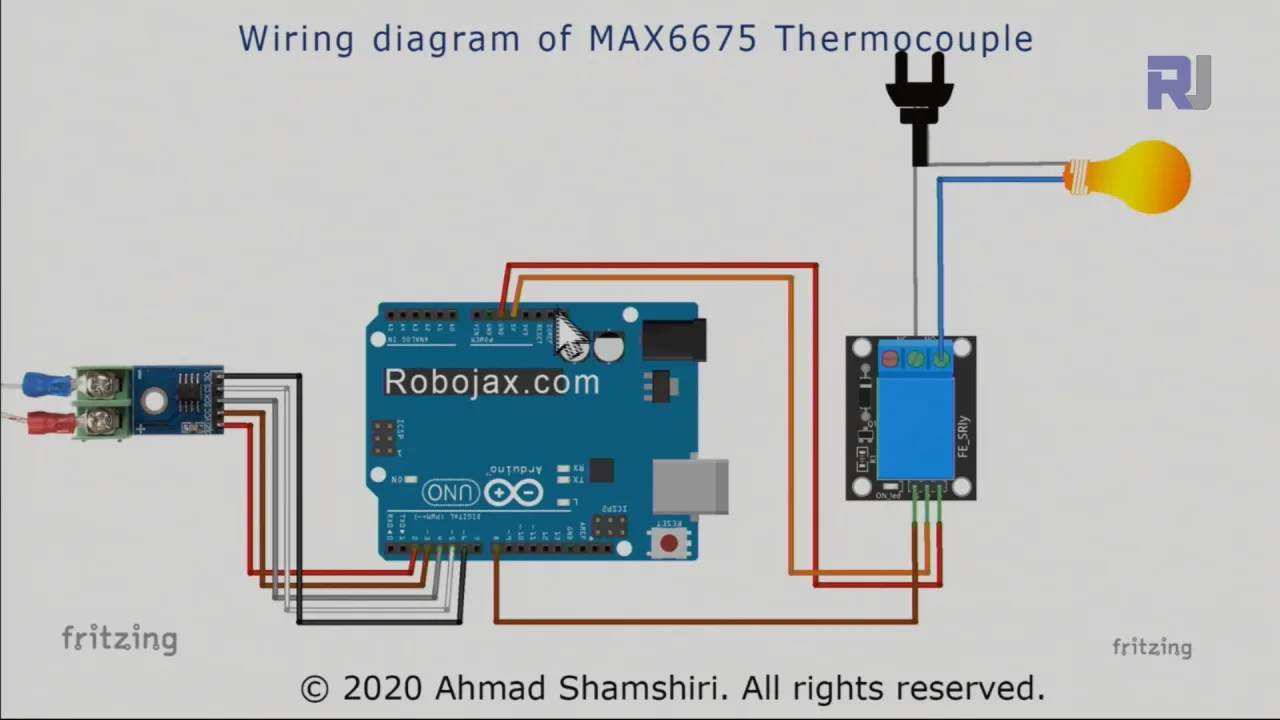
程式碼解釋
Arduino程式碼(下面片段有顯示)用咗MAX6675函式庫嚟讀取熱電偶嘅溫度值。程式碼入面用戶可以設定嘅部分包括:
relayPin:連接到繼電器模組嘅Arduino針腳(預設:8)。(喺影片07:35)relayON同relayOFF:呢啲常數定義咗用嚟開同關繼電器嘅邏輯電平。通常係LOW同HIGH,但可能要根據你嘅繼電器模組去調整。(喺影片07:35)TEMPERATURE_UNIT:設定溫度讀數嘅單位(1係攝氏,2係華氏,3係開爾文)。(喺影片08:21)START_TEMPERATURE同STOP_TEMPERATURE:呢啲變數定義咗控制系統嘅溫度範圍。當溫度低過START_TEMPERATURE時,系統會開繼電器;當溫度去到STOP_TEMPERATURE時,就會關繼電器(或者相反,視乎你控制緊加熱器定冷卻器)。(喺影片08:31)CONTROL_TYPE:一個變數,決定系統係做加熱器(1)定冷卻器(2)。(喺影片08:36)
程式碼包含咗好似readTemperature()、printTemperature()、loadControl()同relayControl()呢啲函數,用嚟處理溫度讀取、顯示同繼電器操作。呢啲函數喺影片入面有清楚定義同解釋。(喺影片09:37、10:00、10:43、11:30)
const int relayPin =8;
const int relayON = LOW;//唔好改
const int relayOFF = HIGH; //唔好改
int relayState = relayOFF;//繼電器嘅初始狀態

const int TEMPERATURE_UNIT =1;//1=攝氏, 2=華氏, 3=開爾文
const float START_TEMPERATURE = 80.0;//上面嘅單位
const float STOP_TEMPERATURE = 100.0;//上面嘅單位
const int CONTROL_TYPE = 1;// 1=加熱器, 2=冷卻器
實際項目/示範
影片示範咗呢個溫度控制系統喺加熱同冷卻兩種情況下嘅運作。(喺影片13:15同15:28)示範清楚顯示咗系統點樣透過按需要開關繼電器,將溫度維持喺設定範圍之內。
章節
- [00:00] 簡介
- [00:55] 加熱器/冷卻器控制解釋
- [03:28] 接線圖
- [06:26] 程式碼解釋
- [13:15] 加熱器控制示範
- [15:28] 冷卻器控制示範
- [17:29] 總結
圖片
Robojax course 47 MAX6675 temperature 0
Robojax course 47 MAX6675 temperature 2 cool
Robojax course 47 MAX6675 temperature 1
Robojax course 47 MAX6675 relay wiring
25-Arduino code for a MAX6675 K-type thermocouple with relay (no display)
語言: C++
/*
 * This is the Arduino code for MAX6675 Thermocouple K-Type with Relay and Display
 * The output pin 10 is connected to the relay.
 * When the temperature reaches the desired value, pin 10 turns the
 * relay ON.

 * This code has been explained in our video at https://youtu.be/cD5oOu4N_AE

 *
 * Written by Ahmad Nejrabi for Robojax Video
 * Date: December 9, 2017, in Ajax, Ontario, Canada
 * Permission granted to share this code given that this
 * note is kept with the code.
 * Disclaimer: This code is "AS IS" and for educational purposes only.
 *
 */

 // This example is public domain. Enjoy!
// www.ladyada.net/learn/sensors/thermocouple

#include "max6675.h"


int thermoDO = 4;
int thermoCS = 5;
int thermoCLK = 6;


MAX6675 thermocouple(thermoCLK, thermoCS, thermoDO);
int vccPin = 3;
int gndPin = 2;

void setup() {
  Serial.begin(9600);
  // Use Arduino pins
  pinMode(vccPin, OUTPUT); digitalWrite(vccPin, HIGH);
  pinMode(gndPin, OUTPUT); digitalWrite(gndPin, LOW);
    pinMode(10, OUTPUT);// set pin 10 as output

  Serial.println("Robojax: MAX6675 test");
  // wait for MAX chip to stabilize
  delay(500);
}

void loop() {
  // basic readout test, just print the current temp


   Serial.print("C = ");
   Serial.println(thermocouple.readCelsius());
   Serial.print("F = ");
   Serial.println(thermocouple.readFahrenheit());

   // If temperature goes above 80.0C, turn the relay ON
   if(thermocouple.readCelsius() > 80.00){
    digitalWrite(10, LOW);// set pin 10 LOW
   }else{
    digitalWrite(10, HIGH);// set pin 10 HIGH
   }


   delay(1000);
}757-Arduino code to measure a MAX6675 K-type thermocouple
語言: C++
++
/*
 * Library from: // www.ladyada.net/learn/sensors/thermocouple
 *
 * This is Arduino code to measure MAX6675 Thermocouple K-Type sensor
 * and control relay as heater or cooler
 *
 * Watch Video instruction for this code: https://youtu.be/dVh77wT-4Ao
 *

 * Written by Ahmad Shamshiri on May 20, 2020 in Ajax, Ontario, Canada
 * www.robojax.com
 *

 * Get this code and other Arduino codes from Robojax.com.
Learn Arduino step by step in a structured course with all material, wiring diagrams, and libraries
all in one place. Purchase My course on Udemy.com http://robojax.com/L/?id=62

If you found this tutorial helpful, please support me so I can continue creating
content like this.

or make a donation using PayPal http://robojax.com/L/?id=64
Related videos:
Introduction to MAX6675 K-Type: https://youtu.be/VGqONmUinqA
Using MAX6675 K-Type thermocouple with LED display: https://youtu.be/cD5oOu4N_AE
Using MAX6675 K-Type thermocouple with LCD1602-I2C: https://youtu.be/BlhpktgPdKs
Using 2 or more MAX6675 K-Type thermocouples: https://youtu.be/c90NszbNG8c
Using MAX6675 K-Type thermocouple as heater or cooler controller: [this video]
 *  * This code is "AS IS" without warranty or liability. Free to be used as long as you keep this note intact.*
 * This code has been downloaded from Robojax.com
    This program is free software: you can redistribute it and/or modify
    it under the terms of the GNU General Public License as published by
    the Free Software Foundation, either version 3 of the License, or
    (at your option) any later version.

    This program is distributed in the hope that it will be useful,
    but WITHOUT ANY WARRANTY; without even the implied warranty of
    MERCHANTABILITY or FITNESS FOR A PARTICULAR PURPOSE.  See the
    GNU General Public License for more details.

    You should have received a copy of the GNU General Public License
    along with this program.  If not, see <https://www.gnu.org/licenses/>.


*/


#include "max6675.h"
//Robojax.com heater/cooler with MAX6675 Thermocoupler
int GNDpin = 2;
int VCCpin =3;
int thermoCLK = 4;
int thermoCS = 5;
int thermoDO = 6;
MAX6675 thermocouple(thermoCLK, thermoCS, thermoDO);


const int relayPin =8;
const int relayON = LOW;// do not change
const int relayOFF = HIGH; //do not change
int relayState = relayOFF;//initial state of relay

const int TEMPERATURE_UNIT =1;//1=Celsius, 2=Fahrenheit, 3=Kelvin
const float START_TEMPERATURE = 80.0;//unit above
const float STOP_TEMPERATURE = 100.0;//unit above
const int CONTROL_TYPE = 1;// 1= heater, 2=cooler
float temperature;

void setup() {
  //Robojax.com heater/cooler with MAX6675 Thermocoupler
  Serial.begin(9600);
  Serial.println("MAX6675 test with relay");
  // use Arduino pins
  pinMode(relayPin, OUTPUT);//pin for relay
  digitalWrite(relayPin, relayState);

  pinMode(VCCpin, OUTPUT);
  digitalWrite(VCCpin, HIGH);

  pinMode(GNDpin, OUTPUT);
  digitalWrite(GNDpin, LOW);

  // wait for MAX chip to stabilize
  delay(500);
//Robojax.com heater/cooler with MAX6675 Thermocoupler
}

void loop() {
  //Robojax.com heater/cooler with MAX6675 Thermocoupler
   readTemperature();
   printTemperature();
   loadControl();
   if(temperature >=89.5)
   {
    ///
   }
   delay(1000);
//Robojax.com heater/cooler with MAX6675 Thermocoupler
}//loop


/*
 * loadControl()
 * @brief controls the load based
 * @param state can be either : relayON or relayOFF

 * @return returns none
 * Written by Ahmad Shamshiri for robojax.com
 * on May 20, 2020 at 15:23 in Ajax, Ontario, Canada
 */
void loadControl()
{
//Robojax.com heater/cooler with MAX6675 Thermocoupler
     // Serial.print("Start: ");
     // Serial.print(START_TEMPERATURE);
     // Serial.print(" Stop: ");
      //Serial.println(STOP_TEMPERATURE);
  if(CONTROL_TYPE ==1)
  {
    if(START_TEMPERATURE >= temperature && STOP_TEMPERATURE >=temperature)
    {
      relayControl(relayON);
    }
    if(STOP_TEMPERATURE <=temperature)
    {
      relayControl(relayOFF);
    }
  }else{
    if(START_TEMPERATURE >= temperature && STOP_TEMPERATURE >=temperature)
    {
      relayControl(relayOFF);
    }
    if(STOP_TEMPERATURE <=temperature)
    {
      relayControl(relayON);
    }
  }

//Robojax.com heater/cooler with MAX6675 Thermocoupler
}//loadControl()


/*
 * relayControl(int state))
 * @brief turns the relay ON or OFF
 * @param state is "relayON" or "relayOFF" defined at the top of code
 * @return returns none
 * Written by Ahmad Shamshiri for robojax.com
 * on May 20, 2020 at 15:23 in Ajax, Ontario, Canada
 */
void relayControl(int state)
{
  //Robojax.com heater/cooler with MAX6675 Thermocoupler
  if(state ==relayON)
  {
    digitalWrite(relayPin, relayON);
    Serial.println("Relay ON");
  }else{
   digitalWrite(relayPin, relayOFF);
    Serial.println("Relay OFF");
  }
  //Robojax.com heater/cooler with MAX6675 Thermocoupler

}//relayControl()


/*
 *  readTemperature()
 * @brief reads the temperature based on the TEMPERATURE_UNIT
 * @param average temperature

 * @return returns one of the values above
 * Written by Ahmad Shamshiri for robojax.com
 * on May 20, 2020 at 15:23 in Ajax, Ontario, Canada
 */
void readTemperature()
{
 //Robojax.com heater/cooler with MAX6675 Thermocoupler

  if(TEMPERATURE_UNIT ==2)
   {
   temperature = thermocouple.readFahrenheit();//convert to Fahrenheit
   }else if(TEMPERATURE_UNIT ==3)
   {
    temperature = thermocouple.readCelsius() + 273.15;//convert to Kelvin
   }else{
    temperature = thermocouple.readCelsius();// return Celsius
   }
 //Robojax.com heater/cooler with MAX6675 Thermocoupler
}// readTemperature()

/*
 * printTemperature()
 * @brief prints  temperature on serial monitor
 * @param charact type
 * @param "type" is character
 *     C = Celsius
 *     K = Kelvin
 *     F = Fahrenheit
 * @return none
 * Written by Ahmad Shamshiri for robojax.com
 * on May 08, 2020 at 02:45 in Ajax, Ontario, Canada
 */
void printTemperature()
{
//Robojax.com heater/cooler with MAX6675 Thermocoupler
   Serial.print(temperature);
    printDegree();
  if(TEMPERATURE_UNIT ==2)
   {
     Serial.print("F");
    }else if(TEMPERATURE_UNIT ==3)
   {
     Serial.print("K");
   }else{
     Serial.print("C");
   }
  Serial.println();
//Robojax.com heater/cooler with MAX6675 Thermocoupler
}//printTemperature()

/*
 * @brief prints degree symbol on serial monitor
 * @param none
 * @return returns nothing
 * Written by Ahmad Shamshiri on July 13, 2019
 * for Robojax Tutorial Robojax.com
 */
void printDegree()
{
    Serial.print("\\xC2");
    Serial.print("\\xB0");
}
你可能需要嘅嘢
-
易贝
-
阿里巴巴速卖通Purchase 1 channel 5V KY-019 relay from AliExpresss.click.aliexpress.com
-
邦购Purchase MAX6675 K-Type from Banggoodbanggood.com
資源與參考資料
-
外部MAX6675 datasheet (PDF)datasheets.maximintegrated.com
文件📁
冇文件可用。