سبق 47: K-Type MAX6675 کو ریلے کے ساتھ تھرموسٹیٹ کے طور پر استعمال کرنا | Arduino سٹیپ بائی سٹیپ کورس
یہ پروجیکٹ آپ کو Arduino، MAX6675 K-type thermocouple، اور relay استعمال کرتے ہوئے درجہ حرارت کنٹرول سسٹم بنانے کا طریقہ سکھاتا ہے۔ یہ سسٹم مطلوبہ درجہ حرارت کی حد برقرار رکھ سکتا ہے، جو مختلف استعمالات کے لیے موزوں ہے۔ آپ اسے بنانے کے لیے استعمال کر سکتے ہیں:
- نازک تجربات یا seedlings کے لیے درجہ حرارت کنٹرول شدہ incubator۔
- مستقل wort درجہ حرارت برقرار رکھنے کے لیے خودکار brewing سسٹم۔
- reptiles یا دیگر درجہ حرارت کے حساس جانوروں کے لیے climate-controlled enclosure۔
- چھوٹی جگہ کے لیے سادہ heating یا cooling سسٹم۔
-
robojax_course_47_MAX6675_temperature-0
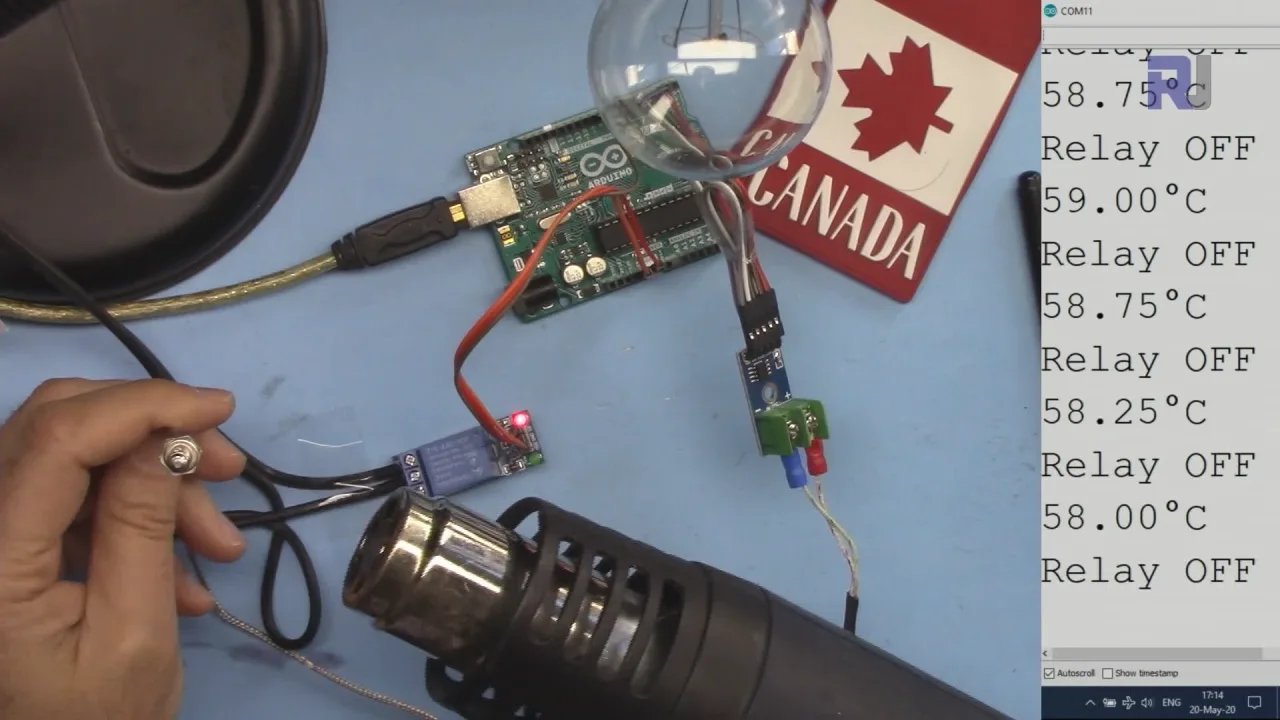
یہ سسٹم MAX6675 کا استعمال کرتے ہوئے K-type thermocouple سے درجہ حرارت پڑھتا ہے، جو وسیع رینج میں درست درجہ حرارت کی پیمائش فراہم کرتا ہے (thermocouple کی قسم پر منحصر، 1000°C یا اس سے زیادہ تک)۔ Arduino ان پڑھائیوں پر کارروائی کرتا ہے اور relay کو کنٹرول کرتا ہے تاکہ heating یا cooling عنصر کو آن یا آف کیا جا سکے، اور درجہ حرارت کو صارف کی متعین کردہ حد کے اندر برقرار رکھا جا سکے۔ (ویڈیو میں 00:32 پر)
ہارڈویئر/اجزاء
یہ پروجیکٹ بنانے کے لیے، آپ کو درج ذیل اجزاء کی ضرورت ہوگی:
- Arduino بورڈ (Uno، Nano، وغیرہ)
- MAX6675 thermocouple amplifier
- K-type thermocouple
- Relay ماجیول
- AC بلب (یا دیگر لوڈ، جیسے پنکھا یا ہیٹر)
- Jumper تار
- Breadboard (اختیاری، لیکن تجویز کردہ)
وائرنگ گائیڈ
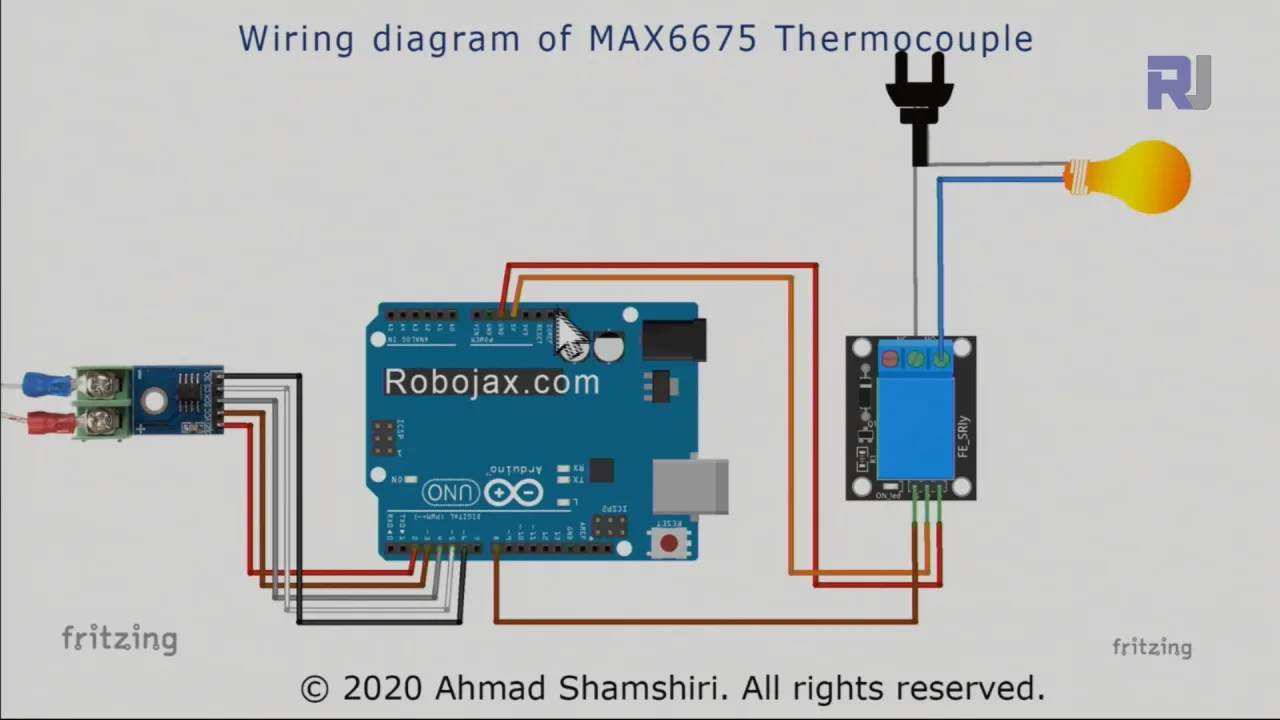
وائرنگ کی تفصیل ویڈیو میں دی گئی ہے۔ (ویڈیو میں 03:28 پر) بصری گائیڈ کے لیے ویڈیو دیکھیں۔ اہم کنکشنز میں MAX6675 کو Arduino سے جوڑنا (پن 2-6)، relay ماجیول کو Arduino سے جوڑنا (پن 8 اور پاور)، اور relay ماجیول کو AC لوڈ سے جوڑنا شامل ہے۔ ایک اہم پہلو یہ ہے کہ AC لوڈ کی live اور neutral تاروں کی درست شناخت کریں اس سے پہلے کہ انہیں relay سے جوڑیں۔ غلط وائرنگ خطرناک حالات کا باعث بن سکتی ہے۔
کوڈ کی وضاحت
Arduino کوڈ (نیچے snippets میں دکھایا گیا) MAX6675 لائبریری کا استعمال کرتا ہے تاکہ thermocouple سے درجہ حرارت کی قدریں پڑھ سکے۔ کوڈ کے صارف کے قابل ترتیب حصے یہ ہیں:
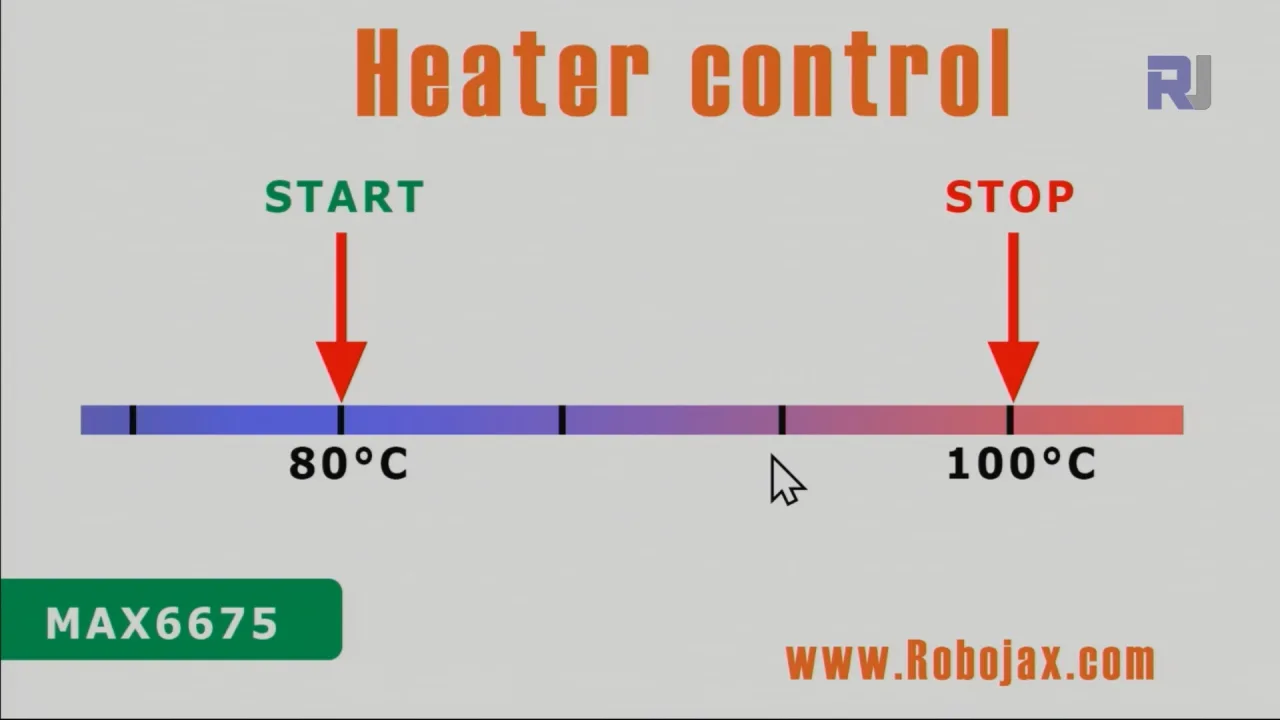
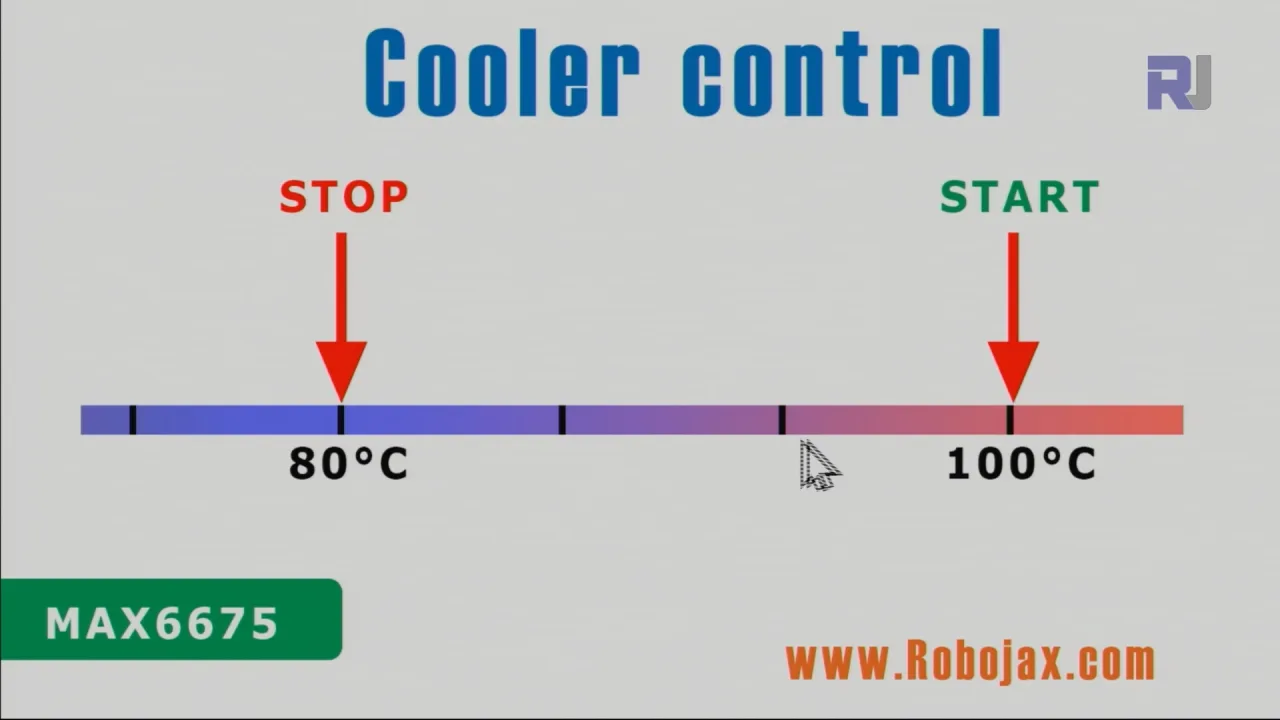
relayPin: Arduino پن جو relay ماجیول سے جڑا ہے (ڈیفالٹ: 8)۔ (ویڈیو میں 07:35 پر)relayONاورrelayOFF: یہ مستقلات relay کو آن اور آف کرنے کے لیے منطقی سطحوں کی وضاحت کرتے ہیں۔ یہ عام طور پر LOW اور HIGH ہوتے ہیں، لیکن آپ کے relay ماجیول کے لحاظ سے انہیں ایڈجسٹ کرنے کی ضرورت ہو سکتی ہے۔ (ویڈیو میں 07:35 پر)TEMPERATURE_UNIT: درجہ حرارت کی پیمائش کے لیے یونٹ سیٹ کرتا ہے (1 سیلسیس کے لیے، 2 فارن ہائیٹ کے لیے، 3 کیلون کے لیے)۔ (ویڈیو میں 08:21 پر)START_TEMPERATUREاورSTOP_TEMPERATURE: یہ متغیرات کنٹرول سسٹم کے لیے درجہ حرارت کی حد کی وضاحت کرتے ہیں۔ سسٹم relay کو آن کرے گا جب درجہ حرارتSTART_TEMPERATUREسے نیچے گر جائے اور اسے بند کر دے گا جب درجہ حرارتSTOP_TEMPERATUREتک پہنچ جائے (یا اس کے برعکس، اس بات پر منحصر کہ آپ ہیٹر یا کولر کنٹرول کر رہے ہیں)۔ (ویڈیو میں 08:31 پر)CONTROL_TYPE: ایک متغیر جو یہ طے کرتا ہے کہ سسٹم ہیٹر (1) یا کولر (2) کے طور پر کام کرتا ہے۔ (ویڈیو میں 08:36 پر)
کوڈ میں readTemperature()، printTemperature()، loadControl()، اور relayControl() جیسے فنکشنز شامل ہیں تاکہ درجہ حرارت پڑھنے، ڈسپلے، اور relay آپریشن کو سنبھالا جا سکے۔ یہ فنکشنز ویڈیو میں واضح طور پر بیان اور وضاحت کیے گئے ہیں۔ (ویڈیو میں 09:37، 10:00، 10:43، 11:30 پر)
const int relayPin =8;
const int relayON = LOW;// تبدیل نہ کریں
const int relayOFF = HIGH; //تبدیل نہ کریں
int relayState = relayOFF;//relay کی ابتدائی حالت

const int TEMPERATURE_UNIT =1;//1=سیلسیس، 2=فارن ہائیٹ، 3=کیلون
const float START_TEMPERATURE = 80.0;//اوپر والی یونٹ
const float STOP_TEMPERATURE = 100.0;//اوپر والی یونٹ
const int CONTROL_TYPE = 1;// 1= ہیٹر، 2=کولر
لائیو پروجیکٹ/ڈیموسٹریشن
ویڈیو heating اور cooling دونوں منظرناموں کے لیے درجہ حرارت کنٹرول سسٹم کے کام کا مظاہرہ کرتی ہے۔ (ویڈیو میں 13:15 اور 15:28 پر) ڈیموسٹریشن واضح طور پر دکھاتی ہے کہ سسٹم relay کو ضرورت کے مطابق آن اور آف کرکے درجہ حرارت کو مقررہ حد کے اندر کیسے برقرار رکھتا ہے۔
ابواب
- [00:00] تعارف
- [00:55] ہیٹر/کولر کنٹرول کی وضاحت
- [03:28] وائرنگ ڈایاگرام
- [06:26] کوڈ کی وضاحت
- [13:15] ہیٹر کنٹرول ڈیموسٹریشن
- [15:28] کولر کنٹرول ڈیموسٹریشن
- [17:29] نتیجہ
تصاویر
/*
 * This is the Arduino code for MAX6675 Thermocouple K-Type with Relay and Display
 * The output pin 10 is connected to the relay.
 * When the temperature reaches the desired value, pin 10 turns the
 * relay ON.

 * This code has been explained in our video at https://youtu.be/cD5oOu4N_AE

 *
 * Written by Ahmad Nejrabi for Robojax Video
 * Date: December 9, 2017, in Ajax, Ontario, Canada
 * Permission granted to share this code given that this
 * note is kept with the code.
 * Disclaimer: This code is "AS IS" and for educational purposes only.
 *
 */

 // This example is public domain. Enjoy!
// www.ladyada.net/learn/sensors/thermocouple

#include "max6675.h"


int thermoDO = 4;
int thermoCS = 5;
int thermoCLK = 6;


MAX6675 thermocouple(thermoCLK, thermoCS, thermoDO);
int vccPin = 3;
int gndPin = 2;

void setup() {
  Serial.begin(9600);
  // Use Arduino pins
  pinMode(vccPin, OUTPUT); digitalWrite(vccPin, HIGH);
  pinMode(gndPin, OUTPUT); digitalWrite(gndPin, LOW);
    pinMode(10, OUTPUT);// set pin 10 as output

  Serial.println("Robojax: MAX6675 test");
  // wait for MAX chip to stabilize
  delay(500);
}

void loop() {
  // basic readout test, just print the current temp


   Serial.print("C = ");
   Serial.println(thermocouple.readCelsius());
   Serial.print("F = ");
   Serial.println(thermocouple.readFahrenheit());

   // If temperature goes above 80.0C, turn the relay ON
   if(thermocouple.readCelsius() > 80.00){
    digitalWrite(10, LOW);// set pin 10 LOW
   }else{
    digitalWrite(10, HIGH);// set pin 10 HIGH
   }


   delay(1000);
}++
/*
* Library from: // www.ladyada.net/learn/sensors/thermocouple
*
* This is Arduino code to measure MAX6675 Thermocouple K-Type sensor
* and control relay as heater or cooler
*
* Watch Video instruction for this code: https://youtu.be/dVh77wT-4Ao
*
* Written by Ahmad Shamshiri on May 20, 2020 in Ajax, Ontario, Canada
* www.robojax.com
*
* Get this code and other Arduino codes from Robojax.com.
Learn Arduino step by step in a structured course with all material, wiring diagrams, and libraries
all in one place. Purchase My course on Udemy.com http://robojax.com/L/?id=62
If you found this tutorial helpful, please support me so I can continue creating
content like this.
or make a donation using PayPal http://robojax.com/L/?id=64
Related videos:
Introduction to MAX6675 K-Type: https://youtu.be/VGqONmUinqA
Using MAX6675 K-Type thermocouple with LED display: https://youtu.be/cD5oOu4N_AE
Using MAX6675 K-Type thermocouple with LCD1602-I2C: https://youtu.be/BlhpktgPdKs
Using 2 or more MAX6675 K-Type thermocouples: https://youtu.be/c90NszbNG8c
Using MAX6675 K-Type thermocouple as heater or cooler controller: [this video]
* * This code is "AS IS" without warranty or liability. Free to be used as long as you keep this note intact.*
* This code has been downloaded from Robojax.com
This program is free software: you can redistribute it and/or modify
it under the terms of the GNU General Public License as published by
the Free Software Foundation, either version 3 of the License, or
(at your option) any later version.
This program is distributed in the hope that it will be useful,
but WITHOUT ANY WARRANTY; without even the implied warranty of
MERCHANTABILITY or FITNESS FOR A PARTICULAR PURPOSE. See the
GNU General Public License for more details.
You should have received a copy of the GNU General Public License
along with this program. If not, see <https://www.gnu.org/licenses/>.
*/
#include "max6675.h"
//Robojax.com heater/cooler with MAX6675 Thermocoupler
int GNDpin = 2;
int VCCpin =3;
int thermoCLK = 4;
int thermoCS = 5;
int thermoDO = 6;
MAX6675 thermocouple(thermoCLK, thermoCS, thermoDO);
const int relayPin =8;
const int relayON = LOW;// do not change
const int relayOFF = HIGH; //do not change
int relayState = relayOFF;//initial state of relay
const int TEMPERATURE_UNIT =1;//1=Celsius, 2=Fahrenheit, 3=Kelvin
const float START_TEMPERATURE = 80.0;//unit above
const float STOP_TEMPERATURE = 100.0;//unit above
const int CONTROL_TYPE = 1;// 1= heater, 2=cooler
float temperature;
void setup() {
//Robojax.com heater/cooler with MAX6675 Thermocoupler
Serial.begin(9600);
Serial.println("MAX6675 test with relay");
// use Arduino pins
pinMode(relayPin, OUTPUT);//pin for relay
digitalWrite(relayPin, relayState);
pinMode(VCCpin, OUTPUT);
digitalWrite(VCCpin, HIGH);
pinMode(GNDpin, OUTPUT);
digitalWrite(GNDpin, LOW);
// wait for MAX chip to stabilize
delay(500);
//Robojax.com heater/cooler with MAX6675 Thermocoupler
}
void loop() {
//Robojax.com heater/cooler with MAX6675 Thermocoupler
readTemperature();
printTemperature();
loadControl();
if(temperature >=89.5)
{
///
}
delay(1000);
//Robojax.com heater/cooler with MAX6675 Thermocoupler
}//loop
/*
* loadControl()
* @brief controls the load based
* @param state can be either : relayON or relayOFF
* @return returns none
* Written by Ahmad Shamshiri for robojax.com
* on May 20, 2020 at 15:23 in Ajax, Ontario, Canada
*/
void loadControl()
{
//Robojax.com heater/cooler with MAX6675 Thermocoupler
// Serial.print("Start: ");
// Serial.print(START_TEMPERATURE);
// Serial.print(" Stop: ");
//Serial.println(STOP_TEMPERATURE);
if(CONTROL_TYPE ==1)
{
if(START_TEMPERATURE >= temperature && STOP_TEMPERATURE >=temperature)
{
relayControl(relayON);
}
if(STOP_TEMPERATURE <=temperature)
{
relayControl(relayOFF);
}
}else{
if(START_TEMPERATURE >= temperature && STOP_TEMPERATURE >=temperature)
{
relayControl(relayOFF);
}
if(STOP_TEMPERATURE <=temperature)
{
relayControl(relayON);
}
}
//Robojax.com heater/cooler with MAX6675 Thermocoupler
}//loadControl()
/*
* relayControl(int state))
* @brief turns the relay ON or OFF
* @param state is "relayON" or "relayOFF" defined at the top of code
* @return returns none
* Written by Ahmad Shamshiri for robojax.com
* on May 20, 2020 at 15:23 in Ajax, Ontario, Canada
*/
void relayControl(int state)
{
//Robojax.com heater/cooler with MAX6675 Thermocoupler
if(state ==relayON)
{
digitalWrite(relayPin, relayON);
Serial.println("Relay ON");
}else{
digitalWrite(relayPin, relayOFF);
Serial.println("Relay OFF");
}
//Robojax.com heater/cooler with MAX6675 Thermocoupler
}//relayControl()
/*
* readTemperature()
* @brief reads the temperature based on the TEMPERATURE_UNIT
* @param average temperature
* @return returns one of the values above
* Written by Ahmad Shamshiri for robojax.com
* on May 20, 2020 at 15:23 in Ajax, Ontario, Canada
*/
void readTemperature()
{
//Robojax.com heater/cooler with MAX6675 Thermocoupler
if(TEMPERATURE_UNIT ==2)
{
temperature = thermocouple.readFahrenheit();//convert to Fahrenheit
}else if(TEMPERATURE_UNIT ==3)
{
temperature = thermocouple.readCelsius() + 273.15;//convert to Kelvin
}else{
temperature = thermocouple.readCelsius();// return Celsius
}
//Robojax.com heater/cooler with MAX6675 Thermocoupler
}// readTemperature()
/*
* printTemperature()
* @brief prints temperature on serial monitor
* @param charact type
* @param "type" is character
* C = Celsius
* K = Kelvin
* F = Fahrenheit
* @return none
* Written by Ahmad Shamshiri for robojax.com
* on May 08, 2020 at 02:45 in Ajax, Ontario, Canada
*/
void printTemperature()
{
//Robojax.com heater/cooler with MAX6675 Thermocoupler
Serial.print(temperature);
printDegree();
if(TEMPERATURE_UNIT ==2)
{
Serial.print("F");
}else if(TEMPERATURE_UNIT ==3)
{
Serial.print("K");
}else{
Serial.print("C");
}
Serial.println();
//Robojax.com heater/cooler with MAX6675 Thermocoupler
}//printTemperature()
/*
* @brief prints degree symbol on serial monitor
* @param none
* @return returns nothing
* Written by Ahmad Shamshiri on July 13, 2019
* for Robojax Tutorial Robojax.com
*/
void printDegree()
{
Serial.print("\\xC2");
Serial.print("\\xB0");
}آپ کو جن چیزوں کی ضرورت ہو سکتی ہے
-
ای بے
-
علی ایکسپریسPurchase 1 channel 5V KY-019 relay from AliExpresss.click.aliexpress.com
-
بینگوڈPurchase MAX6675 K-Type from Banggoodbanggood.com
وسائل اور حوالہ جات
-
باہرونیMAX6675 datasheet (PDF)datasheets.maximintegrated.com
فائلیں📁
کوئی فائلیں دستیاب نہیں ہیں۔