Ders 47: K Tipi MAX6675'i röle ile termostat olarak kullanma | Arduino Adım Adım Kurs
Bu proje, bir Arduino, MAX6675 K-tipi termokupl ve bir röle kullanarak bir sıcaklık kontrol sistemi kurmanızı sağlar. Bu sistem, istenen bir sıcaklık aralığını koruyabilir ve çeşitli uygulamalar için uygundur. Bunu şunları yapmak için kullanabilirsiniz:
- Hassas deneyler veya fideler için sıcaklık kontrollü bir inkübatör.
- Sabit mayşe sıcaklıklarını korumak için otomatik bir demleme sistemi.
- Sürüngenler veya diğer sıcaklığa duyarlı hayvanlar için iklim kontrollü bir muhafaza.
- Küçük bir alan için basit bir ısıtma veya soğutma sistemi.
-
robojax_course_47_MAX6675_temperature-0
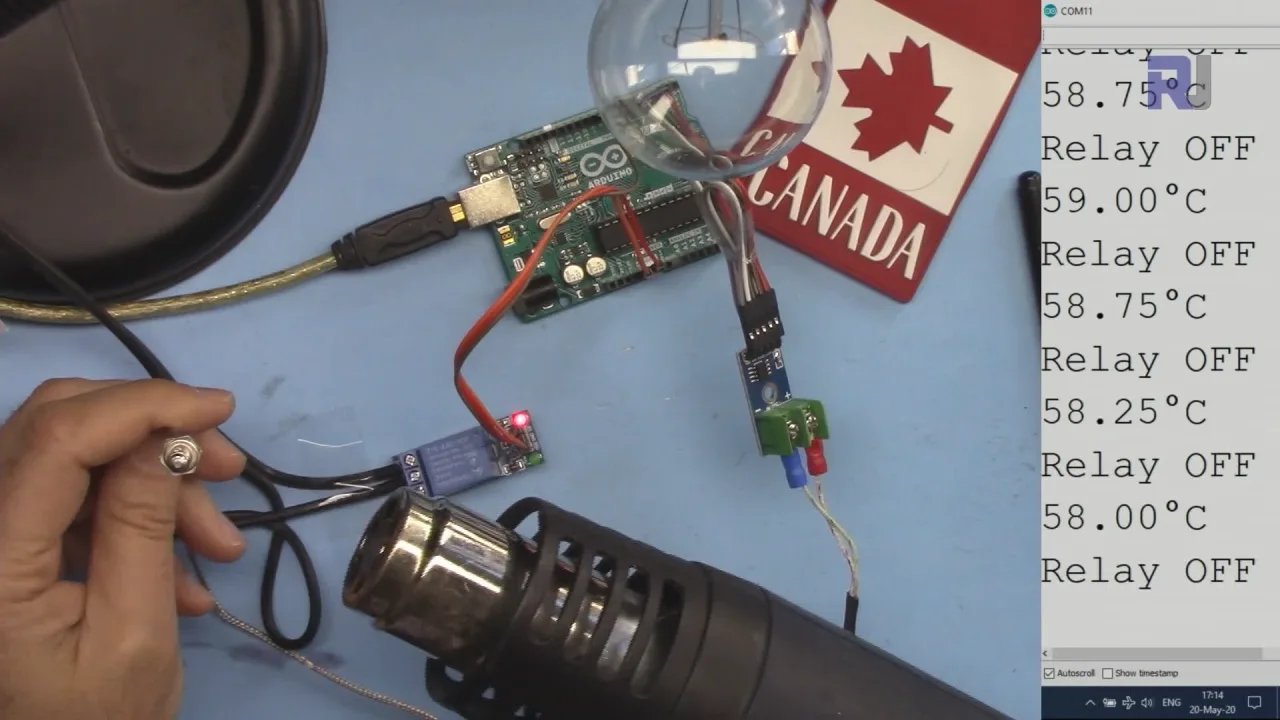
Sistem, MAX6675 kullanarak K-tipi bir termokupl'dan sıcaklıkları okur ve geniş bir aralıkta (termokupl tipine bağlı olarak 1000°C veya daha fazlasına kadar) doğru sıcaklık okumaları sağlar. Arduino bu okumaları işler ve bir ısıtma veya soğutma elemanını açıp kapatmak için bir röleyi kontrol eder, böylece sıcaklığı kullanıcı tanımlı bir aralıkta tutar. (videoda 00:32'de)
Donanım/Bileşenler
Bu projeyi oluşturmak için aşağıdaki bileşenlere ihtiyacınız olacak:
- Arduino kartı (Uno, Nano, vb.)
- MAX6675 termokupl amplifikatörü
- K-tipi termokupl
- Röle modülü
- AC ampul (veya fan veya ısıtıcı gibi başka bir yük)
- Jumper kablolar
- Breadboard (isteğe bağlı, ancak önerilir)
Bağlantı Kılavuzu
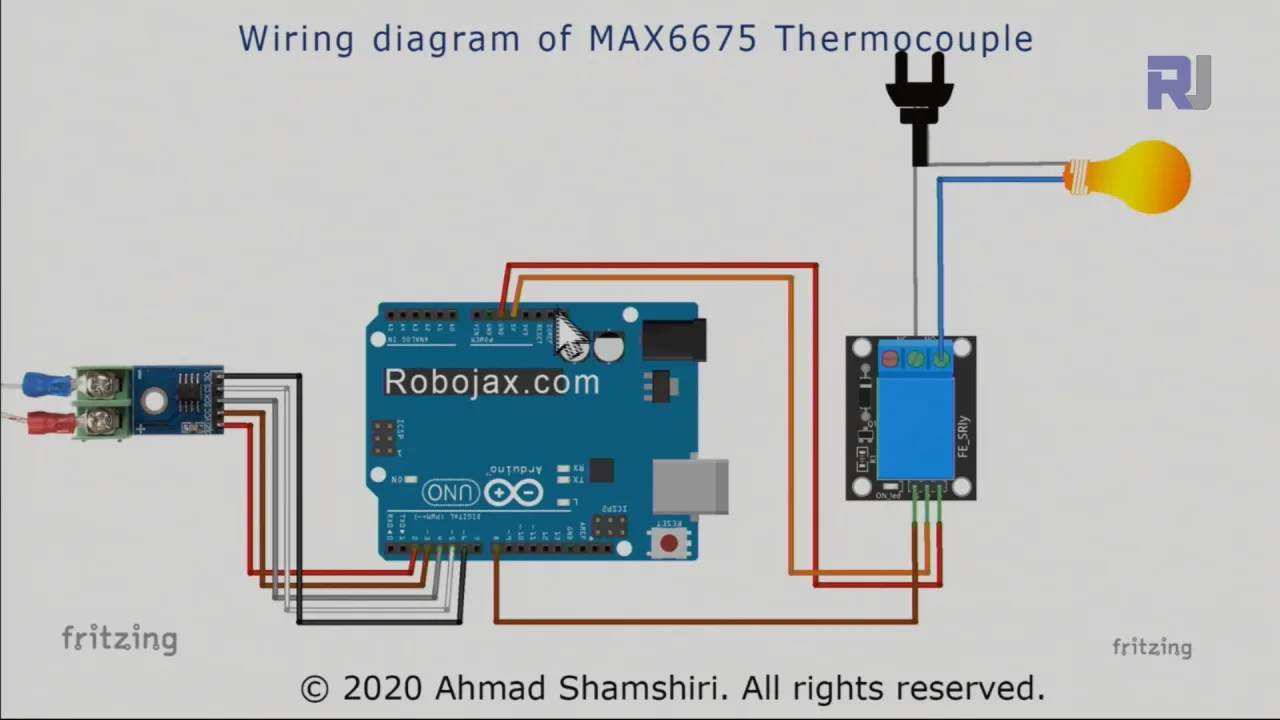
Bağlantılar videoda ayrıntılı olarak açıklanmıştır. (videoda 03:28'de) Görsel bir kılavuz için videoya bakın. Temel bağlantılar, MAX6675'i Arduino'ya (pin 2-6), röle modülünü Arduino'ya (pin 8 ve güç) ve röle modülünü AC yüküne bağlamayı içerir. Kritik bir husus, AC yükünüzün canlı ve nötr kablolarını röleye bağlamadan önce doğru şekilde tanımlamaktır. Yanlış bağlantı tehlikeli durumlara yol açabilir.
Kod Açıklaması
Arduino kodu (aşağıdaki parçacıklarda gösterilmiştir), termokupl'dan sıcaklık değerlerini okumak için MAX6675 kitaplığını kullanır. Kodun kullanıcı tarafından yapılandırılabilir bölümleri şunlardır:
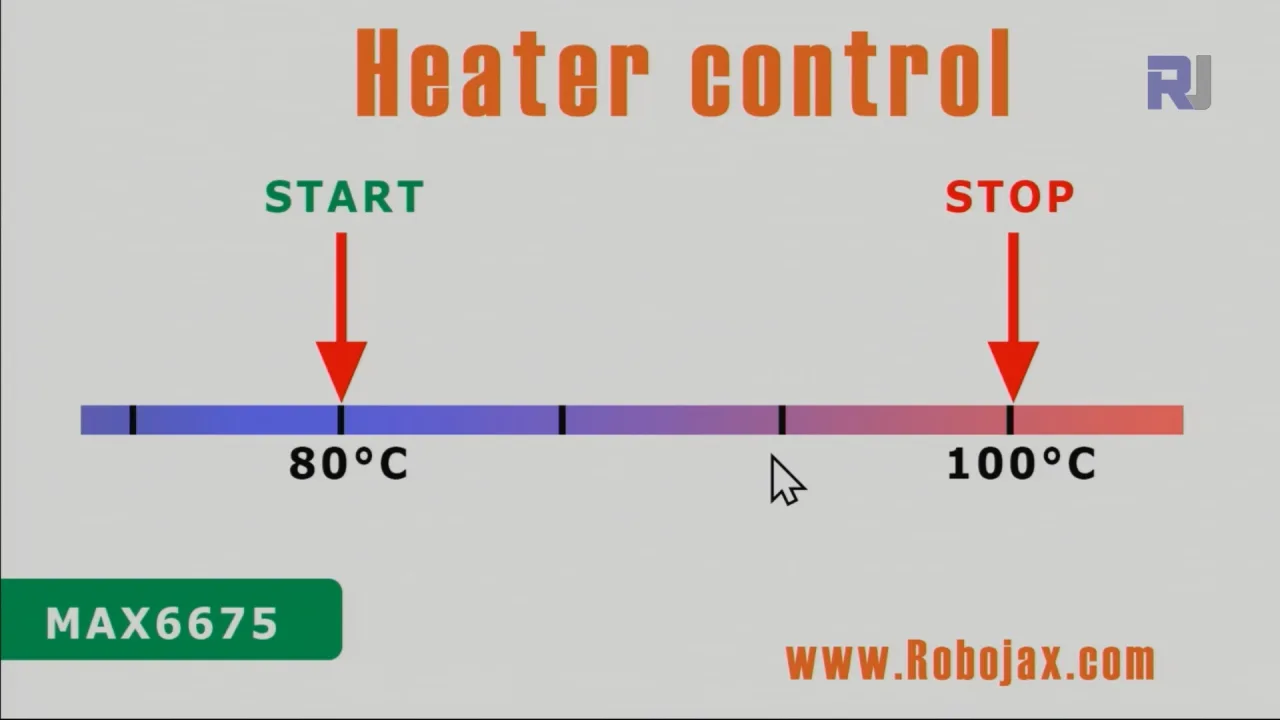
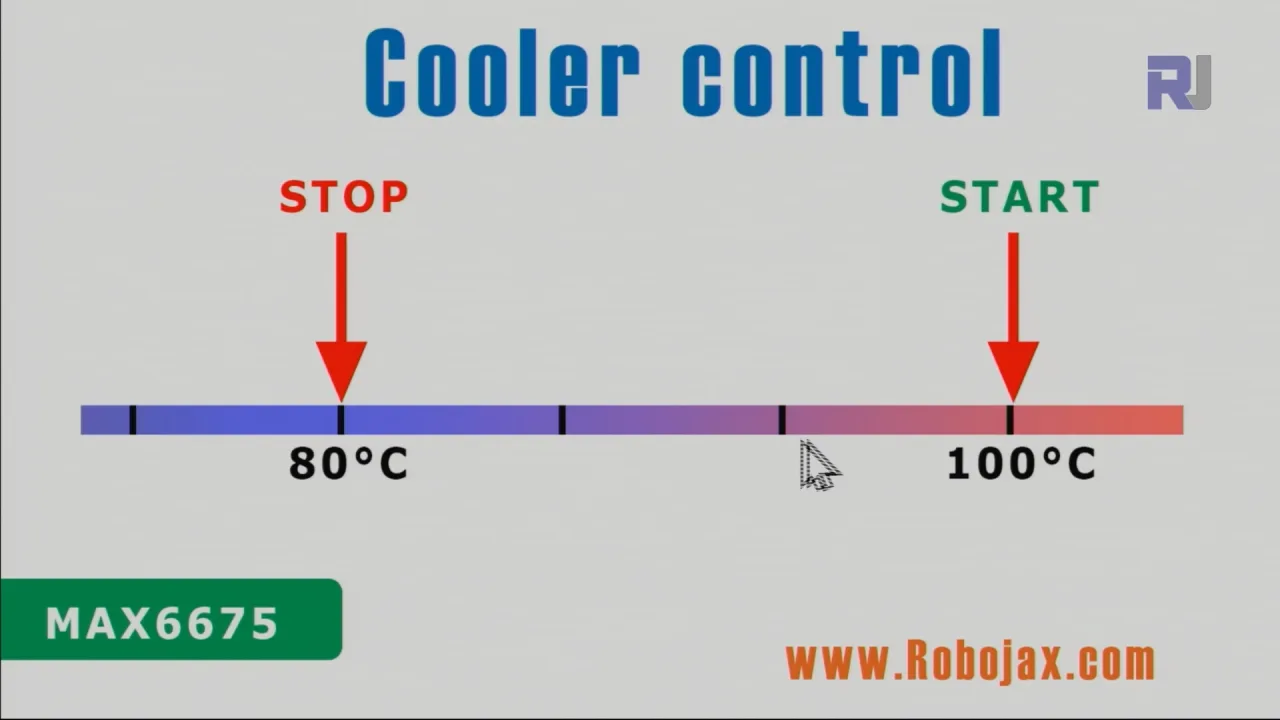
relayPin: Röle modülüne bağlı Arduino pini (varsayılan: 8). (videoda 07:35'te)relayONverelayOFF: Bu sabitler, röleyi sırasıyla açıp kapatmak için mantık seviyelerini tanımlar. Bunlar genellikle LOW ve HIGH'dır, ancak röle modülünüze bağlı olarak ayarlanması gerekebilir. (videoda 07:35'te)TEMPERATURE_UNIT: Sıcaklık okumaları için birimi ayarlar (1 Celsius, 2 Fahrenheit, 3 Kelvin için). (videoda 08:21'de)START_TEMPERATUREveSTOP_TEMPERATURE: Bu değişkenler, kontrol sistemi için sıcaklık aralığını tanımlar. Sistem, sıcaklıkSTART_TEMPERATUREaltına düştüğünde röleyi açar ve sıcaklıkSTOP_TEMPERATUREdeğerine ulaştığında kapatır (veya bir ısıtıcı mı yoksa soğutucu mu kontrol ettiğinize bağlı olarak tam tersi). (videoda 08:31'de)CONTROL_TYPE: Sistemin bir ısıtıcı (1) veya soğutucu (2) olarak hareket edip etmediğini belirleyen bir değişken. (videoda 08:36'da)
Kod, sıcaklık okuma, görüntüleme ve röle işlemini yönetmek için readTemperature(), printTemperature(), loadControl() ve relayControl() gibi işlevler içerir. Bu işlevler videoda açıkça tanımlanmış ve açıklanmıştır. (videoda 09:37, 10:00, 10:43, 11:30'da)
const int relayPin =8;
const int relayON = LOW;// do not change
const int relayOFF = HIGH; //do not change
int relayState = relayOFF;//initial state of relay

const int TEMPERATURE_UNIT =1;//1=Celsius, 2=Fahrenheit, 3=Kelvin
const float START_TEMPERATURE = 80.0;//unit above
const float STOP_TEMPERATURE = 100.0;//unit above
const int CONTROL_TYPE = 1;// 1= heater, 2=cooler
Canlı Proje/Gösterim
Video, hem ısıtma hem de soğutma senaryoları için sıcaklık kontrol sisteminin çalışmasını göstermektedir. (videoda 13:15 ve 15:28'de) Gösterim, sistemin röleyi gerektiği gibi açıp kapatarak sıcaklığı ayarlanan aralıkta nasıl tuttuğunu açıkça gösterir.
Bölümler
- [00:00] Giriş
- [00:55] Isıtıcı/Soğutucu Kontrol Açıklaması
- [03:28] Bağlantı Şeması
- [06:26] Kod Açıklaması
- [13:15] Isıtıcı Kontrol Gösterimi
- [15:28] Soğutucu Kontrol Gösterimi
- [17:29] Sonuç
Görseller
/*
 * This is the Arduino code for MAX6675 Thermocouple K-Type with Relay and Display
 * The output pin 10 is connected to the relay.
 * When the temperature reaches the desired value, pin 10 turns the
 * relay ON.

 * This code has been explained in our video at https://youtu.be/cD5oOu4N_AE

 *
 * Written by Ahmad Nejrabi for Robojax Video
 * Date: December 9, 2017, in Ajax, Ontario, Canada
 * Permission granted to share this code given that this
 * note is kept with the code.
 * Disclaimer: This code is "AS IS" and for educational purposes only.
 *
 */

 // This example is public domain. Enjoy!
// www.ladyada.net/learn/sensors/thermocouple

#include "max6675.h"


int thermoDO = 4;
int thermoCS = 5;
int thermoCLK = 6;


MAX6675 thermocouple(thermoCLK, thermoCS, thermoDO);
int vccPin = 3;
int gndPin = 2;

void setup() {
  Serial.begin(9600);
  // Use Arduino pins
  pinMode(vccPin, OUTPUT); digitalWrite(vccPin, HIGH);
  pinMode(gndPin, OUTPUT); digitalWrite(gndPin, LOW);
    pinMode(10, OUTPUT);// set pin 10 as output

  Serial.println("Robojax: MAX6675 test");
  // wait for MAX chip to stabilize
  delay(500);
}

void loop() {
  // basic readout test, just print the current temp


   Serial.print("C = ");
   Serial.println(thermocouple.readCelsius());
   Serial.print("F = ");
   Serial.println(thermocouple.readFahrenheit());

   // If temperature goes above 80.0C, turn the relay ON
   if(thermocouple.readCelsius() > 80.00){
    digitalWrite(10, LOW);// set pin 10 LOW
   }else{
    digitalWrite(10, HIGH);// set pin 10 HIGH
   }


   delay(1000);
}++
/*
* Library from: // www.ladyada.net/learn/sensors/thermocouple
*
* This is Arduino code to measure MAX6675 Thermocouple K-Type sensor
* and control relay as heater or cooler
*
* Watch Video instruction for this code: https://youtu.be/dVh77wT-4Ao
*
* Written by Ahmad Shamshiri on May 20, 2020 in Ajax, Ontario, Canada
* www.robojax.com
*
* Get this code and other Arduino codes from Robojax.com.
* Learn Arduino step by step in a structured course with all material, wiring diagrams, and libraries
* all in one place. Purchase My course on Udemy.com http://robojax.com/L/?id=62
*
* If you found this tutorial helpful, please support me so I can continue creating
* content like this.
*
* or make a donation using PayPal http://robojax.com/L/?id=64
* Related videos:
* Introduction to MAX6675 K-Type: https://youtu.be/VGqONmUinqA
* Using MAX6675 K-Type thermocouple with LED display: https://youtu.be/cD5oOu4N_AE
* Using MAX6675 K-Type thermocouple with LCD1602-I2C: https://youtu.be/BlhpktgPdKs
* Using 2 or more MAX6675 K-Type thermocouples: https://youtu.be/c90NszbNG8c
* Using MAX6675 K-Type thermocouple as heater or cooler controller: [this video]
* * This code is "AS IS" without warranty or liability. Free to be used as long as you keep this note intact.*
* This code has been downloaded from Robojax.com
* This program is free software: you can redistribute it and/or modify
* it under the terms of the GNU General Public License as published by
* the Free Software Foundation, either version 3 of the License, or
* (at your option) any later version.
*
* This program is distributed in the hope that it will be useful,
* but WITHOUT ANY WARRANTY; without even the implied warranty of
* MERCHANTABILITY or FITNESS FOR A PARTICULAR PURPOSE. See the
* GNU General Public License for more details.
*
* You should have received a copy of the GNU General Public License
* along with this program. If not, see <https://www.gnu.org/licenses/>.
*/
#include "max6675.h"
// Robojax.com heater/cooler with MAX6675 Thermocoupler
int GNDpin = 2;
int VCCpin =3;
int thermoCLK = 4;
int thermoCS = 5;
int thermoDO = 6;
MAX6675 thermocouple(thermoCLK, thermoCS, thermoDO);
const int relayPin =8;
const int relayON = LOW; // do not change
const int relayOFF = HIGH; // do not change
int relayState = relayOFF; // initial state of relay
const int TEMPERATURE_UNIT =1; // 1=Celsius, 2=Fahrenheit, 3=Kelvin
const float START_TEMPERATURE = 80.0; // unit above
const float STOP_TEMPERATURE = 100.0; // unit above
const int CONTROL_TYPE = 1; // 1= heater, 2=cooler
float temperature;
void setup() {
// Robojax.com heater/cooler with MAX6675 Thermocoupler
Serial.begin(9600);
Serial.println("MAX6675 test with relay");
// use Arduino pins
pinMode(relayPin, OUTPUT); // pin for relay
digitalWrite(relayPin, relayState);
pinMode(VCCpin, OUTPUT);
digitalWrite(VCCpin, HIGH);
pinMode(GNDpin, OUTPUT);
digitalWrite(GNDpin, LOW);
// wait for MAX chip to stabilize
delay(500);
// Robojax.com heater/cooler with MAX6675 Thermocoupler
}
void loop() {
// Robojax.com heater/cooler with MAX6675 Thermocoupler
readTemperature();
printTemperature();
loadControl();
if(temperature >=89.5)
{
// /
}
delay(1000);
// Robojax.com heater/cooler with MAX6675 Thermocoupler
} // loop
/*
* loadControl()
* @brief controls the load based
* @param state can be either : relayON or relayOFF
* @return returns none
* Written by Ahmad Shamshiri for robojax.com
* on May 20, 2020 at 15:23 in Ajax, Ontario, Canada
*/
void loadControl()
{
// Robojax.com heater/cooler with MAX6675 Thermocoupler
// Serial.print("Start: ");
// Serial.print(START_TEMPERATURE);
// Serial.print(" Stop: ");
// Serial.println(STOP_TEMPERATURE);
if(CONTROL_TYPE ==1)
{
if(START_TEMPERATURE >= temperature && STOP_TEMPERATURE >=temperature)
{
relayControl(relayON);
}
if(STOP_TEMPERATURE <=temperature)
{
relayControl(relayOFF);
}
}else{
if(START_TEMPERATURE >= temperature && STOP_TEMPERATURE >=temperature)
{
relayControl(relayOFF);
}
if(STOP_TEMPERATURE <=temperature)
{
relayControl(relayON);
}
}
// Robojax.com heater/cooler with MAX6675 Thermocoupler
} // loadControl()
/*
* relayControl(int state))
* @brief turns the relay ON or OFF
* @param state is "relayON" or "relayOFF" defined at the top of code
* @return returns none
* Written by Ahmad Shamshiri for robojax.com
* on May 20, 2020 at 15:23 in Ajax, Ontario, Canada
*/
void relayControl(int state)
{
// Robojax.com heater/cooler with MAX6675 Thermocoupler
if(state ==relayON)
{
digitalWrite(relayPin, relayON);
Serial.println("Relay ON");
}else{
digitalWrite(relayPin, relayOFF);
Serial.println("Relay OFF");
}
// Robojax.com heater/cooler with MAX6675 Thermocoupler
} // relayControl()
/*
* readTemperature()
* @brief reads the temperature based on the TEMPERATURE_UNIT
* @param average temperature
* @return returns one of the values above
* Written by Ahmad Shamshiri for robojax.com
* on May 20, 2020 at 15:23 in Ajax, Ontario, Canada
*/
void readTemperature()
{
// Robojax.com heater/cooler with MAX6675 Thermocoupler
if(TEMPERATURE_UNIT ==2)
{
temperature = thermocouple.readFahrenheit(); // convert to Fahrenheit
}else if(TEMPERATURE_UNIT ==3)
{
temperature = thermocouple.readCelsius() + 273.15; // convert to Kelvin
}else{
temperature = thermocouple.readCelsius(); // return Celsius
}
// Robojax.com heater/cooler with MAX6675 Thermocoupler
} // readTemperature()
/*
* printTemperature()
* @brief prints temperature on serial monitor
* @param charact type
* @param "type" is character
* C = Celsius
* K = Kelvin
* F = Fahrenheit
* @return none
* Written by Ahmad Shamshiri for robojax.com
* on May 08, 2020 at 02:45 in Ajax, Ontario, Canada
*/
void printTemperature()
{
// Robojax.com heater/cooler with MAX6675 Thermocoupler
Serial.print(temperature);
printDegree();
if(TEMPERATURE_UNIT ==2)
{
Serial.print("F");
}else if(TEMPERATURE_UNIT ==3)
{
Serial.print("K");
}else{
Serial.print("C");
}
Serial.println();
// Robojax.com heater/cooler with MAX6675 Thermocoupler
} // printTemperature()
/*
* @brief prints degree symbol on serial monitor
* @param none
* @return returns nothing
* Written by Ahmad Shamshiri on July 13, 2019
* for Robojax Tutorial Robojax.com
*/
void printDegree()
{
Serial.print("\\xC2");
Serial.print("\\xB0");
}
İhtiyacın olabileceğini düşünüyor
-
eBay
-
AliExpressPurchase 1 channel 5V KY-019 relay from AliExpresss.click.aliexpress.com
-
BanggoodPurchase MAX6675 K-Type from Banggoodbanggood.com
Kaynaklar ve referanslar
-
DışMAX6675 datasheet (PDF)datasheets.maximintegrated.com
Dosyalar📁
Dosya mevcut değil.


![SABRENT USB to RS-232 DB9 Serial 9 pin Adapter Prolific PL2303 1-ft [SBT-USC1K]](https://i.ebayimg.com/images/g/ppYAAOSwze5l7xBy/s-l225.jpg)