Somo la 47: Kutumia K-Type MAX6675 kama thermostat na relay | Kozi ya Arduino Hatua kwa Hatua
Mradi huu unakuongoza katika kujenga mfumo wa kudhibiti halijoto kwa kutumia Arduino, thermocouple ya MAX6675 K-type, na relay. Mfumo huu unaweza kudumisha kiwango cha halijoto unachotaka, na kuufanya ufae kwa matumizi mbalimbali. Unaweza kutumia hii kujenga:
- Incubator inayodhibitiwa na halijoto kwa majaribio nyeti au miche ya mimea.
- Mfumo wa kutengeneza pombe kiotomatiki kwa kudumisha halijoto thabiti ya wort.
- Eneo lenye hali ya hewa inayodhibitiwa kwa wanyama watambaao au wanyama wengine nyeti kwa halijoto.
- Mfumo rahisi wa kupasha joto au kupoza kwa nafasi ndogo.
-
robojax_course_47_MAX6675_temperature-0
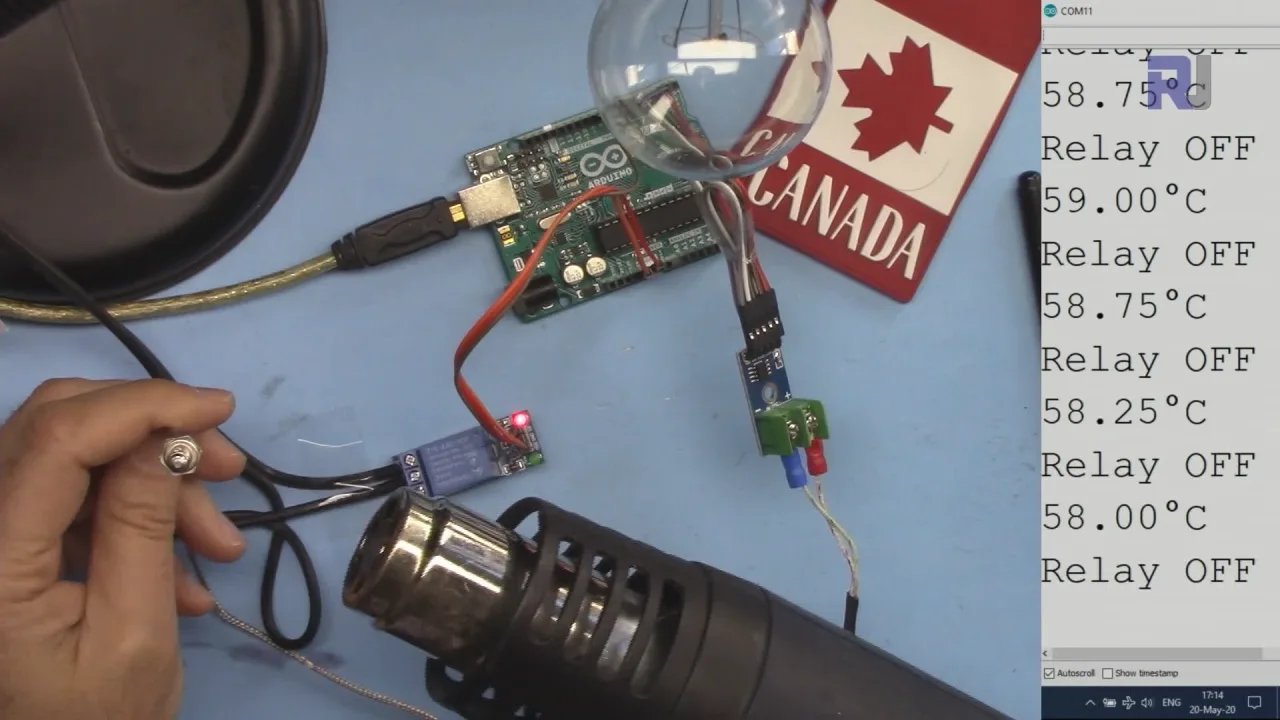
Mfumo hutumia MAX6675 kusoma halijoto kutoka kwenye thermocouple ya K-type, ikitoa usomaji sahihi wa halijoto katika anuwai pana (kulingana na aina ya thermocouple, hadi 1000°C au zaidi). Arduino huchakata usomaji huu na kudhibiti relay kuwasha au kuzima kipengele cha kupasha joto au kupoza, kikidumisha halijoto ndani ya kiwango kilichobainishwa na mtumiaji. (katika video saa 00:32)
Vifaa/Sehemu
Ili kujenga mradi huu, utahitaji vifaa vifuatavyo:
- Bodi ya Arduino (Uno, Nano, n.k.)
- Kikuza cha thermocouple MAX6675
- Thermocouple ya K-type
- Moduli ya relay
- Bulbu ya AC (au mzigo mwingine, kama shabiki au hita)
- Waya za kurukia
- Breadboard (si lazima, lakini inapendekezwa)
Mwongozo wa Uunganishaji
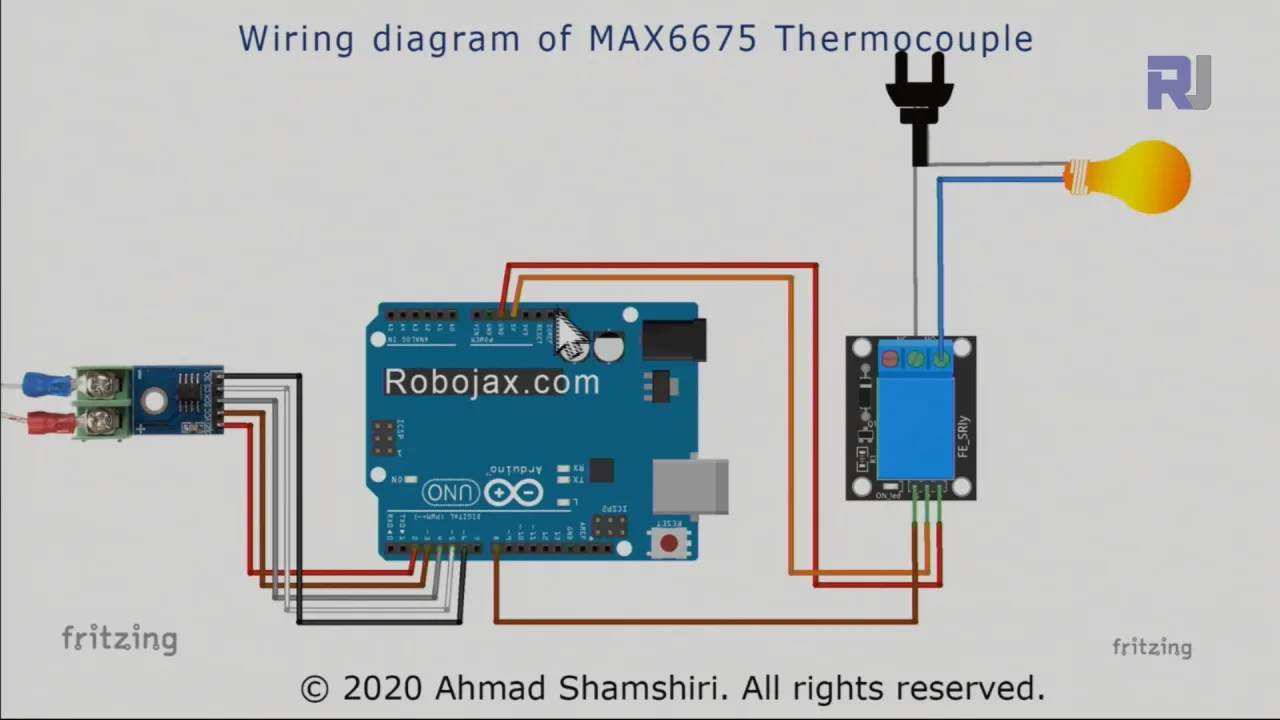
Uunganishaji umeelezewa kwa kina katika video. (katika video saa 03:28) Rejea video kwa mwongozo wa kuona. Uunganisho muhimu unajumuisha kuunganisha MAX6675 kwenye Arduino (pini 2-6), moduli ya relay kwenye Arduino (pini 8 na nguvu), na moduli ya relay kwenye mzigo wa AC. Kipengele muhimu ni kutambua kwa usahihi waya za live na neutral za mzigo wako wa AC kabla ya kuziunganisha kwenye relay. Uunganishaji usio sahihi unaweza kusababisha hatari.
Maelezo ya Msimbo
Msimbo wa Arduino (unaoonyeshwa katika sehemu hapa chini) hutumia maktaba ya MAX6675 kusoma thamani za halijoto kutoka kwenye thermocouple. Sehemu zinazoweza kubadilishwa na mtumiaji za msimbo ni:
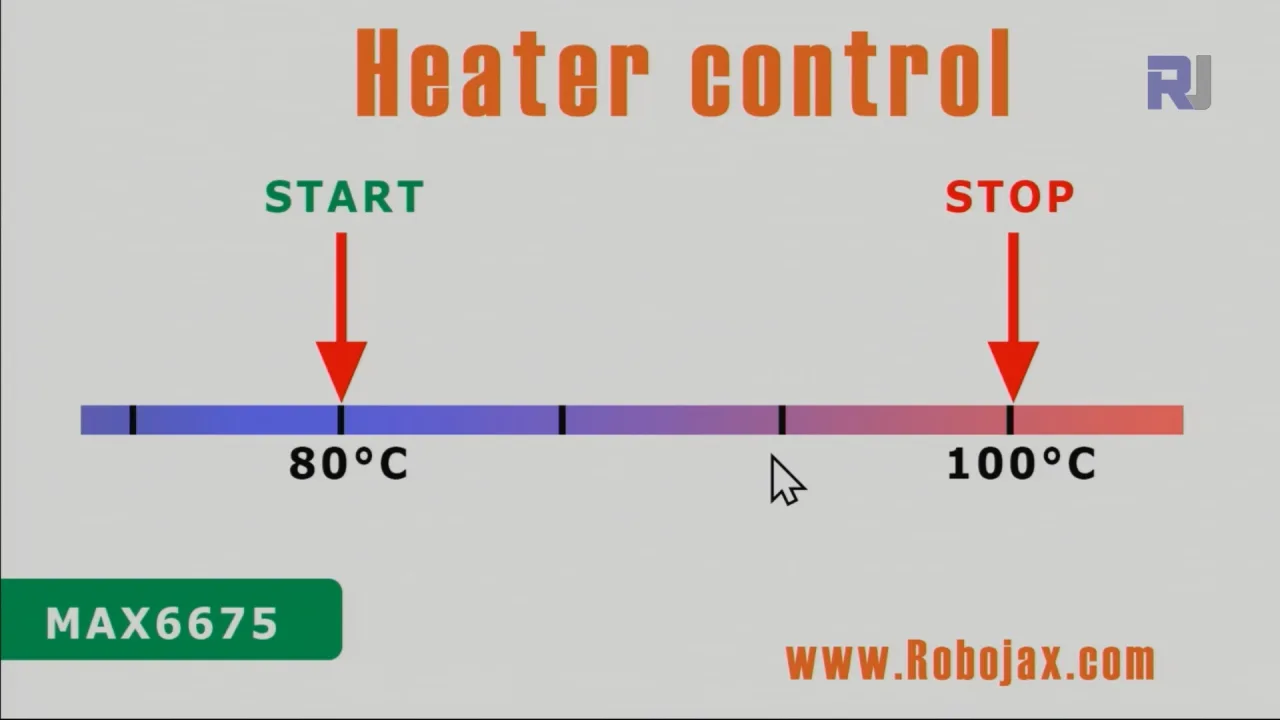
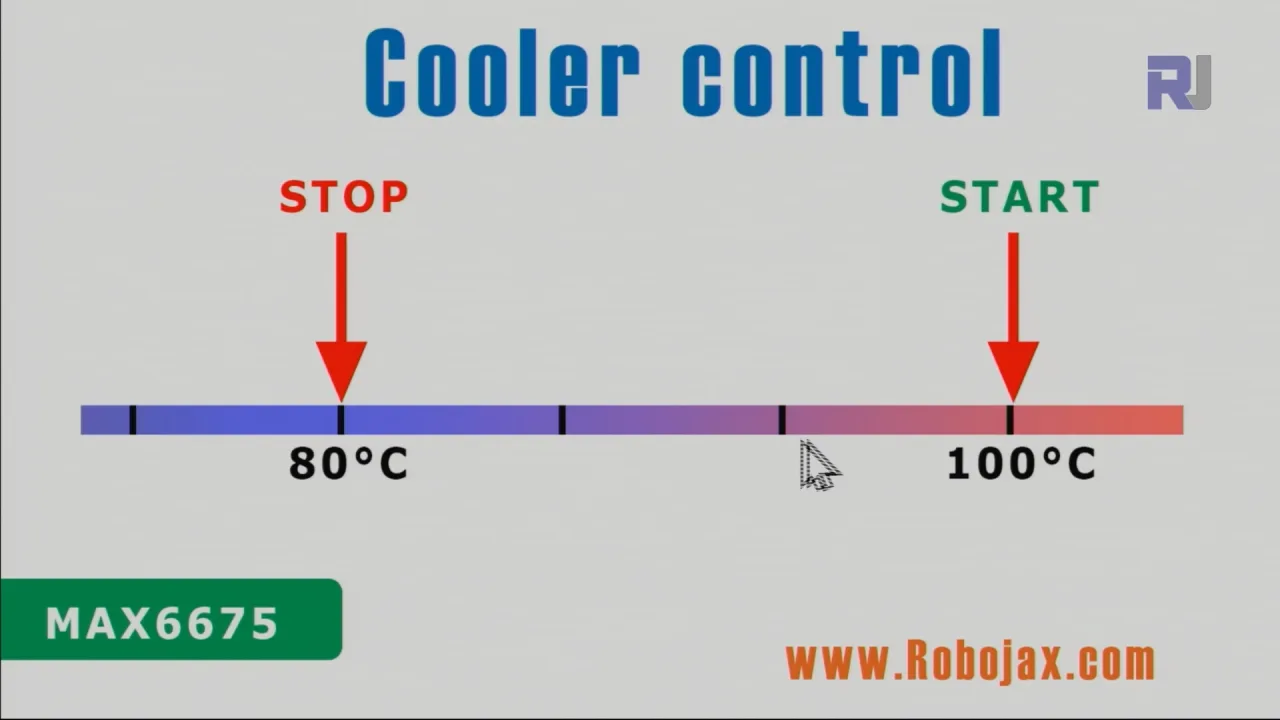
relayPin: Pini ya Arduino iliyounganishwa kwenye moduli ya relay (chaguo-msingi: 8). (katika video saa 07:35)relayONnarelayOFF: Viwango hivi vinafafanua viwango vya mantiki kuwasha na kuzima relay, mtawalia. Kwa kawaida ni LOW na HIGH, lakini vinaweza kuhitaji kubadilishwa kulingana na moduli yako ya relay. (katika video saa 07:35)TEMPERATURE_UNIT: Huweka kitengo cha usomaji wa halijoto (1 kwa Selsiasi, 2 kwa Fahrenheit, 3 kwa Kelvin). (katika video saa 08:21)START_TEMPERATUREnaSTOP_TEMPERATURE: Vigezo hivi vinafafanua kiwango cha halijoto kwa mfumo wa udhibiti. Mfumo utawasha relay wakati halijoto inaposhuka chini yaSTART_TEMPERATUREna kuizima wakati halijoto inapofikiaSTOP_TEMPERATURE(au kinyume chake, kulingana na kama unadhibiti hita au kipoza). (katika video saa 08:31)CONTROL_TYPE: Kigezo kinachoamua kama mfumo hufanya kazi kama hita (1) au kipoza (2). (katika video saa 08:36)
Msimbo unajumuisha kazi kama readTemperature(), printTemperature(), loadControl(), na relayControl() kushughulikia usomaji wa halijoto, uonyeshaji, na uendeshaji wa relay. Kazi hizi zimefafanuliwa wazi na kuelezewa katika video. (katika video saa 09:37, 10:00, 10:43, 11:30)
const int relayPin =8;
const int relayON = LOW;// do not change
const int relayOFF = HIGH; //do not change
int relayState = relayOFF;//initial state of relay

const int TEMPERATURE_UNIT =1;//1=Celsius, 2=Fahrenheit, 3=Kelvin
const float START_TEMPERATURE = 80.0;//unit above
const float STOP_TEMPERATURE = 100.0;//unit above
const int CONTROL_TYPE = 1;// 1= heater, 2=cooler
Mradi wa Moja kwa Moja/Maonyesho
Video inaonyesha utendaji wa mfumo wa kudhibiti halijoto kwa hali zote za kupasha joto na kupoza. (katika video saa 13:15 na 15:28) Maonyesho yanaonyesha wazi jinsi mfumo unavyodumisha halijoto ndani ya kiwango kilichowekwa kwa kuwasha na kuzima relay inavyohitajika.
Sura
- [00:00] Utangulizi
- [00:55] Maelezo ya Udhibiti wa Hita/Kipoza
- [03:28] Mchoro wa Uunganishaji
- [06:26] Maelezo ya Msimbo
- [13:15] Maonyesho ya Udhibiti wa Hita
- [15:28] Maonyesho ya Udhibiti wa Kipoza
- [17:29] Hitimisho
Bilder
/*
 * This is the Arduino code for MAX6675 Thermocouple K-Type with Relay and Display
 * The output pin 10 is connected to the relay.
 * When the temperature reaches the desired value, pin 10 turns the
 * relay ON.

 * This code has been explained in our video at https://youtu.be/cD5oOu4N_AE

 *
 * Written by Ahmad Nejrabi for Robojax Video
 * Date: December 9, 2017, in Ajax, Ontario, Canada
 * Permission granted to share this code given that this
 * note is kept with the code.
 * Disclaimer: This code is "AS IS" and for educational purposes only.
 *
 */

 // This example is public domain. Enjoy!
// www.ladyada.net/learn/sensors/thermocouple

#include "max6675.h"


int thermoDO = 4;
int thermoCS = 5;
int thermoCLK = 6;


MAX6675 thermocouple(thermoCLK, thermoCS, thermoDO);
int vccPin = 3;
int gndPin = 2;

void setup() {
  Serial.begin(9600);
  // Use Arduino pins
  pinMode(vccPin, OUTPUT); digitalWrite(vccPin, HIGH);
  pinMode(gndPin, OUTPUT); digitalWrite(gndPin, LOW);
    pinMode(10, OUTPUT);// set pin 10 as output

  Serial.println("Robojax: MAX6675 test");
  // wait for MAX chip to stabilize
  delay(500);
}

void loop() {
  // basic readout test, just print the current temp


   Serial.print("C = ");
   Serial.println(thermocouple.readCelsius());
   Serial.print("F = ");
   Serial.println(thermocouple.readFahrenheit());

   // If temperature goes above 80.0C, turn the relay ON
   if(thermocouple.readCelsius() > 80.00){
    digitalWrite(10, LOW);// set pin 10 LOW
   }else{
    digitalWrite(10, HIGH);// set pin 10 HIGH
   }


   delay(1000);
}++
/*
* Library from: // www.ladyada.net/learn/sensors/thermocouple
*
* This is Arduino code to measure MAX6675 Thermocouple K-Type sensor
* and control relay as heater or cooler
*
* Watch Video instruction for this code: https://youtu.be/dVh77wT-4Ao
*
* Written by Ahmad Shamshiri on May 20, 2020 in Ajax, Ontario, Canada
* www.robojax.com
*
* Get this code and other Arduino codes from Robojax.com.
Learn Arduino step by step in a structured course with all material, wiring diagrams, and libraries
all in one place. Purchase My course on Udemy.com http://robojax.com/L/?id=62
If you found this tutorial helpful, please support me so I can continue creating
content like this.
or make a donation using PayPal http://robojax.com/L/?id=64
Related videos:
Introduction to MAX6675 K-Type: https://youtu.be/VGqONmUinqA
Using MAX6675 K-Type thermocouple with LED display: https://youtu.be/cD5oOu4N_AE
Using MAX6675 K-Type thermocouple with LCD1602-I2C: https://youtu.be/BlhpktgPdKs
Using 2 or more MAX6675 K-Type thermocouples: https://youtu.be/c90NszbNG8c
Using MAX6675 K-Type thermocouple as heater or cooler controller: [this video]
* * This code is "AS IS" without warranty or liability. Free to be used as long as you keep this note intact.*
* This code has been downloaded from Robojax.com
This program is free software: you can redistribute it and/or modify
it under the terms of the GNU General Public License as published by
the Free Software Foundation, either version 3 of the License, or
(at your option) any later version.
This program is distributed in the hope that it will be useful,
but WITHOUT ANY WARRANTY; without even the implied warranty of
MERCHANTABILITY or FITNESS FOR A PARTICULAR PURPOSE. See the
GNU General Public License for more details.
You should have received a copy of the GNU General Public License
along with this program. If not, see <https://www.gnu.org/licenses/>.
*/
#include "max6675.h"
//Robojax.com heater/cooler with MAX6675 Thermocoupler
int GNDpin = 2;
int VCCpin =3;
int thermoCLK = 4;
int thermoCS = 5;
int thermoDO = 6;
MAX6675 thermocouple(thermoCLK, thermoCS, thermoDO);
const int relayPin =8;
const int relayON = LOW;// do not change
const int relayOFF = HIGH; //do not change
int relayState = relayOFF;//initial state of relay
const int TEMPERATURE_UNIT =1;//1=Celsius, 2=Fahrenheit, 3=Kelvin
const float START_TEMPERATURE = 80.0;//unit above
const float STOP_TEMPERATURE = 100.0;//unit above
const int CONTROL_TYPE = 1;// 1= heater, 2=cooler
float temperature;
void setup() {
//Robojax.com heater/cooler with MAX6675 Thermocoupler
Serial.begin(9600);
Serial.println("MAX6675 test with relay");
// use Arduino pins
pinMode(relayPin, OUTPUT);//pin for relay
digitalWrite(relayPin, relayState);
pinMode(VCCpin, OUTPUT);
digitalWrite(VCCpin, HIGH);
pinMode(GNDpin, OUTPUT);
digitalWrite(GNDpin, LOW);
// wait for MAX chip to stabilize
delay(500);
//Robojax.com heater/cooler with MAX6675 Thermocoupler
}
void loop() {
//Robojax.com heater/cooler with MAX6675 Thermocoupler
readTemperature();
printTemperature();
loadControl();
if(temperature >=89.5)
{
///
}
delay(1000);
//Robojax.com heater/cooler with MAX6675 Thermocoupler
}//loop
/*
* loadControl()
* @brief controls the load based
* @param state can be either : relayON or relayOFF
* @return returns none
* Written by Ahmad Shamshiri for robojax.com
* on May 20, 2020 at 15:23 in Ajax, Ontario, Canada
*/
void loadControl()
{
//Robojax.com heater/cooler with MAX6675 Thermocoupler
// Serial.print("Start: ");
// Serial.print(START_TEMPERATURE);
// Serial.print(" Stop: ");
//Serial.println(STOP_TEMPERATURE);
if(CONTROL_TYPE ==1)
{
if(START_TEMPERATURE >= temperature && STOP_TEMPERATURE >=temperature)
{
relayControl(relayON);
}
if(STOP_TEMPERATURE <=temperature)
{
relayControl(relayOFF);
}
}else{
if(START_TEMPERATURE >= temperature && STOP_TEMPERATURE >=temperature)
{
relayControl(relayOFF);
}
if(STOP_TEMPERATURE <=temperature)
{
relayControl(relayON);
}
}
//Robojax.com heater/cooler with MAX6675 Thermocoupler
}//loadControl()
/*
* relayControl(int state))
* @brief turns the relay ON or OFF
* @param state is "relayON" or "relayOFF" defined at the top of code
* @return returns none
* Written by Ahmad Shamshiri for robojax.com
* on May 20, 2020 at 15:23 in Ajax, Ontario, Canada
*/
void relayControl(int state)
{
//Robojax.com heater/cooler with MAX6675 Thermocoupler
if(state ==relayON)
{
digitalWrite(relayPin, relayON);
Serial.println("Relay ON");
}else{
digitalWrite(relayPin, relayOFF);
Serial.println("Relay OFF");
}
//Robojax.com heater/cooler with MAX6675 Thermocoupler
}//relayControl()
/*
* readTemperature()
* @brief reads the temperature based on the TEMPERATURE_UNIT
* @param average temperature
* @return returns one of the values above
* Written by Ahmad Shamshiri for robojax.com
* on May 20, 2020 at 15:23 in Ajax, Ontario, Canada
*/
void readTemperature()
{
//Robojax.com heater/cooler with MAX6675 Thermocoupler
if(TEMPERATURE_UNIT ==2)
{
temperature = thermocouple.readFahrenheit();//convert to Fahrenheit
}else if(TEMPERATURE_UNIT ==3)
{
temperature = thermocouple.readCelsius() + 273.15;//convert to Kelvin
}else{
temperature = thermocouple.readCelsius();// return Celsius
}
//Robojax.com heater/cooler with MAX6675 Thermocoupler
}// readTemperature()
/*
* printTemperature()
* @brief prints temperature on serial monitor
* @param charact type
* @param "type" is character
* C = Celsius
* K = Kelvin
* F = Fahrenheit
* @return none
* Written by Ahmad Shamshiri for robojax.com
* on May 08, 2020 at 02:45 in Ajax, Ontario, Canada
*/
void printTemperature()
{
//Robojax.com heater/cooler with MAX6675 Thermocoupler
Serial.print(temperature);
printDegree();
if(TEMPERATURE_UNIT ==2)
{
Serial.print("F");
}else if(TEMPERATURE_UNIT ==3)
{
Serial.print("K");
}else{
Serial.print("C");
}
Serial.println();
//Robojax.com heater/cooler with MAX6675 Thermocoupler
}//printTemperature()
/*
* @brief prints degree symbol on serial monitor
* @param none
* @return returns nothing
* Written by Ahmad Shamshiri on July 13, 2019
* for Robojax Tutorial Robojax.com
*/
void printDegree()
{
Serial.print("\\xC2");
Serial.print("\\xB0");
}Tänker att du kanske behöver
-
eBay
-
AliExpressPurchase 1 channel 5V KY-019 relay from AliExpresss.click.aliexpress.com
-
BanggoodPurchase MAX6675 K-Type from Banggoodbanggood.com
Resurser och referenser
-
Extern.MAX6675 datasheet (PDF)datasheets.maximintegrated.com
Filer📁
Inga filer tillgängliga.