لومړی ۴۷: د K-ډول MAX6675 د ترموسټاټ په توګه د ریلې سره کارول | د آردوینو ګام په ګام کورس
دا پروژه تاسو ته لارښوونه کوي چې څنګه د Arduino، MAX6675 K-ډوله ترموسکوپل، او ریلې په کارولو سره د تودوخې کنټرول سیسټم جوړ کړئ. دا سیسټم کولی شي د تودوخې مطلوب حد وساتي، چې دا د بېلابېلو کارونو لپاره مناسب کوي. تاسو کولی شئ دا د لاندې لپاره وکاروئ:
- د حساسو تجربو یا تخمونو لپاره د تودوخې کنټرول شوی انکیوبیټر.
- د مستقل وورټ تودوخې ساتلو لپاره اتوماتیک شراب جوړونې سیسټم.
- د ریپټیلونو یا نورو تودوخې حساسو ژویو لپاره د اقلیم کنټرول شوی احاطه.
- د کوچني ځای لپاره ساده ګرمونکی یا یخ کوونکی سیسټم.
-
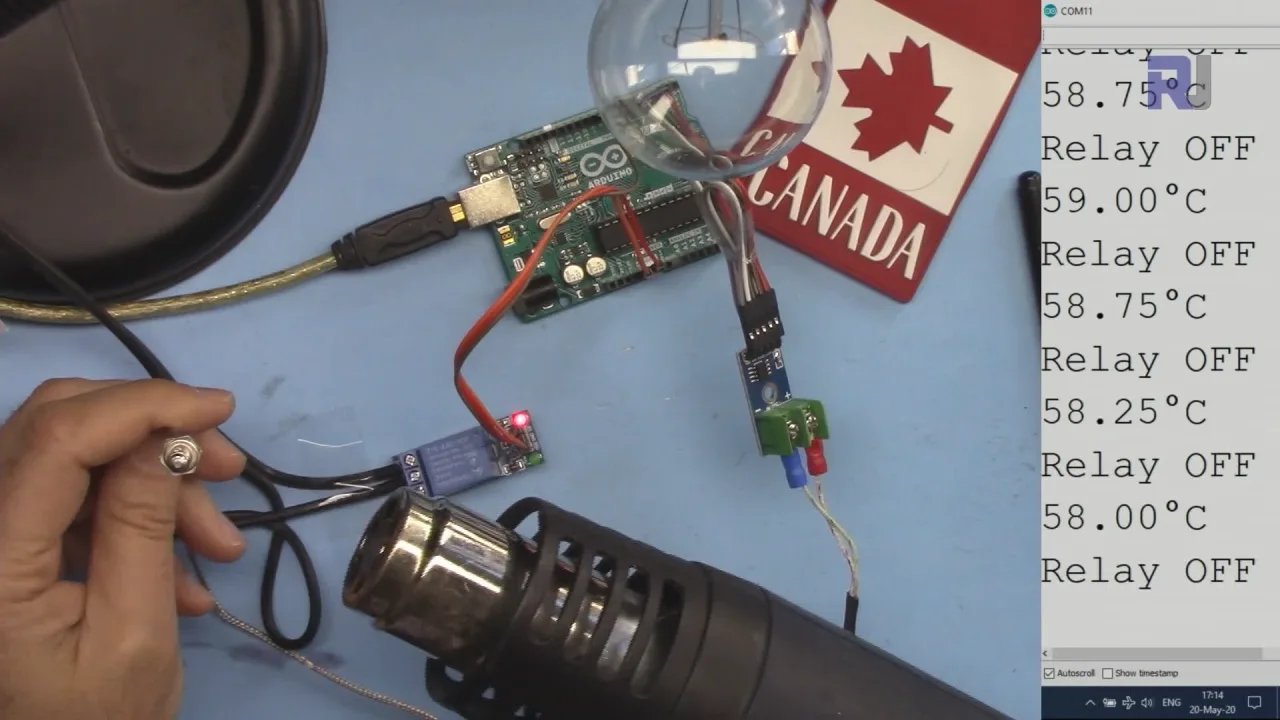
robojax_course_47_MAX6675_temperature-0
سیسټم د K-ډوله ترموسکوپل څخه د تودوخې لوستلو لپاره MAX6675 کاروي، چې په پراخه حد کې دقیق تودوخې لوستل چمتو کوي (د ترموسکوپل ډول پورې اړه لري، تر 1000°C یا ډیر پورې). Arduino دا لوستل پروسس کوي او د ګرمونکي یا یخ کوونکي عنصر د فعال یا غیر فعال کولو لپاره ریلې کنټرولوي، چې تودوخه د کارونکي لخوا ټاکل شوي حد کې ساتي. (په ویډیو کې په 00:32)
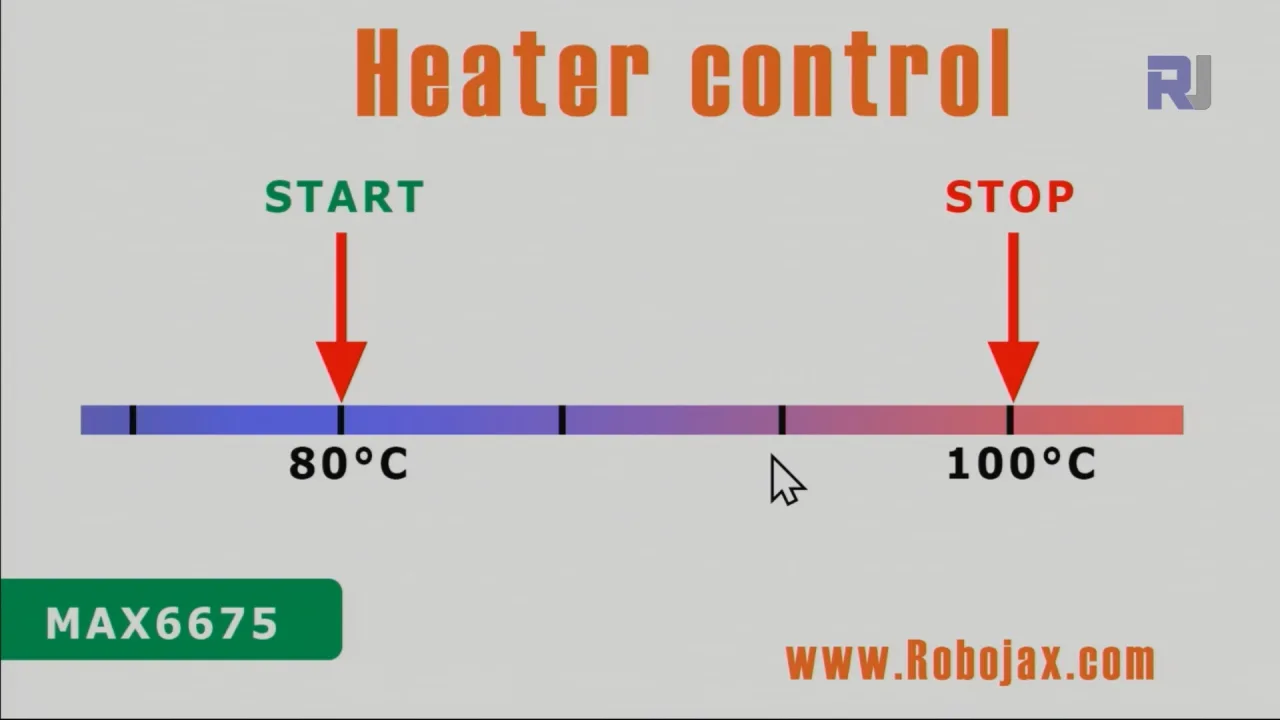
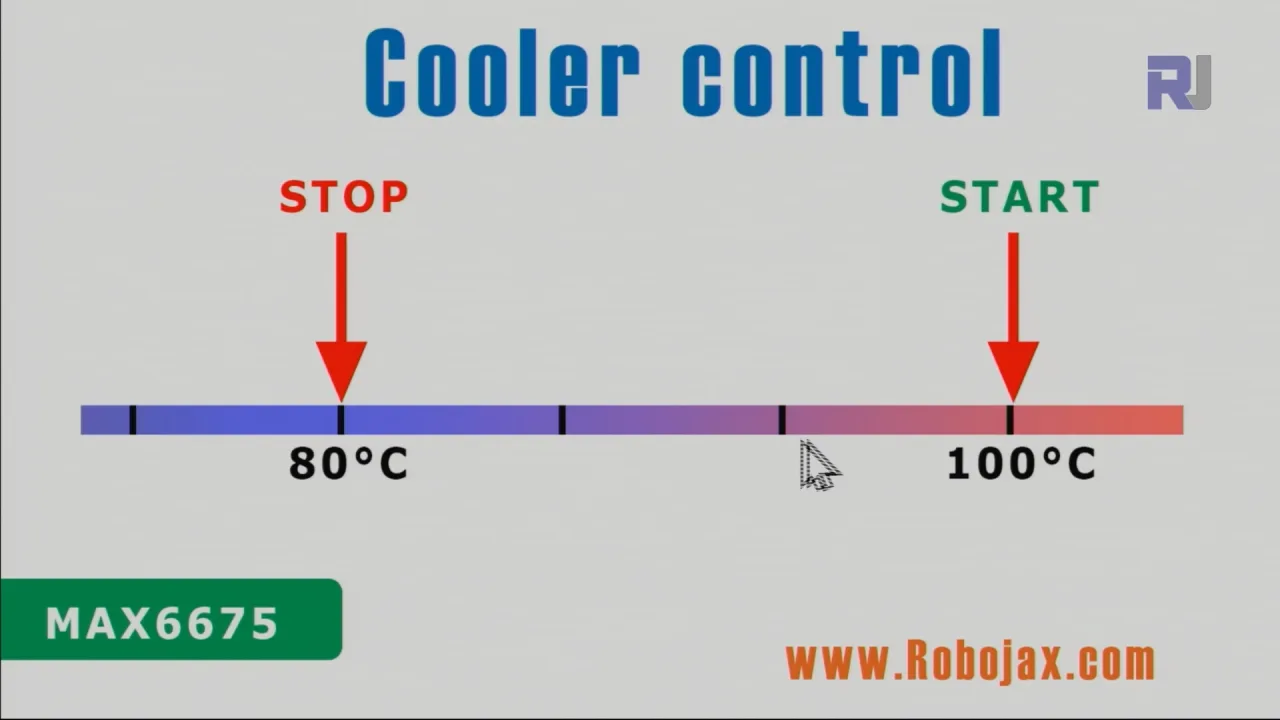
هارډویر/اجزاوې
د دې پروژې د جوړولو لپاره، تاسو به لاندې اجزاوو ته اړتیا ولرئ:
- Arduino بورډ (Uno، Nano، او داسې نور)
- MAX6675 ترموسکوپل امپلیفایر
- K-ډوله ترموسکوپل
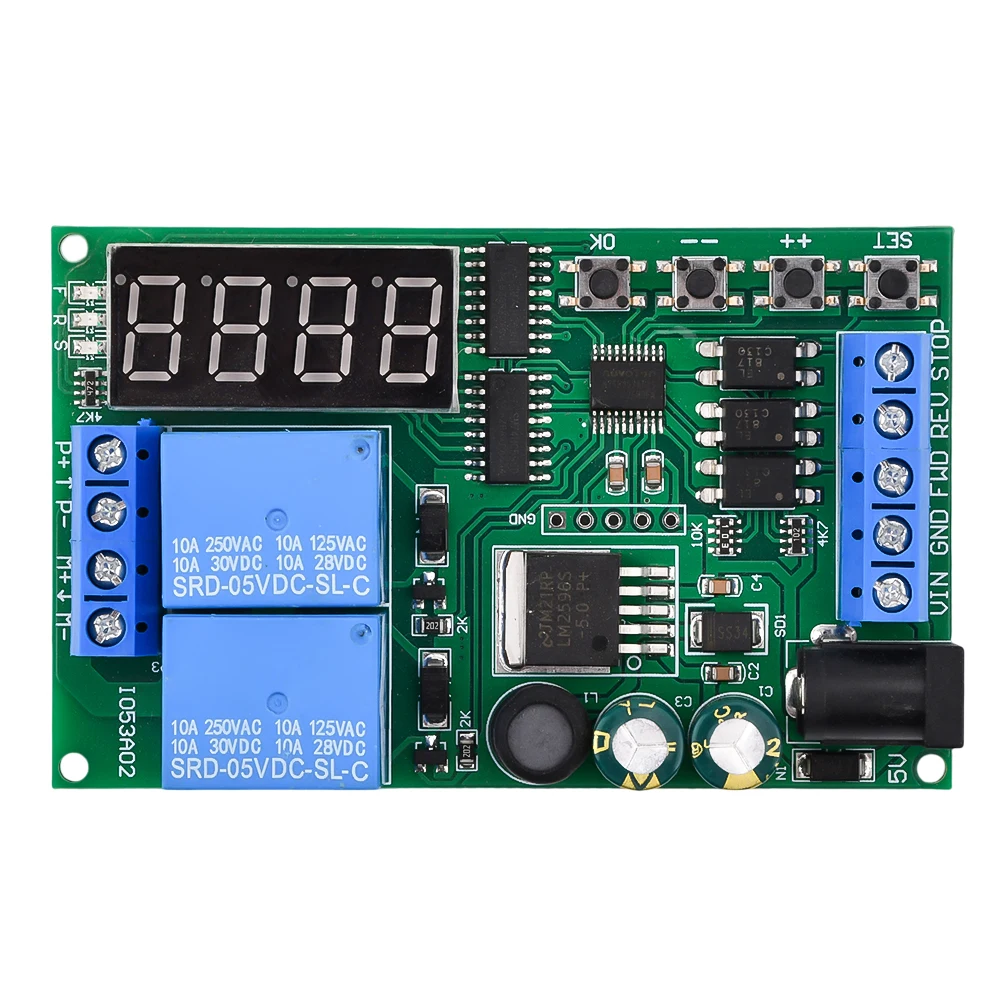
- ریلې ماډل
- AC بلب (یا بل بار، لکه پنکه یا هیټر)
- جمپر تارونه
- بریډبورډ (اختیاري، مګر سپارښت کیږي)
وایرنګ لارښود
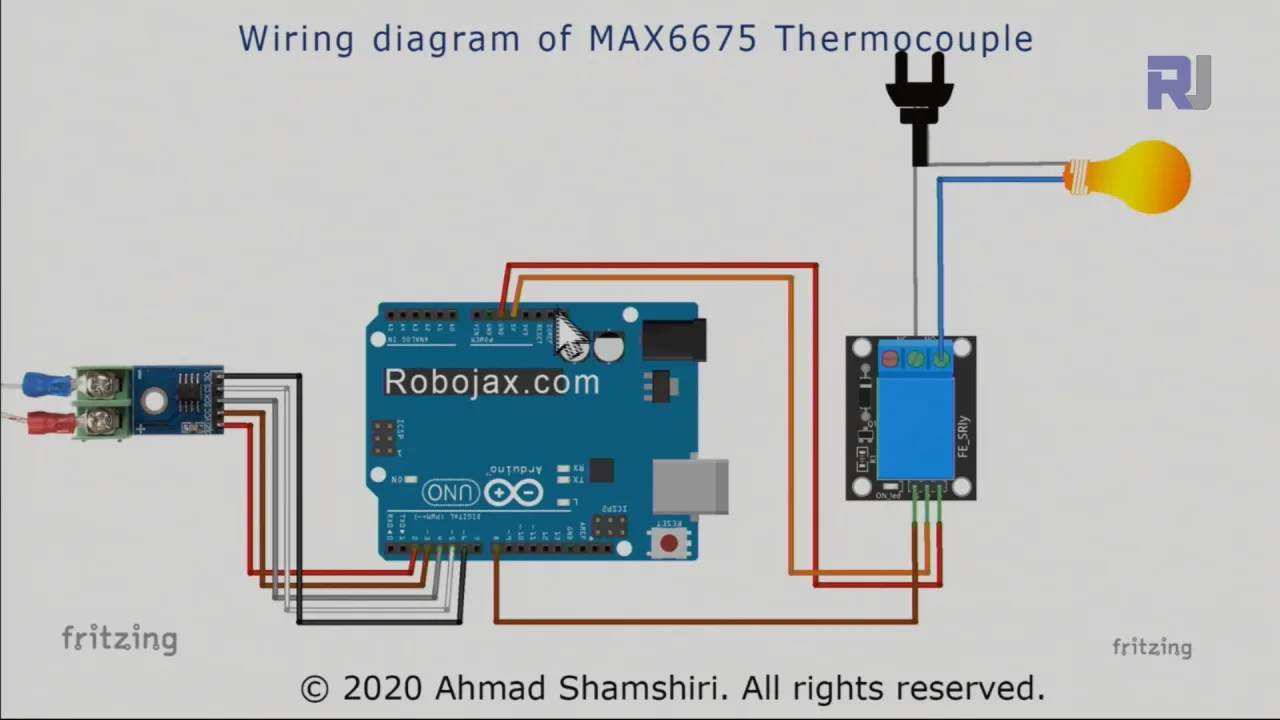
وایرنګ په ویډیو کې په تفصیل سره تشریح شوی دی. (په ویډیو کې په 03:28) د بصري لارښود لپاره ویډیو ته مراجعه وکړئ. کلیدي اړیکې د MAX6675 د Arduino سره نښلول (پنونه 2-6)، د ریلې ماډل د Arduino سره نښلول (پن 8 او بریښنا)، او د ریلې ماډل د AC بار سره نښلول شامل دي. یو مهم اړخ دا دی چې د AC بار د ژوندی او بې طرفه تارونو په سمه توګه پیژندل مخکې له دې چې دوی ریلې سره وصل کړئ. ناسم وایرنګ کولی شي خطرناک حالتونو ته لار هواره کړي.
کوډ تشریح
د Arduino کوډ (لاندې په ټوټو کې ښودل شوی) د ترموسکوپل څخه د تودوخې ارزښتونو لوستلو لپاره د MAX6675 کتابتون کاروي. د کوډ کارونکي-ترتیب وړ برخې دا دي:
relayPin: د Arduino پن چې د ریلې ماډل سره وصل دی (تلوالیز: 8). (په ویډیو کې په 07:35)relayONاوrelayOFF: دا ثابتونه هغه منطقي کچې تعریفوي چې ریلې په ترتیب سره فعال یا غیر فعال کړي. دا معمولا LOW او HIGH دي، مګر ممکن ستاسو د ریلې ماډل پورې اړه ولري چې تنظیم ته اړتیا ولري. (په ویډیو کې په 07:35)TEMPERATURE_UNIT: د تودوخې لوستلو لپاره واحد ټاکي (1 د سیلسیس لپاره، 2 د فارنهایټ لپاره، 3 د کیلوین لپاره). (په ویډیو کې په 08:21)START_TEMPERATUREاوSTOP_TEMPERATURE: دا متغیرونه د کنټرول سیسټم لپاره د تودوخې حد تعریفوي. سیسټم به ریلې فعاله کړي کله چې تودوخه دSTART_TEMPERATUREڅخه ښکته شي او به یې بنده کړي کله چې تودوخهSTOP_TEMPERATUREته ورسیږي (یا برعکس، پدې پورې اړه لري چې تاسو هیټر یا یخ کوونکی کنټرولوئ). (په ویډیو کې په 08:31)CONTROL_TYPE: یو متغیر چې ټاکي چې ایا سیسټم د هیټر (1) یا یخ کوونکي (2) په توګه کار کوي. (په ویډیو کې په 08:36)
کوډ داسې دندې لري لکه readTemperature()، printTemperature()، loadControl()، او relayControl() چې د تودوخې لوستل، ښودل، او د ریلې عملیات اداره کوي. دا دندې په ویډیو کې په روښانه توګه تعریف شوي او تشریح شوي دي. (په ویډیو کې په 09:37، 10:00، 10:43، 11:30)
const int relayPin =8;
const int relayON = LOW;// بدلون مه کوئ
const int relayOFF = HIGH; //بدلون مه کوئ
int relayState = relayOFF;//د ریلې لومړنی حالت

const int TEMPERATURE_UNIT =1;//1=سیلسیس، 2=فارنهایټ، 3=کیلوین
const float START_TEMPERATURE = 80.0;//پورته واحد
const float STOP_TEMPERATURE = 100.0;//پورته واحد
const int CONTROL_TYPE = 1;// 1= هیټر، 2=یخ کوونکی
ژوندی پروژه/مظاهره
ویډیو د ګرمونکي او یخ کوونکي دواړو سناریوګانو لپاره د تودوخې کنټرول سیسټم فعالیت ښیې. (په ویډیو کې په 13:15 او 15:28) مظاهره په روښانه توګه ښیې چې څنګه سیسټم د اړتیا سره سم د ریلې فعال او غیر فعال کولو سره تودوخه په ټاکل شوي حد کې ساتي.
فصلونه
- [00:00] پیژندنه
- [00:55] د هیټر/یخ کوونکي کنټرول تشریح
- [03:28] وایرنګ ډیاګرام
- [06:26] د کوډ تشریح
- [13:15] د هیټر کنټرول مظاهره
- [15:28] د یخ کوونکي کنټرول مظاهره
- [17:29] پایله
Images
/*
 * This is the Arduino code for MAX6675 Thermocouple K-Type with Relay and Display
 * The output pin 10 is connected to the relay.
 * When the temperature reaches the desired value, pin 10 turns the
 * relay ON.

 * This code has been explained in our video at https://youtu.be/cD5oOu4N_AE

 *
 * Written by Ahmad Nejrabi for Robojax Video
 * Date: December 9, 2017, in Ajax, Ontario, Canada
 * Permission granted to share this code given that this
 * note is kept with the code.
 * Disclaimer: This code is "AS IS" and for educational purposes only.
 *
 */

 // This example is public domain. Enjoy!
// www.ladyada.net/learn/sensors/thermocouple

#include "max6675.h"


int thermoDO = 4;
int thermoCS = 5;
int thermoCLK = 6;


MAX6675 thermocouple(thermoCLK, thermoCS, thermoDO);
int vccPin = 3;
int gndPin = 2;

void setup() {
  Serial.begin(9600);
  // Use Arduino pins
  pinMode(vccPin, OUTPUT); digitalWrite(vccPin, HIGH);
  pinMode(gndPin, OUTPUT); digitalWrite(gndPin, LOW);
    pinMode(10, OUTPUT);// set pin 10 as output

  Serial.println("Robojax: MAX6675 test");
  // wait for MAX chip to stabilize
  delay(500);
}

void loop() {
  // basic readout test, just print the current temp


   Serial.print("C = ");
   Serial.println(thermocouple.readCelsius());
   Serial.print("F = ");
   Serial.println(thermocouple.readFahrenheit());

   // If temperature goes above 80.0C, turn the relay ON
   if(thermocouple.readCelsius() > 80.00){
    digitalWrite(10, LOW);// set pin 10 LOW
   }else{
    digitalWrite(10, HIGH);// set pin 10 HIGH
   }


   delay(1000);
}++
/*
* Library from: // www.ladyada.net/learn/sensors/thermocouple
*
* This is Arduino code to measure MAX6675 Thermocouple K-Type sensor
* and control relay as heater or cooler
*
* Watch Video instruction for this code: https://youtu.be/dVh77wT-4Ao
*
* Written by Ahmad Shamshiri on May 20, 2020 in Ajax, Ontario, Canada
* www.robojax.com
*
* Get this code and other Arduino codes from Robojax.com.
Learn Arduino step by step in a structured course with all material, wiring diagrams, and libraries
all in one place. Purchase My course on Udemy.com http://robojax.com/L/?id=62
If you found this tutorial helpful, please support me so I can continue creating
content like this.
or make a donation using PayPal http://robojax.com/L/?id=64
Related videos:
Introduction to MAX6675 K-Type: https://youtu.be/VGqONmUinqA
Using MAX6675 K-Type thermocouple with LED display: https://youtu.be/cD5oOu4N_AE
Using MAX6675 K-Type thermocouple with LCD1602-I2C: https://youtu.be/BlhpktgPdKs
Using 2 or more MAX6675 K-Type thermocouples: https://youtu.be/c90NszbNG8c
Using MAX6675 K-Type thermocouple as heater or cooler controller: [this video]
* * This code is "AS IS" without warranty or liability. Free to be used as long as you keep this note intact.*
* This code has been downloaded from Robojax.com
This program is free software: you can redistribute it and/or modify
it under the terms of the GNU General Public License as published by
the Free Software Foundation, either version 3 of the License, or
(at your option) any later version.
This program is distributed in the hope that it will be useful,
but WITHOUT ANY WARRANTY; without even the implied warranty of
MERCHANTABILITY or FITNESS FOR A PARTICULAR PURPOSE. See the
GNU General Public License for more details.
You should have received a copy of the GNU General Public License
along with this program. If not, see <https://www.gnu.org/licenses/>.
*/
#include "max6675.h"
//Robojax.com heater/cooler with MAX6675 Thermocoupler
int GNDpin = 2;
int VCCpin =3;
int thermoCLK = 4;
int thermoCS = 5;
int thermoDO = 6;
MAX6675 thermocouple(thermoCLK, thermoCS, thermoDO);
const int relayPin =8;
const int relayON = LOW;// do not change
const int relayOFF = HIGH; //do not change
int relayState = relayOFF;//initial state of relay
const int TEMPERATURE_UNIT =1;//1=Celsius, 2=Fahrenheit, 3=Kelvin
const float START_TEMPERATURE = 80.0;//unit above
const float STOP_TEMPERATURE = 100.0;//unit above
const int CONTROL_TYPE = 1;// 1= heater, 2=cooler
float temperature;
void setup() {
//Robojax.com heater/cooler with MAX6675 Thermocoupler
Serial.begin(9600);
Serial.println("MAX6675 test with relay");
// use Arduino pins
pinMode(relayPin, OUTPUT);//pin for relay
digitalWrite(relayPin, relayState);
pinMode(VCCpin, OUTPUT);
digitalWrite(VCCpin, HIGH);
pinMode(GNDpin, OUTPUT);
digitalWrite(GNDpin, LOW);
// wait for MAX chip to stabilize
delay(500);
//Robojax.com heater/cooler with MAX6675 Thermocoupler
}
void loop() {
//Robojax.com heater/cooler with MAX6675 Thermocoupler
readTemperature();
printTemperature();
loadControl();
if(temperature >=89.5)
{
///
}
delay(1000);
//Robojax.com heater/cooler with MAX6675 Thermocoupler
}//loop
/*
* loadControl()
* @brief controls the load based
* @param state can be either : relayON or relayOFF
* @return returns none
* Written by Ahmad Shamshiri for robojax.com
* on May 20, 2020 at 15:23 in Ajax, Ontario, Canada
*/
void loadControl()
{
//Robojax.com heater/cooler with MAX6675 Thermocoupler
// Serial.print("Start: ");
// Serial.print(START_TEMPERATURE);
// Serial.print(" Stop: ");
//Serial.println(STOP_TEMPERATURE);
if(CONTROL_TYPE ==1)
{
if(START_TEMPERATURE >= temperature && STOP_TEMPERATURE >=temperature)
{
relayControl(relayON);
}
if(STOP_TEMPERATURE <=temperature)
{
relayControl(relayOFF);
}
}else{
if(START_TEMPERATURE >= temperature && STOP_TEMPERATURE >=temperature)
{
relayControl(relayOFF);
}
if(STOP_TEMPERATURE <=temperature)
{
relayControl(relayON);
}
}
//Robojax.com heater/cooler with MAX6675 Thermocoupler
}//loadControl()
/*
* relayControl(int state))
* @brief turns the relay ON or OFF
* @param state is "relayON" or "relayOFF" defined at the top of code
* @return returns none
* Written by Ahmad Shamshiri for robojax.com
* on May 20, 2020 at 15:23 in Ajax, Ontario, Canada
*/
void relayControl(int state)
{
//Robojax.com heater/cooler with MAX6675 Thermocoupler
if(state ==relayON)
{
digitalWrite(relayPin, relayON);
Serial.println("Relay ON");
}else{
digitalWrite(relayPin, relayOFF);
Serial.println("Relay OFF");
}
//Robojax.com heater/cooler with MAX6675 Thermocoupler
}//relayControl()
/*
* readTemperature()
* @brief reads the temperature based on the TEMPERATURE_UNIT
* @param average temperature
* @return returns one of the values above
* Written by Ahmad Shamshiri for robojax.com
* on May 20, 2020 at 15:23 in Ajax, Ontario, Canada
*/
void readTemperature()
{
//Robojax.com heater/cooler with MAX6675 Thermocoupler
if(TEMPERATURE_UNIT ==2)
{
temperature = thermocouple.readFahrenheit();//convert to Fahrenheit
}else if(TEMPERATURE_UNIT ==3)
{
temperature = thermocouple.readCelsius() + 273.15;//convert to Kelvin
}else{
temperature = thermocouple.readCelsius();// return Celsius
}
//Robojax.com heater/cooler with MAX6675 Thermocoupler
}// readTemperature()
/*
* printTemperature()
* @brief prints temperature on serial monitor
* @param charact type
* @param "type" is character
* C = Celsius
* K = Kelvin
* F = Fahrenheit
* @return none
* Written by Ahmad Shamshiri for robojax.com
* on May 08, 2020 at 02:45 in Ajax, Ontario, Canada
*/
void printTemperature()
{
//Robojax.com heater/cooler with MAX6675 Thermocoupler
Serial.print(temperature);
printDegree();
if(TEMPERATURE_UNIT ==2)
{
Serial.print("F");
}else if(TEMPERATURE_UNIT ==3)
{
Serial.print("K");
}else{
Serial.print("C");
}
Serial.println();
//Robojax.com heater/cooler with MAX6675 Thermocoupler
}//printTemperature()
/*
* @brief prints degree symbol on serial monitor
* @param none
* @return returns nothing
* Written by Ahmad Shamshiri on July 13, 2019
* for Robojax Tutorial Robojax.com
*/
void printDegree()
{
Serial.print("\\xC2");
Serial.print("\\xB0");
}Things you might need
-
eBay
-
AliExpressPurchase 1 channel 5V KY-019 relay from AliExpresss.click.aliexpress.com
-
BanggoodPurchase MAX6675 K-Type from Banggoodbanggood.com
Resources & references
-
ExternalMAX6675 datasheet (PDF)datasheets.maximintegrated.com
Files📁
No files available.