Les 47: De K-type MAX6675 gebruiken als thermostaat met relais | Arduino Stap voor Stap Cursus
Dit project begeleidt je bij het bouwen van een temperatuurregelsysteem met behulp van een Arduino, een MAX6675 K-type thermokoppel en een relais. Dit systeem kan een gewenst temperatuurbereik handhaven, waardoor het geschikt is voor verschillende toepassingen. Je kunt dit gebruiken om te bouwen:
- Een temperatuurgestuurde broedstoof voor delicate experimenten of zaailingen.
- Een geautomatiseerd brouwsysteem voor het handhaven van constante worttemperaturen.
- Een klimaatgestuurde behuizing voor reptielen of andere temperatuurgevoelige dieren.
- Een eenvoudig verwarmings- of koelsysteem voor een kleine ruimte.
-
robojax_course_47_MAX6675_temperature-0
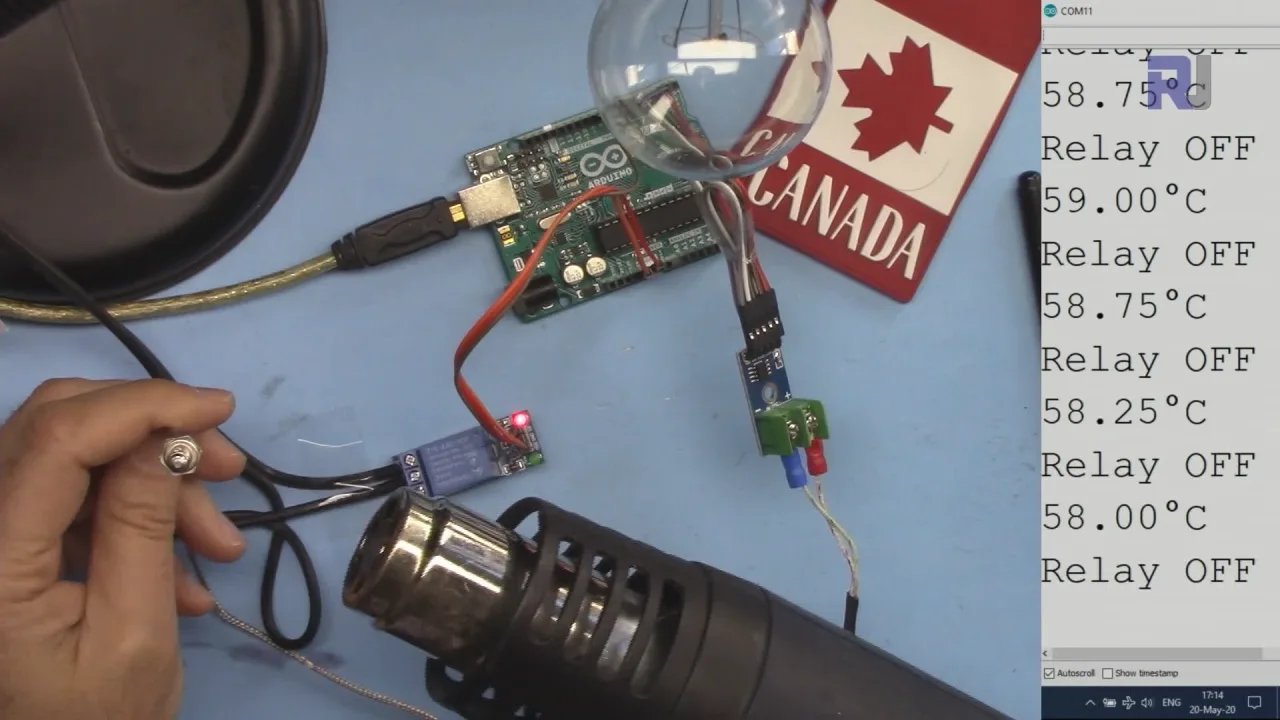
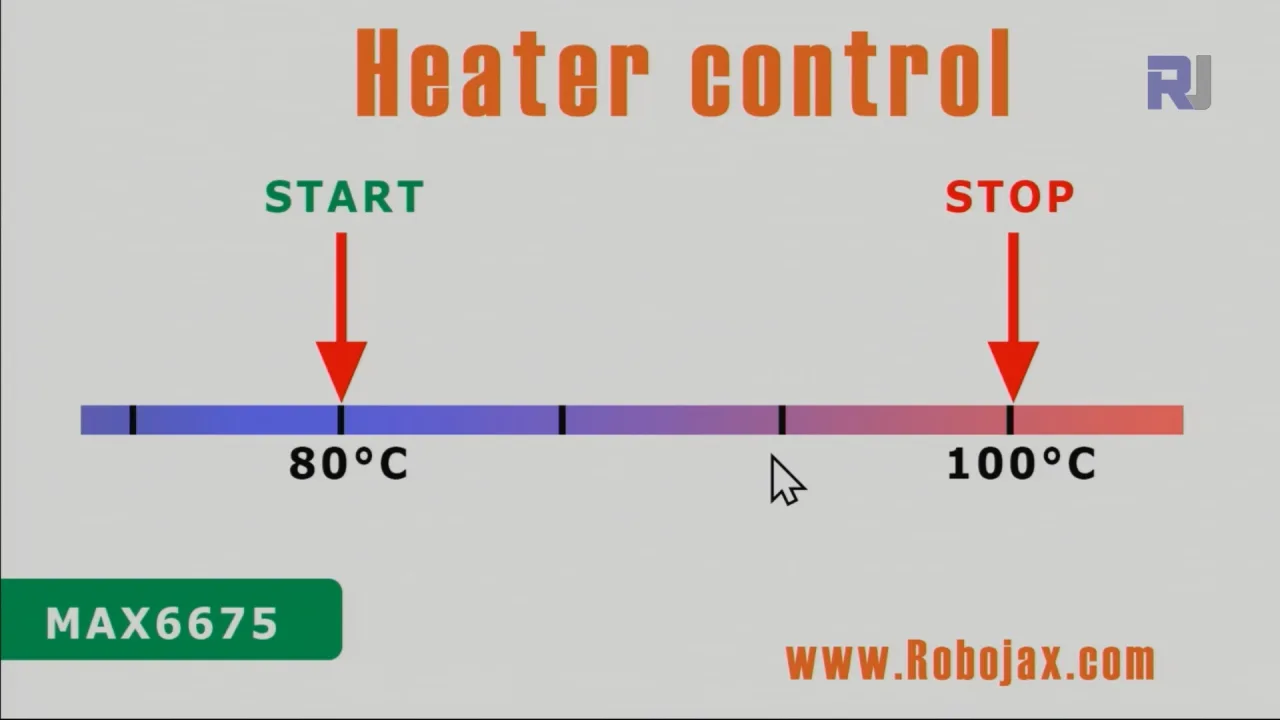
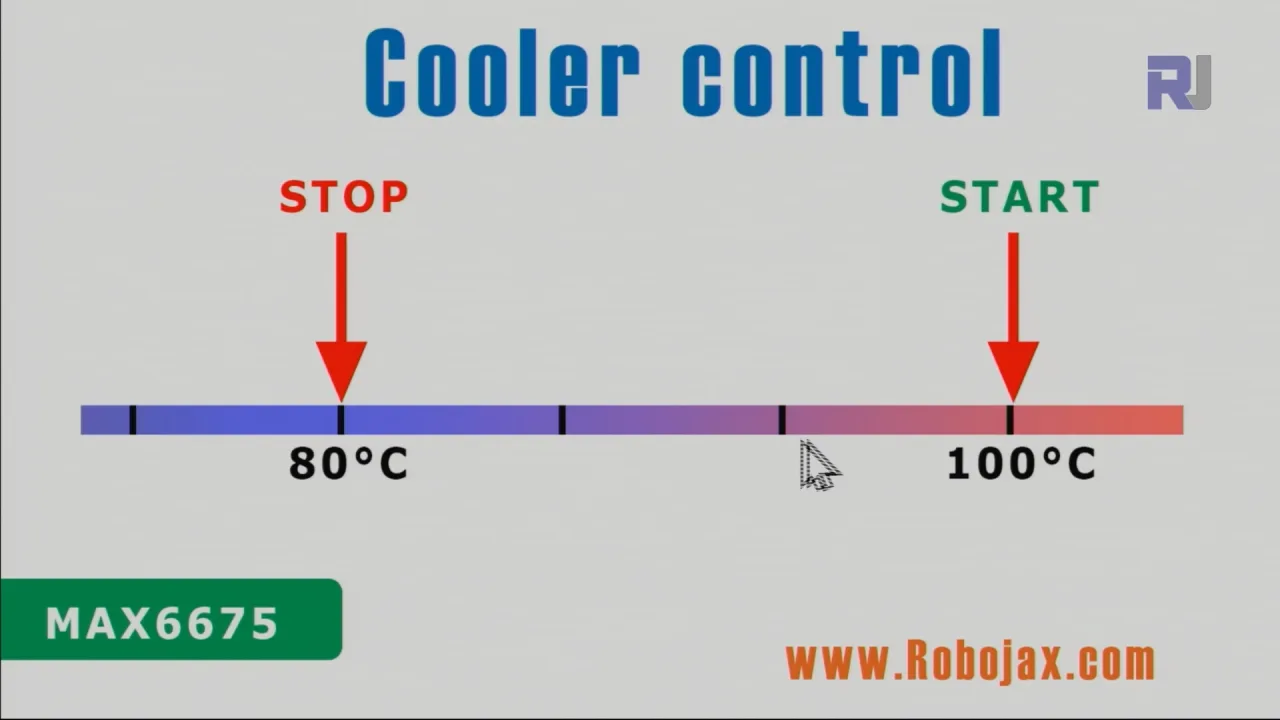
Het systeem gebruikt de MAX6675 om temperaturen van een K-type thermokoppel te lezen, wat nauwkeurige temperatuurmetingen oplevert over een breed bereik (afhankelijk van het thermokoppeltype, tot 1000°C of meer). De Arduino verwerkt deze metingen en bestuurt een relais om een verwarmings- of koelingselement aan of uit te zetten, waardoor de temperatuur binnen een door de gebruiker gedefinieerd bereik blijft. (in video op 00:32)
Hardware/Componenten
Om dit project te bouwen, heb je de volgende componenten nodig:
- Arduino-board (Uno, Nano, etc.)
- MAX6675 thermokoppelversterker
- K-type thermokoppel
- Relaismodule
- AC-lamp (of andere belasting, zoals een ventilator of verwarming)
- Jumperdraden
- Breadboard (optioneel, maar aanbevolen)
Bedradingsgids
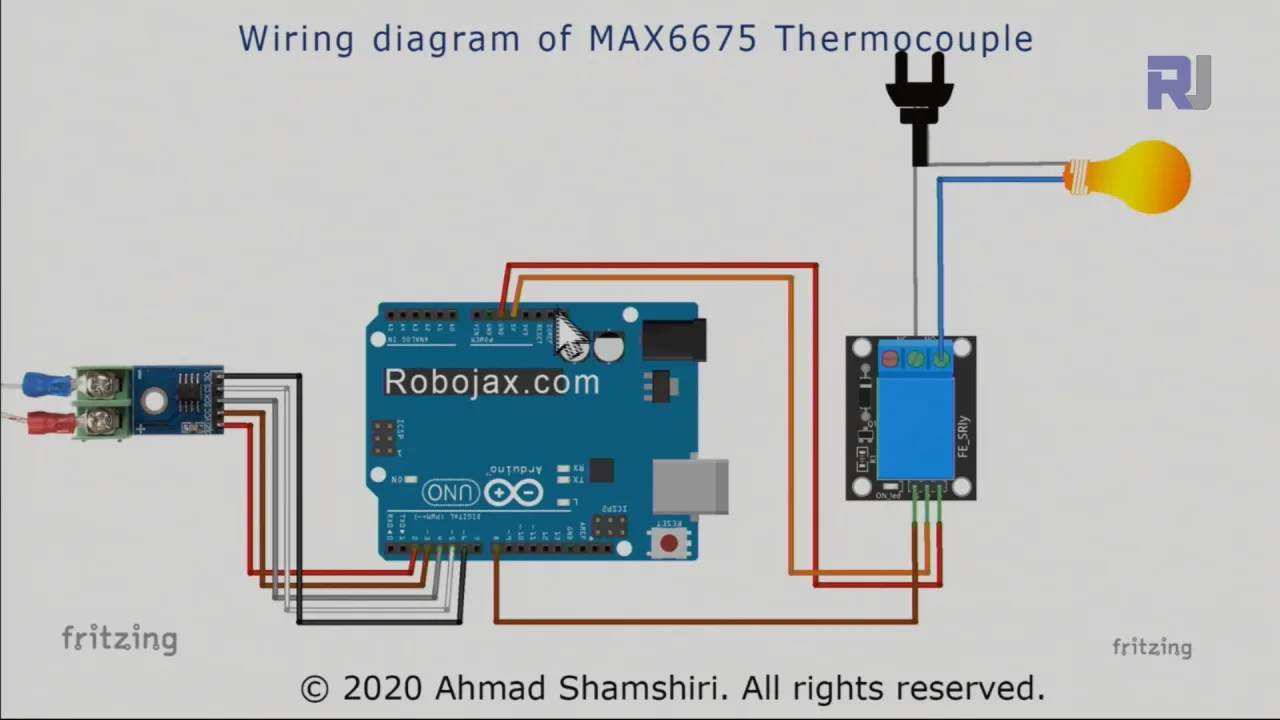
De bedrading wordt in detail uitgelegd in de video. (in video op 03:28) Raadpleeg de video voor een visuele gids. De belangrijkste verbindingen omvatten het aansluiten van de MAX6675 op de Arduino (pinnen 2-6), de relaismodule op de Arduino (pin 8 en voeding), en de relaismodule op de AC-belasting. Een kritiek aspect is het correct identificeren van de fase- en nuldraden van je AC-belasting voordat je ze op het relais aansluit. Onjuiste bedrading kan leiden tot gevaarlijke situaties.
Code-uitleg
De Arduino-code (weergegeven in onderstaande fragmenten) gebruikt de MAX6675-bibliotheek om temperatuurwaarden van het thermokoppel te lezen. De door de gebruiker configureerbare delen van de code zijn:
relayPin: De Arduino-pin die is verbonden met de relaismodule (standaard: 8). (in video op 07:35)relayONenrelayOFF: Deze constanten definiëren de logische niveaus om het relais respectievelijk aan en uit te zetten. Deze zijn meestal LOW en HIGH, maar moeten mogelijk worden aangepast afhankelijk van je relaismodule. (in video op 07:35)TEMPERATURE_UNIT: Stelt de eenheid in voor temperatuurmetingen (1 voor Celsius, 2 voor Fahrenheit, 3 voor Kelvin). (in video op 08:21)START_TEMPERATUREenSTOP_TEMPERATURE: Deze variabelen definiëren het temperatuurbereik voor het regelsysteem. Het systeem schakelt het relais in wanneer de temperatuur onderSTART_TEMPERATUREzakt en schakelt het uit wanneer de temperatuurSTOP_TEMPERATUREbereikt (of omgekeerd, afhankelijk van of je een verwarming of koeler regelt). (in video op 08:31)CONTROL_TYPE: Een variabele die bepaalt of het systeem fungeert als verwarming (1) of koeler (2). (in video op 08:36)
De code bevat functies zoals readTemperature(), printTemperature(), loadControl() en relayControl() om het lezen van de temperatuur, weergave en relaiswerking te behandelen. Deze functies worden duidelijk gedefinieerd en uitgelegd in de video. (in video op 09:37, 10:00, 10:43, 11:30)
const int relayPin =8;
const int relayON = LOW;// niet wijzigen
const int relayOFF = HIGH; //niet wijzigen
int relayState = relayOFF;//initiële staat van relais

const int TEMPERATURE_UNIT =1;//1=Celsius, 2=Fahrenheit, 3=Kelvin
const float START_TEMPERATURE = 80.0;//eenheid hierboven
const float STOP_TEMPERATURE = 100.0;//eenheid hierboven
const int CONTROL_TYPE = 1;// 1= verwarming, 2=koeler
Live-project/Demonstratie
De video demonstreert de werking van het temperatuurregelsysteem voor zowel verwarmings- als koelingsscenario's. (in video op 13:15 en 15:28) De demonstratie laat duidelijk zien hoe het systeem de temperatuur binnen het ingestelde bereik handhaaft door het relais indien nodig aan en uit te zetten.
Hoofdstukken
- [00:00] Inleiding
- [00:55] Uitleg Verwarming/Koeler-regeling
- [03:28] Bedradingsschema
- [06:26] Code-uitleg
- [13:15] Demonstratie Verwarmingsregeling
- [15:28] Demonstratie Koelregeling
- [17:29] Conclusie
Afbeeldingen
/*
 * This is the Arduino code for MAX6675 Thermocouple K-Type with Relay and Display
 * The output pin 10 is connected to the relay.
 * When the temperature reaches the desired value, pin 10 turns the
 * relay ON.

 * This code has been explained in our video at https://youtu.be/cD5oOu4N_AE

 *
 * Written by Ahmad Nejrabi for Robojax Video
 * Date: December 9, 2017, in Ajax, Ontario, Canada
 * Permission granted to share this code given that this
 * note is kept with the code.
 * Disclaimer: This code is "AS IS" and for educational purposes only.
 *
 */

 // This example is public domain. Enjoy!
// www.ladyada.net/learn/sensors/thermocouple

#include "max6675.h"


int thermoDO = 4;
int thermoCS = 5;
int thermoCLK = 6;


MAX6675 thermocouple(thermoCLK, thermoCS, thermoDO);
int vccPin = 3;
int gndPin = 2;

void setup() {
  Serial.begin(9600);
  // Use Arduino pins
  pinMode(vccPin, OUTPUT); digitalWrite(vccPin, HIGH);
  pinMode(gndPin, OUTPUT); digitalWrite(gndPin, LOW);
    pinMode(10, OUTPUT);// set pin 10 as output

  Serial.println("Robojax: MAX6675 test");
  // wait for MAX chip to stabilize
  delay(500);
}

void loop() {
  // basic readout test, just print the current temp


   Serial.print("C = ");
   Serial.println(thermocouple.readCelsius());
   Serial.print("F = ");
   Serial.println(thermocouple.readFahrenheit());

   // If temperature goes above 80.0C, turn the relay ON
   if(thermocouple.readCelsius() > 80.00){
    digitalWrite(10, LOW);// set pin 10 LOW
   }else{
    digitalWrite(10, HIGH);// set pin 10 HIGH
   }


   delay(1000);
}++
/*
* Library from: // www.ladyada.net/learn/sensors/thermocouple
*
* This is Arduino code to measure MAX6675 Thermocouple K-Type sensor
* and control relay as heater or cooler
*
* Watch Video instruction for this code: https://youtu.be/dVh77wT-4Ao
*
* Written by Ahmad Shamshiri on May 20, 2020 in Ajax, Ontario, Canada
* www.robojax.com
*
* Get this code and other Arduino codes from Robojax.com.
Learn Arduino step by step in a structured course with all material, wiring diagrams, and libraries
all in one place. Purchase My course on Udemy.com http://robojax.com/L/?id=62
If you found this tutorial helpful, please support me so I can continue creating
content like this.
or make a donation using PayPal http://robojax.com/L/?id=64
Related videos:
Introduction to MAX6675 K-Type: https://youtu.be/VGqONmUinqA
Using MAX6675 K-Type thermocouple with LED display: https://youtu.be/cD5oOu4N_AE
Using MAX6675 K-Type thermocouple with LCD1602-I2C: https://youtu.be/BlhpktgPdKs
Using 2 or more MAX6675 K-Type thermocouples: https://youtu.be/c90NszbNG8c
Using MAX6675 K-Type thermocouple as heater or cooler controller: [this video]
* * This code is "AS IS" without warranty or liability. Free to be used as long as you keep this note intact.*
* This code has been downloaded from Robojax.com
This program is free software: you can redistribute it and/or modify
it under the terms of the GNU General Public License as published by
the Free Software Foundation, either version 3 of the License, or
(at your option) any later version.
This program is distributed in the hope that it will be useful,
but WITHOUT ANY WARRANTY; without even the implied warranty of
MERCHANTABILITY or FITNESS FOR A PARTICULAR PURPOSE. See the
GNU General Public License for more details.
You should have received a copy of the GNU General Public License
along with this program. If not, see <https://www.gnu.org/licenses/>.
*/
#include "max6675.h"
//Robojax.com heater/cooler with MAX6675 Thermocoupler
int GNDpin = 2;
int VCCpin =3;
int thermoCLK = 4;
int thermoCS = 5;
int thermoDO = 6;
MAX6675 thermocouple(thermoCLK, thermoCS, thermoDO);
const int relayPin =8;
const int relayON = LOW;// do not change
const int relayOFF = HIGH; //do not change
int relayState = relayOFF;//initial state of relay
const int TEMPERATURE_UNIT =1;//1=Celsius, 2=Fahrenheit, 3=Kelvin
const float START_TEMPERATURE = 80.0;//unit above
const float STOP_TEMPERATURE = 100.0;//unit above
const int CONTROL_TYPE = 1;// 1= heater, 2=cooler
float temperature;
void setup() {
//Robojax.com heater/cooler with MAX6675 Thermocoupler
Serial.begin(9600);
Serial.println("MAX6675 test with relay");
// use Arduino pins
pinMode(relayPin, OUTPUT);//pin for relay
digitalWrite(relayPin, relayState);
pinMode(VCCpin, OUTPUT);
digitalWrite(VCCpin, HIGH);
pinMode(GNDpin, OUTPUT);
digitalWrite(GNDpin, LOW);
// wait for MAX chip to stabilize
delay(500);
//Robojax.com heater/cooler with MAX6675 Thermocoupler
}
void loop() {
//Robojax.com heater/cooler with MAX6675 Thermocoupler
readTemperature();
printTemperature();
loadControl();
if(temperature >=89.5)
{
///
}
delay(1000);
//Robojax.com heater/cooler with MAX6675 Thermocoupler
}//loop
/*
* loadControl()
* @brief controls the load based
* @param state can be either : relayON or relayOFF
* @return returns none
* Written by Ahmad Shamshiri for robojax.com
* on May 20, 2020 at 15:23 in Ajax, Ontario, Canada
*/
void loadControl()
{
//Robojax.com heater/cooler with MAX6675 Thermocoupler
// Serial.print("Start: ");
// Serial.print(START_TEMPERATURE);
// Serial.print(" Stop: ");
//Serial.println(STOP_TEMPERATURE);
if(CONTROL_TYPE ==1)
{
if(START_TEMPERATURE >= temperature && STOP_TEMPERATURE >=temperature)
{
relayControl(relayON);
}
if(STOP_TEMPERATURE <=temperature)
{
relayControl(relayOFF);
}
}else{
if(START_TEMPERATURE >= temperature && STOP_TEMPERATURE >=temperature)
{
relayControl(relayOFF);
}
if(STOP_TEMPERATURE <=temperature)
{
relayControl(relayON);
}
}
//Robojax.com heater/cooler with MAX6675 Thermocoupler
}//loadControl()
/*
* relayControl(int state))
* @brief turns the relay ON or OFF
* @param state is "relayON" or "relayOFF" defined at the top of code
* @return returns none
* Written by Ahmad Shamshiri for robojax.com
* on May 20, 2020 at 15:23 in Ajax, Ontario, Canada
*/
void relayControl(int state)
{
//Robojax.com heater/cooler with MAX6675 Thermocoupler
if(state ==relayON)
{
digitalWrite(relayPin, relayON);
Serial.println("Relay ON");
}else{
digitalWrite(relayPin, relayOFF);
Serial.println("Relay OFF");
}
//Robojax.com heater/cooler with MAX6675 Thermocoupler
}//relayControl()
/*
* readTemperature()
* @brief reads the temperature based on the TEMPERATURE_UNIT
* @param average temperature
* @return returns one of the values above
* Written by Ahmad Shamshiri for robojax.com
* on May 20, 2020 at 15:23 in Ajax, Ontario, Canada
*/
void readTemperature()
{
//Robojax.com heater/cooler with MAX6675 Thermocoupler
if(TEMPERATURE_UNIT ==2)
{
temperature = thermocouple.readFahrenheit();//convert to Fahrenheit
}else if(TEMPERATURE_UNIT ==3)
{
temperature = thermocouple.readCelsius() + 273.15;//convert to Kelvin
}else{
temperature = thermocouple.readCelsius();// return Celsius
}
//Robojax.com heater/cooler with MAX6675 Thermocoupler
}// readTemperature()
/*
* printTemperature()
* @brief prints temperature on serial monitor
* @param charact type
* @param "type" is character
* C = Celsius
* K = Kelvin
* F = Fahrenheit
* @return none
* Written by Ahmad Shamshiri for robojax.com
* on May 08, 2020 at 02:45 in Ajax, Ontario, Canada
*/
void printTemperature()
{
//Robojax.com heater/cooler with MAX6675 Thermocoupler
Serial.print(temperature);
printDegree();
if(TEMPERATURE_UNIT ==2)
{
Serial.print("F");
}else if(TEMPERATURE_UNIT ==3)
{
Serial.print("K");
}else{
Serial.print("C");
}
Serial.println();
//Robojax.com heater/cooler with MAX6675 Thermocoupler
}//printTemperature()
/*
* @brief prints degree symbol on serial monitor
* @param none
* @return returns nothing
* Written by Ahmad Shamshiri on July 13, 2019
* for Robojax Tutorial Robojax.com
*/
void printDegree()
{
Serial.print("\\xC2");
Serial.print("\\xB0");
}Dingen die je misschien nodig hebt
-
eBay
-
AliExpressPurchase 1 channel 5V KY-019 relay from AliExpresss.click.aliexpress.com
-
BanggoodPurchase MAX6675 K-Type from Banggoodbanggood.com
Hulpmiddelen en referenties
-
ExternMAX6675 datasheet (PDF)datasheets.maximintegrated.com
Bestanden📁
Geen bestanden beschikbaar.