Сабақ 47: K-типті MAX6675 термостат ретінде реле арқылы қолдану | Arduino қадамдық курс
Бұл жоба Arduino, MAX6675 K-типті термопара және реле арқылы температураны бақылау жүйесін құруды үйретеді. Бұл жүйе қажетті температура диапазонын сақтай алады, бұл оны әртүрлі қолдануға жарамды етеді. Сіз мұны келесілерді жасау үшін пайдалана аласыз:
- Нәзік эксперименттер немесе көшеттер үшін температураны бақылайтын инкубатор.
- Сусло температурасын тұрақты ұстау үшін автоматтандырылған қайнату жүйесі.
- Бауырымен жорғалаушылар немесе басқа температураға сезімтал жануарлар үшін климатты бақылайтын қоршау.
- Шағын кеңістік үшін қарапайым жылыту немесе салқындату жүйесі.
-
robojax_course_47_MAX6675_temperature-0
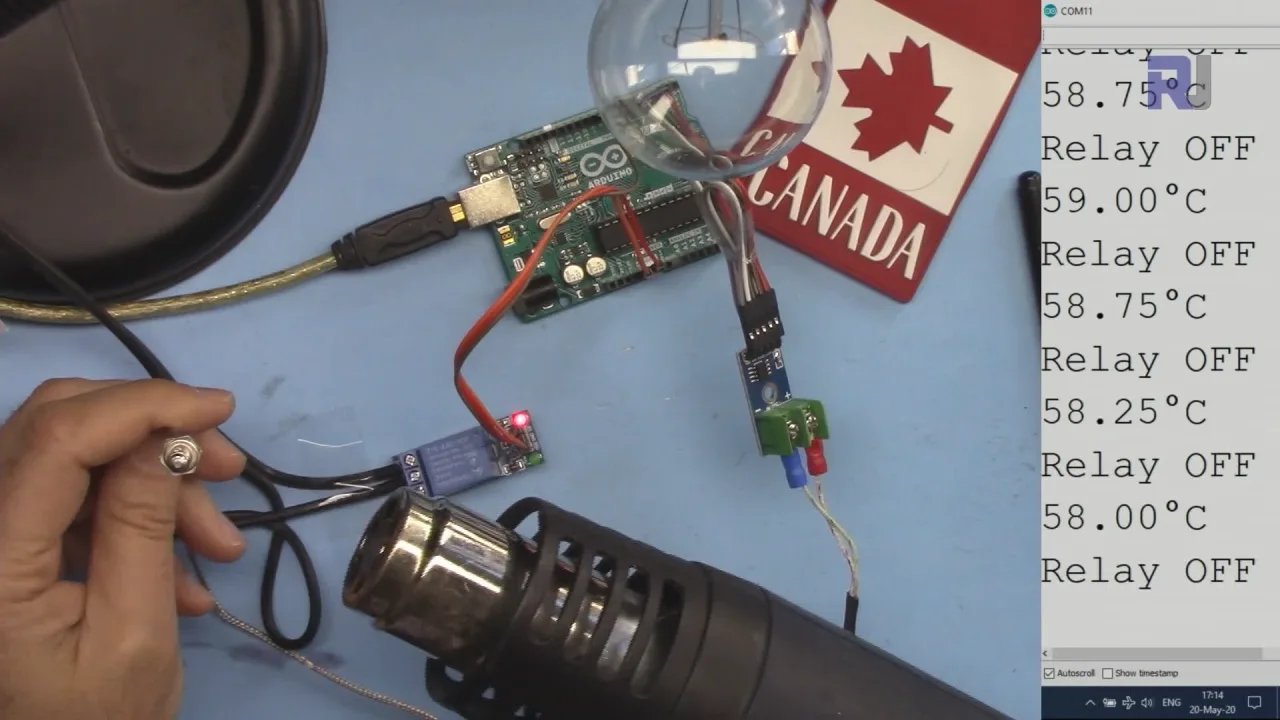
Жүйе MAX6675 арқылы K-типті термопарадан температураны оқиды, бұл кең диапазонда дәл температура көрсеткіштерін қамтамасыз етеді (термопара түріне байланысты 1000°C немесе одан да жоғары). Arduino бұл көрсеткіштерді өңдейді және жылыту немесе салқындату элементін қосу/өшіру үшін релені басқарады, температураны пайдаланушы анықтаған диапазонда сақтайды. (бейнеде 00:32)
Аппараттық құралдар/Компоненттер
Бұл жобаны құру үшін сізге келесі компоненттер қажет:
- Arduino тақтасы (Uno, Nano және т.б.)
- MAX6675 термопара күшейткіші
- K-типті термопара
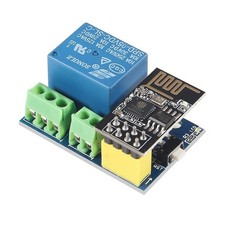
- Реле модулі
- Айнымалы ток шамы (немесе желдеткіш немесе жылытқыш сияқты басқа жүктеме)
- Жалғау сымдары
- Макет тақтасы (міндетті емес, бірақ ұсынылады)
Сым қосу нұсқаулығы
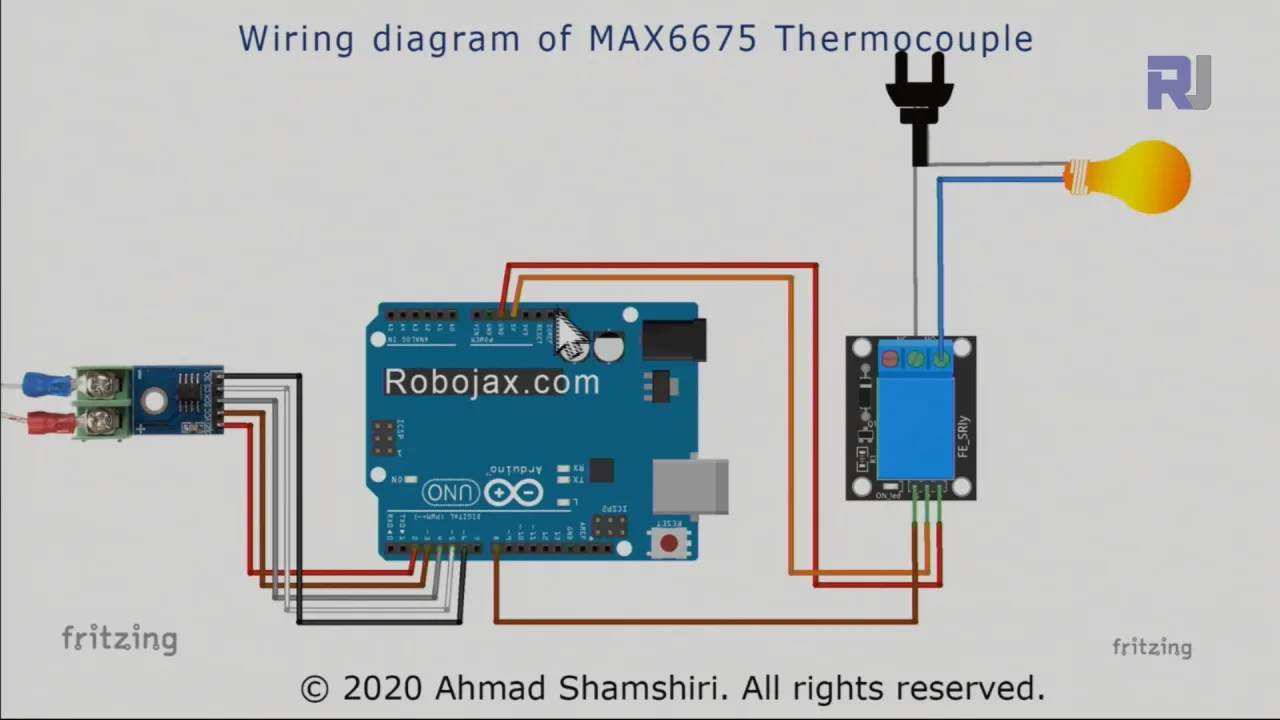
Сым қосу бейнеде егжей-тегжейлі түсіндіріледі. (бейнеде 03:28) Көрнекі нұсқаулық үшін бейнені қараңыз. Негізгі қосылымдар MAX6675-ті Arduino-ға (2-6 пиндер), реле модулін Arduino-ға (8 пин және қуат) және реле модулін айнымалы ток жүктемесіне қосуды қамтиды. Маңызды аспект - айнымалы ток жүктемесінің фазалық және бейтарап сымдарын релеге қосар алдында дұрыс анықтау. Қате сым қосу қауіпті жағдайларға әкелуі мүмкін.
Код түсіндірмесі
Arduino коды (төмендегі үзінділерде көрсетілген) термопарадан температура мәндерін оқу үшін MAX6675 кітапханасын пайдаланады. Кодтың пайдаланушы конфигурациялайтын бөліктері:
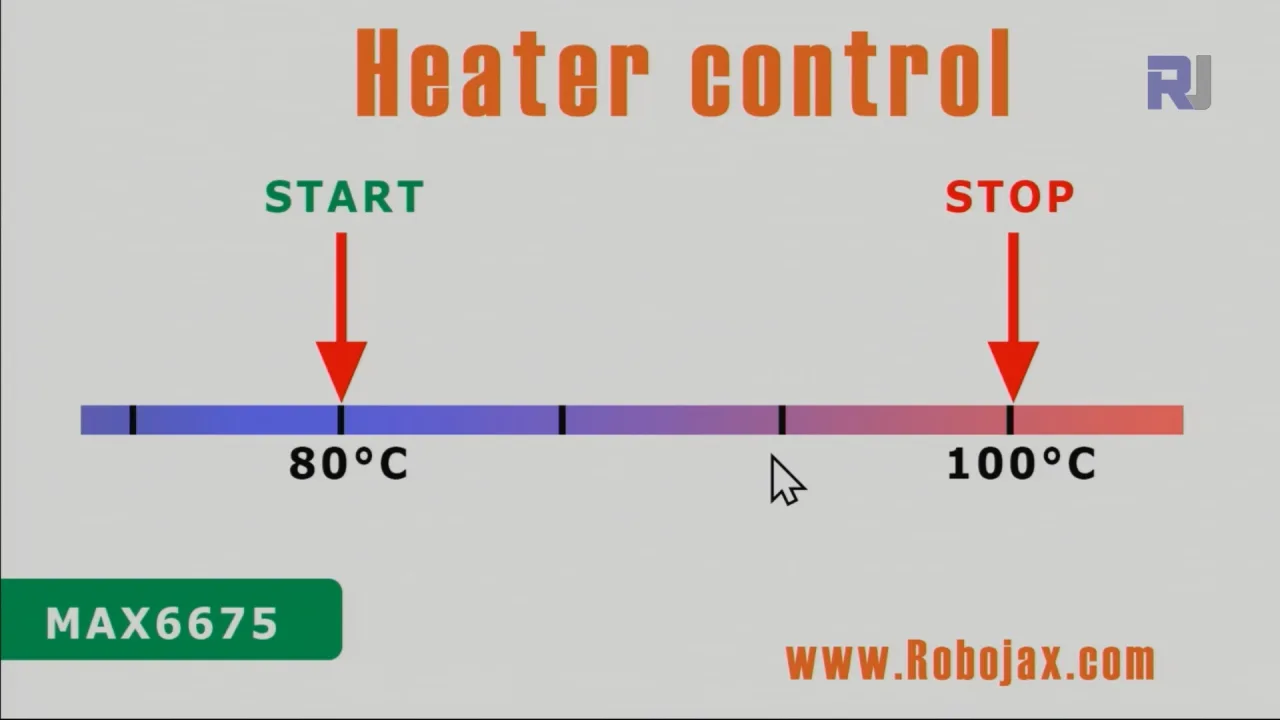
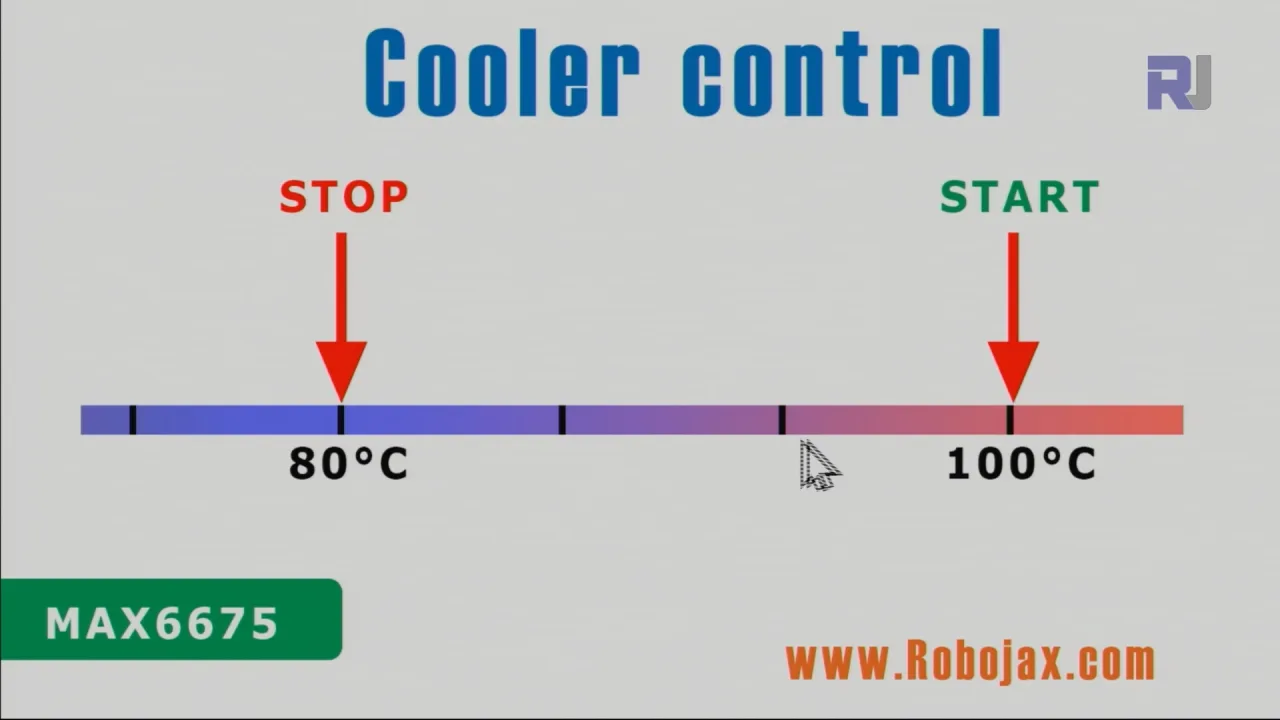
relayPin: Реле модуліне қосылған Arduino пины (әдепкі: 8). (бейнеде 07:35)relayONжәнеrelayOFF: Бұл тұрақтылар релені қосу және өшіру үшін логикалық деңгейлерді анықтайды. Олар әдетте LOW және HIGH, бірақ реле модуліңізге байланысты реттеу қажет болуы мүмкін. (бейнеде 07:35)TEMPERATURE_UNIT: Температура көрсеткіштерінің бірлігін орнатады (1 - Цельсий, 2 - Фаренгейт, 3 - Кельвин). (бейнеде 08:21)START_TEMPERATUREжәнеSTOP_TEMPERATURE: Бұл айнымалылар бақылау жүйесінің температура диапазонын анықтайды. Жүйе температураSTART_TEMPERATUREмәнінен төмен түскенде релені қосады және температураSTOP_TEMPERATUREмәніне жеткенде оны өшіреді (немесе керісінше, жылытқышты немесе салқындатқышты басқаратыныңызға байланысты). (бейнеде 08:31)CONTROL_TYPE: Жүйенің жылытқыш (1) немесе салқындатқыш (2) ретінде әрекет ететінін анықтайтын айнымалы. (бейнеде 08:36)
Код температураны оқу, көрсету және реле жұмысын өңдеу үшін readTemperature(), printTemperature(), loadControl() және relayControl() сияқты функцияларды қамтиды. Бұл функциялар бейнеде нақты анықталған және түсіндірілген. (бейнеде 09:37, 10:00, 10:43, 11:30)
const int relayPin =8;
const int relayON = LOW;// өзгертпеңіз
const int relayOFF = HIGH; //өзгертпеңіз
int relayState = relayOFF;//реленің бастапқы күйі

const int TEMPERATURE_UNIT =1;//1=Цельсий, 2=Фаренгейт, 3=Кельвин
const float START_TEMPERATURE = 80.0;//жоғарыдағы бірлік
const float STOP_TEMPERATURE = 100.0;//жоғарыдағы бірлік
const int CONTROL_TYPE = 1;// 1= жылытқыш, 2=салқындатқыш
Тірі жоба/Демонстрация
Бейне жылыту және салқындату сценарийлері үшін температураны бақылау жүйесінің жұмысын көрсетеді. (бейнеде 13:15 және 15:28) Демонстрация жүйенің қажетінше релені қосу және өшіру арқылы температураны белгіленген диапазонда қалай сақтайтынын нақты көрсетеді.
Тараулар
- [00:00] Кіріспе
- [00:55] Жылытқыш/Салқындатқыш басқару түсіндірмесі
- [03:28] Сым қосу диаграммасы
- [06:26] Код түсіндірмесі
- [13:15] Жылытқышты басқару демонстрациясы
- [15:28] Салқындатқышты басқару демонстрациясы
- [17:29] Қорытынды
Суреттер
/*
 * This is the Arduino code for MAX6675 Thermocouple K-Type with Relay and Display
 * The output pin 10 is connected to the relay.
 * When the temperature reaches the desired value, pin 10 turns the
 * relay ON.

 * This code has been explained in our video at https://youtu.be/cD5oOu4N_AE

 *
 * Written by Ahmad Nejrabi for Robojax Video
 * Date: December 9, 2017, in Ajax, Ontario, Canada
 * Permission granted to share this code given that this
 * note is kept with the code.
 * Disclaimer: This code is "AS IS" and for educational purposes only.
 *
 */

 // This example is public domain. Enjoy!
// www.ladyada.net/learn/sensors/thermocouple

#include "max6675.h"


int thermoDO = 4;
int thermoCS = 5;
int thermoCLK = 6;


MAX6675 thermocouple(thermoCLK, thermoCS, thermoDO);
int vccPin = 3;
int gndPin = 2;

void setup() {
  Serial.begin(9600);
  // Use Arduino pins
  pinMode(vccPin, OUTPUT); digitalWrite(vccPin, HIGH);
  pinMode(gndPin, OUTPUT); digitalWrite(gndPin, LOW);
    pinMode(10, OUTPUT);// set pin 10 as output

  Serial.println("Robojax: MAX6675 test");
  // wait for MAX chip to stabilize
  delay(500);
}

void loop() {
  // basic readout test, just print the current temp


   Serial.print("C = ");
   Serial.println(thermocouple.readCelsius());
   Serial.print("F = ");
   Serial.println(thermocouple.readFahrenheit());

   // If temperature goes above 80.0C, turn the relay ON
   if(thermocouple.readCelsius() > 80.00){
    digitalWrite(10, LOW);// set pin 10 LOW
   }else{
    digitalWrite(10, HIGH);// set pin 10 HIGH
   }


   delay(1000);
}++
/*
* Library from: // www.ladyada.net/learn/sensors/thermocouple
*
* This is Arduino code to measure MAX6675 Thermocouple K-Type sensor
* and control relay as heater or cooler
*
* Watch Video instruction for this code: https://youtu.be/dVh77wT-4Ao
*
* Written by Ahmad Shamshiri on May 20, 2020 in Ajax, Ontario, Canada
* www.robojax.com
*
* Get this code and other Arduino codes from Robojax.com.
Learn Arduino step by step in a structured course with all material, wiring diagrams, and libraries
all in one place. Purchase My course on Udemy.com http://robojax.com/L/?id=62
If you found this tutorial helpful, please support me so I can continue creating
content like this.
or make a donation using PayPal http://robojax.com/L/?id=64
Related videos:
Introduction to MAX6675 K-Type: https://youtu.be/VGqONmUinqA
Using MAX6675 K-Type thermocouple with LED display: https://youtu.be/cD5oOu4N_AE
Using MAX6675 K-Type thermocouple with LCD1602-I2C: https://youtu.be/BlhpktgPdKs
Using 2 or more MAX6675 K-Type thermocouples: https://youtu.be/c90NszbNG8c
Using MAX6675 K-Type thermocouple as heater or cooler controller: [this video]
* * This code is "AS IS" without warranty or liability. Free to be used as long as you keep this note intact.*
* This code has been downloaded from Robojax.com
This program is free software: you can redistribute it and/or modify
it under the terms of the GNU General Public License as published by
the Free Software Foundation, either version 3 of the License, or
(at your option) any later version.
This program is distributed in the hope that it will be useful,
but WITHOUT ANY WARRANTY; without even the implied warranty of
MERCHANTABILITY or FITNESS FOR A PARTICULAR PURPOSE. See the
GNU General Public License for more details.
You should have received a copy of the GNU General Public License
along with this program. If not, see <https://www.gnu.org/licenses/>.
*/
#include "max6675.h"
//Robojax.com heater/cooler with MAX6675 Thermocoupler
int GNDpin = 2;
int VCCpin =3;
int thermoCLK = 4;
int thermoCS = 5;
int thermoDO = 6;
MAX6675 thermocouple(thermoCLK, thermoCS, thermoDO);
const int relayPin =8;
const int relayON = LOW;// do not change
const int relayOFF = HIGH; //do not change
int relayState = relayOFF;//initial state of relay
const int TEMPERATURE_UNIT =1;//1=Celsius, 2=Fahrenheit, 3=Kelvin
const float START_TEMPERATURE = 80.0;//unit above
const float STOP_TEMPERATURE = 100.0;//unit above
const int CONTROL_TYPE = 1;// 1= heater, 2=cooler
float temperature;
void setup() {
//Robojax.com heater/cooler with MAX6675 Thermocoupler
Serial.begin(9600);
Serial.println("MAX6675 test with relay");
// use Arduino pins
pinMode(relayPin, OUTPUT);//pin for relay
digitalWrite(relayPin, relayState);
pinMode(VCCpin, OUTPUT);
digitalWrite(VCCpin, HIGH);
pinMode(GNDpin, OUTPUT);
digitalWrite(GNDpin, LOW);
// wait for MAX chip to stabilize
delay(500);
//Robojax.com heater/cooler with MAX6675 Thermocoupler
}
void loop() {
//Robojax.com heater/cooler with MAX6675 Thermocoupler
readTemperature();
printTemperature();
loadControl();
if(temperature >=89.5)
{
///
}
delay(1000);
//Robojax.com heater/cooler with MAX6675 Thermocoupler
}//loop
/*
* loadControl()
* @brief controls the load based
* @param state can be either : relayON or relayOFF
* @return returns none
* Written by Ahmad Shamshiri for robojax.com
* on May 20, 2020 at 15:23 in Ajax, Ontario, Canada
*/
void loadControl()
{
//Robojax.com heater/cooler with MAX6675 Thermocoupler
// Serial.print("Start: ");
// Serial.print(START_TEMPERATURE);
// Serial.print(" Stop: ");
//Serial.println(STOP_TEMPERATURE);
if(CONTROL_TYPE ==1)
{
if(START_TEMPERATURE >= temperature && STOP_TEMPERATURE >=temperature)
{
relayControl(relayON);
}
if(STOP_TEMPERATURE <=temperature)
{
relayControl(relayOFF);
}
}else{
if(START_TEMPERATURE >= temperature && STOP_TEMPERATURE >=temperature)
{
relayControl(relayOFF);
}
if(STOP_TEMPERATURE <=temperature)
{
relayControl(relayON);
}
}
//Robojax.com heater/cooler with MAX6675 Thermocoupler
}//loadControl()
/*
* relayControl(int state))
* @brief turns the relay ON or OFF
* @param state is "relayON" or "relayOFF" defined at the top of code
* @return returns none
* Written by Ahmad Shamshiri for robojax.com
* on May 20, 2020 at 15:23 in Ajax, Ontario, Canada
*/
void relayControl(int state)
{
//Robojax.com heater/cooler with MAX6675 Thermocoupler
if(state ==relayON)
{
digitalWrite(relayPin, relayON);
Serial.println("Relay ON");
}else{
digitalWrite(relayPin, relayOFF);
Serial.println("Relay OFF");
}
//Robojax.com heater/cooler with MAX6675 Thermocoupler
}//relayControl()
/*
* readTemperature()
* @brief reads the temperature based on the TEMPERATURE_UNIT
* @param average temperature
* @return returns one of the values above
* Written by Ahmad Shamshiri for robojax.com
* on May 20, 2020 at 15:23 in Ajax, Ontario, Canada
*/
void readTemperature()
{
//Robojax.com heater/cooler with MAX6675 Thermocoupler
if(TEMPERATURE_UNIT ==2)
{
temperature = thermocouple.readFahrenheit();//convert to Fahrenheit
}else if(TEMPERATURE_UNIT ==3)
{
temperature = thermocouple.readCelsius() + 273.15;//convert to Kelvin
}else{
temperature = thermocouple.readCelsius();// return Celsius
}
//Robojax.com heater/cooler with MAX6675 Thermocoupler
}// readTemperature()
/*
* printTemperature()
* @brief prints temperature on serial monitor
* @param charact type
* @param "type" is character
* C = Celsius
* K = Kelvin
* F = Fahrenheit
* @return none
* Written by Ahmad Shamshiri for robojax.com
* on May 08, 2020 at 02:45 in Ajax, Ontario, Canada
*/
void printTemperature()
{
//Robojax.com heater/cooler with MAX6675 Thermocoupler
Serial.print(temperature);
printDegree();
if(TEMPERATURE_UNIT ==2)
{
Serial.print("F");
}else if(TEMPERATURE_UNIT ==3)
{
Serial.print("K");
}else{
Serial.print("C");
}
Serial.println();
//Robojax.com heater/cooler with MAX6675 Thermocoupler
}//printTemperature()
/*
* @brief prints degree symbol on serial monitor
* @param none
* @return returns nothing
* Written by Ahmad Shamshiri on July 13, 2019
* for Robojax Tutorial Robojax.com
*/
void printDegree()
{
Serial.print("\\xC2");
Serial.print("\\xB0");
}Сізге қажет болуы мүмкін нәрселер
-
eBay
-
AliExpressPurchase 1 channel 5V KY-019 relay from AliExpresss.click.aliexpress.com
-
BanggoodPurchase MAX6675 K-Type from Banggoodbanggood.com
Ресурстар мен сілтемелер
-
СыртқыMAX6675 datasheet (PDF)datasheets.maximintegrated.com
Файлдар📁
Файлдар жоқ.