পাঠ ৪৭: রিলে দিয়ে থার্মোস্ট্যাট হিসেবে K-টাইপ MAX6675 ব্যবহার | আরডুইনো স্টেপ বাই স্টেপ কোর্স
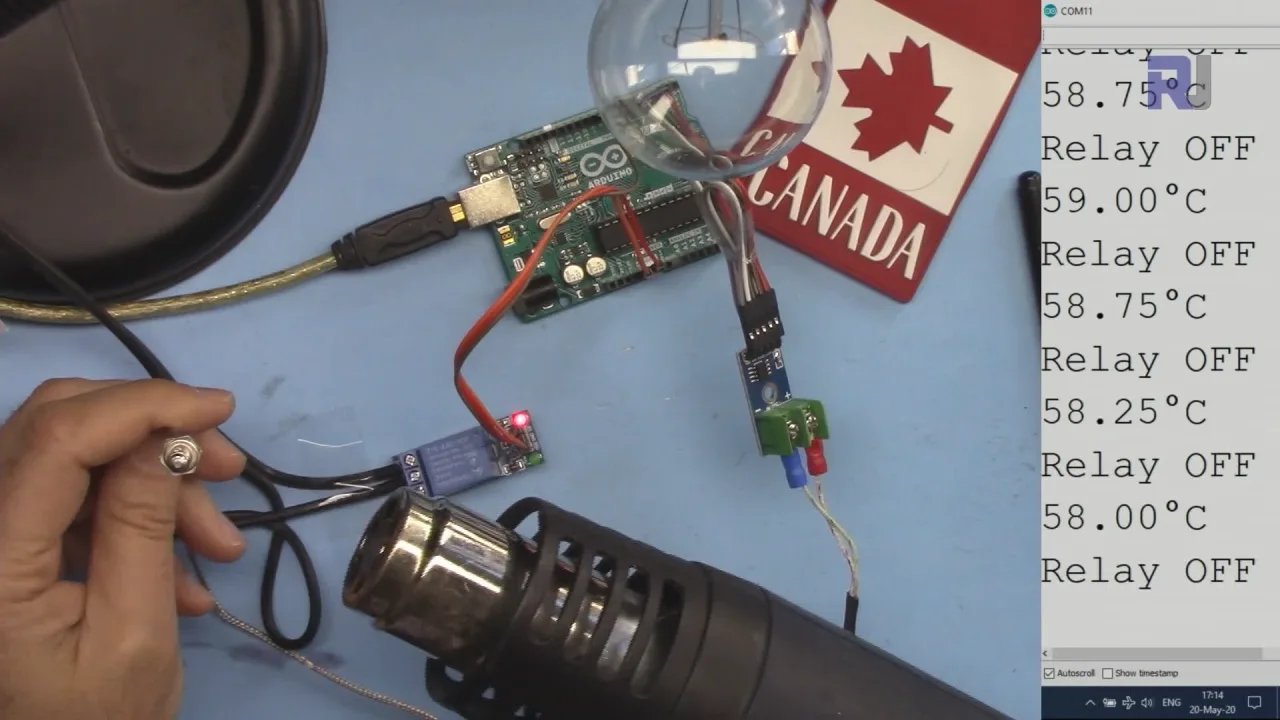
এই প্রকল্পটি আপনাকে একটি Arduino, একটি MAX6675 K-টাইপ থার্মোকাপল এবং একটি রিলে ব্যবহার করে একটি তাপমাত্রা নিয়ন্ত্রণ ব্যবস্থা তৈরি করতে গাইড করে। এই সিস্টেমটি একটি কাঙ্ক্ষিত তাপমাত্রার পরিসীমা বজায় রাখতে পারে, যা বিভিন্ন প্রয়োগের জন্য উপযুক্ত। আপনি এটি ব্যবহার করে তৈরি করতে পারেন:
- সূক্ষ্ম পরীক্ষা বা চারা গাছের জন্য একটি তাপমাত্রা-নিয়ন্ত্রিত ইনকিউবেটর।
- সামঞ্জস্যপূর্ণ ওয়ার্ট তাপমাত্রা বজায় রাখার জন্য একটি স্বয়ংক্রিয় ব্রুইং সিস্টেম।
- সরীসৃপ বা অন্যান্য তাপমাত্রা-সংবেদনশীল প্রাণীদের জন্য একটি জলবায়ু-নিয়ন্ত্রিত ঘের।
- ছোট জায়গার জন্য একটি সাধারণ গরম বা ঠান্ডা করার সিস্টেম।
-
robojax_course_47_MAX6675_temperature-0
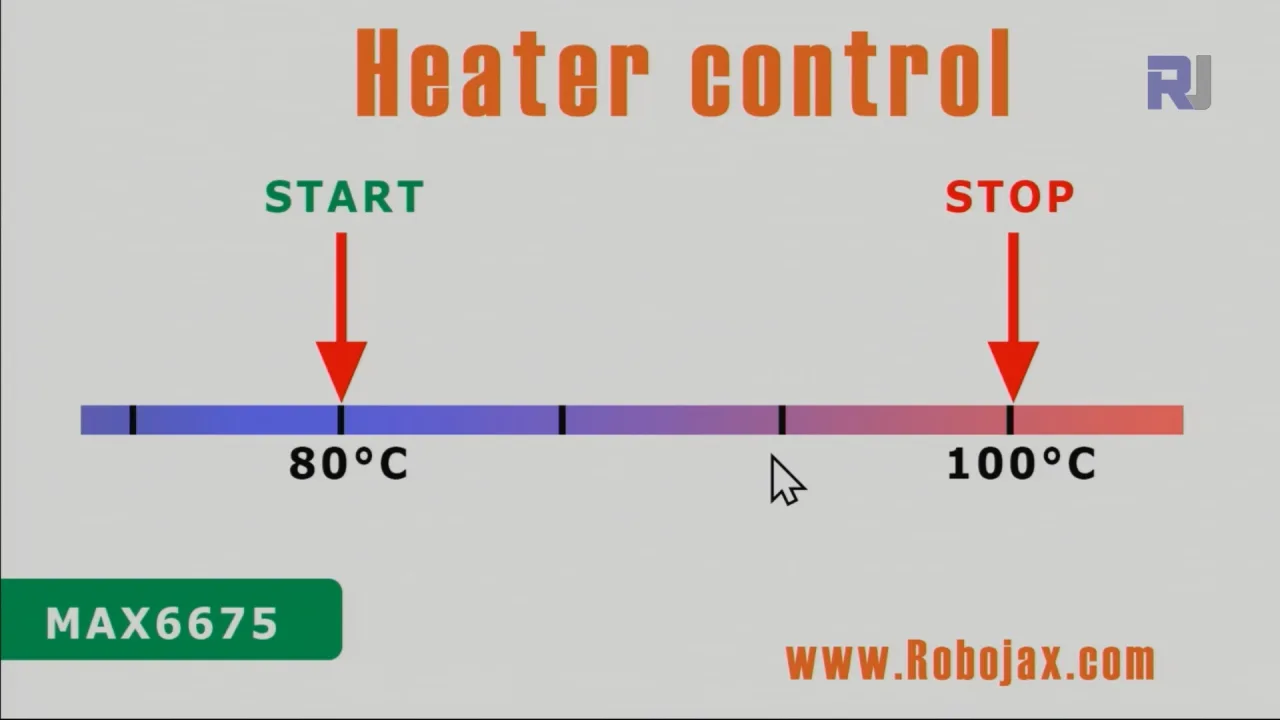
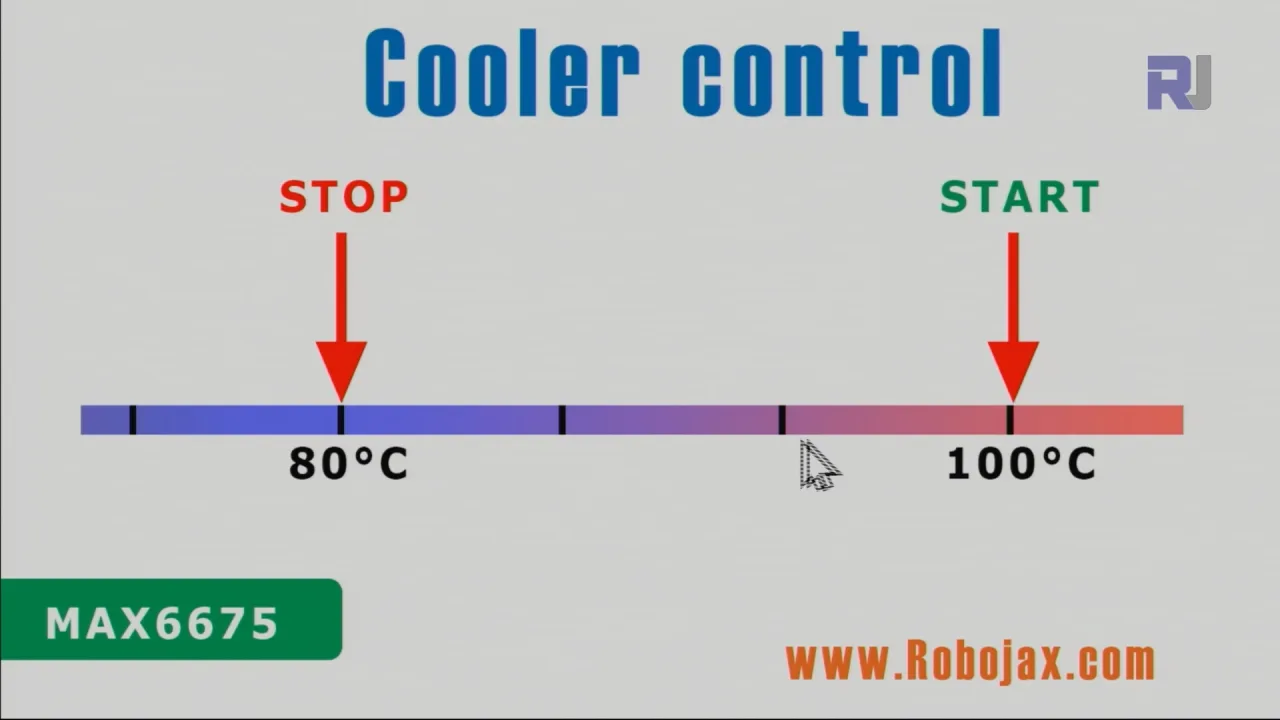
সিস্টেমটি একটি K-টাইপ থার্মোকাপল থেকে তাপমাত্রা পড়তে MAX6675 ব্যবহার করে, যা বিস্তৃত পরিসরে সঠিক তাপমাত্রা রিডিং প্রদান করে (থার্মোকাপলের ধরণের উপর নির্ভর করে, 1000°C বা তার বেশি পর্যন্ত)। Arduino এই রিডিংগুলি প্রক্রিয়া করে এবং একটি রিলে নিয়ন্ত্রণ করে একটি গরম বা ঠান্ডা করার উপাদান চালু বা বন্ধ করতে, ব্যবহারকারী-সংজ্ঞায়িত পরিসরের মধ্যে তাপমাত্রা বজায় রাখে। (ভিডিওতে 00:32 এ)
হার্ডওয়্যার/কম্পোনেন্ট
এই প্রকল্পটি তৈরি করতে, আপনার নিম্নলিখিত উপাদানগুলির প্রয়োজন হবে:
- Arduino বোর্ড (Uno, Nano, ইত্যাদি)
- MAX6675 থার্মোকাপল অ্যামপ্লিফায়ার
- K-টাইপ থার্মোকাপল
- রিলে মডিউল
- AC বাল্ব (বা অন্যান্য লোড, যেমন একটি ফ্যান বা হিটার)
- জাম্পার তার
- ব্রেডবোর্ড (ঐচ্ছিক, তবে সুপারিশকৃত)
ওয়্যারিং গাইড
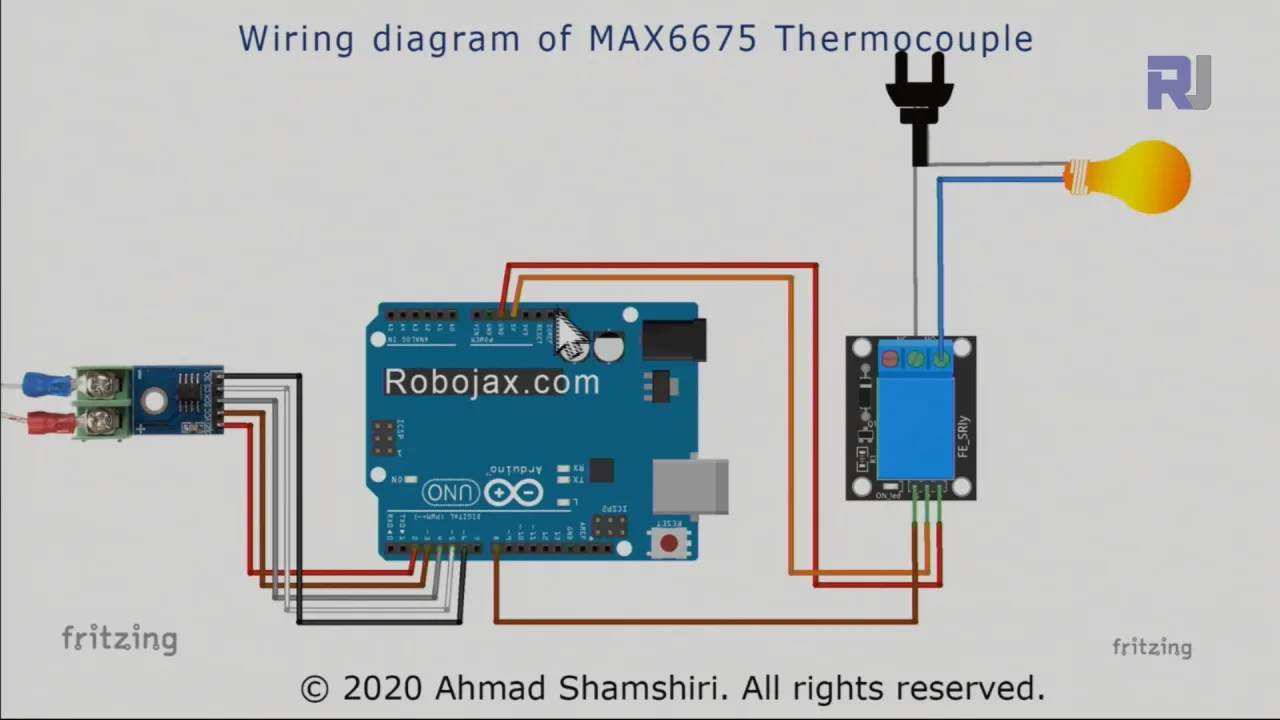
ওয়্যারিংটি ভিডিওতে বিস্তারিতভাবে ব্যাখ্যা করা হয়েছে। (ভিডিওতে 03:28 এ) একটি ভিজ্যুয়াল গাইডের জন্য ভিডিওটি দেখুন। মূল সংযোগগুলির মধ্যে রয়েছে MAX6675 কে Arduino এর সাথে সংযুক্ত করা (পিন 2-6), রিলে মডিউলটি Arduino এর সাথে (পিন 8 এবং পাওয়ার), এবং রিলে মডিউলটি AC লোডের সাথে। একটি গুরুত্বপূর্ণ দিক হল রিলেতে সংযোগ করার আগে আপনার AC লোডের লাইভ এবং নিউট্রাল তারগুলি সঠিকভাবে শনাক্ত করা। ভুল ওয়্যারিং বিপজ্জনক পরিস্থিতির দিকে নিয়ে যেতে পারে।
কোড ব্যাখ্যা
Arduino কোডটি (নিচের স্নিপেটে দেখানো হয়েছে) থার্মোকাপল থেকে তাপমাত্রার মান পড়তে MAX6675 লাইব্রেরি ব্যবহার করে। কোডের ব্যবহারকারী-কনফিগারযোগ্য অংশগুলি হল:
relayPin: রিলে মডিউলের সাথে সংযুক্ত Arduino পিন (ডিফল্ট: 8)। (ভিডিওতে 07:35 এ)relayONএবংrelayOFF: এই ধ্রুবকগুলি রিলে চালু এবং বন্ধ করার জন্য লজিক লেভেল নির্ধারণ করে। এগুলি সাধারণত LOW এবং HIGH হয়, তবে আপনার রিলে মডিউলের উপর নির্ভর করে সামঞ্জস্য করার প্রয়োজন হতে পারে। (ভিডিওতে 07:35 এ)TEMPERATURE_UNIT: তাপমাত্রা রিডিংয়ের জন্য ইউনিট সেট করে (1 সেলসিয়াসের জন্য, 2 ফারেনহাইটের জন্য, 3 কেলভিনের জন্য)। (ভিডিওতে 08:21 এ)START_TEMPERATUREএবংSTOP_TEMPERATURE: এই ভেরিয়েবলগুলি নিয়ন্ত্রণ ব্যবস্থার জন্য তাপমাত্রার পরিসীমা নির্ধারণ করে। তাপমাত্রাSTART_TEMPERATUREএর নিচে নেমে গেলে সিস্টেমটি রিলে চালু করবে এবং তাপমাত্রাSTOP_TEMPERATUREএ পৌঁছালে এটি বন্ধ করবে (বা বিপরীত, আপনি একটি হিটার বা কুলার নিয়ন্ত্রণ করছেন কিনা তার উপর নির্ভর করে)। (ভিডিওতে 08:31 এ)CONTROL_TYPE: একটি ভেরিয়েবল যা নির্ধারণ করে সিস্টেমটি হিটার (1) বা কুলার (2) হিসাবে কাজ করে কিনা। (ভিডিওতে 08:36 এ)
কোডটিতে readTemperature(), printTemperature(), loadControl(), এবং relayControl() এর মতো ফাংশন রয়েছে যা তাপমাত্রা পড়া, প্রদর্শন এবং রিলে অপারেশন পরিচালনা করে। এই ফাংশনগুলি ভিডিওতে স্পষ্টভাবে সংজ্ঞায়িত এবং ব্যাখ্যা করা হয়েছে। (ভিডিওতে 09:37, 10:00, 10:43, 11:30 এ)
const int relayPin =8;
const int relayON = LOW;// do not change
const int relayOFF = HIGH; //do not change
int relayState = relayOFF;//initial state of relay

const int TEMPERATURE_UNIT =1;//1=Celsius, 2=Fahrenheit, 3=Kelvin
const float START_TEMPERATURE = 80.0;//unit above
const float STOP_TEMPERATURE = 100.0;//unit above
const int CONTROL_TYPE = 1;// 1= heater, 2=cooler
লাইভ প্রকল্প/প্রদর্শন
ভিডিওটি গরম এবং ঠান্ডা করার উভয় পরিস্থিতির জন্য তাপমাত্রা নিয়ন্ত্রণ ব্যবস্থার কার্যকারিতা প্রদর্শন করে। (ভিডিওতে 13:15 এবং 15:28 এ) প্রদর্শনটি স্পষ্টভাবে দেখায় যে সিস্টেমটি প্রয়োজন অনুযায়ী রিলে চালু এবং বন্ধ করে সেট পরিসরের মধ্যে তাপমাত্রা কীভাবে বজায় রাখে।
অধ্যায়
- [00:00] ভূমিকা
- [00:55] হিটার/কুলার নিয়ন্ত্রণ ব্যাখ্যা
- [03:28] ওয়্যারিং ডায়াগ্রাম
- [06:26] কোড ব্যাখ্যা
- [13:15] হিটার নিয়ন্ত্রণ প্রদর্শন
- [15:28] কুলার নিয়ন্ত্রণ প্রদর্শন
- [17:29] উপসংহার
ছবি
/*
 * This is the Arduino code for MAX6675 Thermocouple K-Type with Relay and Display
 * The output pin 10 is connected to the relay.
 * When the temperature reaches the desired value, pin 10 turns the
 * relay ON.

 * This code has been explained in our video at https://youtu.be/cD5oOu4N_AE

 *
 * Written by Ahmad Nejrabi for Robojax Video
 * Date: December 9, 2017, in Ajax, Ontario, Canada
 * Permission granted to share this code given that this
 * note is kept with the code.
 * Disclaimer: This code is "AS IS" and for educational purposes only.
 *
 */

 // This example is public domain. Enjoy!
// www.ladyada.net/learn/sensors/thermocouple

#include "max6675.h"


int thermoDO = 4;
int thermoCS = 5;
int thermoCLK = 6;


MAX6675 thermocouple(thermoCLK, thermoCS, thermoDO);
int vccPin = 3;
int gndPin = 2;

void setup() {
  Serial.begin(9600);
  // Use Arduino pins
  pinMode(vccPin, OUTPUT); digitalWrite(vccPin, HIGH);
  pinMode(gndPin, OUTPUT); digitalWrite(gndPin, LOW);
    pinMode(10, OUTPUT);// set pin 10 as output

  Serial.println("Robojax: MAX6675 test");
  // wait for MAX chip to stabilize
  delay(500);
}

void loop() {
  // basic readout test, just print the current temp


   Serial.print("C = ");
   Serial.println(thermocouple.readCelsius());
   Serial.print("F = ");
   Serial.println(thermocouple.readFahrenheit());

   // If temperature goes above 80.0C, turn the relay ON
   if(thermocouple.readCelsius() > 80.00){
    digitalWrite(10, LOW);// set pin 10 LOW
   }else{
    digitalWrite(10, HIGH);// set pin 10 HIGH
   }


   delay(1000);
}++
/*
* Library from: // www.ladyada.net/learn/sensors/thermocouple
*
* This is Arduino code to measure MAX6675 Thermocouple K-Type sensor
* and control relay as heater or cooler
*
* Watch Video instruction for this code: https://youtu.be/dVh77wT-4Ao
*
* Written by Ahmad Shamshiri on May 20, 2020 in Ajax, Ontario, Canada
* www.robojax.com
*
* Get this code and other Arduino codes from Robojax.com.
Learn Arduino step by step in a structured course with all material, wiring diagrams, and libraries
all in one place. Purchase My course on Udemy.com http://robojax.com/L/?id=62
If you found this tutorial helpful, please support me so I can continue creating
content like this.
or make a donation using PayPal http://robojax.com/L/?id=64
Related videos:
Introduction to MAX6675 K-Type: https://youtu.be/VGqONmUinqA
Using MAX6675 K-Type thermocouple with LED display: https://youtu.be/cD5oOu4N_AE
Using MAX6675 K-Type thermocouple with LCD1602-I2C: https://youtu.be/BlhpktgPdKs
Using 2 or more MAX6675 K-Type thermocouples: https://youtu.be/c90NszbNG8c
Using MAX6675 K-Type thermocouple as heater or cooler controller: [this video]
* * This code is "AS IS" without warranty or liability. Free to be used as long as you keep this note intact.*
* This code has been downloaded from Robojax.com
This program is free software: you can redistribute it and/or modify
it under the terms of the GNU General Public License as published by
the Free Software Foundation, either version 3 of the License, or
(at your option) any later version.
This program is distributed in the hope that it will be useful,
but WITHOUT ANY WARRANTY; without even the implied warranty of
MERCHANTABILITY or FITNESS FOR A PARTICULAR PURPOSE. See the
GNU General Public License for more details.
You should have received a copy of the GNU General Public License
along with this program. If not, see <https://www.gnu.org/licenses/>.
*/
#include "max6675.h"
//Robojax.com heater/cooler with MAX6675 Thermocoupler
int GNDpin = 2;
int VCCpin =3;
int thermoCLK = 4;
int thermoCS = 5;
int thermoDO = 6;
MAX6675 thermocouple(thermoCLK, thermoCS, thermoDO);
const int relayPin =8;
const int relayON = LOW;// do not change
const int relayOFF = HIGH; //do not change
int relayState = relayOFF;//initial state of relay
const int TEMPERATURE_UNIT =1;//1=Celsius, 2=Fahrenheit, 3=Kelvin
const float START_TEMPERATURE = 80.0;//unit above
const float STOP_TEMPERATURE = 100.0;//unit above
const int CONTROL_TYPE = 1;// 1= heater, 2=cooler
float temperature;
void setup() {
//Robojax.com heater/cooler with MAX6675 Thermocoupler
Serial.begin(9600);
Serial.println("MAX6675 test with relay");
// use Arduino pins
pinMode(relayPin, OUTPUT);//pin for relay
digitalWrite(relayPin, relayState);
pinMode(VCCpin, OUTPUT);
digitalWrite(VCCpin, HIGH);
pinMode(GNDpin, OUTPUT);
digitalWrite(GNDpin, LOW);
// wait for MAX chip to stabilize
delay(500);
//Robojax.com heater/cooler with MAX6675 Thermocoupler
}
void loop() {
//Robojax.com heater/cooler with MAX6675 Thermocoupler
readTemperature();
printTemperature();
loadControl();
if(temperature >=89.5)
{
///
}
delay(1000);
//Robojax.com heater/cooler with MAX6675 Thermocoupler
}//loop
/*
* loadControl()
* @brief controls the load based
* @param state can be either : relayON or relayOFF
* @return returns none
* Written by Ahmad Shamshiri for robojax.com
* on May 20, 2020 at 15:23 in Ajax, Ontario, Canada
*/
void loadControl()
{
//Robojax.com heater/cooler with MAX6675 Thermocoupler
// Serial.print("Start: ");
// Serial.print(START_TEMPERATURE);
// Serial.print(" Stop: ");
//Serial.println(STOP_TEMPERATURE);
if(CONTROL_TYPE ==1)
{
if(START_TEMPERATURE >= temperature && STOP_TEMPERATURE >=temperature)
{
relayControl(relayON);
}
if(STOP_TEMPERATURE <=temperature)
{
relayControl(relayOFF);
}
}else{
if(START_TEMPERATURE >= temperature && STOP_TEMPERATURE >=temperature)
{
relayControl(relayOFF);
}
if(STOP_TEMPERATURE <=temperature)
{
relayControl(relayON);
}
}
//Robojax.com heater/cooler with MAX6675 Thermocoupler
}//loadControl()
/*
* relayControl(int state))
* @brief turns the relay ON or OFF
* @param state is "relayON" or "relayOFF" defined at the top of code
* @return returns none
* Written by Ahmad Shamshiri for robojax.com
* on May 20, 2020 at 15:23 in Ajax, Ontario, Canada
*/
void relayControl(int state)
{
//Robojax.com heater/cooler with MAX6675 Thermocoupler
if(state ==relayON)
{
digitalWrite(relayPin, relayON);
Serial.println("Relay ON");
}else{
digitalWrite(relayPin, relayOFF);
Serial.println("Relay OFF");
}
//Robojax.com heater/cooler with MAX6675 Thermocoupler
}//relayControl()
/*
* readTemperature()
* @brief reads the temperature based on the TEMPERATURE_UNIT
* @param average temperature
* @return returns one of the values above
* Written by Ahmad Shamshiri for robojax.com
* on May 20, 2020 at 15:23 in Ajax, Ontario, Canada
*/
void readTemperature()
{
//Robojax.com heater/cooler with MAX6675 Thermocoupler
if(TEMPERATURE_UNIT ==2)
{
temperature = thermocouple.readFahrenheit();//convert to Fahrenheit
}else if(TEMPERATURE_UNIT ==3)
{
temperature = thermocouple.readCelsius() + 273.15;//convert to Kelvin
}else{
temperature = thermocouple.readCelsius();// return Celsius
}
//Robojax.com heater/cooler with MAX6675 Thermocoupler
}// readTemperature()
/*
* printTemperature()
* @brief prints temperature on serial monitor
* @param charact type
* @param "type" is character
* C = Celsius
* K = Kelvin
* F = Fahrenheit
* @return none
* Written by Ahmad Shamshiri for robojax.com
* on May 08, 2020 at 02:45 in Ajax, Ontario, Canada
*/
void printTemperature()
{
//Robojax.com heater/cooler with MAX6675 Thermocoupler
Serial.print(temperature);
printDegree();
if(TEMPERATURE_UNIT ==2)
{
Serial.print("F");
}else if(TEMPERATURE_UNIT ==3)
{
Serial.print("K");
}else{
Serial.print("C");
}
Serial.println();
//Robojax.com heater/cooler with MAX6675 Thermocoupler
}//printTemperature()
/*
* @brief prints degree symbol on serial monitor
* @param none
* @return returns nothing
* Written by Ahmad Shamshiri on July 13, 2019
* for Robojax Tutorial Robojax.com
*/
void printDegree()
{
Serial.print("\\xC2");
Serial.print("\\xB0");
}আপনাকে যা প্রয়োজন হতে পারে
-
ইবে
-
অলি এক্সপ্রেসPurchase 1 channel 5V KY-019 relay from AliExpresss.click.aliexpress.com
-
ব্যাংগুডPurchase MAX6675 K-Type from Banggoodbanggood.com
সম্পদ ও রেফারেন্সসমূহ
-
বাহ্যিকMAX6675 datasheet (PDF)datasheets.maximintegrated.com
ফাইলসমূহ📁
কোনো ফাইল উপলব্ধ নেই।


![Arduino Motor Shield REV3 [A000079]](https://i.ebayimg.com/images/g/To8AAOSwg8Bj00PN/s-l225.jpg)