ትምህርት 47፡ K-ዓይነት MAX6675ን እንደ ሙቀት መቆጣጠሪያ ከሬሌ ጋር መጠቀም | አርዱኢኖ ደረጃ በደረጃ ኮርስ
ይህ ፕሮጀክት አርዱኖን፣ MAX6675 K-አይነት ቴርሞኮፕል እና ሪሌይ በመጠቀም የሙቀት መቆጣጠሪያ ስርዓት እንዴት እንደሚገነቡ ይመራዎታል። ይህ ስርዓት የሚፈለገውን የሙቀት መጠን መጠበቅ ይችላል፣ ይህም ለተለያዩ አፕሊኬሽኖች ተስማሚ ያደርገዋል። ይህንን ለመገንባት መጠቀም ይችላሉ፡-
- ለስሱ ሙከራዎች ወይም ችግኞች የሙቀት መጠን ቁጥጥር የሚደረግበት ኢንኩቤተር።
- ወጥ የሆነ የዎርት ሙቀት ለመጠበቅ አውቶማቲክ የቢራ አመራረት ስርዓት።
- ለዝርፊያዎች ወይም ለሌሎች ሙቀትን ለሚነኩ እንስሳት የአየር ንብረት ቁጥጥር የሚደረግበት ክፍል።
- ለአነስተኛ ቦታ ቀላል የማሞቂያ ወይም የማቀዝቀዣ ስርዓት።
-
robojax_course_47_MAX6675_temperature-0
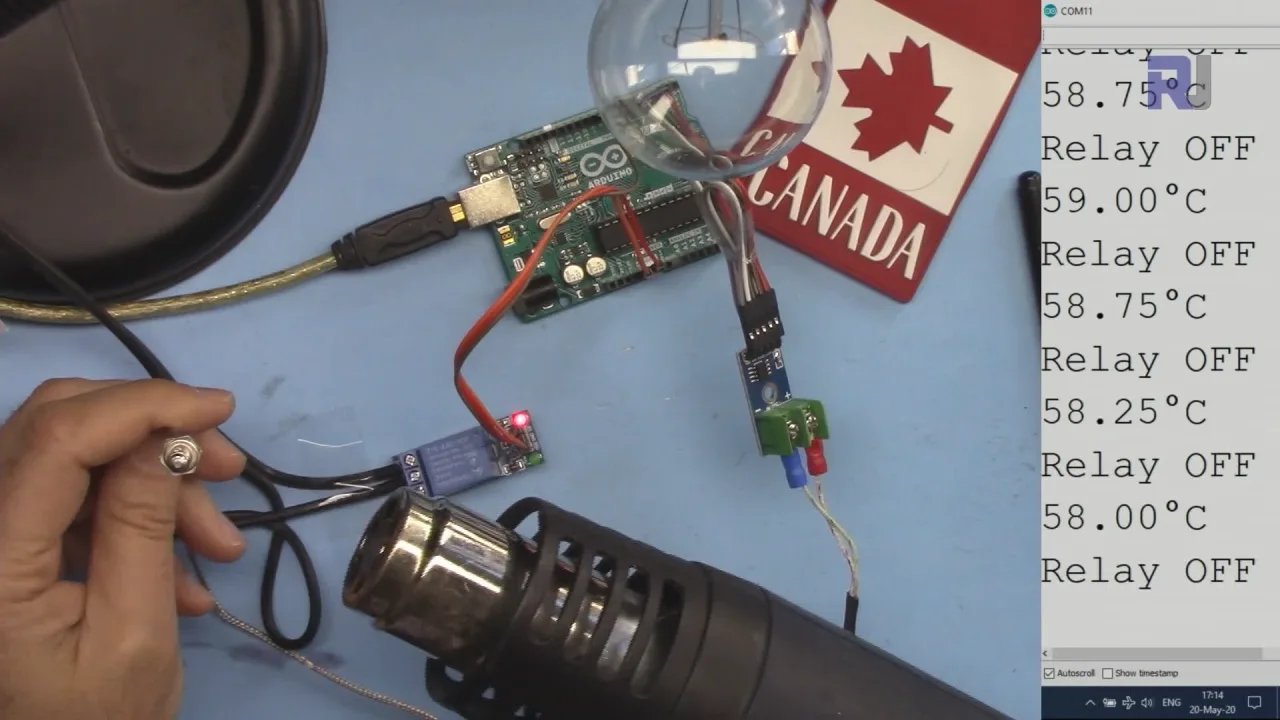
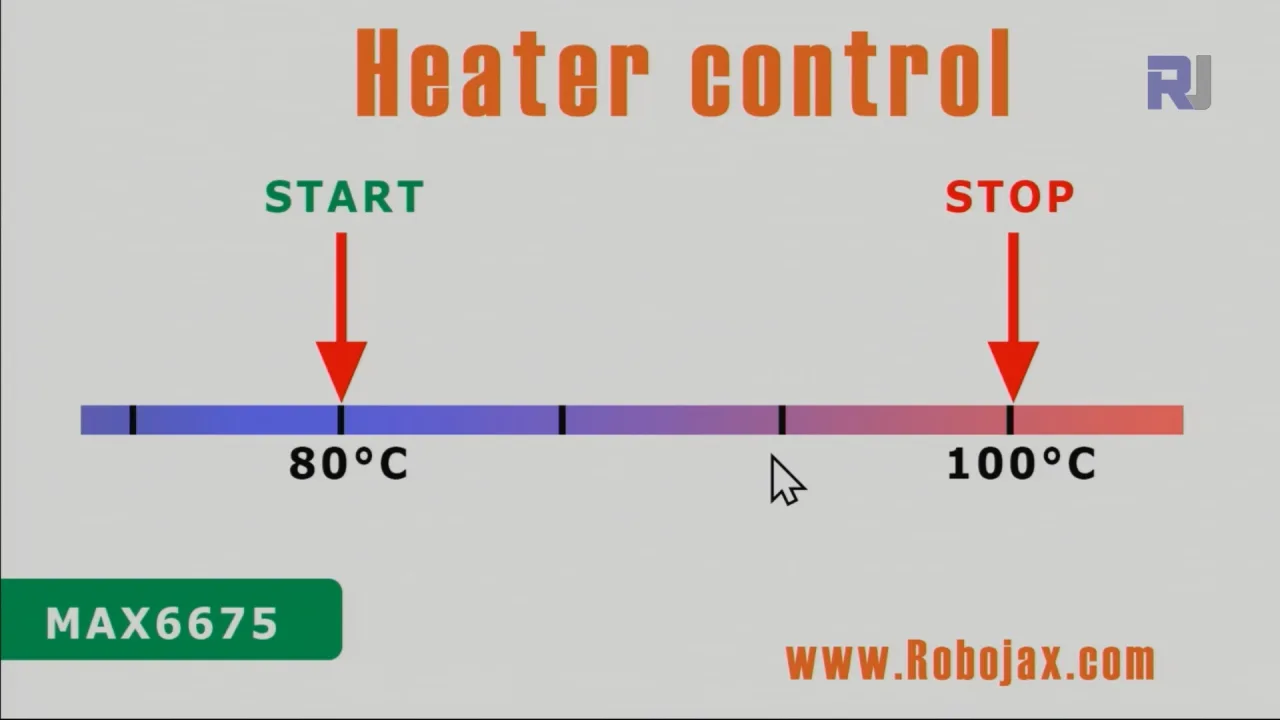
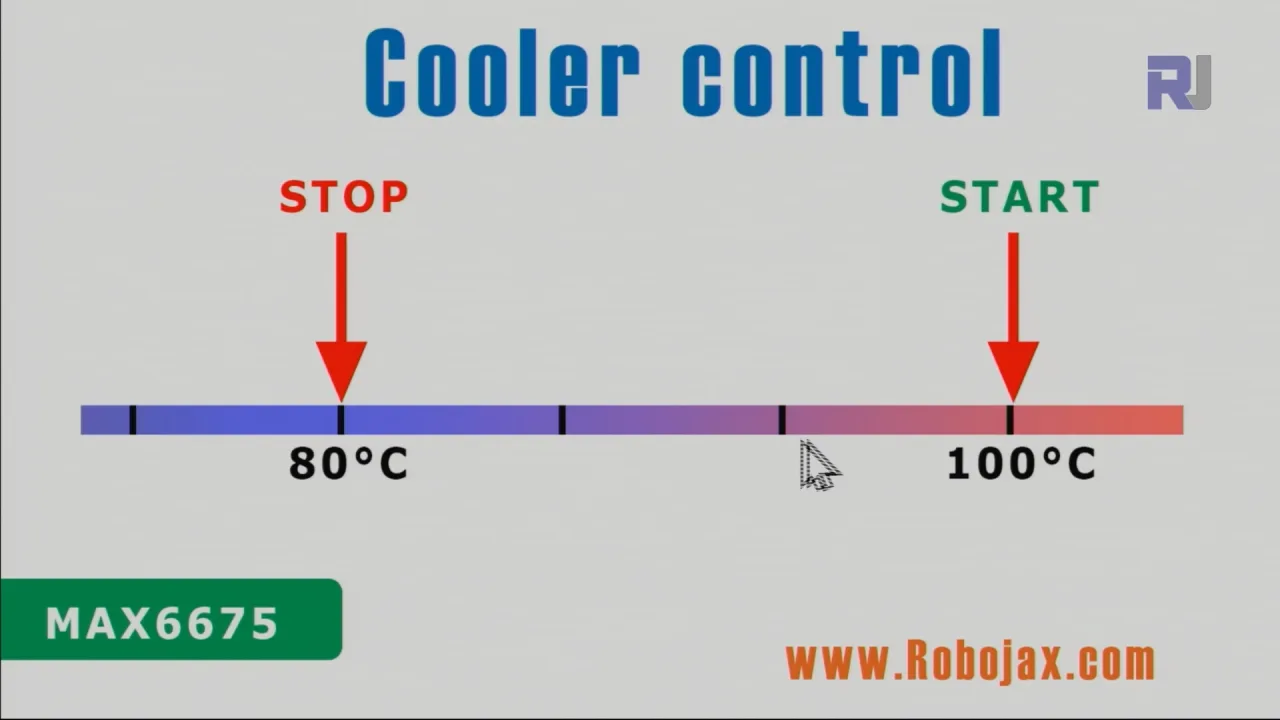
ስርዓቱ MAX6675 ን በመጠቀም ከ K-አይነት ቴርሞኮፕል የሙቀት መጠንን ያነባል፣ ይህም በሰፊ ክልል ውስጥ ትክክለኛ የሙቀት መጠን ንባቦችን ይሰጣል (እንደ ቴርሞኮፕል አይነት፣ እስከ 1000°C ወይም ከዚያ በላይ)። አርዱኖ እነዚህን ንባቦች ያስኬዳል እና ሪሌይን በመቆጣጠር የማሞቂያ ወይም የማቀዝቀዣ ኤለመንትን ያበራል ወይም ያጠፋል፣ ይህም ሙቀቱን በተጠቃሚ በተገለጸው ክልል ውስጥ ይጠብቃል። (በቪዲዮ በ00:32)
ሃርድዌር/ክፍሎች
ይህንን ፕሮጀክት ለመገንባት የሚከተሉትን ክፍሎች ያስፈልግዎታል፡-
- አርዱኖ ቦርድ (Uno፣ Nano፣ ወዘተ.)
- MAX6675 ቴርሞኮፕል ማጉያ
- K-አይነት ቴርሞኮፕል
- ሪሌይ ሞጁል
- AC አምፑል (ወይም ሌላ ጭነት፣ እንደ ማራገቢያ ወይም ማሞቂያ)
- ጃምፐር ሽቦዎች
- ብሬድቦርድ (አማራጭ፣ ግን ይመከራል)
የሽቦ አገናኝ መመሪያ
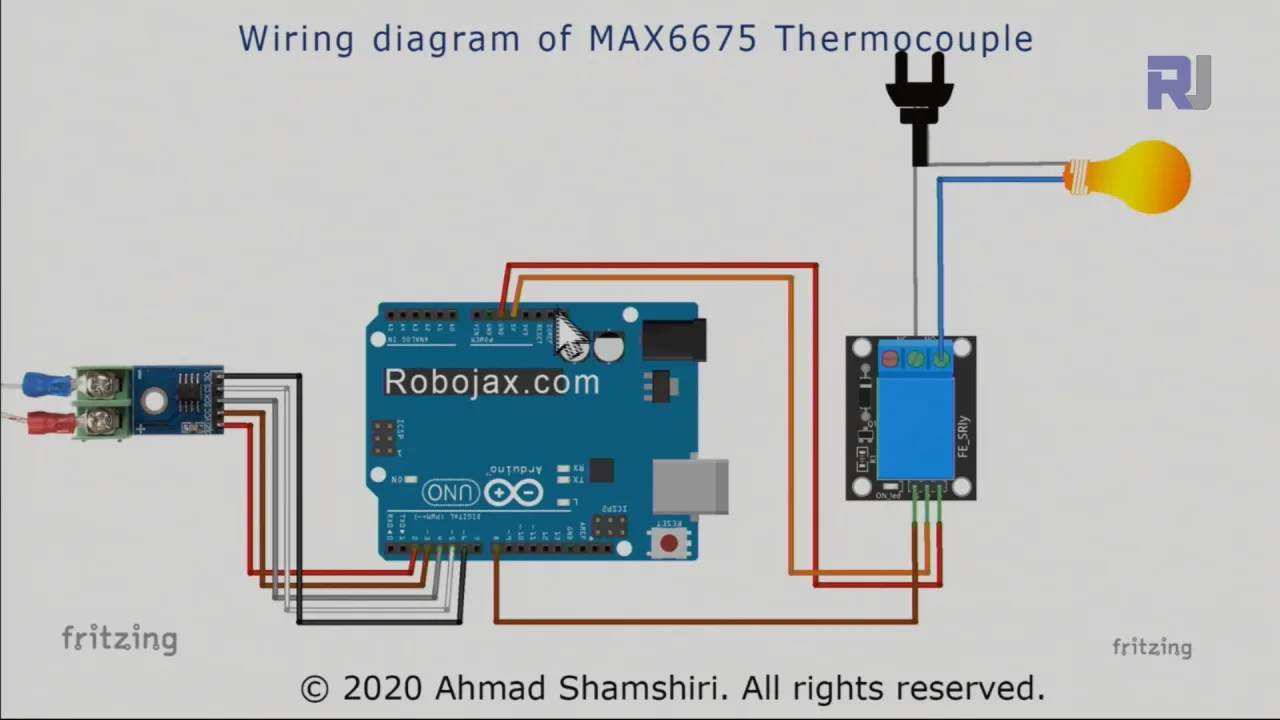
የሽቦ አገናኝ ስራው በቪዲዮው ውስጥ በዝርዝር ተብራርቷል። (በቪዲዮ በ03:28) ለእይታ መመሪያ ቪዲዮውን ይመልከቱ። ቁልፍ ግንኙነቶች MAX6675 ን ከአርዱኖ ጋር (ፒን 2-6)፣ ሪሌይ ሞጁሉን ከአርዱኖ ጋር (ፒን 8 እና ሃይል) እና ሪሌይ ሞጁሉን ከAC ጭነት ጋር ማገናኘትን ያካትታሉ። ወሳኝ ገጽታ የAC ጭነትዎን የቀጥታ እና የገለልተኛ ሽቦዎችን ከሪሌይ ጋር ከማገናኘትዎ በፊት በትክክል መለየት ነው። የተሳሳተ የሽቦ አገናኝ ወደ አደገኛ ሁኔታዎች ሊመራ ይችላል።
የኮድ ማብራሪያ
የአርዱኖ ኮድ (ከዚህ በታች በቁርጥራጮች የሚታየው) ከቴርሞኮፕል የሙቀት መጠን እሴቶችን ለማንበብ MAX6675 ቤተ-መጻሕፍትን ይጠቀማል። በተጠቃሚ ሊዋቀሩ የሚችሉት የኮዱ ክፍሎች የሚከተሉት ናቸው፡-
relayPin፡ ከሪሌይ ሞጁል ጋር የተገናኘው የአርዱኖ ፒን (ነባሪ፡ 8)። (በቪዲዮ በ07:35)relayONእናrelayOFF፡ እነዚህ ቋሚዎች ሪሌይን ለማብራት እና ለማጥፋት የሎጂክ ደረጃዎችን ይገልጻሉ። እነዚህ ብዙውን ጊዜ LOW እና HIGH ናቸው፣ ግን እንደ ሪሌይ ሞጁልዎ ሊስተካከሉ ይችላሉ። (በቪዲዮ በ07:35)TEMPERATURE_UNIT፡ ለሙቀት መጠን ንባቦች አሃድ ያዘጋጃል (1 ለሴልሺየስ፣ 2 ለፋራናይት፣ 3 ለኬልቪን)። (በቪዲዮ በ08:21)START_TEMPERATUREእናSTOP_TEMPERATURE፡ እነዚህ ተለዋዋጮች ለቁጥጥር ስርዓቱ የሙቀት ክልል ይገልጻሉ። ስርዓቱ የሙቀት መጠኑ ከSTART_TEMPERATUREበታች ሲወድቅ ሪሌይን ያበራል እና የሙቀት መጠኑSTOP_TEMPERATUREሲደርስ ያጠፋዋል (ወይም በተቃራኒው፣ ማሞቂያ ወይም ማቀዝቀዣ እየተቆጣጠሩ እንደሆነ)። (በቪዲዮ በ08:31)CONTROL_TYPE፡ ስርዓቱ እንደ ማሞቂያ (1) ወይም ማቀዝቀዣ (2) እንደሚሰራ የሚወስን ተለዋዋጭ። (በቪዲዮ በ08:36)
ኮዱ readTemperature()፣ printTemperature()፣ loadControl() እና relayControl() የመሳሰሉ ተግባራትን ያካትታል፣ እነዚህም የሙቀት መጠን ንባብን፣ ማሳያን እና የሪሌይ አሰራርን ያስተናግዳሉ። እነዚህ ተግባራት በቪዲዮው ውስጥ በግልጽ ተገልጸዋል እና ተብራርተዋል። (በቪዲዮ በ09:37፣ 10:00፣ 10:43፣ 11:30)
const int relayPin =8;
const int relayON = LOW;// አይቀይሩ
const int relayOFF = HIGH; //አይቀይሩ
int relayState = relayOFF;//የሪሌይ የመጀመሪያ ሁኔታ

const int TEMPERATURE_UNIT =1;//1=ሴልሺየስ፣ 2=ፋራናይት፣ 3=ኬልቪን
const float START_TEMPERATURE = 80.0;//ከላይ ያለው አሃድ
const float STOP_TEMPERATURE = 100.0;//ከላይ ያለው አሃድ
const int CONTROL_TYPE = 1;// 1= ማሞቂያ፣ 2=ማቀዝቀዣ
የቀጥታ ፕሮጀክት/ማሳያ
ቪዲዮው የሙቀት መቆጣጠሪያ ስርዓቱን ለሁለቱም የማሞቂያ እና የማቀዝቀዣ ሁኔታዎች እንዴት እንደሚሰራ ያሳያል። (በቪዲዮ በ13:15 እና 15:28) ማሳያው ስርዓቱ ሪሌይን እንደ አስፈላጊነቱ በማብራት እና በማጥፋት ሙቀቱን በተቀመጠው ክልል ውስጥ እንዴት እንደሚጠብቅ በግልጽ ያሳያል።
ምዕራፎች
- [00:00] መግቢያ
- [00:55] የማሞቂያ/ማቀዝቀዣ ቁጥጥር ማብራሪያ
- [03:28] የሽቦ አገናኝ ንድፍ
- [06:26] የኮድ ማብራሪያ
- [13:15] የማሞቂያ ቁጥጥር ማሳያ
- [15:28] የማቀዝቀዣ ቁጥጥር ማሳያ
- [17:29] መደምደሚያ
ምስሎች
/*
 * This is the Arduino code for MAX6675 Thermocouple K-Type with Relay and Display
 * The output pin 10 is connected to the relay.
 * When the temperature reaches the desired value, pin 10 turns the
 * relay ON.

 * This code has been explained in our video at https://youtu.be/cD5oOu4N_AE

 *
 * Written by Ahmad Nejrabi for Robojax Video
 * Date: December 9, 2017, in Ajax, Ontario, Canada
 * Permission granted to share this code given that this
 * note is kept with the code.
 * Disclaimer: This code is "AS IS" and for educational purposes only.
 *
 */

 // This example is public domain. Enjoy!
// www.ladyada.net/learn/sensors/thermocouple

#include "max6675.h"


int thermoDO = 4;
int thermoCS = 5;
int thermoCLK = 6;


MAX6675 thermocouple(thermoCLK, thermoCS, thermoDO);
int vccPin = 3;
int gndPin = 2;

void setup() {
  Serial.begin(9600);
  // Use Arduino pins
  pinMode(vccPin, OUTPUT); digitalWrite(vccPin, HIGH);
  pinMode(gndPin, OUTPUT); digitalWrite(gndPin, LOW);
    pinMode(10, OUTPUT);// set pin 10 as output

  Serial.println("Robojax: MAX6675 test");
  // wait for MAX chip to stabilize
  delay(500);
}

void loop() {
  // basic readout test, just print the current temp


   Serial.print("C = ");
   Serial.println(thermocouple.readCelsius());
   Serial.print("F = ");
   Serial.println(thermocouple.readFahrenheit());

   // If temperature goes above 80.0C, turn the relay ON
   if(thermocouple.readCelsius() > 80.00){
    digitalWrite(10, LOW);// set pin 10 LOW
   }else{
    digitalWrite(10, HIGH);// set pin 10 HIGH
   }


   delay(1000);
}++
/*
* Library from: // www.ladyada.net/learn/sensors/thermocouple
*
* This is Arduino code to measure MAX6675 Thermocouple K-Type sensor
* and control relay as heater or cooler
*
* Watch Video instruction for this code: https://youtu.be/dVh77wT-4Ao
*
* Written by Ahmad Shamshiri on May 20, 2020 in Ajax, Ontario, Canada
* www.robojax.com
*
* Get this code and other Arduino codes from Robojax.com.
Learn Arduino step by step in a structured course with all material, wiring diagrams, and libraries
all in one place. Purchase My course on Udemy.com http://robojax.com/L/?id=62
If you found this tutorial helpful, please support me so I can continue creating
content like this.
or make a donation using PayPal http://robojax.com/L/?id=64
Related videos:
Introduction to MAX6675 K-Type: https://youtu.be/VGqONmUinqA
Using MAX6675 K-Type thermocouple with LED display: https://youtu.be/cD5oOu4N_AE
Using MAX6675 K-Type thermocouple with LCD1602-I2C: https://youtu.be/BlhpktgPdKs
Using 2 or more MAX6675 K-Type thermocouples: https://youtu.be/c90NszbNG8c
Using MAX6675 K-Type thermocouple as heater or cooler controller: [this video]
* * This code is "AS IS" without warranty or liability. Free to be used as long as you keep this note intact.*
* This code has been downloaded from Robojax.com
This program is free software: you can redistribute it and/or modify
it under the terms of the GNU General Public License as published by
the Free Software Foundation, either version 3 of the License, or
(at your option) any later version.
This program is distributed in the hope that it will be useful,
but WITHOUT ANY WARRANTY; without even the implied warranty of
MERCHANTABILITY or FITNESS FOR A PARTICULAR PURPOSE. See the
GNU General Public License for more details.
You should have received a copy of the GNU General Public License
along with this program. If not, see <https://www.gnu.org/licenses/>.
*/
#include "max6675.h"
//Robojax.com heater/cooler with MAX6675 Thermocoupler
int GNDpin = 2;
int VCCpin =3;
int thermoCLK = 4;
int thermoCS = 5;
int thermoDO = 6;
MAX6675 thermocouple(thermoCLK, thermoCS, thermoDO);
const int relayPin =8;
const int relayON = LOW;// do not change
const int relayOFF = HIGH; //do not change
int relayState = relayOFF;//initial state of relay
const int TEMPERATURE_UNIT =1;//1=Celsius, 2=Fahrenheit, 3=Kelvin
const float START_TEMPERATURE = 80.0;//unit above
const float STOP_TEMPERATURE = 100.0;//unit above
const int CONTROL_TYPE = 1;// 1= heater, 2=cooler
float temperature;
void setup() {
//Robojax.com heater/cooler with MAX6675 Thermocoupler
Serial.begin(9600);
Serial.println("MAX6675 test with relay");
// use Arduino pins
pinMode(relayPin, OUTPUT);//pin for relay
digitalWrite(relayPin, relayState);
pinMode(VCCpin, OUTPUT);
digitalWrite(VCCpin, HIGH);
pinMode(GNDpin, OUTPUT);
digitalWrite(GNDpin, LOW);
// wait for MAX chip to stabilize
delay(500);
//Robojax.com heater/cooler with MAX6675 Thermocoupler
}
void loop() {
//Robojax.com heater/cooler with MAX6675 Thermocoupler
readTemperature();
printTemperature();
loadControl();
if(temperature >=89.5)
{
///
}
delay(1000);
//Robojax.com heater/cooler with MAX6675 Thermocoupler
}//loop
/*
* loadControl()
* @brief controls the load based
* @param state can be either : relayON or relayOFF
* @return returns none
* Written by Ahmad Shamshiri for robojax.com
* on May 20, 2020 at 15:23 in Ajax, Ontario, Canada
*/
void loadControl()
{
//Robojax.com heater/cooler with MAX6675 Thermocoupler
// Serial.print("Start: ");
// Serial.print(START_TEMPERATURE);
// Serial.print(" Stop: ");
//Serial.println(STOP_TEMPERATURE);
if(CONTROL_TYPE ==1)
{
if(START_TEMPERATURE >= temperature && STOP_TEMPERATURE >=temperature)
{
relayControl(relayON);
}
if(STOP_TEMPERATURE <=temperature)
{
relayControl(relayOFF);
}
}else{
if(START_TEMPERATURE >= temperature && STOP_TEMPERATURE >=temperature)
{
relayControl(relayOFF);
}
if(STOP_TEMPERATURE <=temperature)
{
relayControl(relayON);
}
}
//Robojax.com heater/cooler with MAX6675 Thermocoupler
}//loadControl()
/*
* relayControl(int state))
* @brief turns the relay ON or OFF
* @param state is "relayON" or "relayOFF" defined at the top of code
* @return returns none
* Written by Ahmad Shamshiri for robojax.com
* on May 20, 2020 at 15:23 in Ajax, Ontario, Canada
*/
void relayControl(int state)
{
//Robojax.com heater/cooler with MAX6675 Thermocoupler
if(state ==relayON)
{
digitalWrite(relayPin, relayON);
Serial.println("Relay ON");
}else{
digitalWrite(relayPin, relayOFF);
Serial.println("Relay OFF");
}
//Robojax.com heater/cooler with MAX6675 Thermocoupler
}//relayControl()
/*
* readTemperature()
* @brief reads the temperature based on the TEMPERATURE_UNIT
* @param average temperature
* @return returns one of the values above
* Written by Ahmad Shamshiri for robojax.com
* on May 20, 2020 at 15:23 in Ajax, Ontario, Canada
*/
void readTemperature()
{
//Robojax.com heater/cooler with MAX6675 Thermocoupler
if(TEMPERATURE_UNIT ==2)
{
temperature = thermocouple.readFahrenheit();//convert to Fahrenheit
}else if(TEMPERATURE_UNIT ==3)
{
temperature = thermocouple.readCelsius() + 273.15;//convert to Kelvin
}else{
temperature = thermocouple.readCelsius();// return Celsius
}
//Robojax.com heater/cooler with MAX6675 Thermocoupler
}// readTemperature()
/*
* printTemperature()
* @brief prints temperature on serial monitor
* @param charact type
* @param "type" is character
* C = Celsius
* K = Kelvin
* F = Fahrenheit
* @return none
* Written by Ahmad Shamshiri for robojax.com
* on May 08, 2020 at 02:45 in Ajax, Ontario, Canada
*/
void printTemperature()
{
//Robojax.com heater/cooler with MAX6675 Thermocoupler
Serial.print(temperature);
printDegree();
if(TEMPERATURE_UNIT ==2)
{
Serial.print("F");
}else if(TEMPERATURE_UNIT ==3)
{
Serial.print("K");
}else{
Serial.print("C");
}
Serial.println();
//Robojax.com heater/cooler with MAX6675 Thermocoupler
}//printTemperature()
/*
* @brief prints degree symbol on serial monitor
* @param none
* @return returns nothing
* Written by Ahmad Shamshiri on July 13, 2019
* for Robojax Tutorial Robojax.com
*/
void printDegree()
{
Serial.print("\\xC2");
Serial.print("\\xB0");
}እንደሚያስፈልግዎት ይችላል
-
ኢቤይ
-
አሊኤክስፕሬስPurchase 1 channel 5V KY-019 relay from AliExpresss.click.aliexpress.com
-
ባንጉድPurchase MAX6675 K-Type from Banggoodbanggood.com
ምንጮች እና ምንጮች
-
ውስጥMAX6675 datasheet (PDF)datasheets.maximintegrated.com
ፋይሎች📁
አንድ ፋይል የለም።