第42课:使用LM35温度传感器 | Arduino零基础入门课程
在本课中,我们将学习如何使用LM35温度传感器与Arduino配合,测量并显示摄氏度、华氏度和开尔文温度。该传感器输出与温度成比例的电压,使我们能够轻松地在Arduino程序中读取和处理数据。当本教程结束时,您将能够在项目中实现基于温度的操作。

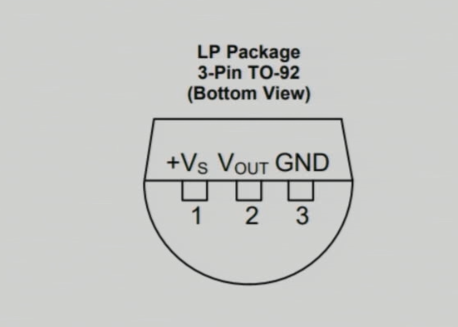
LM35温度传感器具有三个引脚:左侧引脚用于电源,中间引脚输出与温度对应的电压,右侧引脚用于接地。该传感器在4到30伏特的电压范围内工作,并提供每摄氏度10毫伏的输出。这种精度可在各种应用中实现准确的温度测量。
硬件解析
该项目的主要组件是LM35温度传感器。它设计用于提供与摄氏度温度线性成比例的模拟电压输出。该传感器适用于-55°C至+150°C的广泛温度范围,使其在不同环境中具有多样性。
LM35 需要最低功率(60 微安),并在广泛的电压范围内运行。它的输出阻抗低,可以直接与 Arduino 的模拟输入引脚接口,而无需额外电路。这种设计上的简洁性使 LM35 成为温度测量任务的优秀选择。
数据表详细信息
| 制造商 | 德州仪器 |
|---|---|
| 零件号 | LM35 |
| 逻辑/IO电压 | 4-30 伏 |
| 输出电流(每通道) | 1 毫安最大 |
| 温度范围 | -55至+150°C |
| 输出电压 | 10 mV/°C |
| 准确性 | ±0.5 °C 在 25 °C 时 |
| 包裹 | TO-92 |
- 确保电源供应在4V到30V之间,以获得准确的读数。
- 输出电压与温度成正比(10 mV/°C)。
- 在电源引脚附近使用解耦电容器以进行稳定。
- 连接时保持正确的极性以避免损坏。
- 确保良好的连接以避免浮动输入,这可能导致错误的读数。
接线说明

将LM35温度传感器接线,左侧引脚(VCC)连接到Arduino的5V输出。中间引脚(输出)应连接到模拟输入引脚。A0我们将使用它来读取温度。最后,将右侧引脚(接地)连接到 Arduino 上的一个接地引脚。确保所有连接都是安全的,以防在操作期间出现任何问题。
在接线时,请记住LM35的供电电压范围为4V到30V,但对于Arduino应用,使用5V足够。如果您看到意外的温度读数,请仔细检查连接并确保传感器正确供电。
代码示例与教程
在Arduino代码中,我们定义了模拟输入引脚以读取LM35输出电压,标识符为inPin,定于A0此外,我们定义了一个常量LM35_FACTOR设置为0.01,以表示传感器每摄氏度的输出。
const int inPin = A0; // can change
const float LM35_FACTOR = 0.01; // do not change
这个设置使我们能够以简单明了的方式读取温度。接下来,我们初始化串行通信。setup()函数开始向串行监视器输出温度数据。
void setup() {
  Serial.begin(9600);
  Serial.println("Robojax LM35 for Arduino");
}
在其中loop()功能,我们持续读取温度并以不同单位输出。printTemperature()该函数接受一个字符参数以指定所需的温度格式,从而允许我们以摄氏度、华氏度或开尔文显示温度。
void loop() {
  printTemperature('C');
  printTemperature('F');
  printTemperature('K');
  delay(1000); // Wait for 1000ms
}
根据温度采取行动,我们可以检查温度是否超过某个阈值。getTemperature()这个函数计算指定样本数量的平均温度。
有关详细信息,请观看相关视频以获取完整的代码讲解(视频时间为10:15)。
演示 / 期待什么
当LM35传感器正确连接且Arduino代码上传后,您应该能够在串行监视器上看到以摄氏度、华氏度和开尔文显示的温度。如果您给传感器加热,您将观察到温度读数相应上升。
请注意,接线不当可能导致温度读数不稳定,例如极高或极低的数值。始终确保传感器正确连接,以避免此类问题(视频中时间为12:30)。
视频时间戳
- 00:00- LM35简介
- 02:30- 接线说明
- 05:00- 代码说明
- 10:15- 温度读数演示
- 12:30常见问题与故障排除
图像
++
/*
 * Robojax Arduino Step-by-Step Course
 * Part 4: Temperature Sensors
 * Lesson 42: Introduction to LM35
 * This Arduino sketch is to use LM35 to measure temperature
 * This code has two ways to get temperature
 * 1-To print the temperature either in C, F or K on the serial monitor
 * 2-To return the value in C, F and K
 *


  Please watch video instruction here https://youtu.be/DRIC4wDu878
 This code is available at http://robojax.com/course1/?vid=lecture37

with over 100 lectures free on YouTube. Watch it here http://robojax.com/L/?id=338
Get the code for the course: http://robojax.com/L/?id=339

 * Written by Ahmad Shamshiri on May 08, 2020 at 02:45 in Ajax, Ontario, Canada
 * in Ajax, Ontario, Canada. www.robojax.com
 *


 *  * This code is "AS IS" without warranty or liability. Free to be used as long as you keep this note intact.*
 * This code has been downloaded from Robojax.com
    This program is free software: you can redistribute it and/or modify
    it under the terms of the GNU General Public License as published by
    the Free Software Foundation, either version 3 of the License, or
    (at your option) any later version.

    This program is distributed in the hope that it will be useful,
    but WITHOUT ANY WARRANTY; without even the implied warranty of
    MERCHANTABILITY or FITNESS FOR A PARTICULAR PURPOSE.  See the
    GNU General Public License for more details.

    You should have received a copy of the GNU General Public License
    along with this program.  If not, see <https://www.gnu.org/licenses/>.


*/

const int inPin =A0;//can change
const int iteration = 1000; //can change (see video)
const float LM35_FACTOR =0.01;// do not change

// the setup routine runs once when you press reset:
void setup() {
  // initialize serial communication at 9600 bits per second:
// Robojax.com Code YouTube Watch it here http://robojax.com/L/?id=338
  Serial.begin(9600);
  Serial.println("Robojax LM35 for Arduino");
  delay(500);
}

// the loop routine runs over and over again forever:
void loop() {
 //robojax.com LM35 Code for Arduino
  printTemperature('C');
  Serial.println();
  printTemperature('F');
  Serial.println();
  printTemperature('K');
  Serial.println();
  Serial.println();
//  Serial.print(" Temperature: ");
//  printDegree();
//  Serial.print(getTemperature('C'));
if(getTemperature('C') >87)
{
 // do something here (watch video)
}
//  Serial.println();
  delay(1000);//Wait for 1000ms (change it if you want)
}

/*
 * getTemperature()
 * @brief gets the average temperature
 * @param average temperature
 * @param "type" is character
 *     C = Celsius
 *     K = Kelvin
 *     F = Fahrenheit
 * @return returns one of the values above
 * Written by Ahmad Shamshiri for robojax.com
 * on May 08, 2020 at 02:36 in Ajax, Ontario, Canada
 */
float getTemperature(char type)
{
	// Robojax.com Code YouTube Watch it here http://robojax.com/L/?id=338
    float value,voltage,temperature;//define variables
    int sensorValue;
    float averageTemperature =0;

    for(int i=0; i< iteration; i++)
    {
      sensorValue = analogRead(inPin);//read analog value
      voltage = sensorValue * (5.0 / 1023.0); //convert it to voltage
      temperature = voltage / LM35_FACTOR; //convert voltage to temperature
      averageTemperature += temperature;//add
    }

    averageTemperature /=iteration;
  if(type =='F')
   {
    value = averageTemperature *9/5 + 32;//convert to Fahrenheit
   }else if(type =='K')
   {
    value = averageTemperature + 273.15;//convert to Kelvin
   }else{
    value = averageTemperature;// return Celsius
   }
    return value ;
}//getTemperature()

/*
 * printTemperature()
 * @brief prints  temperature on serial monitor
 * @param charact type
 * @param "type" is character
 *     C = Celsius
 *     K = Kelvin
 *     F = Fahrenheit
 * @return none
 * Written by Ahmad Shamshiri for robojax.com
 * on May 08, 2020 at 02:45 in Ajax, Ontario, Canada
 */
void printTemperature(char type)
{
	// Robojax.com Code YouTube Watch it here http://robojax.com/L/?id=338
    float value;
    float temp = getTemperature(type);
   Serial.print(temp);
    printDegree();
  if(type =='F')
   {
     Serial.print("F");
    }else if(type =='K')
   {
     Serial.print("K");
   }else{
     Serial.print("C");
   }

}//printTemperature()

/*
 * @brief prints degree symbol on serial monitor
 * @param none
 * @return returns nothing
 * Written by Ahmad Shamshiri on July 13, 2019
 * for Robojax Tutorial Robojax.com
 */
void printDegree()
{
    Serial.print("\\xC2");
    Serial.print("\\xB0");
}
|||您可能需要的东西
-
亚马逊在亚马逊购买LM35amzn.to
-
易趣从eBay购买LM35ebay.us
资源与参考
-
产品规格书LM35 数据表ti.com
文件📁
没有可用的文件。