レッスン42:LM35温度センサーの使用 | Arduinoステップバイステップコース
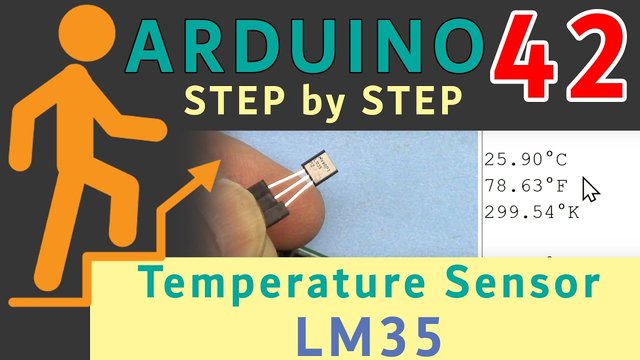
このレッスンでは、LM35温度センサーを使用してArduinoで摂氏、華氏、ケルビンの温度を測定し表示する方法を学びます。このセンサーは温度に比例した電圧を出力し、Arduinoプログラム内でデータを簡単に読み取り処理できるようにします。このチュートリアルの終わりまでには、プロジェクトで温度に基づくアクションを実装できるようになります。

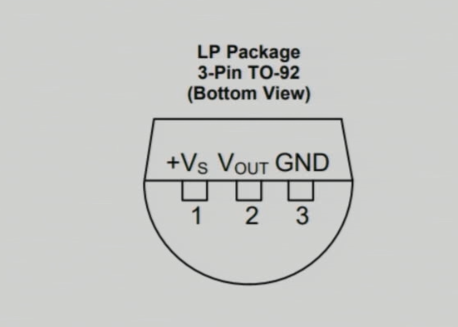
LM35温度センサーは、3つのピンを備えています。左側のピンは電源用で、中間のピンは温度に対応する電圧を出力し、右側のピンはグラウンド用です。このセンサーは4ボルトから30ボルトの範囲で動作し、摂氏1度あたり10ミリボルトの出力を提供します。この精度により、さまざまなアプリケーションで正確な温度測定が可能になります。
ハードウェアの解説
このプロジェクトの主なコンポーネントはLM35温度センサーです。このセンサーは、摂氏度での温度に線形比例したアナログ電圧出力を提供するよう設計されています。このセンサーは-55°Cから+150°Cまでの広い温度範囲に適しており、さまざまな環境での使用に適しています。
LM35は最小限の電力(60マイクロアンペア)を必要とし、広い電圧範囲で動作します。その出力インピーダンスは低く、追加の回路なしでArduinoのアナログ入力ピンと直接接続することができます。この設計のシンプルさにより、LM35は温度測定作業に最適な選択肢となります。
データシートの詳細
| 製造業者 | テキサス・インスツルメンツ |
|---|---|
| 部品番号 | LM35 |
| 論理/入出力電圧 | 4-30 V |
| 出力電流(チャネルごと) | 1 mA 最大 |
| 温度範囲 | -55から+150°C |
| 出力電圧 | 10 mV/°C |
| 精度 | ±0.5 °C at 25 °C |
| パッケージ | TO-92 |
- 4Vから30Vの間で適切な電源供給を確保し、正確な測定を行ってください。
- 出力電圧は温度に比例します(10 mV/°C)。
- 電源ピンの近くにデカップリングコンデンサを使用して安定化してください。
- 接続時はダメージを避けるため、極性を正しく維持してください。
- 良好な接続を確保して、浮遊入力を避けることが重要です。浮遊入力は誤った読み取りを引き起こす可能性があります。
配線指示

LM35温度センサーを配線するには、左側のピン(VCC)をArduinoの5V出力に接続します。中央のピン(Output)はアナログ入力ピンに接続する必要があります。A0温度を読み取るために使用します。最後に、右のピン(グランド)をArduinoの任意のグランドピンに接続します。すべての接続が確実であることを確認して、動作中に問題が発生しないようにしてください。
配線する際は、LM35は4Vから30Vの間で供給電圧を受けられますが、Arduinoアプリケーションには5Vの使用で十分です。予期しない温度読み取りがある場合は、接続を再確認し、センサーに正しく電源が供給されていることを確認してください。
コード例とウォークスルー
Arduinoコードでは、識別子を使用してLM35出力電圧を読み取るためのアナログ入力ピンを定義します。inPin、設定されているA0さらに、定数を定義します。LM35_FACTOR0.01に設定して、センサーの出力を摂氏1度あたりの値として表します。
const int inPin = A0; // can change
const float LM35_FACTOR = 0.01; // do not change
この設定により、温度を簡単に読み取ることができます。次に、シリアル通信を初期化します。setup()シリアルモニターに温度データを出力するための関数。
void setup() {
  Serial.begin(9600);
  Serial.println("Robojax LM35 for Arduino");
}
内部でloop()関数では、温度を継続的に読み取り、さまざまな単位で表示します。printTemperature()関数は、希望する温度フォーマットを指定するための文字パラメータを受け取り、温度を摂氏、華氏、またはケルビンで表示できるようにします。
void loop() {
  printTemperature('C');
  printTemperature('F');
  printTemperature('K');
  delay(1000); // Wait for 1000ms
}
温度に基づいて行動を起こすために、温度が特定の閾値を超えているかどうかを確認できます。getTemperature()この関数は、指定されたサンプル数の平均温度を計算します。
詳細については、関連するビデオを見て完全なコードの説明を確認してください(ビデオの10:15にあります)。
デモンストレーション / 期待すること
LM35センサーが適切に接続され、Arduinoのコードがアップロードされると、シリアルモニターに摂氏、華氏、ケルビンで温度が表示されるはずです。センサーに熱を加えると、温度の読み取り値がそれに応じて増加するのが観察されます。
不適切な配線は、極端に高いまたは低い値など、異常な温度測定を引き起こす可能性があることに注意してください。そのような問題を避けるために、センサーが正しく接続されていることを常に確認してください(動画の12:30で)。
動画のタイムスタンプ
- 00:00- LM35の紹介
- 02:30- 配線指示
- 05:00- コードの説明
- 10:15- 温度測定のデモンストレーション
- 12:30- よくある問題とトラブルシューティング
画像
++
/*
 * Robojax Arduino Step-by-Step Course
 * Part 4: Temperature Sensors
 * Lesson 42: Introduction to LM35
 * This Arduino sketch is to use LM35 to measure temperature
 * This code has two ways to get temperature
 * 1-To print the temperature either in C, F or K on the serial monitor
 * 2-To return the value in C, F and K
 *


  Please watch video instruction here https://youtu.be/DRIC4wDu878
 This code is available at http://robojax.com/course1/?vid=lecture37

with over 100 lectures free on YouTube. Watch it here http://robojax.com/L/?id=338
Get the code for the course: http://robojax.com/L/?id=339

 * Written by Ahmad Shamshiri on May 08, 2020 at 02:45 in Ajax, Ontario, Canada
 * in Ajax, Ontario, Canada. www.robojax.com
 *


 *  * This code is "AS IS" without warranty or liability. Free to be used as long as you keep this note intact.*
 * This code has been downloaded from Robojax.com
    This program is free software: you can redistribute it and/or modify
    it under the terms of the GNU General Public License as published by
    the Free Software Foundation, either version 3 of the License, or
    (at your option) any later version.

    This program is distributed in the hope that it will be useful,
    but WITHOUT ANY WARRANTY; without even the implied warranty of
    MERCHANTABILITY or FITNESS FOR A PARTICULAR PURPOSE.  See the
    GNU General Public License for more details.

    You should have received a copy of the GNU General Public License
    along with this program.  If not, see <https://www.gnu.org/licenses/>.


*/

const int inPin =A0;//can change
const int iteration = 1000; //can change (see video)
const float LM35_FACTOR =0.01;// do not change

// the setup routine runs once when you press reset:
void setup() {
  // initialize serial communication at 9600 bits per second:
// Robojax.com Code YouTube Watch it here http://robojax.com/L/?id=338
  Serial.begin(9600);
  Serial.println("Robojax LM35 for Arduino");
  delay(500);
}

// the loop routine runs over and over again forever:
void loop() {
 //robojax.com LM35 Code for Arduino
  printTemperature('C');
  Serial.println();
  printTemperature('F');
  Serial.println();
  printTemperature('K');
  Serial.println();
  Serial.println();
//  Serial.print(" Temperature: ");
//  printDegree();
//  Serial.print(getTemperature('C'));
if(getTemperature('C') >87)
{
 // do something here (watch video)
}
//  Serial.println();
  delay(1000);//Wait for 1000ms (change it if you want)
}

/*
 * getTemperature()
 * @brief gets the average temperature
 * @param average temperature
 * @param "type" is character
 *     C = Celsius
 *     K = Kelvin
 *     F = Fahrenheit
 * @return returns one of the values above
 * Written by Ahmad Shamshiri for robojax.com
 * on May 08, 2020 at 02:36 in Ajax, Ontario, Canada
 */
float getTemperature(char type)
{
	// Robojax.com Code YouTube Watch it here http://robojax.com/L/?id=338
    float value,voltage,temperature;//define variables
    int sensorValue;
    float averageTemperature =0;

    for(int i=0; i< iteration; i++)
    {
      sensorValue = analogRead(inPin);//read analog value
      voltage = sensorValue * (5.0 / 1023.0); //convert it to voltage
      temperature = voltage / LM35_FACTOR; //convert voltage to temperature
      averageTemperature += temperature;//add
    }

    averageTemperature /=iteration;
  if(type =='F')
   {
    value = averageTemperature *9/5 + 32;//convert to Fahrenheit
   }else if(type =='K')
   {
    value = averageTemperature + 273.15;//convert to Kelvin
   }else{
    value = averageTemperature;// return Celsius
   }
    return value ;
}//getTemperature()

/*
 * printTemperature()
 * @brief prints  temperature on serial monitor
 * @param charact type
 * @param "type" is character
 *     C = Celsius
 *     K = Kelvin
 *     F = Fahrenheit
 * @return none
 * Written by Ahmad Shamshiri for robojax.com
 * on May 08, 2020 at 02:45 in Ajax, Ontario, Canada
 */
void printTemperature(char type)
{
	// Robojax.com Code YouTube Watch it here http://robojax.com/L/?id=338
    float value;
    float temp = getTemperature(type);
   Serial.print(temp);
    printDegree();
  if(type =='F')
   {
     Serial.print("F");
    }else if(type =='K')
   {
     Serial.print("K");
   }else{
     Serial.print("C");
   }

}//printTemperature()

/*
 * @brief prints degree symbol on serial monitor
 * @param none
 * @return returns nothing
 * Written by Ahmad Shamshiri on July 13, 2019
 * for Robojax Tutorial Robojax.com
 */
void printDegree()
{
    Serial.print("\\xC2");
    Serial.print("\\xB0");
}
必要かもしれないもの
-
アマゾンAmazonでLM35を購入するamzn.to
-
イーベイeBayでLM35を購入するebay.us
リソースと参考文献
-
データシートLM35 データシートti.com
ファイル📁
ファイルは利用できません。