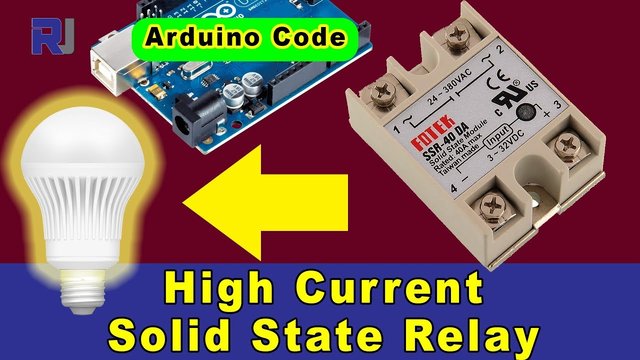
Arduino Code and Video for the SSR-40 Solid-State Relay
In this tutorial, we will explore how to use the Fotek SSR-40 solid-state relay with an Arduino to control AC loads. The solid-state relay allows us to manage high-power devices safely and efficiently, making it ideal for controlling appliances like lights and even air conditioners. We’ll walk through the wiring, code, and expected outcomes of this project. For a clearer understanding, please refer to the video (in video at 00:00).

Hardware Explained
The main component of this project is the Fotek SSR-40 solid-state relay, which is designed to control high-voltage AC loads. Unlike traditional electromechanical relays, solid-state relays have no moving parts, allowing for faster switching and a longer lifespan. They can handle high currents up to 40A, making them suitable for heavy-duty applications.
In addition to the relay, we will use an Arduino board to control the relay's operation. The Arduino sends a signal to the relay to switch it on or off, allowing us to control the connected AC load. This setup is particularly useful for automation tasks, where precise control is necessary.
Datasheet Details
| Manufacturer | Fotek |
|---|---|
| Part number | SSR-40 |
| Logic/IO voltage | 3 – 32 VDC |
| Supply voltage | 24 – 380 VAC |
| Output current (per channel) | 40 A |
| Peak current (per channel) | 80 A |
| PWM frequency guidance | Not applicable |
| Input logic thresholds | 1.5 V min. for LOW, 3 V min. for HIGH |
| Voltage drop / RDS(on) / saturation | 1.5 V max. |
| Thermal limits | 75 °C max. operating temperature |
| Package | Din rail mount |
| Notes / variants | Available in various current ratings |
- Ensure adequate heat sinking for high current applications.
- Use appropriate gauge wire for connections to handle the load current.
- Check the AC load specifications before connecting.
- Always ensure the relay is rated for the load voltage and current.
- Be cautious of the input control voltage; do not exceed 32 VDC.
Wiring Instructions

To wire the Fotek SSR-40 solid-state relay, start by connecting the AC load. The two wires from your AC device should be connected to the relay's AC terminals, labeled as AC1 and AC2. Ensure that you connect the live wire to one terminal and the neutral wire to the other; the relay will act as a switch to turn the AC load on or off.
For the control side, connect the positive control wire to pin 8 of the Arduino and the negative control wire to the Arduino's ground (GND). This setup will allow the Arduino to control the relay. Make sure to double-check the connections before powering up the circuit, as incorrect wiring can cause damage.
Code Examples & Walkthrough
The Arduino code for controlling the relay is straightforward. First, we define the relay pin:
int relayPin = 8; // set pin 8 for relay outputThis line sets relayPin to 8, which is where we connected the relay's control input. Next, we initialize the serial communication and set the pin mode in the setup() function:
void setup() {
    Serial.begin(9600);
    pinMode(relayPin, OUTPUT);
}
Here, we start serial communication at 9600 baud and configure the relayPin as an output. In the loop() function, we control the relay by writing HIGH or LOW to the pin:

void loop() {
  digitalWrite(relayPin, HIGH); // set relay pin to HIGH
  delay(2000); // wait for 2 seconds
  digitalWrite(relayPin, LOW); // set relay pin to LOW
  delay(2000); // wait for 2 seconds
}
This code turns the relay on for 2 seconds and then off for 2 seconds, repeating indefinitely. You can modify the delays or conditions based on your specific requirements.
Demonstration / What to Expect
When the code is uploaded to the Arduino, the relay should switch on and off every 2 seconds, controlling the connected AC load accordingly. If everything is set up correctly, you should see the light or appliance connected to the relay turn on and off as expected. Be cautious with the AC connections to avoid electric shock or damage (in video at 05:00).
Video Timestamps
- 00:00 - Introduction to the solid-state relay
- 01:30 - Wiring setup explanation
- 03:15 - Code walkthrough
- 05:00 - Demonstration of relay operation
图像
This code has not been parsed yet. Please return to the admin panel to parse it.|||您可能需要的东西
-
亚马逊从亚马逊购买SSR-40amzn.to
资源与参考
尚无可用资源。
文件📁
Fritzing 文件
-
ssr-40va-ss-relay
ssr-40va-ss-relay.fzpz0.02 MB -
AC插头Fritzing组件(Robojax.com)
ACPlug_Robojax.com.fzpz


![Leonardo with Headers [A000057] - Atmega32U4 Microcontroller, 16Mhz, 20 Digital](https://i.ebayimg.com/images/g/3CcAAeSwBqxpaVFa/s-l225.jpg)