第89課:使用連續或360度伺服馬達| Arduino逐步課程
你有冇試過想令一個摩打向任何一個方向轉幾耐都得,而唔係好似標準舵機咁淨係可以左右擺動?呢個正正就係連續旋轉或者360度舵機可以提供嘅功能。同標準舵機唔同,標準舵機會移動到特定角度(通常係0到180度),而連續舵機就可以無限咁順時針或者逆時針旋轉。咁樣令到佢好適合用嚟整細型機械人、相機平台,或者任何需要連續旋轉控制嘅項目。
喺呢個項目入面,我哋會用三個按鈕嚟整一個360度舵機嘅控制系統。你可以命令舵機順時針轉、逆時針轉,或者隨時停低。呢個指南會帶你行過接線步驟、解釋程式入面可以俾用戶設定嘅部分,仲會示範成個系統實際運作嘅情況。
以下係一啲喺你自己項目入面用連續舵機嘅實際諗法:
- 整一個細型兩輪機械人:用兩個連續舵機嚟驅動車輪,可以向前、向後同埋轉彎。
- 整一個上下左右轉動嘅相機支架:用一個連續舵機嚟做保安或者野生動物相機嘅慢速無限水平轉動。
- 自動化一條輸送帶:控制一個細型輸送系統嚟分類或者分發物品。
- 設計一個旋轉展示台:將一個3D模型或者產品放喺一個可以連續旋轉嘅平台上展示。
所需硬件
- Arduino板(Uno、Nano等)
- 連續(360度)舵機(例如FS90R、DS04-NFC)
- 3個按鈕
- 杜邦線
- 麵包板
接線指南
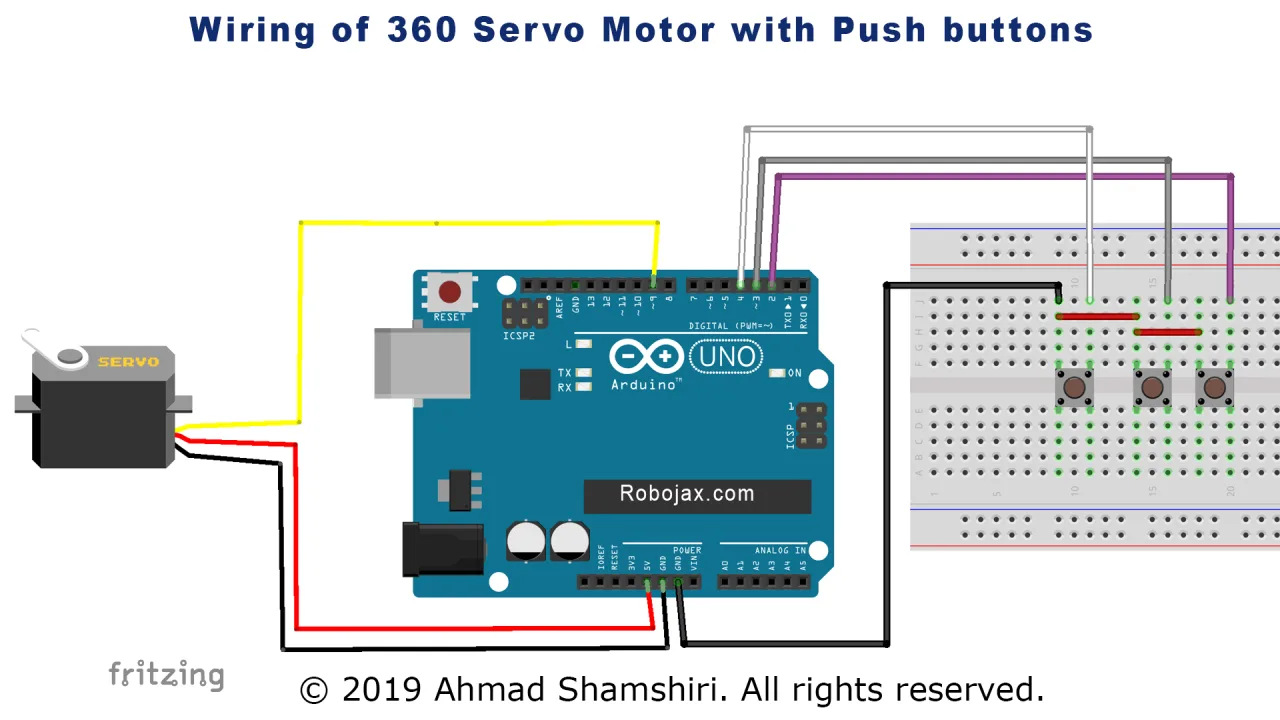
呢個項目嘅接線好簡單。舵機有三條線:通常深色嗰條係接地(GND),中間嗰條(通常紅色)係電源(5V),而淺色嗰條(橙色、黃色或者白色)就係信號線。好似影片入面咁,舵機同Arduino嘅接線如下:
- 舵機接地(深色線):連接到Arduino嘅GND。
- 舵機電源(中間/紅色線):連接到Arduino嘅5V。
- 舵機信號(淺色線):連接到Arduino嘅第9腳。
至於三個按鈕,每個按鈕都有兩邊。所有按鈕嘅一邊會連埋一齊,然後接到Arduino嘅GND。每個按鈕嘅另一邊就分別連接到唔同嘅數位腳,如下所述(影片03:40位置):
- 順時針(CW)按鈕:連接到Arduino嘅第2腳。
- 停止按鈕:連接到Arduino嘅第3腳。
- 逆時針(CCW)按鈕:連接到Arduino嘅第4腳。
程式碼解釋
程式碼設計得好容易設定。你需要調整嘅最重要部分就係sc[]陣列,佢儲住傳送俾舵機嚟控制動作嘅特定PWM數值。呢啲數值唔係通用嘅,一定要針對你嘅特定舵機嚟校準(影片12:23位置)。
int sc[]={106, 58, 0};// 舵機指令按順序排列
        //逆時針、停止、順時針
呢個陣列就係校準嘅核心。啲數值會按呢個順序使用:
- sc[0] = 106:呢個數值會令舵機逆時針旋轉。
- sc[1] = 58:呢個係「停止」數值。由於內部電路嘅關係,令摩打真正停低嘅數值會唔同。你可能會發現就算傳送咗呢個指令,你嘅舵機仍然會慢慢轉,你需要稍微調整呢個數字嚟搵到你摩打真正「完全停止」嘅數值。
- sc[2] = 0:呢個數值會令舵機以最高速度順時針旋轉。
你可以調整sc[]陣列入面嘅數值嚟改變旋轉速度。例如,將sc[0]設做70會令逆時針旋轉慢啲。數值越接近「停止」數值(58),摩打喺嗰個方向轉得越慢。離58越遠嘅數值就會增加速度,直到最高上限。
仲有幾個其他主要變數你可能需要修改。servoPin設定做9,呢個一定要係你Arduino上面支援PWM嘅腳位。按鈕腳位喺程式碼頂部定義,如果有需要可以更改。
int servoPin = 9;// 呢個腳位一定要係有PWM ~嘅其中一個

#define STOPpin 3 // 停止用嘅按鈕腳位
#define CWpin 2 //  順時針用嘅按鈕腳位
#define CCWpin 4 // 逆時針用嘅按鈕腳位最後,scText[]陣列儲住用嚟喺Serial Monitor度印出嚟做除錯嘅字串。如果你想顯示唔同嘅訊息,可以更改呢啲字串。
點樣用呢個程式碼
將提供嘅程式碼上載到你嘅Arduino板。打開Serial Monitor(設定做9600 baud)就可以睇到狀態訊息。你而家可以用三個按鈕嚟控制舵機:
- 按住CW按鈕:舵機會開始順時針旋轉。Serial Monitor會顯示「CW」同埋正在傳送嘅數值。
- 按住CCW按鈕:舵機會開始逆時針旋轉。Serial Monitor會顯示「CCW」同埋正在傳送嘅數值。
- 撳Stop按鈕:舵機會嘗試停止。Serial Monitor會顯示「Stop」。
如果你撳咗停止掣之後,你嘅伺服馬達冇完全停低,你就需要校準sc[]陣列入面嘅sc[1]值。試吓稍微改個值(例如由58改成54或者52),然後重新上載程式碼,直到馬達完全保持靜止為止。
現場示範
喺條片入面,示範者展示咗成個系統。你可以睇到伺服馬達根據掣嘅按壓向兩個方向旋轉。Serial Monitor嘅輸出都有顯示,展示當前狀態(「CW」、「Stop」或者「CCW」)以及傳送俾伺服馬達嘅具體數值。呢個係一個好好嘅除錯工具,幫你搵出最適合你嗰隻馬達嘅校準值。個示範仲展示咗點樣調整sc[]陣列入面嘅值會直接影響馬達嘅速度,由好慢嘅爬行到佢嘅最高旋轉速度都得。
總結
呢個項目提供咗一個簡單又有效嘅方法去控制連續旋轉伺服馬達。透過了解「停止」值嘅校準過程,你可以確保喺自己嘅機械人同自動化項目入面做到精確控制。
影片章節
- [00:05] 連續伺服馬達簡介
- [02:02] 伺服馬達硬件概覽
- [02:40] 接線圖同連接
- [05:07] 程式碼解釋:變數同設定
- [08:03] 程式碼解釋:主迴圈邏輯
- [09:56] servoCommand() 函數
- [10:54] 現場示範同Serial Monitor輸出
- [12:23] 校準伺服馬達速度同停止值
圖片
++
/*
 *  S05-13 Servo with 3 push buttons
 *  Demonstration of Controlling a Continuous Servo (360 servo)
 *  This code allows you to control a 360-degree servo using push buttons
 *
 * Modified by Ahmad Shamshiri for Robojax Robojax.com
 * on Jan 17, 2019 at 22:42 in Ajax, Ontario, Canada
 Watch the video instruction for this sketch: https://youtu.be/hVe4TSRV4ww

 Watch Introduction to  360 Servo video with code: https://youtu.be/b_xvu6wWafA
 You can get the wiring diagram from my Arduino Course at Udemy.com
 Learn Arduino step by step with all libraries, codes, and wiring diagrams all in one place
 visit my course now http://robojax.com/L/?id=62

 If you found this tutorial helpful, please support me so I can continue creating
 content like this.
 or make a donation using PayPal http://robojax.com/L/?id=64

 Original code by BARRAGAN <http://barraganstudio.com>
 *
 * Code is available at http://robojax.com/learn/arduino

 * This code is "AS IS" without warranty or liability. Free to be used as long as you keep this note intact.
 * This code has been downloaded from Robojax.com
    This program is free software: you can redistribute it and/or modify
    it under the terms of the GNU General Public License as published by
    the Free Software Foundation, either version 3 of the License, or
    (at your option) any later version.

    This program is distributed in the hope that it will be useful,
    but WITHOUT ANY WARRANTY; without even the implied warranty of
    MERCHANTABILITY or FITNESS FOR A PARTICULAR PURPOSE.  See the
    GNU General Public License for more details.

    You should have received a copy of the GNU General Public License
    along with this program.  If not, see <https://www.gnu.org/licenses/>.

*/

#include <Servo.h>

Servo myservo;  // create servo object to control a servo
// twelve servo objects can be created on most boards

int servoPin = 9;// this pin must be one of those with PWM ~


#define STOPpin 3 // push button pin  for STOP
#define CWpin 2 //  push button for CW
#define CCWpin 4 // push button for CCW

int sc[]={106, 58, 0};// servo commands are in order
        //CCW, STOP,CW

String scText[]={"CCW","Stop","CW"};// define texts for 3 actions
int statusText;
int CWBS, CCWBS, SBS;
      //CW button status (CWBS)
      //CCW button status (CCWBS)
      //stop button status (SBS)

void setup() {
  Serial.begin(9600);
  pinMode(STOPpin,INPUT_PULLUP);// set pin for push button STOP
  pinMode(CCWpin,INPUT_PULLUP);// set pin for push button CCW
  pinMode(CWpin,INPUT_PULLUP);// set pin for push button CW

  myservo.attach(servoPin);  // attaches the servo on pin 9 to the servo object
  myservo.write(sc[1]);// send STOP command
  statusText=1;// initial value is STOP
}


void loop() {

    CCWBS = digitalRead(CCWpin);// read status of button CCW
    SBS = digitalRead(STOPpin);// read status of button STOP
    CWBS = digitalRead(CWpin);// read status of button CW

    if(CCWBS ==LOW)
    {
      servoCommand(0);
    }else if(SBS ==LOW)
    {
      servoCommand(1);
    }else if(CWBS ==LOW)
    {
      servoCommand(2);
    }

  Serial.println(scText[statusText]);
  delay(50);
}// loop


void servoCommand(int n)
{
   statusText = n;
   myservo.write(sc[n]);
   Serial.print("Going to  ");
   Serial.print(scText[n]);
   Serial.print( "(");
   Serial.print(sc[n]);
   Serial.println(")");
}
你可能需要嘅嘢
-
亞馬遜360 Degree Servo motor on Amazonlink.amazon
-
易贝360 Degree Servo motor on eBayebay.us
-
阿里巴巴速卖通360 Degree Servo motor on AliExpresss.click.aliexpress.com
-
阿里巴巴速卖通360 Degree Servo motor on AliExpress-2s.click.aliexpress.com
資源與參考資料
文件📁
其他文件
-
SG90 Seroo 馬達數據表
robojax-servo-SG90_datasheet.pdf0.12 MB