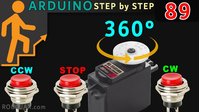
第89课:使用连续旋转或360度舵机| Arduino逐步课程
您是否曾经想过让电机按您想要的方向持续旋转,而不是像标准舵机那样只能来回摆动?这正是连续旋转或360度舵机所提供的功能。与移动到特定角度(通常为0到180度)的标准舵机不同,连续舵机可以顺时针或逆时针方向无限旋转。这使得它非常适合构建小型机器人、摄像头云台,或任何需要连续旋转控制的项目。
在本项目中,我们将仅使用三个按钮构建一个360度舵机的控制系统。您将能够命令舵机顺时针旋转、逆时针旋转,或随时停止。本指南将引导您完成接线,解释代码中可用户配置的部分,并向您展示系统的实际运行演示。
以下是一些在您自己的项目中使用连续舵机的实用想法:
- 构建小型两轮机器人:使用两个连续舵机驱动车轮,实现前进、后退和转弯动作。
- 创建平移俯仰摄像头云台:使用一个连续舵机实现安防或野生动物摄像头的缓慢、无限平移。
- 自动化传送带:控制一个小型传送系统,用于分拣或分发物品。
- 设计旋转展示台:在连续旋转的平台上展示3D模型或产品。
所需硬件
- Arduino开发板(Uno、Nano等)
- 连续(360度)舵机(例如FS90R、DS04-NFC)
- 3个按钮
- 跳线
- 面包板
接线指南
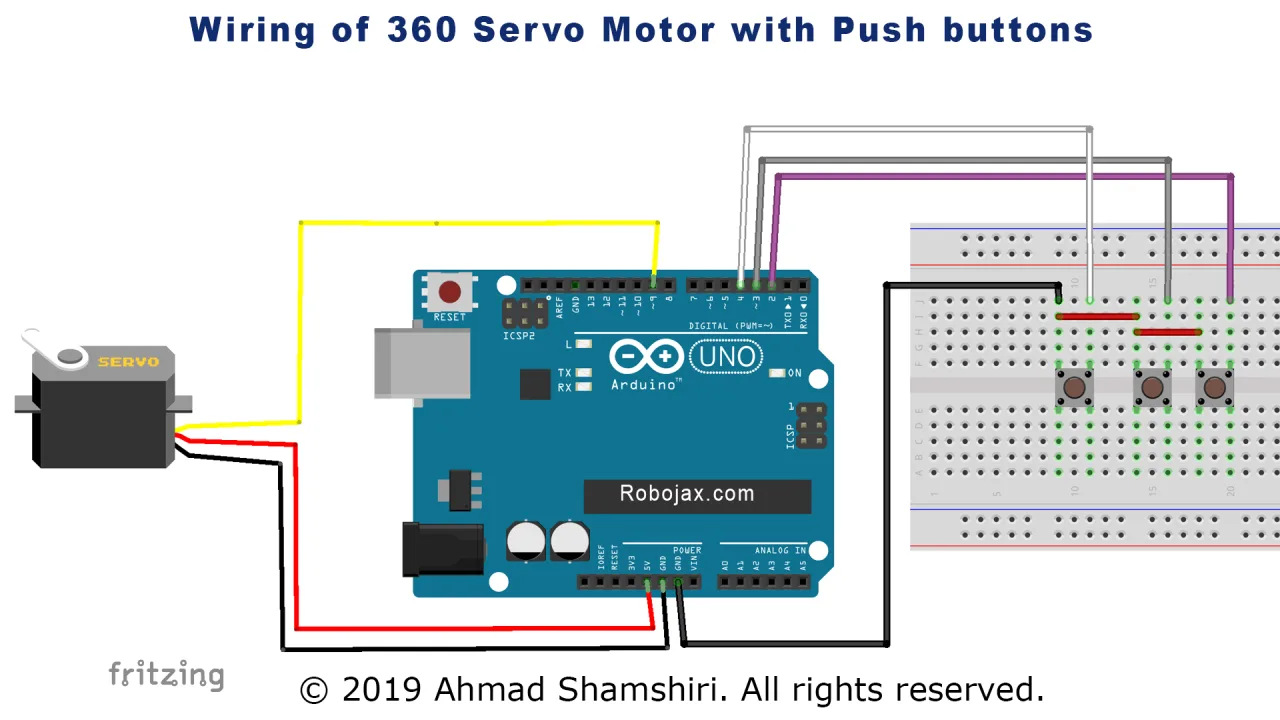
本项目的接线非常简单。舵机有三根线:通常一根深色线用于接地(GND),一根中间线(通常为红色)用于电源(5V),以及一根浅色线(橙色、黄色或白色)用于信号。如视频所示,舵机与Arduino的接线如下:
- 舵机接地(深色线):连接到Arduino的GND。
- 舵机电源(中间/红色线):连接到Arduino的5V。
- 舵机信号(浅色线):连接到Arduino的引脚9。
对于三个按钮,每个按钮有两侧。所有按钮的一侧连接在一起,然后连接到Arduino的GND。每个按钮的另一侧连接到单独的数字引脚,如下所述(视频中03:40处):
- 顺时针(CW)按钮:连接到Arduino的引脚2。
- 停止按钮:连接到Arduino的引脚3。
- 逆时针(CCW)按钮:连接到Arduino的引脚4。
代码解释
代码设计为易于配置。您需要调整的最重要部分是sc[]数组,它保存发送给舵机以控制其动作的特定PWM值。这些值并非通用,必须针对您的特定舵机进行校准(视频中12:23处)。
int sc[]={106, 58, 0};// 舵机命令按顺序排列
        //CCW, STOP, CW
该数组是校准的核心。这些值按以下顺序使用:
- sc[0] = 106:发送此值使舵机逆时针旋转。
- sc[1] = 58:这是“停止”值。由于内部电路的原因,使电机停止的确切值会有所不同。您可能会发现即使发送此命令,舵机仍在缓慢旋转,您需要稍微调整此数字以找到您电机的真正“死停”值。
- sc[2] = 0:此值使舵机以最大速度顺时针旋转。
您可以调整sc[]数组中的值来改变旋转速度。例如,将sc[0]设置为70将使逆时针旋转变慢。值越接近“停止”值(58),电机在该方向上的旋转就越慢。离58越远的值将增加速度,直到达到最大限制。
还有其他一些您可能需要修改的关键变量。servoPin设置为9,这必须是Arduino上支持PWM的引脚。按钮引脚在代码顶部定义,如有需要可以更改。
int servoPin = 9;// 此引脚必须是带有PWM ~ 的引脚之一

#define STOPpin 3 // 用于STOP的按钮引脚
#define CWpin 2 // 用于CW的按钮引脚
#define CCWpin 4 // 用于CCW的按钮引脚最后,scText[]数组保存打印到串行监视器用于调试的字符串。如果您希望显示不同的消息,可以更改这些内容。
如何使用代码
将提供的代码上传到您的Arduino开发板。打开串行监视器(设置为9600波特率)以查看状态消息。您现在可以使用三个按钮控制舵机:
- 按住CW按钮:舵机将开始顺时针旋转。串行监视器将显示“CW”和正在发送的值。
- 按住CCW按钮:舵机将开始逆时针旋转。串行监视器将显示“CCW”和正在发送的值。
- 按下停止按钮:舵机将尝试停止。串行监视器将显示“Stop”。
如果按下停止按钮时舵机没有完全停止,您需要校准sc[]数组中的sc[1]值。尝试稍微更改该值(例如,从58改为54或52),然后重新上传代码,直到电机保持完全静止。
现场演示
在视频中,演示者展示了完整的系统。您可以看到舵机根据按钮按下情况向两个方向旋转。串行监视器输出也会显示,展示当前状态(“CW”、“Stop”或“CCW”)以及发送到舵机的具体值。这是调试和为您的特定电机找到完美校准值的绝佳工具。演示还展示了调整sc[]数组中的值如何直接影响电机的速度,从缓慢爬行到其最大旋转速度。
结论
该项目提供了一种简单有效的方法来控制连续旋转舵机。通过理解“停止”值的校准过程,您可以确保在您自己的机器人和自动化项目中实现精确控制。
视频章节
- [00:05] 连续旋转舵机简介
- [02:02] 舵机硬件概览
- [02:40] 接线图和连接
- [05:07] 代码解释:变量和设置
- [08:03] 代码解释:主循环逻辑
- [09:56] servoCommand()函数
- [10:54] 现场演示和串行监视器输出
- [12:23] 校准舵机速度和停止值
图像
++
/*
 *  S05-13 Servo with 3 push buttons
 *  Demonstration of Controlling a Continuous Servo (360 servo)
 *  This code allows you to control a 360-degree servo using push buttons
 *
 * Modified by Ahmad Shamshiri for Robojax Robojax.com
 * on Jan 17, 2019 at 22:42 in Ajax, Ontario, Canada
 Watch the video instruction for this sketch: https://youtu.be/hVe4TSRV4ww

 Watch Introduction to  360 Servo video with code: https://youtu.be/b_xvu6wWafA
 You can get the wiring diagram from my Arduino Course at Udemy.com
 Learn Arduino step by step with all libraries, codes, and wiring diagrams all in one place
 visit my course now http://robojax.com/L/?id=62

 If you found this tutorial helpful, please support me so I can continue creating
 content like this.
 or make a donation using PayPal http://robojax.com/L/?id=64

 Original code by BARRAGAN <http://barraganstudio.com>
 *
 * Code is available at http://robojax.com/learn/arduino

 * This code is "AS IS" without warranty or liability. Free to be used as long as you keep this note intact.
 * This code has been downloaded from Robojax.com
    This program is free software: you can redistribute it and/or modify
    it under the terms of the GNU General Public License as published by
    the Free Software Foundation, either version 3 of the License, or
    (at your option) any later version.

    This program is distributed in the hope that it will be useful,
    but WITHOUT ANY WARRANTY; without even the implied warranty of
    MERCHANTABILITY or FITNESS FOR A PARTICULAR PURPOSE.  See the
    GNU General Public License for more details.

    You should have received a copy of the GNU General Public License
    along with this program.  If not, see <https://www.gnu.org/licenses/>.

*/

#include <Servo.h>

Servo myservo;  // create servo object to control a servo
// twelve servo objects can be created on most boards

int servoPin = 9;// this pin must be one of those with PWM ~


#define STOPpin 3 // push button pin  for STOP
#define CWpin 2 //  push button for CW
#define CCWpin 4 // push button for CCW

int sc[]={106, 58, 0};// servo commands are in order
        //CCW, STOP,CW

String scText[]={"CCW","Stop","CW"};// define texts for 3 actions
int statusText;
int CWBS, CCWBS, SBS;
      //CW button status (CWBS)
      //CCW button status (CCWBS)
      //stop button status (SBS)

void setup() {
  Serial.begin(9600);
  pinMode(STOPpin,INPUT_PULLUP);// set pin for push button STOP
  pinMode(CCWpin,INPUT_PULLUP);// set pin for push button CCW
  pinMode(CWpin,INPUT_PULLUP);// set pin for push button CW

  myservo.attach(servoPin);  // attaches the servo on pin 9 to the servo object
  myservo.write(sc[1]);// send STOP command
  statusText=1;// initial value is STOP
}


void loop() {

    CCWBS = digitalRead(CCWpin);// read status of button CCW
    SBS = digitalRead(STOPpin);// read status of button STOP
    CWBS = digitalRead(CWpin);// read status of button CW

    if(CCWBS ==LOW)
    {
      servoCommand(0);
    }else if(SBS ==LOW)
    {
      servoCommand(1);
    }else if(CWBS ==LOW)
    {
      servoCommand(2);
    }

  Serial.println(scText[statusText]);
  delay(50);
}// loop


void servoCommand(int n)
{
   statusText = n;
   myservo.write(sc[n]);
   Serial.print("Going to  ");
   Serial.print(scText[n]);
   Serial.print( "(");
   Serial.print(sc[n]);
   Serial.println(")");
}
|||您可能需要的东西
-
亚马逊360 Degree Servo motor on Amazonlink.amazon
-
易趣360 Degree Servo motor on eBayebay.us
-
全球速卖通360 Degree Servo motor on AliExpresss.click.aliexpress.com
-
全球速卖通360 Degree Servo motor on AliExpress-2s.click.aliexpress.com
资源与参考
文件📁
其他文件
-
SG90 Seroo 电机数据表
robojax-servo-SG90_datasheet.pdf0.12 MB