第78課:將VL53L0X嘅距離顯示喺LCD上 | Arduino逐步課程
呢個教學會示範點樣用 VL53L0X 飛行時間感測器同埋一個帶 I2C 模組嘅 16x2 LCD 顯示屏,整一個精準嘅激光測距儀。呢個項目好啱啲 makers 想喺自己嘅創作入面加入準確、非接觸式嘅距離測量。VL53L0X 用激光嚟測距離,好適合用喺超聲波感測器可能搞唔掂嘅應用,例如量度水箱嘅填充水平,或者偵測物件喺輸送帶上嘅精確位置。
以下係幾個實際嘅用途,你可以用呢個項目嚟做:
- 自動寵物餵食器: 量度容器入面嘅食物水平,用嚟觸發補充或者發送通知。
- 智能垃圾桶: 偵測垃圾桶有幾滿,滿咗嘅時候提醒你要倒垃圾。
- DIY 高度計: 整一個精確嘅量度工具,用嚟量度細小物件或者追蹤小朋友嘅成長。
- 泊車輔助: 建立一個感測器系統,幫你喺車房或者狹窄空間入面精確泊車。
- 機械人技術: 用喺機械人入面偵測障礙物,或者量度同牆壁嘅距離嚟做導航。
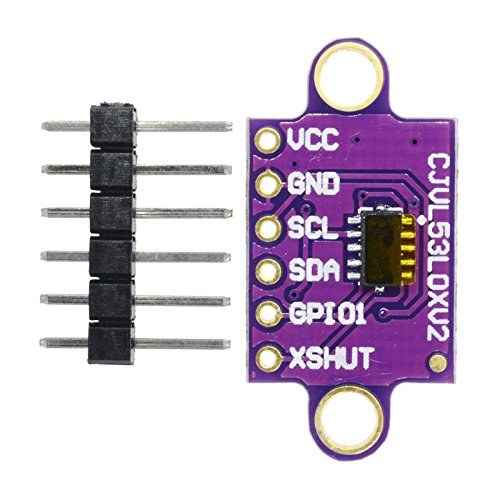
所需硬件
- Arduino 板(例如 Uno)
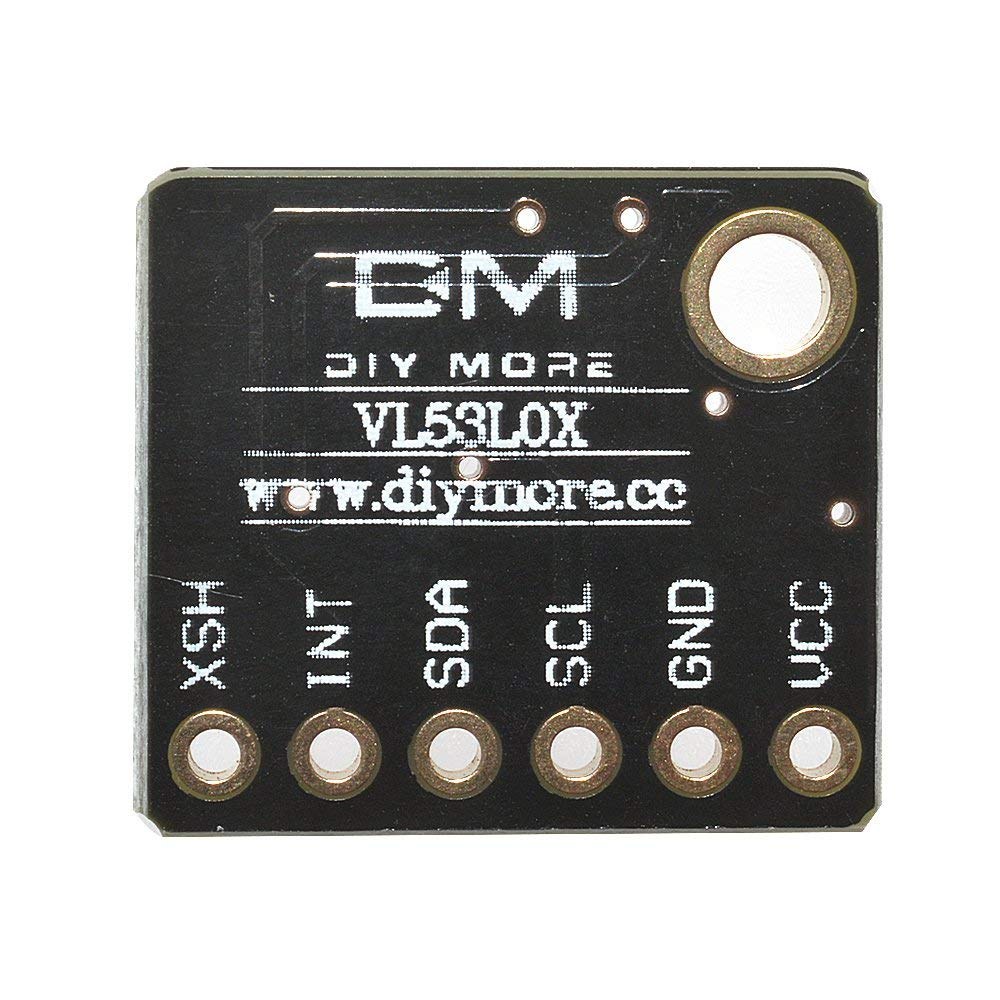
- VL53L0X 激光距離感測器
- LCD 1602 顯示屏連 I2C 模組
- 杜邦線
接線指南
呢個項目嘅接線好簡單,全靠 I2C 協議,令到 LCD 同感測器可以用同一對線嚟通訊。VL53L0X 感測器需要 5V 電源,直接由 Arduino 嘅 5V 針腳攞電。為咗確保感測器有穩定嘅電源,會用多一個針腳做第二個 VCC。(喺影片 00:27)
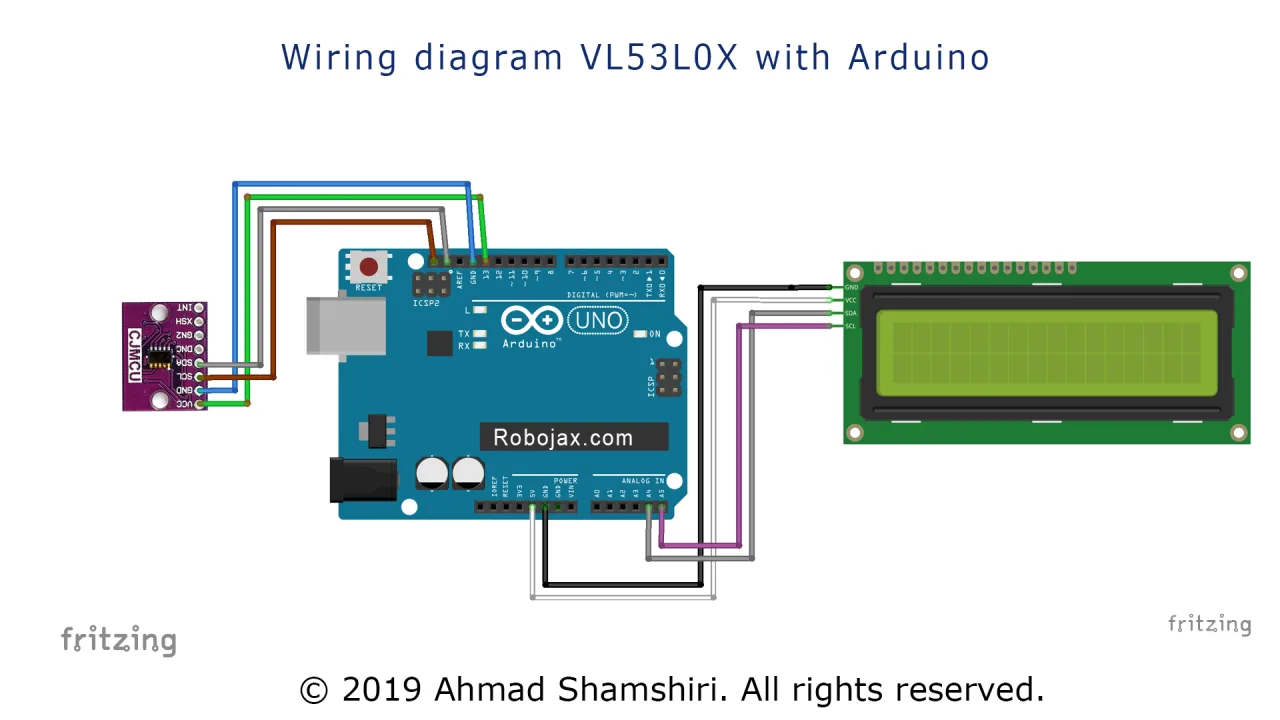
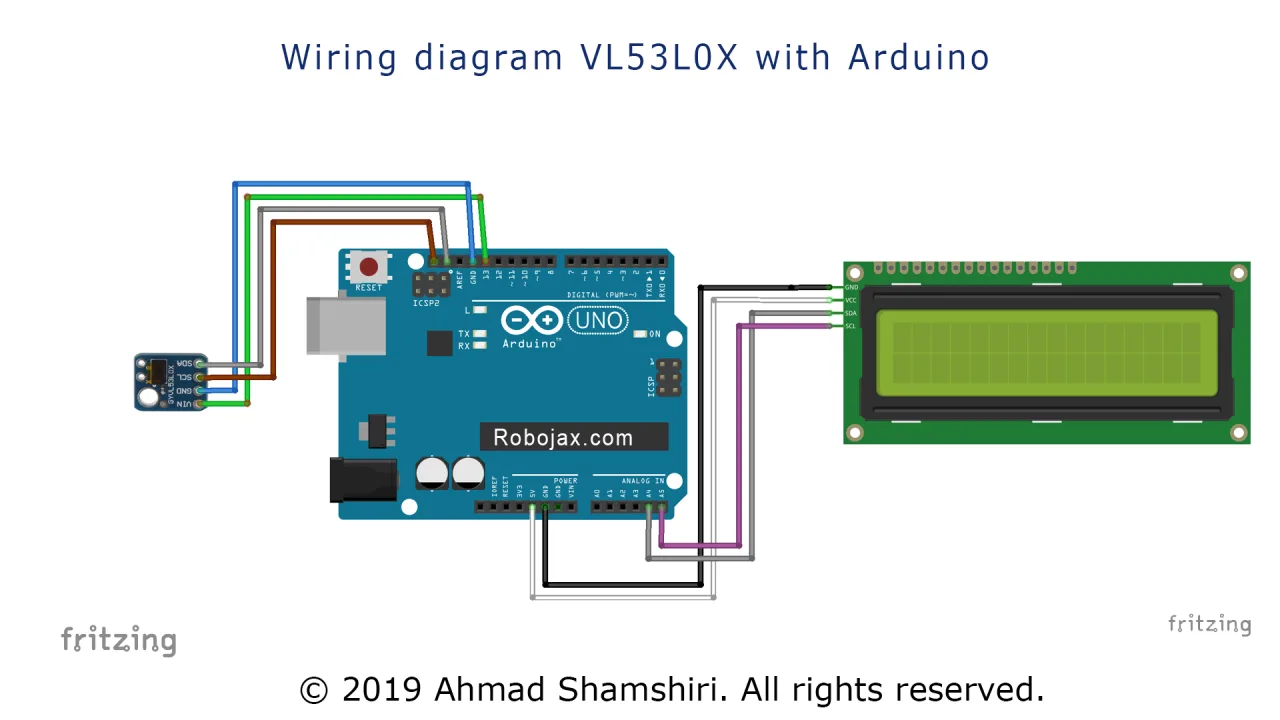
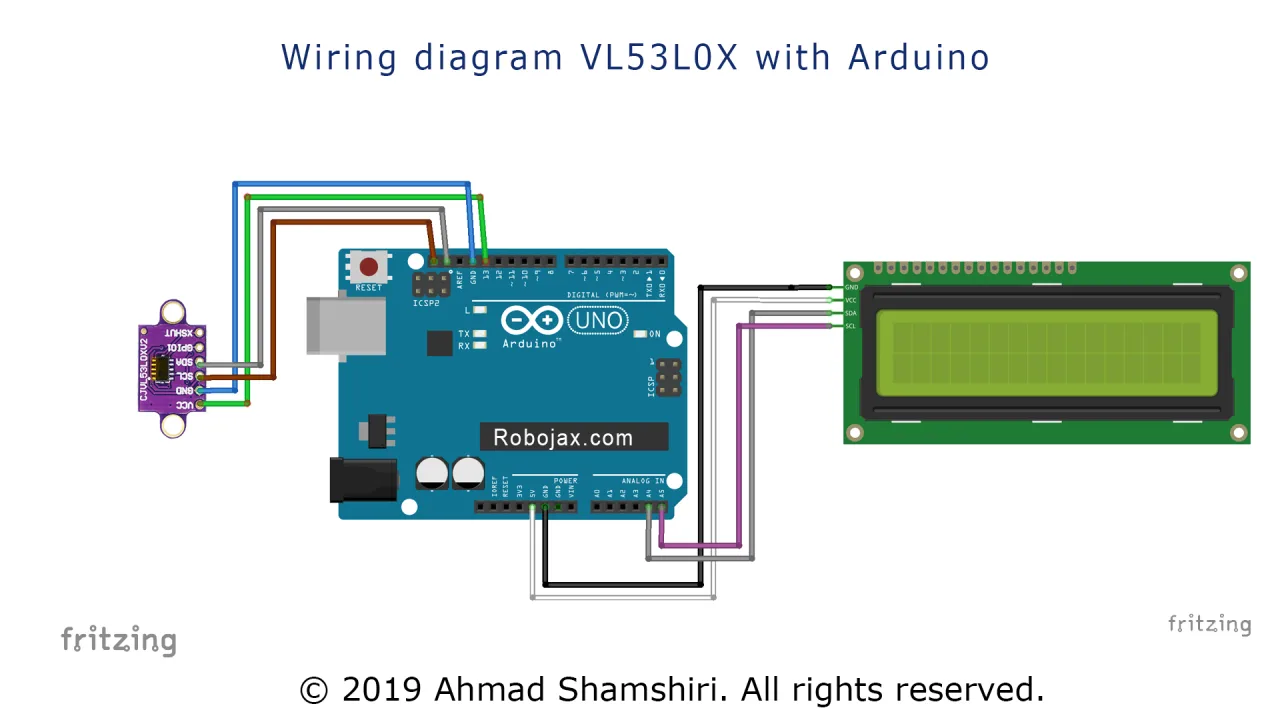
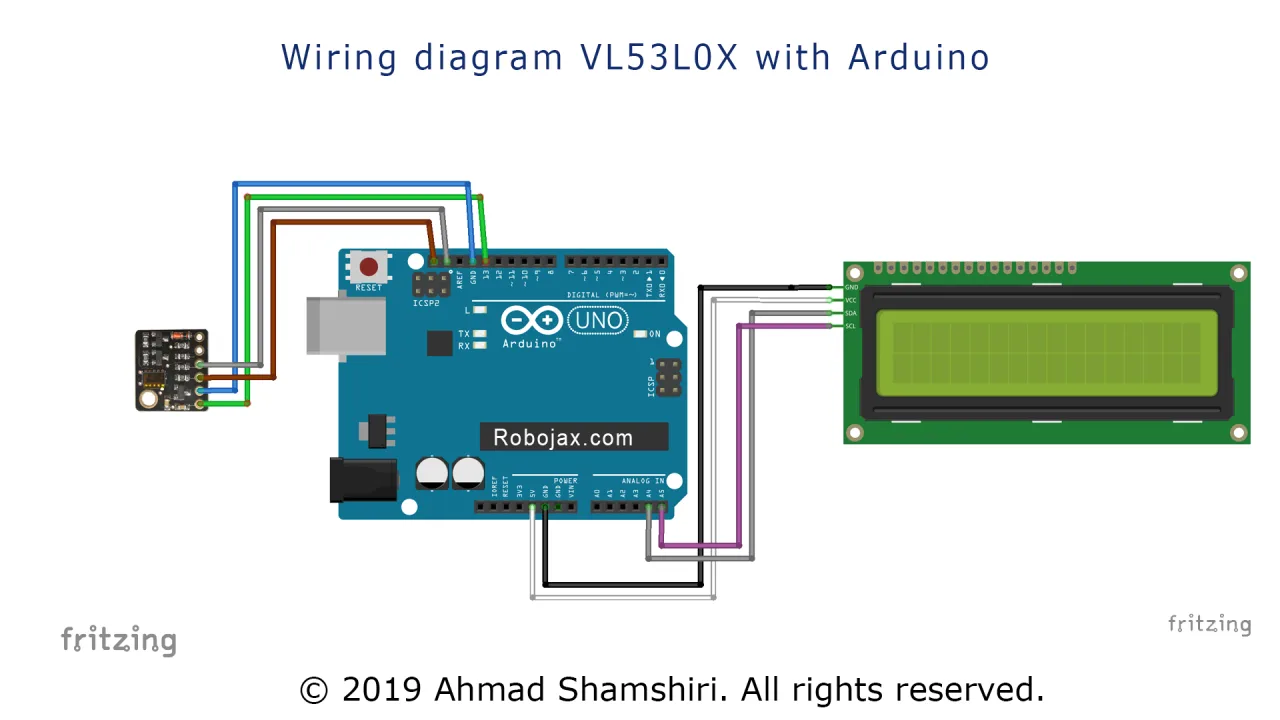
以下係接線圖:

接線方式如下:
- VL53L0X VCC -> Arduino 5V 同 針腳 13(針腳 13 設定做數碼輸出,用嚟提供額外嘅電源穩定性)。
- VL53L0X GND -> Arduino GND。
- VL53L0X SCL -> Arduino SCL (A5)。
- VL53L0X SDA -> Arduino SDA (A4)。
- LCD I2C VCC -> Arduino 5V。
- LCD I2C GND -> Arduino GND。
- LCD I2C SCL -> Arduino SCL (A5)。
- LCD I2C SDA -> Arduino SDA (A4)。
如果你用嘅係其他型號嘅 Arduino,I2C 針腳可能喺第二個位置。SDA 同 SCL 針腳通常會直接標示喺板上面。(喺影片 02:42)
程式碼解釋
程式碼設計得好簡單,容易設定。主要俾用家設定嘅部分喺 sketch 最頂。(喺影片 04:18)
首先,我哋定義一個常數用嚟做額外電源針腳。呢個係用嚟提供一個乾淨嘅 5V 電源俾感測器。
const int vcc2 = 13; // VL53L0X 感測器嘅額外 VCC 針腳跟住,我哋建立一個 LCD 程式庫嘅實例,並定義佢嘅 I2C 地址。你可以透過執行一個 I2C 掃描器 sketch 嚟搵到呢個地址,好似影片入面示範咁。(喺影片 03:26)
LiquidCrystal_I2C lcd(0x3F, 16, 2); // 將 LCD 地址設定做 0x3F,用於 16 字元同 2 行顯示最後,有一個變數控制量度單位。你可以改呢個值嚟顯示距離,用毫米或者厘米都得。
const int type = 1; // 設定做 1 係毫米,2 係厘米喺 setup() 函數入面,額外嘅 VCC 針腳設定做輸出,並設定做 HIGH 嚟提供電源俾感測器。然後初始化 LCD。
loop() 函數入面嘅主要邏輯會讀取感測器嘅距離,清除 LCD,然後印出數值同單位。當 type 設定做 2 嘅時候,距離會由毫米轉換做厘米嘅浮點數值,用嚟提供更精確嘅讀數。(喺影片 06:47)
現場項目示範
喺示範入面,感測器會用間尺嚟測試,驗證佢嘅準確度。影片顯示感測器提供好精確嘅讀數,偏差只有幾毫米。(喺影片 08:32)
要注意嘅係,感測器喺連續量度模式下面嘅最大範圍大約係 1.2 米。當目標超出範圍嘅時候,顯示屏會顯示 8190 呢個數值。(喺影片 09:53)
另一個重要觀察係,感應器喺高反光表面上面可能會讀到唔準確嘅數值。將佢指向一個光滑嘅物件會造成好大嘅誤差,而指向啞面表面就會得到準確嘅結果。(影片10:42位置)
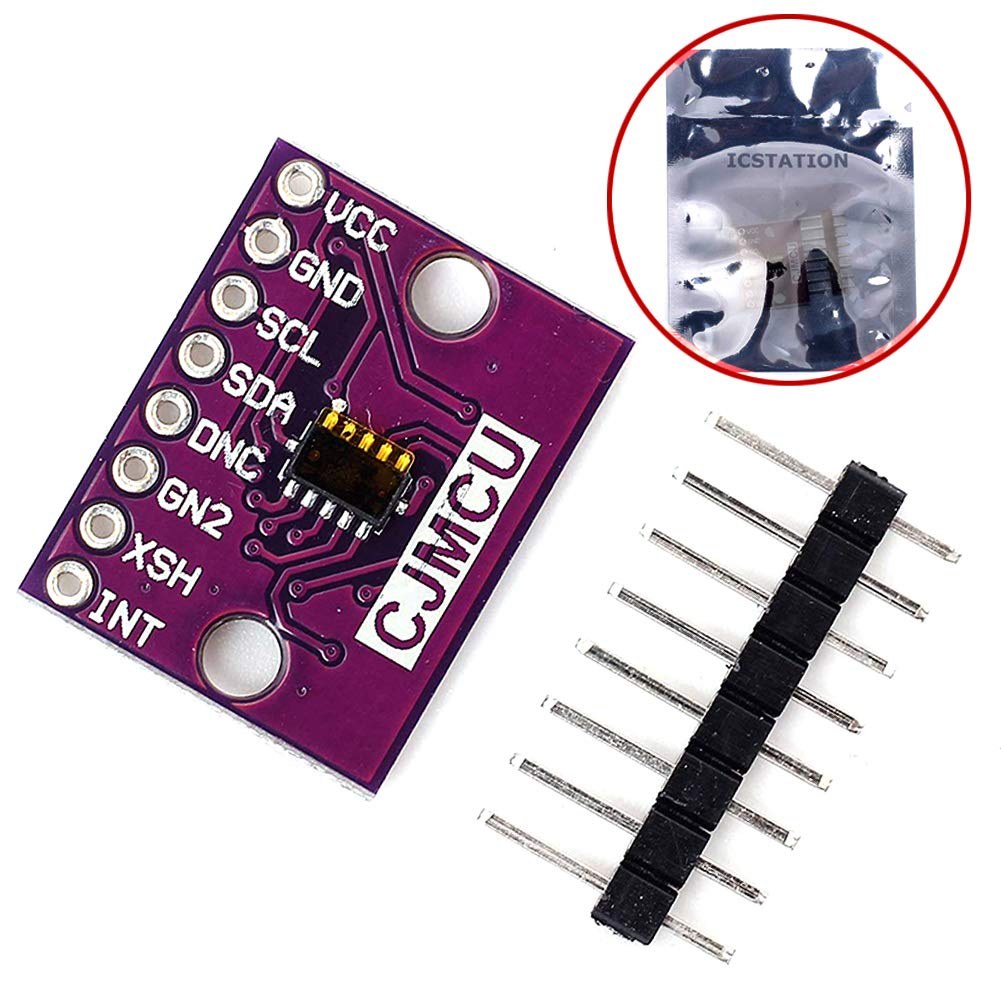
呢個程式碼亦都兼容唔同嘅VL53L0X模組版本同埋大啲嘅LCD,好似2004型號咁,接線完全唔使改。(影片11:30位置)
影片章節
- [00:05] VL53L0X同LCD項目簡介
- [00:27] VL53L0X同LCD嘅接線圖
- [02:51] 喺實際Arduino板上面嘅詳細接線
- [03:26] 掃描I2C地址
- [04:18] 程式碼解釋同配置
- [08:32] 距離測量嘅現場示範
- [09:53] 測試感應器嘅量程同限制
- [10:42] 喺唔同表面上面嘅準確度
- [11:30] 用唔同感應器模組同大啲嘅LCD測試
圖片


/*
* Lesson 76-1: Using One single VL6180 Laser Distance Sensor with Arduino
 * Adafruit code modified for this tutorial
 * by Ahmad Shamshiri at 22:22 on
 * March 10-11, 2021 in Ajax, ON, Canada
 Please watch video instruction of this code: https://youtu.be/_H9D0czQpSI

View code for using two or more VL6180X sensors: https://robojax.com/course1/lecture76

  This video is part of Arduino Step by Step Course which starts here: https://youtu.be/-6qSrDUA5a8


If you found this tutorial helpful, please support me so I can continue creating
content like this.

or make a donation using PayPal http://robojax.com/L/?id=64

 * This code is "AS IS" without warranty or liability. Free to be used as long as you keep this note intact. *
 * This code has been downloaded from Robojax.com
    This program is free software: you can redistribute it and/or modify
    it under the terms of the GNU General Public License as published by
    the Free Software Foundation, either version 3 of the License, or
    (at your option) any later version.

    This program is distributed in the hope that it will be useful,
    but WITHOUT ANY WARRANTY; without even the implied warranty of
    MERCHANTABILITY or FITNESS FOR A PARTICULAR PURPOSE.  See the
    GNU General Public License for more details.

    You should have received a copy of the GNU General Public License
    along with this program.  If not, see <https://www.gnu.org/licenses/>.
 */
#include <Wire.h>
#include "Adafruit_VL6180X.h"

Adafruit_VL6180X vl = Adafruit_VL6180X();

void setup() {
  Serial.begin(115200);

  // wait for serial port to open on native usb devices
  while (!Serial) {
    delay(1);
  }

  Serial.println("Adafruit VL6180x test!");
  if (! vl.begin()) {
    Serial.println("Failed to find sensor");
    while (1);
  }
  Serial.println("Sensor found!");
}

void loop() {

  uint8_t range = vl.readRange();
  uint8_t status = vl.readRangeStatus();

  if (status == VL6180X_ERROR_NONE) {
    Serial.print("Range: "); Serial.print(range);
    Serial.println("mm");
  }
//  if(range <=76)
//  {
//    //do something
//  }

  // Some error occurred, print it out!

  if  ((status >= VL6180X_ERROR_SYSERR_1) && (status <= VL6180X_ERROR_SYSERR_5)) {
    Serial.println("System error");
  }
  else if (status == VL6180X_ERROR_ECEFAIL) {
    Serial.println("ECE failure");
  }
  else if (status == VL6180X_ERROR_NOCONVERGE) {
    Serial.println("No convergence");
  }
  else if (status == VL6180X_ERROR_RANGEIGNORE) {
    Serial.println("Ignoring range");
  }
  else if (status == VL6180X_ERROR_SNR) {
    Serial.println("Signal/Noise error");
  }
  else if (status == VL6180X_ERROR_RAWUFLOW) {
    Serial.println("Raw reading underflow");
  }
  else if (status == VL6180X_ERROR_RAWOFLOW) {
    Serial.println("Raw reading overflow");
  }
  else if (status == VL6180X_ERROR_RANGEUFLOW) {
    Serial.println("Range reading underflow");
  }
  else if (status == VL6180X_ERROR_RANGEOFLOW) {
    Serial.println("Range reading overflow");
  }
  delay(50);
}
你可能需要嘅嘢
-
亞馬遜Purchase VL53L0X from Amazonamzn.to
-
易贝Purchase VL53L0X from eBayebay.us
資源與參考資料
-
外部Arduino Library (GitHub)github.com
-
外部Purchase VL53L0X from eBayebay.us
-
外部VL53L0X Datasheet (PDF)st.com
文件📁
Fritzing 文件
-
Adafruit VL6180X Time of Flight Distance SensorFritzing part for the Adafruit VL6180X Time of Flight distance sensor. This sensor measures absolute distance up to 100mm and ambient light, communicating via I2C. Includes the sensor breakout board and pin connections for use in Fritzing projects.
Adafruit VL6180X Time of Flight Distance Sensor-1.fzpz0.02 MB