Cách sử dụng Mosfet Optocoupled HW-532 để điều khiển tốc độ động cơ DC lên đến 30V hoặc tải bằng Arduino
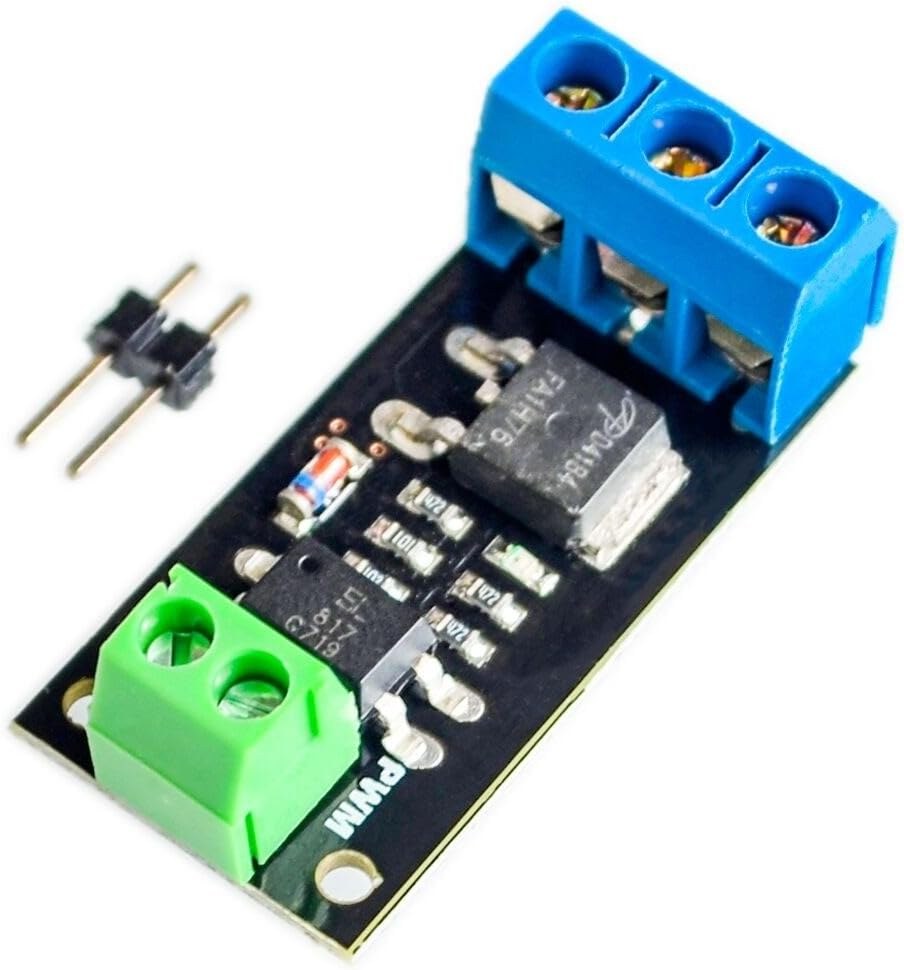
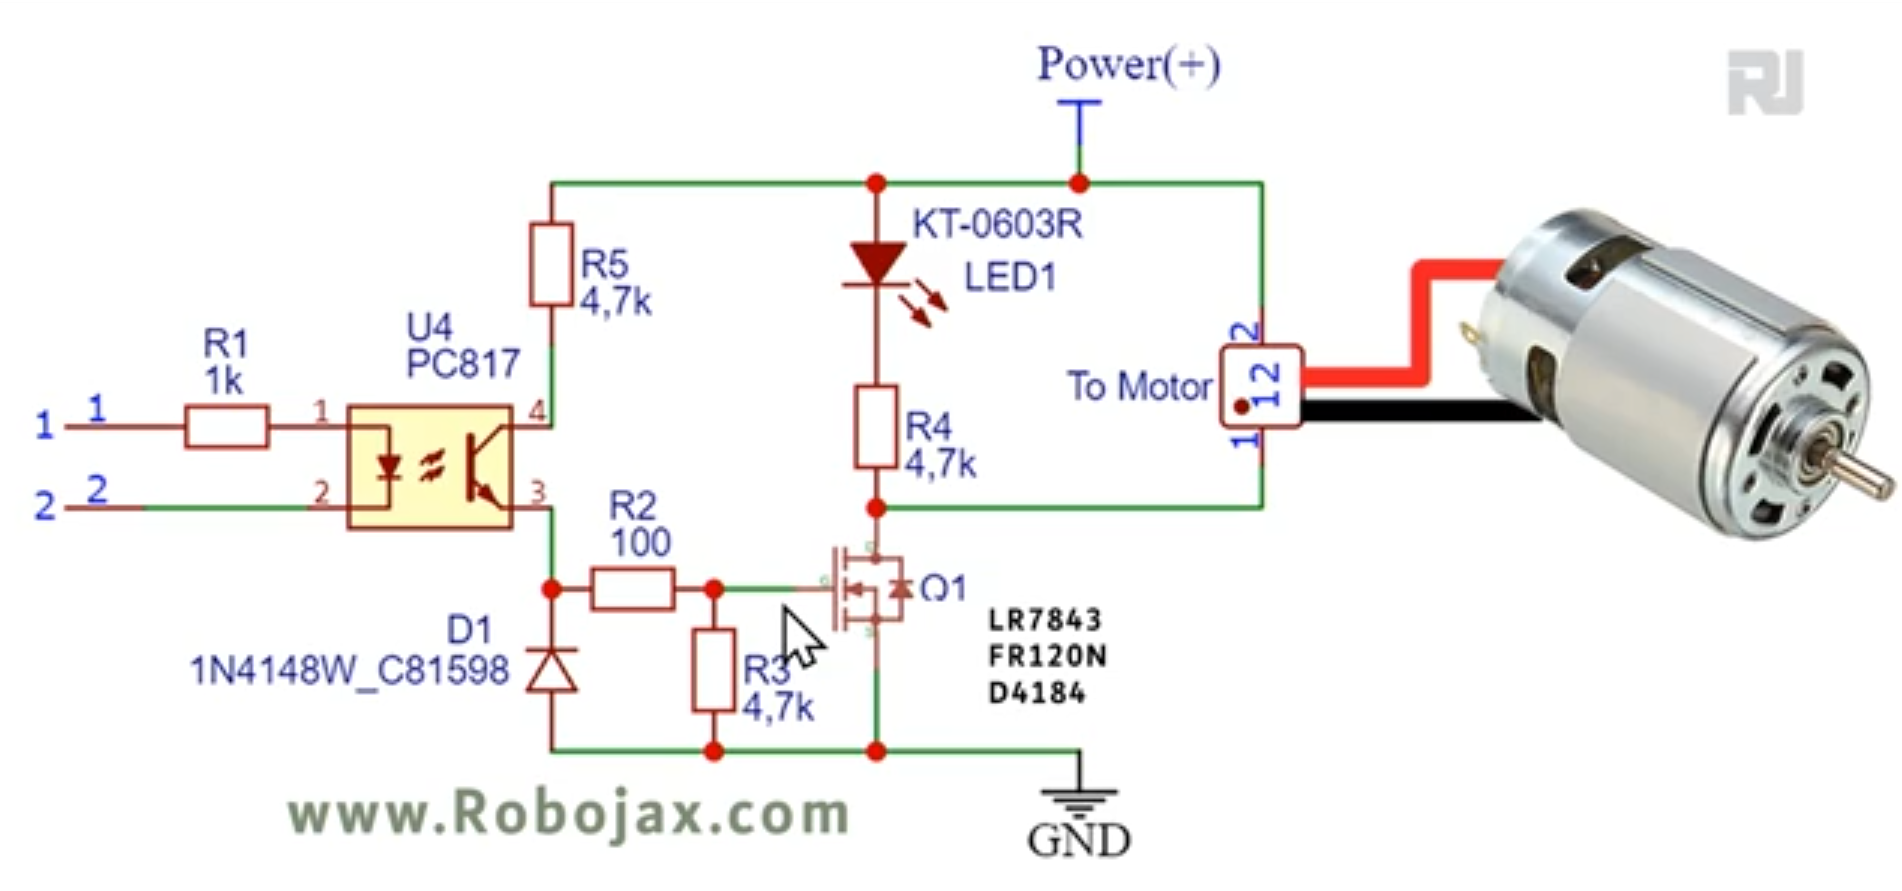
Hướng dẫn dự án này trình bày cách chế tạo bộ điều khiển tốc độ động cơ DC đa năng sử dụng Arduino và mô-đun MOSFET cách ly quang HW-532. MOSFET có thể là FR120N , LR7843 hoặc D4184. Điều này cho phép bạn điều khiển tốc độ và trạng thái bật/tắt của động cơ DC với điện áp lên đến 30V. Mô-đun HW-532 cung cấp khả năng bảo vệ và cách ly, giúp an toàn và đáng tin cậy hơn so với việc kết nối trực tiếp động cơ với Arduino.
Dự án này hữu ích cho nhiều ứng dụng khác nhau. Dưới đây là một vài ví dụ:
- Điều khiển chính xác tốc độ của cánh tay robot
- Chế tạo quạt tốc độ thay đổi cho hệ thống làm mát
- Tạo máy móc tự động với chuyển động có thể điều chỉnh
- Phát triển bộ điều khiển van động cơ cho hệ thống chất lỏng
Phần cứng/Linh kiện
Các thành phần cốt lõi là Arduino, mô-đun MOSFET cách ly quang HW-532 (với các tùy chọn MOSFET như D4184, LR7843 hoặc FR120N), động cơ DC (điện áp định mức ≤ 30V), dây kết nối, và tùy chọn, một chiết áp và công tắc nút nhấn để điều khiển nâng cao (trong video tại 19:34).
Việc lựa chọn MOSFET trong mô-đun HW-532 phụ thuộc vào yêu cầu dòng điện của bạn (trong video tại 01:24). Video cung cấp so sánh chi tiết về các MOSFET khác nhau (trong video tại 06:50) và sự phù hợp của chúng cho các ứng dụng khác nhau (trong video tại 09:45). Hãy nhớ bao gồm một diode cho tải cảm ứng như động cơ DC để bảo vệ mô-đun (trong video tại 06:00 và 22:02).
Hướng dẫn đấu dây
Việc đấu dây cơ bản kết nối cực dương của động cơ với đầu ra của HW-532, cực âm của động cơ với đất của HW-532, và chân điều khiển của HW-532 với một chân kỹ thuật số của Arduino (trong video tại 11:16).

Giải thích mã
Mã được cung cấp cung cấp ba mức điều khiển:
- Điều khiển Bật/Tắt: Mã đơn giản này (trong video tại 15:05) sử dụng một chân kỹ thuật số để bật và tắt động cơ. Phần có thể cấu hình bởi người dùng là hằng số
MOTOR_OUT_PIN, xác định chân Arduino nào điều khiển mô-đun HW-532. - Điều khiển tốc độ PWM: Mã này (trong video tại 15:39) sử dụng Điều chế độ rộng xung (PWM) để điều khiển tốc độ của động cơ. Người dùng có thể điều chỉnh
SPEED_MAXvàSPEED_MINđể đặt giới hạn trên và dưới của điều khiển tốc độ, và các hàmmotorControl()vàstopMotor()được sử dụng để điều khiển động cơ và dừng nó, tương ứng. - Điều khiển bằng chiết áp và nút nhấn: Mã này (trong video tại 22:12) cho phép điều khiển tốc độ động cơ bằng chiết áp và khởi động/dừng bằng nút nhấn. Các phần có thể cấu hình bởi người dùng bao gồm
POT_PIN(chân chiết áp),MOTOR_OUT_PIN(chân điều khiển PWM),START_STOP_PIN(chân nút nhấn),SPEED_MAXvàSPEED_MIN.
Dự án/Demo trực tiếp
Video trình bày hoạt động của cả ba ví dụ mã. Điều khiển bật/tắt được hiển thị (trong video tại 11:41), tiếp theo là điều khiển tốc độ PWM (trong video tại 16:53), và cuối cùng là điều khiển bằng chiết áp và nút nhấn (trong video tại 23:02).
Chương
- [00:00] Giới thiệu và Tổng quan dự án
- [01:24] Mô-đun HW-532 và các tùy chọn MOSFET
- [03:23] Sơ đồ mạch và giải thích
- [05:11] Chi tiết linh kiện
- [06:50] Phân tích bảng dữ liệu MOSFET
- [11:16] Đấu dây cơ bản và demo bật/tắt
- [15:05] Mã Arduino cho điều khiển bật/tắt
- [15:39] Mã Arduino cho điều khiển tốc độ PWM
- [19:34] Đấu dây với chiết áp và nút nhấn
- [22:12] Mã Arduino với chiết áp và nút nhấn
Hình ảnh


/*
* Lesson 108-1: In this lesson we learn how to use  the module with FR120N , LR7843 and D4184 MOSFET to turn ON/OFF DC load up to up to 10A. HW-532 optically isolated from 5V to 30V load up to 10A depending on the module. Schematic shown, wiring diagram explained, different
method of wiring with push button and potentiometer also shown.
Video https://youtu.be/eqXaqRFAWrA

Written by Ahmad Shamshiri for RoboJax.com
// Published on Aug 25, 2022 in Aajx, ON, Canada.


  Project 1: Turning ON/OFF a motor or load (this project)
  Project 2: Controllign Speed using Arduino code
  Project 3: Controllign Speed using potentiometer and a push button

  * Watch Video instrution for this code: https://youtu.be/eqXaqRFAWrA
  *
  * This code is part of Arduino Step by Step Course which starts here:  https://youtu.be/-6qSrDUA5a8
  *
  * for library of this code visit http://robojax.com/
  *
 If you found this tutorial helpful, please support me so I can continue creating
 content like this. Make a donation using PayPal by credit card https://bit.ly/donate-robojax


  *  * This code is "AS IS" without warranty or liability. Free to be used as long as you keep this note intact.*
  * This code has been download from Robojax.com
     This program is free software: you can redistribute it and/or modify
     it under the terms of the GNU General Public License as published by
     the Free Software Foundation, either version 3 of the License, or
     (at your option) any later version.

     This program is distributed in the hope that it will be useful,
     but WITHOUT ANY WARRANTY; without even the implied warranty of
     MERCHANTABILITY or FITNESS FOR A PARTICULAR PURPOSE.  See the
     GNU General Public License for more details.

     You should have received a copy of the GNU General Public License
     along with this program.  If not, see <https://www.gnu.org/licenses/>.

 */


const int MOTOR_OUT_PIN=2;


void setup() {
    //Robojax  MOSFET Motor driver code
  Serial.begin(9600);
  Serial.println("Robojax LR7834 ,  Arduino");

  pinMode(MOTOR_OUT_PIN, OUTPUT);
  digitalWrite(MOTOR_OUT_PIN, HIGH);


}

// the loop routine runs over and over again forever:
void loop() {


    //Robojax XY-GMOS MOSFET Motor driver code
}//loop end# include <Arduino_LSM6DS3.h>
/*
* Lesson 108-2: In this lesson we learn how to use the module with FR120N , LR7843 and D4184 MOSFET to turn ON/OFF DC load up to up to 10A. HW-532 optically isolated from 5V to 30V load up to 10A depending on the module. Schematic shown, wiring diagram explained, different
method of wiring with push button and potentiometer also shown.
Video https://youtu.be/eqXaqRFAWrA
Get code for this project from https://robojax.com/RJT797
Written by Ahmad Shamshiri for RoboJax.com
// Published on Aug 25, 2022 in Aajx, ON, Canada.
Project 1: Turning ON/OFF a motor or load (this project)
Project 2: Controlling Speed using Arduino code
Project 3: Controlling Speed using potentiometer and a push button
* Watch Video instruction for this code:https://youtu.be/eqXaqRFAWrA
*
* This code is part of Arduino Step by Step Course which starts here: https://youtu.be/-6qSrDUA5a8
*
* for library of this code visit http://robojax.com/
*
If you found this tutorial helpful, please support me so I can continue creating
content like this. Make a donation using PayPal by credit card https://bit.ly/donate-robojax
* * This code is "AS IS" without warranty or liability. Free to be used as long as you keep this note intact.*
* This code has been download from Robojax.com
This program is free software: you can redistribute it and/or modify
it under the terms of the GNU General Public License as published by
the Free Software Foundation, either version 3 of the License, or
(at your option) any later version.
This program is distributed in the hope that it will be useful,
but WITHOUT ANY WARRANTY; without even the implied warranty of
MERCHANTABILITY or FITNESS FOR A PARTICULAR PURPOSE. See the
GNU General Public License for more details.
You should have received a copy of the GNU General Public License
along with this program. If not, see <https://www.gnu.org/licenses/>.
*/
const int MOTOR_OUT_PIN = 3;
const int SPEED_MAX = 100;// in %
const int SPEED_MIN = 0;//in %
const int STOP=0;
const int RUN=1;
int motorState=RUN;//
int motorSpeed = 0;//between 0 to 100%.
//video instruction https://youtu.be/eqXaqRFAWrA
void setup() {
//Robojax XY-GMOS MOSFET Motor driver code
Serial.begin(9600);
Serial.println("Robojax XY-GMOS Motor, Arduino");
pinMode(MOTOR_OUT_PIN, OUTPUT);
}//setup ends
// the loop routine runs over and over again forever:
void loop() {
//video https://youtu.be/eqXaqRFAWrA
motorControl(50);//run motor at 50%
delay(5000);//keep it running for 5000ms or 5 seconds
stopMotor();//stop the motor
delay(3000);//keep it stopped for 5000ms or 5 seconds
for(int i=0; i<100; i++)
{
motorControl(i);
delay(200);
}
stopMotor();//stop motor
delay(3000);//keep it stopped for 5000ms or 5 seconds
for(int i=100; i >0; i--)
{
motorControl(i);
delay(200);
}
//Robojax LR7843 MOSFET Motor driver code
}//loop end
/*
* motorControl(int s)
* @brief controls the motor with the value s
* @param return nothing
* @param "type" is character
* on May 08, 2020 at 02:36 in Ajax, Ontario, Canada
*/
void motorControl(int s)
{
//Robojax LR7843 MOSFET Motor driver code
//video https://youtu.be/eqXaqRFAWrA
int k = map(s, SPEED_MIN, SPEED_MAX, 0, 255);
Serial.print("Speed: "); Serial.print(s);Serial.println("%");
analogWrite(MOTOR_OUT_PIN, k);
}//motorControl
/*
* stopMotor()
* @brief stops the motor
* @param return nothing
* @param
* on May 08, 2020 at 02:36 in Ajax, Ontario, Canada
*/
void stopMotor(){
//Robojax XY-GMOS MOSFET Motor driver code
analogWrite( MOTOR_OUT_PIN, 0);
Serial.println("STOPPED");
}//stopMotor()
/*
 * Lesson 108-3: Controlling Speed of motor using Variable Resistor (potentiometer) and using Start/Stop push button with Arduino.
 *
 * In this lesson we learn how to use  the module with FR120N , LR7843 and D4184 MOSFET to turn ON/OFF DC load up to up to 10A. HW-532 optically isolated from 5V to 30V load up to 10A depending on the module. Schematic shown, wiring diagram explained, different
 method of wiring with push button and potentiometer also shown.
 Video https://youtu.be/eqXaqRFAWrA
   Get codes for this project from https://robojax.com/RJT797
 Written by Ahmad Shamshiri for RoboJax.com
 // Published on Aug 25, 2022 in Aajx, ON, Canada.


   Project 1: Turning ON/OFF a motor or load -
   Project 2: Controlling Speed using Arduino code
   Project 3: Controlling Speed using potentiometer and a push button (this project)

   * Watch Video instruction for this code:https://youtu.be/eqXaqRFAWrA
   *
   * This code is part of Arduino Step by Step Course which starts here:  https://youtu.be/-6qSrDUA5a8
   *
   * for library of this code visit http://robojax.com/
   *
  If you found this tutorial helpful, please support me so I can continue creating
  content like this. Make a donation using PayPal by credit card https://bit.ly/donate-robojax


   *  * This code is "AS IS" without warranty or liability. Free to be used as long as you keep this note intact.*
   * This code has been download from Robojax.com
      This program is free software: you can redistribute it and/or modify
      it under the terms of the GNU General Public License as published by
      the Free Software Foundation, either version 3 of the License, or
      (at your option) any later version.

      This program is distributed in the hope that it will be useful,
      but WITHOUT ANY WARRANTY; without even the implied warranty of
      MERCHANTABILITY or FITNESS FOR A PARTICULAR PURPOSE.  See the
      GNU General Public License for more details.

      You should have received a copy of the GNU General Public License
      along with this program.  If not, see <https://www.gnu.org/licenses/>.

  */

const int POT_PIN =A0;//can change
const int MOTOR_OUT_PIN = 3;//~
const int START_STOP_PIN=2;//for push button switch

const int SPEED_MAX = 100;// in %
const int SPEED_MIN = 0;//in %
  //video instruction https://youtu.be/eqXaqRFAWrA

const int STOP=0;
const int RUN=1;
int motorState=RUN;//
int motorSpeed = 0;//between 0 to 100%.

void pushButton();
void setup() {
    //Robojax XY-GMOS MOSFET Motor driver code
  Serial.begin(9600);
  Serial.println("Robojax XY-GMOS Motor,  Arduino");
  pinMode(START_STOP_PIN, INPUT_PULLUP);
  pinMode(MOTOR_OUT_PIN, OUTPUT);
    //video instruction https://youtu.be/eqXaqRFAWrA


}

// the loop routine runs over and over again forever:
void loop() {

 pushButton();
 int potValue =analogRead(POT_PIN);
 int speedPercent = map(potValue, 0, 1023, 0, 100);

 if(motorState ==RUN)
 {
  motorControl(speedPercent);
 }else{
  stopMotor();
 }


  delay(500);
    //Robojax XY-GMOS MOSFET Motor driver code
      //video instruction https://youtu.be/eqXaqRFAWrA
}//loop end


/*
 * motorControl(int s)
 * @brief controls the motor with the value s
 * @param return nothing
 * @param "type" is character

 * on May 08, 2020 at 02:36 in Ajax, Ontario, Canada
 */
void motorControl(int s)
{
    //Robojax LR7843 MOSFET Motor driver code
      //video instruction https://youtu.be/eqXaqRFAWrA
  int k = map(s, SPEED_MIN, SPEED_MAX, 0, 255);
  Serial.print("Speed: "); Serial.print(s);Serial.println("%");
  analogWrite(MOTOR_OUT_PIN, k);
}//motorControl


/*
 * stopMotor()
 * @brief stops the motor
 * @param return nothing
 * @param

 * on May 08, 2020 at 02:36 in Ajax, Ontario, Canada
 */
void stopMotor(){
    //Robojax XY-GMOS MOSFET Motor driver code
      //video instruction https://youtu.be/eqXaqRFAWrA
  analogWrite( MOTOR_OUT_PIN, 0);
  Serial.println("STOPPED");
}//stopMotor()


/*
 * pushButton()
 * @brief reads the push button
 * @param return nothing
 * @param

 * on May 08, 2020 at 02:36 in Ajax, Ontario, Canada
 */
void pushButton()
{
  //Robojax XY-GMOS MOSFET Motor driver code
  //video instruction https://youtu.be/eqXaqRFAWrA
  if(digitalRead(START_STOP_PIN) ==LOW)
  {
    motorState =!motorState;
    delay(100);
  }

}//pushButton()
Nghĩ bạn có thể cần
-
AmazonPurchase HW-532 from Amazonamzn.to
-
eBay
-
AliExpressPurchase FR120N Motor Driver from AliExpresss.click.aliexpress.com
Tài nguyên & tài liệu tham khảo
Chưa có tài nguyên nào.
Tập tin📁
Bảng dữ liệu (pdf)
-
infineon-IRLR7843 LR7843 MOSFET datasheet
infineon-irlr7843-datasheet-en.pdf0.37 MB
Tập tin Fritzing
-
HW-532B Mosfot Module
HW-532B.fzpz0.01 MB
Các tập tin khác
-
infineon-irfr120n-datasheet-en
infineon-irfr120n-datasheet-en.pdf0.39 MB -
alpha-and-Omega-AOD4184A_datasheet
alpha-and-Omega-AOD4184A_datasheet.pdf0.43 MB