วิธีใช้ Mosfet Optocoupled HW-532 เพื่อควบคุมความเร็วมอเตอร์ DC หรือโหลดสูงสุด 30V ด้วย Arduino
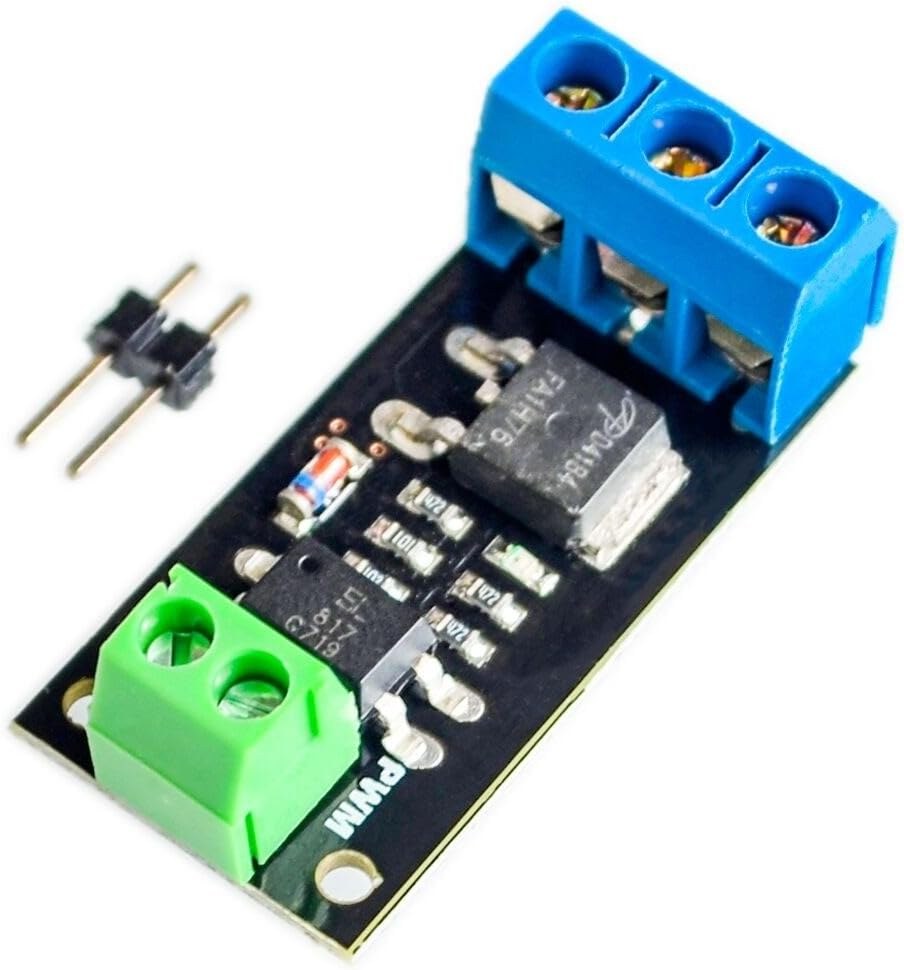
คู่มือโปรเจกต์นี้สาธิตวิธีการสร้างตัวควบคุมความเร็วมอเตอร์ไฟฟ้ากระแสตรงแบบอเนกประสงค์โดยใช้ Arduino และโมดูล MOSFET แบบออปโตคัปเปิล HW-532 มอสเฟตอาจเป็น FR120N , LR7843 หรือ D4184 ซึ่งช่วยให้คุณควบคุมความเร็วและสถานะเปิด/ปิดของมอเตอร์ไฟฟ้ากระแสตรงที่มีแรงดันไฟฟ้าสูงถึง 30V โมดูล HW-532 ให้การป้องกันและการแยกสัญญาณ ทำให้ปลอดภัยและเชื่อถือได้มากกว่าการเชื่อมต่อมอเตอร์เข้ากับ Arduino โดยตรง
โปรเจกต์นี้มีคุณค่าสำหรับการใช้งานที่หลากหลาย นี่คือตัวอย่างบางส่วน:
- ควบคุมความเร็วของแขนหุ่นยนต์อย่างแม่นยำ
- สร้างพัดลมความเร็วปรับได้สำหรับระบบระบายความร้อน
- สร้างเครื่องจักรอัตโนมัติที่มีการเคลื่อนไหวที่ปรับได้
- พัฒนาการควบคุมวาล์วมอเตอร์สำหรับระบบของเหลว
ฮาร์ดแวร์/ส่วนประกอบ
ส่วนประกอบหลักคือ Arduino โมดูล MOSFET แบบออปโตคัปเปิล HW-532 (พร้อมตัวเลือก MOSFET เช่น D4184, LR7843 หรือ FR120N) มอเตอร์ไฟฟ้ากระแสตรง (พิกัดแรงดันไฟฟ้า ≤ 30V) สายเชื่อมต่อ และอุปกรณ์เสริม เช่น โพเทนชิโอมิเตอร์และสวิตช์ปุ่มกดสำหรับการควบคุมขั้นสูง (ในวิดีโอที่ 19:34)
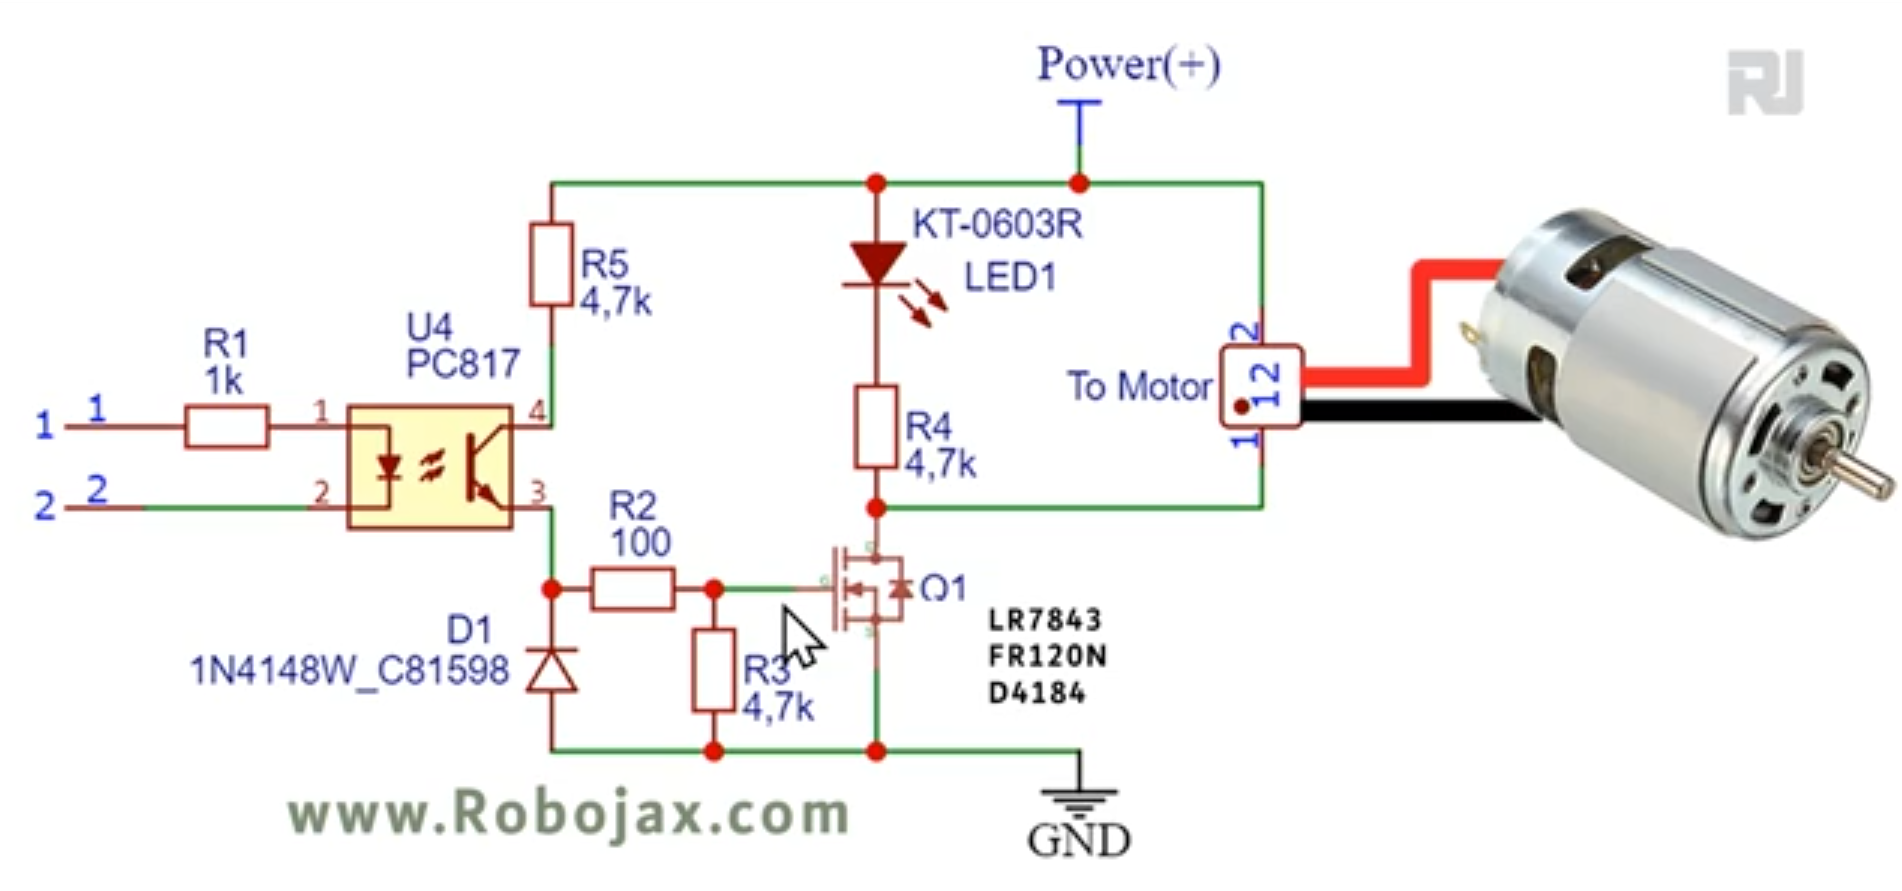
การเลือก MOSFET ภายในโมดูล HW-532 ขึ้นอยู่กับความต้องการกระแสของคุณ (ในวิดีโอที่ 01:24) วิดีโอให้การเปรียบเทียบรายละเอียดของ MOSFET ชนิดต่างๆ (ในวิดีโอที่ 06:50) และความเหมาะสมสำหรับการใช้งานต่างๆ (ในวิดีโอที่ 09:45) อย่าลืมรวมไดโอดสำหรับโหลดเหนี่ยวนำ เช่น มอเตอร์ไฟฟ้ากระแสตรง เพื่อป้องกันโมดูล (ในวิดีโอที่ 06:00 และ 22:02)
คู่มือการเดินสายไฟ
การเดินสายพื้นฐานเชื่อมต่อขั้วบวกของมอเตอร์เข้ากับเอาต์พุตของ HW-532 ขั้วลบของมอเตอร์เข้ากับกราวด์ของ HW-532 และพินควบคุมของ HW-532 เข้ากับพินดิจิทัลของ Arduino (ในวิดีโอที่ 11:16)

คำอธิบายโค้ด
โค้ดที่ให้มามีระดับการควบคุมสามระดับ:
- การควบคุมเปิด/ปิด: โค้ดง่ายๆ นี้ (ในวิดีโอที่ 15:05) ใช้พินดิจิทัลเพื่อสลับการเปิดและปิดมอเตอร์ ส่วนที่ผู้ใช้กำหนดค่าได้คือค่าคงที่
MOTOR_OUT_PINซึ่งกำหนดว่าพินใดของ Arduino ควบคุมโมดูล HW-532 - การควบคุมความเร็วแบบ PWM: โค้ดนี้ (ในวิดีโอที่ 15:39) ใช้การมอดูเลตความกว้างพัลส์ (PWM) เพื่อควบคุมความเร็วของมอเตอร์ ผู้ใช้สามารถปรับ
SPEED_MAXและSPEED_MINเพื่อตั้งค่าขีดจำกัดบนและล่างของการควบคุมความเร็ว และฟังก์ชันmotorControl()และstopMotor()ใช้เพื่อควบคุมมอเตอร์และหยุดมอเตอร์ตามลำดับ - การควบคุมด้วยโพเทนชิโอมิเตอร์และปุ่มกด: โค้ดนี้ (ในวิดีโอที่ 22:12) ช่วยให้ควบคุมความเร็วมอเตอร์ด้วยโพเทนชิโอมิเตอร์และเริ่ม/หยุดด้วยปุ่มกด ส่วนที่ผู้ใช้กำหนดค่าได้รวมถึง
POT_PIN(พินโพเทนชิโอมิเตอร์),MOTOR_OUT_PIN(พินควบคุม PWM),START_STOP_PIN(พินปุ่มกด),SPEED_MAXและSPEED_MIN
โปรเจกต์สด/การสาธิต
วิดีโอสาธิตการทำงานของตัวอย่างโค้ดทั้งสามแบบ การควบคุมเปิด/ปิดแสดง (ในวิดีโอที่ 11:41) ตามด้วยการควบคุมความเร็วแบบ PWM (ในวิดีโอที่ 16:53) และสุดท้ายคือการควบคุมด้วยโพเทนชิโอมิเตอร์และปุ่มกด (ในวิดีโอที่ 23:02)
บทต่างๆ
- [00:00] บทนำและภาพรวมโปรเจกต์
- [01:24] โมดูล HW-532 และตัวเลือก MOSFET
- [03:23] แผนผังวงจรและคำอธิบาย
- [05:11] รายละเอียดส่วนประกอบ
- [06:50] การวิเคราะห์ดาต้าชีต MOSFET
- [11:16] การเดินสายพื้นฐานและการสาธิตเปิด/ปิด
- [15:05] โค้ด Arduino สำหรับการควบคุมเปิด/ปิด
- [15:39] โค้ด Arduino สำหรับการควบคุมความเร็วแบบ PWM
- [19:34] การเดินสายด้วยโพเทนชิโอมิเตอร์และปุ่มกด
- [22:12] โค้ด Arduino ด้วยโพเทนชิโอมิเตอร์และปุ่มกด
ภาพ


/*
* Lesson 108-1: In this lesson we learn how to use  the module with FR120N , LR7843 and D4184 MOSFET to turn ON/OFF DC load up to up to 10A. HW-532 optically isolated from 5V to 30V load up to 10A depending on the module. Schematic shown, wiring diagram explained, different
method of wiring with push button and potentiometer also shown.
Video https://youtu.be/eqXaqRFAWrA

Written by Ahmad Shamshiri for RoboJax.com
// Published on Aug 25, 2022 in Aajx, ON, Canada.


  Project 1: Turning ON/OFF a motor or load (this project)
  Project 2: Controllign Speed using Arduino code
  Project 3: Controllign Speed using potentiometer and a push button

  * Watch Video instrution for this code: https://youtu.be/eqXaqRFAWrA
  *
  * This code is part of Arduino Step by Step Course which starts here:  https://youtu.be/-6qSrDUA5a8
  *
  * for library of this code visit http://robojax.com/
  *
 If you found this tutorial helpful, please support me so I can continue creating
 content like this. Make a donation using PayPal by credit card https://bit.ly/donate-robojax


  *  * This code is "AS IS" without warranty or liability. Free to be used as long as you keep this note intact.*
  * This code has been download from Robojax.com
     This program is free software: you can redistribute it and/or modify
     it under the terms of the GNU General Public License as published by
     the Free Software Foundation, either version 3 of the License, or
     (at your option) any later version.

     This program is distributed in the hope that it will be useful,
     but WITHOUT ANY WARRANTY; without even the implied warranty of
     MERCHANTABILITY or FITNESS FOR A PARTICULAR PURPOSE.  See the
     GNU General Public License for more details.

     You should have received a copy of the GNU General Public License
     along with this program.  If not, see <https://www.gnu.org/licenses/>.

 */


const int MOTOR_OUT_PIN=2;


void setup() {
    //Robojax  MOSFET Motor driver code
  Serial.begin(9600);
  Serial.println("Robojax LR7834 ,  Arduino");

  pinMode(MOTOR_OUT_PIN, OUTPUT);
  digitalWrite(MOTOR_OUT_PIN, HIGH);


}

// the loop routine runs over and over again forever:
void loop() {


    //Robojax XY-GMOS MOSFET Motor driver code
}//loop end# include <Arduino_LSM6DS3.h>
/*
* Lesson 108-2: In this lesson we learn how to use the module with FR120N , LR7843 and D4184 MOSFET to turn ON/OFF DC load up to up to 10A. HW-532 optically isolated from 5V to 30V load up to 10A depending on the module. Schematic shown, wiring diagram explained, different
method of wiring with push button and potentiometer also shown.
Video https://youtu.be/eqXaqRFAWrA
Get code for this project from https://robojax.com/RJT797
Written by Ahmad Shamshiri for RoboJax.com
// Published on Aug 25, 2022 in Aajx, ON, Canada.
Project 1: Turning ON/OFF a motor or load (this project)
Project 2: Controlling Speed using Arduino code
Project 3: Controlling Speed using potentiometer and a push button
* Watch Video instruction for this code:https://youtu.be/eqXaqRFAWrA
*
* This code is part of Arduino Step by Step Course which starts here: https://youtu.be/-6qSrDUA5a8
*
* for library of this code visit http://robojax.com/
*
If you found this tutorial helpful, please support me so I can continue creating
content like this. Make a donation using PayPal by credit card https://bit.ly/donate-robojax
* * This code is "AS IS" without warranty or liability. Free to be used as long as you keep this note intact.*
* This code has been download from Robojax.com
This program is free software: you can redistribute it and/or modify
it under the terms of the GNU General Public License as published by
the Free Software Foundation, either version 3 of the License, or
(at your option) any later version.
This program is distributed in the hope that it will be useful,
but WITHOUT ANY WARRANTY; without even the implied warranty of
MERCHANTABILITY or FITNESS FOR A PARTICULAR PURPOSE. See the
GNU General Public License for more details.
You should have received a copy of the GNU General Public License
along with this program. If not, see <https://www.gnu.org/licenses/>.
*/
const int MOTOR_OUT_PIN = 3;
const int SPEED_MAX = 100;// in %
const int SPEED_MIN = 0;//in %
const int STOP=0;
const int RUN=1;
int motorState=RUN;//
int motorSpeed = 0;//between 0 to 100%.
//video instruction https://youtu.be/eqXaqRFAWrA
void setup() {
//Robojax XY-GMOS MOSFET Motor driver code
Serial.begin(9600);
Serial.println("Robojax XY-GMOS Motor, Arduino");
pinMode(MOTOR_OUT_PIN, OUTPUT);
}//setup ends
// the loop routine runs over and over again forever:
void loop() {
//video https://youtu.be/eqXaqRFAWrA
motorControl(50);//run motor at 50%
delay(5000);//keep it running for 5000ms or 5 seconds
stopMotor();//stop the motor
delay(3000);//keep it stopped for 5000ms or 5 seconds
for(int i=0; i<100; i++)
{
motorControl(i);
delay(200);
}
stopMotor();//stop motor
delay(3000);//keep it stopped for 5000ms or 5 seconds
for(int i=100; i >0; i--)
{
motorControl(i);
delay(200);
}
//Robojax LR7843 MOSFET Motor driver code
}//loop end
/*
* motorControl(int s)
* @brief controls the motor with the value s
* @param return nothing
* @param "type" is character
* on May 08, 2020 at 02:36 in Ajax, Ontario, Canada
*/
void motorControl(int s)
{
//Robojax LR7843 MOSFET Motor driver code
//video https://youtu.be/eqXaqRFAWrA
int k = map(s, SPEED_MIN, SPEED_MAX, 0, 255);
Serial.print("Speed: "); Serial.print(s);Serial.println("%");
analogWrite(MOTOR_OUT_PIN, k);
}//motorControl
/*
* stopMotor()
* @brief stops the motor
* @param return nothing
* @param
* on May 08, 2020 at 02:36 in Ajax, Ontario, Canada
*/
void stopMotor(){
//Robojax XY-GMOS MOSFET Motor driver code
analogWrite( MOTOR_OUT_PIN, 0);
Serial.println("STOPPED");
}//stopMotor()
/*
 * Lesson 108-3: Controlling Speed of motor using Variable Resistor (potentiometer) and using Start/Stop push button with Arduino.
 *
 * In this lesson we learn how to use  the module with FR120N , LR7843 and D4184 MOSFET to turn ON/OFF DC load up to up to 10A. HW-532 optically isolated from 5V to 30V load up to 10A depending on the module. Schematic shown, wiring diagram explained, different
 method of wiring with push button and potentiometer also shown.
 Video https://youtu.be/eqXaqRFAWrA
   Get codes for this project from https://robojax.com/RJT797
 Written by Ahmad Shamshiri for RoboJax.com
 // Published on Aug 25, 2022 in Aajx, ON, Canada.


   Project 1: Turning ON/OFF a motor or load -
   Project 2: Controlling Speed using Arduino code
   Project 3: Controlling Speed using potentiometer and a push button (this project)

   * Watch Video instruction for this code:https://youtu.be/eqXaqRFAWrA
   *
   * This code is part of Arduino Step by Step Course which starts here:  https://youtu.be/-6qSrDUA5a8
   *
   * for library of this code visit http://robojax.com/
   *
  If you found this tutorial helpful, please support me so I can continue creating
  content like this. Make a donation using PayPal by credit card https://bit.ly/donate-robojax


   *  * This code is "AS IS" without warranty or liability. Free to be used as long as you keep this note intact.*
   * This code has been download from Robojax.com
      This program is free software: you can redistribute it and/or modify
      it under the terms of the GNU General Public License as published by
      the Free Software Foundation, either version 3 of the License, or
      (at your option) any later version.

      This program is distributed in the hope that it will be useful,
      but WITHOUT ANY WARRANTY; without even the implied warranty of
      MERCHANTABILITY or FITNESS FOR A PARTICULAR PURPOSE.  See the
      GNU General Public License for more details.

      You should have received a copy of the GNU General Public License
      along with this program.  If not, see <https://www.gnu.org/licenses/>.

  */

const int POT_PIN =A0;//can change
const int MOTOR_OUT_PIN = 3;//~
const int START_STOP_PIN=2;//for push button switch

const int SPEED_MAX = 100;// in %
const int SPEED_MIN = 0;//in %
  //video instruction https://youtu.be/eqXaqRFAWrA

const int STOP=0;
const int RUN=1;
int motorState=RUN;//
int motorSpeed = 0;//between 0 to 100%.

void pushButton();
void setup() {
    //Robojax XY-GMOS MOSFET Motor driver code
  Serial.begin(9600);
  Serial.println("Robojax XY-GMOS Motor,  Arduino");
  pinMode(START_STOP_PIN, INPUT_PULLUP);
  pinMode(MOTOR_OUT_PIN, OUTPUT);
    //video instruction https://youtu.be/eqXaqRFAWrA


}

// the loop routine runs over and over again forever:
void loop() {

 pushButton();
 int potValue =analogRead(POT_PIN);
 int speedPercent = map(potValue, 0, 1023, 0, 100);

 if(motorState ==RUN)
 {
  motorControl(speedPercent);
 }else{
  stopMotor();
 }


  delay(500);
    //Robojax XY-GMOS MOSFET Motor driver code
      //video instruction https://youtu.be/eqXaqRFAWrA
}//loop end


/*
 * motorControl(int s)
 * @brief controls the motor with the value s
 * @param return nothing
 * @param "type" is character

 * on May 08, 2020 at 02:36 in Ajax, Ontario, Canada
 */
void motorControl(int s)
{
    //Robojax LR7843 MOSFET Motor driver code
      //video instruction https://youtu.be/eqXaqRFAWrA
  int k = map(s, SPEED_MIN, SPEED_MAX, 0, 255);
  Serial.print("Speed: "); Serial.print(s);Serial.println("%");
  analogWrite(MOTOR_OUT_PIN, k);
}//motorControl


/*
 * stopMotor()
 * @brief stops the motor
 * @param return nothing
 * @param

 * on May 08, 2020 at 02:36 in Ajax, Ontario, Canada
 */
void stopMotor(){
    //Robojax XY-GMOS MOSFET Motor driver code
      //video instruction https://youtu.be/eqXaqRFAWrA
  analogWrite( MOTOR_OUT_PIN, 0);
  Serial.println("STOPPED");
}//stopMotor()


/*
 * pushButton()
 * @brief reads the push button
 * @param return nothing
 * @param

 * on May 08, 2020 at 02:36 in Ajax, Ontario, Canada
 */
void pushButton()
{
  //Robojax XY-GMOS MOSFET Motor driver code
  //video instruction https://youtu.be/eqXaqRFAWrA
  if(digitalRead(START_STOP_PIN) ==LOW)
  {
    motorState =!motorState;
    delay(100);
  }

}//pushButton()
สิ่งที่คุณอาจต้องการ
-
อเมซอนPurchase HW-532 from Amazonamzn.to
-
อีเบย์
-
อาลีเอ็กซ์เพรสPurchase FR120N Motor Driver from AliExpresss.click.aliexpress.com
แหล่งข้อมูลและเอกสารอ้างอิง
ยังไม่มีทรัพยากรเลย
ไฟล์📁
แผ่นข้อมูล (pdf)
-
infineon-IRLR7843 LR7843 MOSFET datasheet
infineon-irlr7843-datasheet-en.pdf0.37 MB
ไฟล์ Fritzing
-
HW-532B Mosfot Module
HW-532B.fzpz0.01 MB
ไฟล์อื่น ๆ
-
infineon-irfr120n-datasheet-en
infineon-irfr120n-datasheet-en.pdf0.39 MB -
alpha-and-Omega-AOD4184A_datasheet
alpha-and-Omega-AOD4184A_datasheet.pdf0.43 MB