د موټسفټ آپټوکوپلډ HW-532 څخه د کارولو څرنګوالی ترڅو د آردوینو په کارولو سره تر 30V پورې د DC موټرو سرعت یا بار کنټرول کړئ
دا پروژه لارښود ښیي چې څنګه د Arduino او HW-532 آپټوکوپلډ MOSFET ماډل په کارولو سره یو څو اړخیز DC موټور سرعت کنټرولر جوړ کړو. MOSFET ممکن FR120N ، LR7843 یا D4184 وي. دا تاسو ته اجازه درکوي چې د DC موټور سرعت او آن/آف حالت تر 30V پورې ولټاژ سره کنټرول کړئ. د HW-532 ماډل محافظت او جلا کول وړاندې کوي، چې دا د موټور مستقیم Arduino سره نښلولو په پرتله خوندي او ډیر باوري کوي.
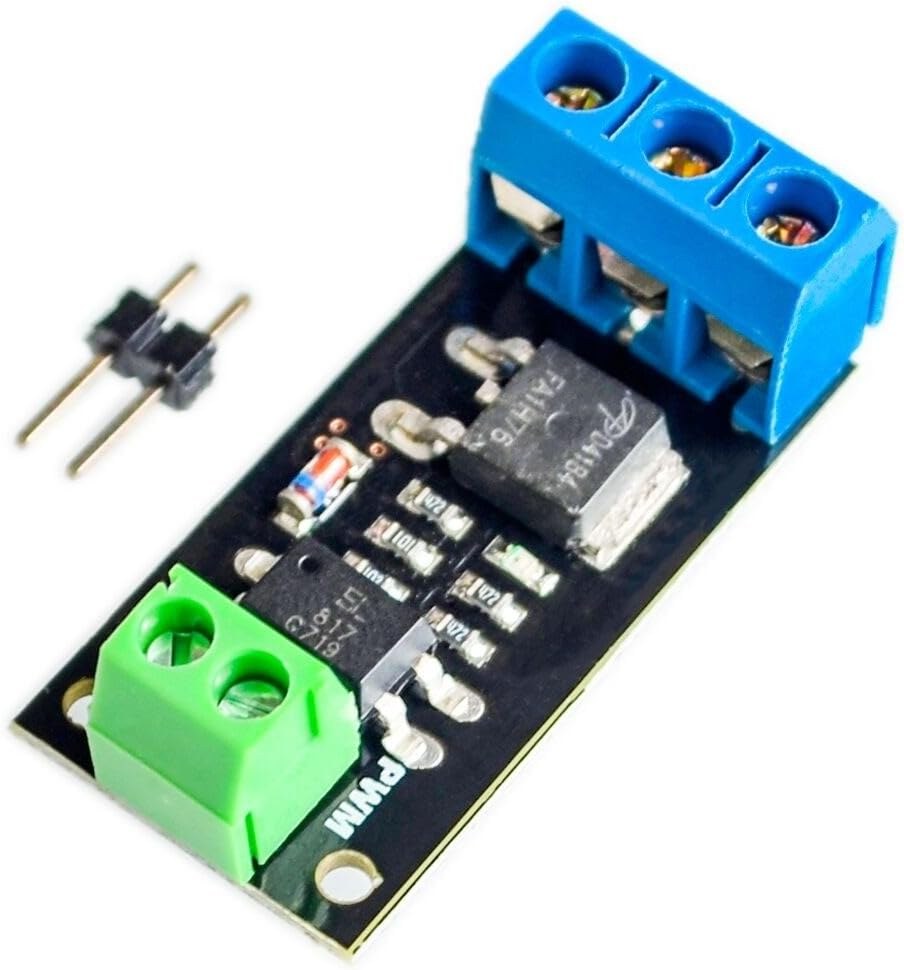
دا پروژه د مختلفو کارونو لپاره ارزښتناکه ده. دلته څو مثالونه دي:
- د روبوټیک بازو د سرعت دقیق کنټرول
- د یخولو سیسټمونو لپاره د متغیر سرعت پنکې جوړول
- د تنظیم وړ حرکت سره اتوماتیک ماشینونه جوړول
- د مایع سیسټمونو لپاره د موټوریز شوي والو کنټرول پراختیا
هارډویر/اجزاوې
اصلي اجزاوې Arduino، د HW-532 آپټوکوپلډ MOSFET ماډل (د MOSFET انتخابونو لکه D4184، LR7843، یا FR120N سره)، یو DC موټور (د ولټاژ درجه ≤ 30V)، نښلونکي تارونه، او په اختیاري توګه، د پرمختللي کنټرول لپاره یو پوټینشیومیټر او پش-بټن سویچ (په ویډیو کې په 19:34) دي.
د HW-532 ماډل دننه د MOSFET انتخاب ستاسو د اوسني اړتیاوو پورې اړه لري (په ویډیو کې په 01:24). ویډیو د مختلفو MOSFETs تفصیلي پرتله کول (په ویډیو کې په 06:50) او د مختلفو کارونو لپاره د دوی مناسبیت (په ویډیو کې په 09:45) وړاندې کوي. په یاد ولرئ چې د DC موټور په څیر د انډکټیو بارونو لپاره یو ډایوډ شامل کړئ ترڅو ماډل خوندي کړئ (په ویډیو کې په 06:00 او 22:02).
د تارونو نښلولو لارښود
اساسي تارونه د موټور مثبت ترمینل د HW-532 آوټ پټ سره، د موټور منفي ترمینل د HW-532 ځمکې سره، او د HW-532 کنټرول پن د Arduino ډیجیټل پن سره نښلوي (په ویډیو کې په 11:16).

د کوډ تشریح
چمتو شوی کوډ د کنټرول درې کچې وړاندې کوي:
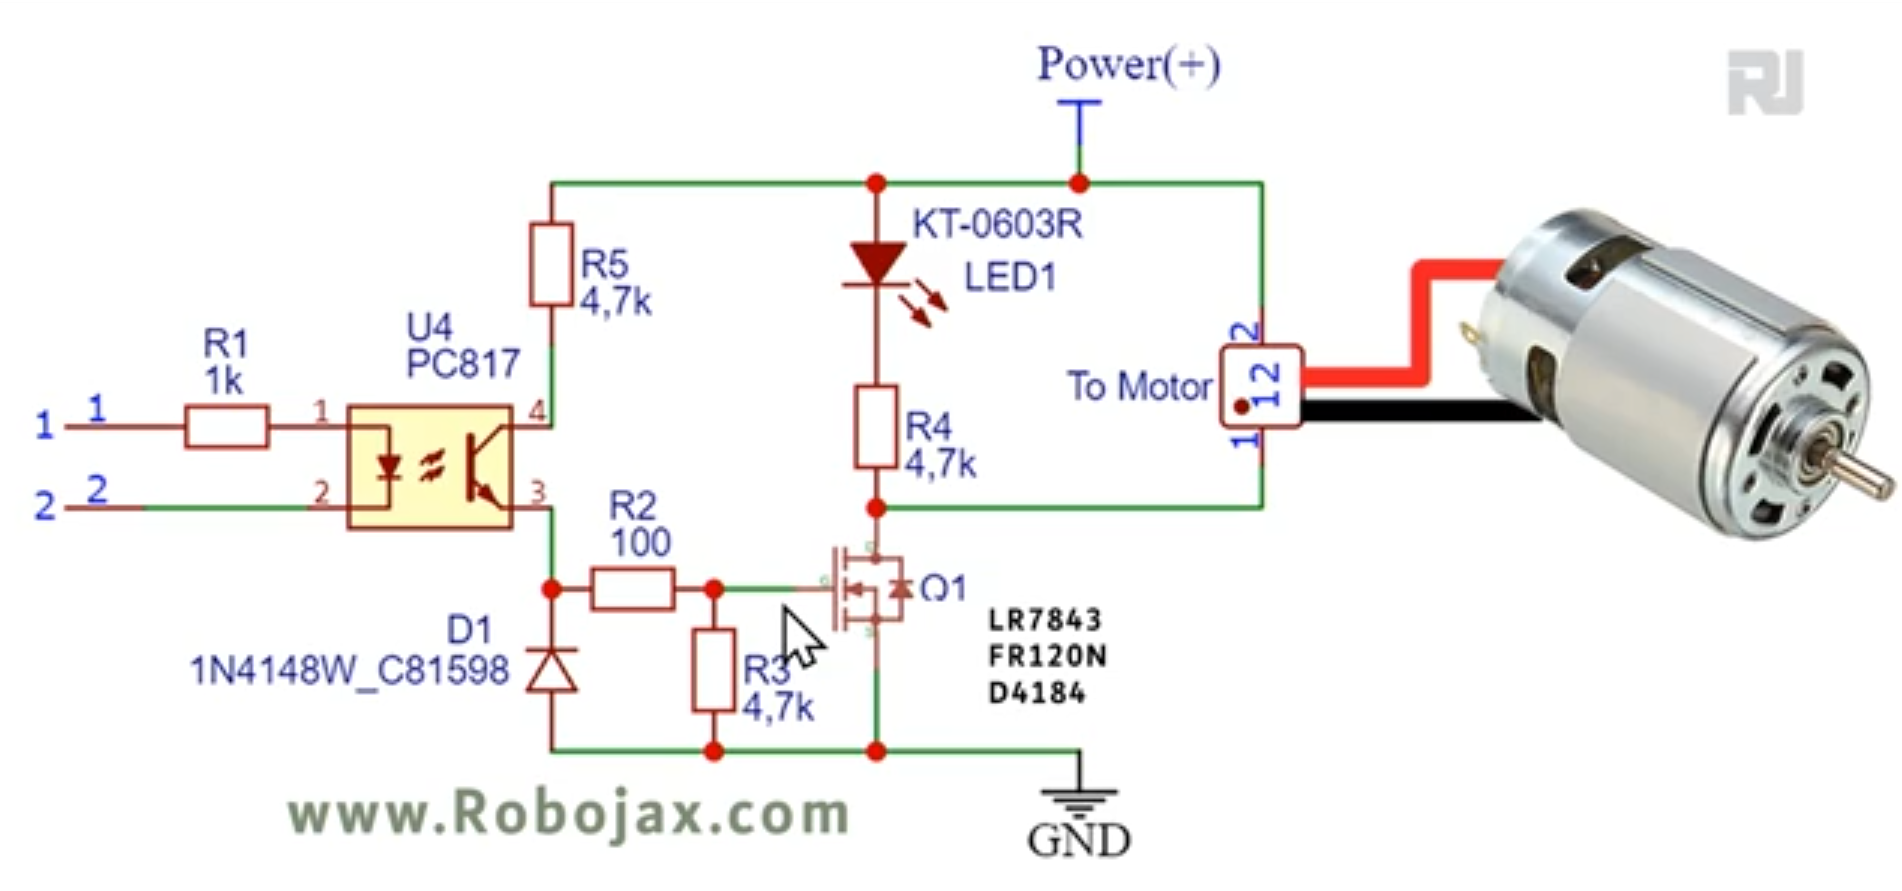
- آن/آف کنټرول: دا ساده کوډ (په ویډیو کې په 15:05) د موټور آن او آف کولو لپاره یو ډیجیټل پن کاروي. د کارونکي لخوا تنظیم وړ برخه د
MOTOR_OUT_PINثابت دی، کوم چې ټاکي چې کوم Arduino پن د HW-532 ماډل کنټرولوي. - PWM سرعت کنټرول: دا کوډ (په ویډیو کې په 15:39) د موټور د سرعت کنټرول لپاره د پلنډ ماډولیشن (PWM) کاروي. کارونکی کولی شي
SPEED_MAXاوSPEED_MINتنظیم کړي ترڅو د سرعت کنټرول پورتنۍ او ښکته حدونه وټاکي، او دmotorControl()اوstopMotor()فنکشنونه په ترتیب سره د موټور کنټرول او د هغه د بندولو لپاره کارول کیږي. - پوټینشیومیټر او پش-بټن کنټرول: دا کوډ (په ویډیو کې په 22:12) د پوټینشیومیټر سره د موټور سرعت کنټرول او د پش بټن سره د هغه پیل/بندولو اجازه ورکوي. د کارونکي لخوا تنظیم وړ برخې شاملې دي
POT_PIN(د پوټینشیومیټر پن)،MOTOR_OUT_PIN(د PWM کنټرول پن)،START_STOP_PIN(د پش بټن پن)،SPEED_MAX، اوSPEED_MIN.
ژوندی پروژه/مظاهره
ویډیو د دریو کوډ مثالونو عملیات ښیي. د آن/آف کنټرول ښودل شوی (په ویډیو کې په 11:41)، ورپسې د PWM سرعت کنټرول (په ویډیو کې په 16:53)، او په پای کې، د پوټینشیومیټر او پش-بټن کنټرول (په ویډیو کې په 23:02).
فصلونه
- [00:00] پیژندنه او د پروژې کتنه
- [01:24] د HW-532 ماډل او MOSFET انتخابونه
- [03:23] د سرکټ سکیماتیک او تشریح
- [05:11] د اجزاوو تفصیلات
- [06:50] د MOSFET ډیټاشیټ تحلیل
- [11:16] اساسي تارونه او د آن/آف مظاهره
- [15:05] د آن/آف کنټرول لپاره د Arduino کوډ
- [15:39] د PWM سرعت کنټرول لپاره د Arduino کوډ
- [19:34] د پوټینشیومیټر او پش بټن سره تارونه
- [22:12] د پوټینشیومیټر او پش بټن سره د Arduino کوډ
انځورونه


/*
* Lesson 108-1: In this lesson we learn how to use  the module with FR120N , LR7843 and D4184 MOSFET to turn ON/OFF DC load up to up to 10A. HW-532 optically isolated from 5V to 30V load up to 10A depending on the module. Schematic shown, wiring diagram explained, different
method of wiring with push button and potentiometer also shown.
Video https://youtu.be/eqXaqRFAWrA

Written by Ahmad Shamshiri for RoboJax.com
// Published on Aug 25, 2022 in Aajx, ON, Canada.


  Project 1: Turning ON/OFF a motor or load (this project)
  Project 2: Controllign Speed using Arduino code
  Project 3: Controllign Speed using potentiometer and a push button

  * Watch Video instrution for this code: https://youtu.be/eqXaqRFAWrA
  *
  * This code is part of Arduino Step by Step Course which starts here:  https://youtu.be/-6qSrDUA5a8
  *
  * for library of this code visit http://robojax.com/
  *
 If you found this tutorial helpful, please support me so I can continue creating
 content like this. Make a donation using PayPal by credit card https://bit.ly/donate-robojax


  *  * This code is "AS IS" without warranty or liability. Free to be used as long as you keep this note intact.*
  * This code has been download from Robojax.com
     This program is free software: you can redistribute it and/or modify
     it under the terms of the GNU General Public License as published by
     the Free Software Foundation, either version 3 of the License, or
     (at your option) any later version.

     This program is distributed in the hope that it will be useful,
     but WITHOUT ANY WARRANTY; without even the implied warranty of
     MERCHANTABILITY or FITNESS FOR A PARTICULAR PURPOSE.  See the
     GNU General Public License for more details.

     You should have received a copy of the GNU General Public License
     along with this program.  If not, see <https://www.gnu.org/licenses/>.

 */


const int MOTOR_OUT_PIN=2;


void setup() {
    //Robojax  MOSFET Motor driver code
  Serial.begin(9600);
  Serial.println("Robojax LR7834 ,  Arduino");

  pinMode(MOTOR_OUT_PIN, OUTPUT);
  digitalWrite(MOTOR_OUT_PIN, HIGH);


}

// the loop routine runs over and over again forever:
void loop() {


    //Robojax XY-GMOS MOSFET Motor driver code
}//loop end# include <Arduino_LSM6DS3.h>
/*
* Lesson 108-2: In this lesson we learn how to use the module with FR120N , LR7843 and D4184 MOSFET to turn ON/OFF DC load up to up to 10A. HW-532 optically isolated from 5V to 30V load up to 10A depending on the module. Schematic shown, wiring diagram explained, different
method of wiring with push button and potentiometer also shown.
Video https://youtu.be/eqXaqRFAWrA
Get code for this project from https://robojax.com/RJT797
Written by Ahmad Shamshiri for RoboJax.com
// Published on Aug 25, 2022 in Aajx, ON, Canada.
Project 1: Turning ON/OFF a motor or load (this project)
Project 2: Controlling Speed using Arduino code
Project 3: Controlling Speed using potentiometer and a push button
* Watch Video instruction for this code:https://youtu.be/eqXaqRFAWrA
*
* This code is part of Arduino Step by Step Course which starts here: https://youtu.be/-6qSrDUA5a8
*
* for library of this code visit http://robojax.com/
*
If you found this tutorial helpful, please support me so I can continue creating
content like this. Make a donation using PayPal by credit card https://bit.ly/donate-robojax
* * This code is "AS IS" without warranty or liability. Free to be used as long as you keep this note intact.*
* This code has been download from Robojax.com
This program is free software: you can redistribute it and/or modify
it under the terms of the GNU General Public License as published by
the Free Software Foundation, either version 3 of the License, or
(at your option) any later version.
This program is distributed in the hope that it will be useful,
but WITHOUT ANY WARRANTY; without even the implied warranty of
MERCHANTABILITY or FITNESS FOR A PARTICULAR PURPOSE. See the
GNU General Public License for more details.
You should have received a copy of the GNU General Public License
along with this program. If not, see <https://www.gnu.org/licenses/>.
*/
const int MOTOR_OUT_PIN = 3;
const int SPEED_MAX = 100;// in %
const int SPEED_MIN = 0;//in %
const int STOP=0;
const int RUN=1;
int motorState=RUN;//
int motorSpeed = 0;//between 0 to 100%.
//video instruction https://youtu.be/eqXaqRFAWrA
void setup() {
//Robojax XY-GMOS MOSFET Motor driver code
Serial.begin(9600);
Serial.println("Robojax XY-GMOS Motor, Arduino");
pinMode(MOTOR_OUT_PIN, OUTPUT);
}//setup ends
// the loop routine runs over and over again forever:
void loop() {
//video https://youtu.be/eqXaqRFAWrA
motorControl(50);//run motor at 50%
delay(5000);//keep it running for 5000ms or 5 seconds
stopMotor();//stop the motor
delay(3000);//keep it stopped for 5000ms or 5 seconds
for(int i=0; i<100; i++)
{
motorControl(i);
delay(200);
}
stopMotor();//stop motor
delay(3000);//keep it stopped for 5000ms or 5 seconds
for(int i=100; i >0; i--)
{
motorControl(i);
delay(200);
}
//Robojax LR7843 MOSFET Motor driver code
}//loop end
/*
* motorControl(int s)
* @brief controls the motor with the value s
* @param return nothing
* @param "type" is character
* on May 08, 2020 at 02:36 in Ajax, Ontario, Canada
*/
void motorControl(int s)
{
//Robojax LR7843 MOSFET Motor driver code
//video https://youtu.be/eqXaqRFAWrA
int k = map(s, SPEED_MIN, SPEED_MAX, 0, 255);
Serial.print("Speed: "); Serial.print(s);Serial.println("%");
analogWrite(MOTOR_OUT_PIN, k);
}//motorControl
/*
* stopMotor()
* @brief stops the motor
* @param return nothing
* @param
* on May 08, 2020 at 02:36 in Ajax, Ontario, Canada
*/
void stopMotor(){
//Robojax XY-GMOS MOSFET Motor driver code
analogWrite( MOTOR_OUT_PIN, 0);
Serial.println("STOPPED");
}//stopMotor()
/*
 * Lesson 108-3: Controlling Speed of motor using Variable Resistor (potentiometer) and using Start/Stop push button with Arduino.
 *
 * In this lesson we learn how to use  the module with FR120N , LR7843 and D4184 MOSFET to turn ON/OFF DC load up to up to 10A. HW-532 optically isolated from 5V to 30V load up to 10A depending on the module. Schematic shown, wiring diagram explained, different
 method of wiring with push button and potentiometer also shown.
 Video https://youtu.be/eqXaqRFAWrA
   Get codes for this project from https://robojax.com/RJT797
 Written by Ahmad Shamshiri for RoboJax.com
 // Published on Aug 25, 2022 in Aajx, ON, Canada.


   Project 1: Turning ON/OFF a motor or load -
   Project 2: Controlling Speed using Arduino code
   Project 3: Controlling Speed using potentiometer and a push button (this project)

   * Watch Video instruction for this code:https://youtu.be/eqXaqRFAWrA
   *
   * This code is part of Arduino Step by Step Course which starts here:  https://youtu.be/-6qSrDUA5a8
   *
   * for library of this code visit http://robojax.com/
   *
  If you found this tutorial helpful, please support me so I can continue creating
  content like this. Make a donation using PayPal by credit card https://bit.ly/donate-robojax


   *  * This code is "AS IS" without warranty or liability. Free to be used as long as you keep this note intact.*
   * This code has been download from Robojax.com
      This program is free software: you can redistribute it and/or modify
      it under the terms of the GNU General Public License as published by
      the Free Software Foundation, either version 3 of the License, or
      (at your option) any later version.

      This program is distributed in the hope that it will be useful,
      but WITHOUT ANY WARRANTY; without even the implied warranty of
      MERCHANTABILITY or FITNESS FOR A PARTICULAR PURPOSE.  See the
      GNU General Public License for more details.

      You should have received a copy of the GNU General Public License
      along with this program.  If not, see <https://www.gnu.org/licenses/>.

  */

const int POT_PIN =A0;//can change
const int MOTOR_OUT_PIN = 3;//~
const int START_STOP_PIN=2;//for push button switch

const int SPEED_MAX = 100;// in %
const int SPEED_MIN = 0;//in %
  //video instruction https://youtu.be/eqXaqRFAWrA

const int STOP=0;
const int RUN=1;
int motorState=RUN;//
int motorSpeed = 0;//between 0 to 100%.

void pushButton();
void setup() {
    //Robojax XY-GMOS MOSFET Motor driver code
  Serial.begin(9600);
  Serial.println("Robojax XY-GMOS Motor,  Arduino");
  pinMode(START_STOP_PIN, INPUT_PULLUP);
  pinMode(MOTOR_OUT_PIN, OUTPUT);
    //video instruction https://youtu.be/eqXaqRFAWrA


}

// the loop routine runs over and over again forever:
void loop() {

 pushButton();
 int potValue =analogRead(POT_PIN);
 int speedPercent = map(potValue, 0, 1023, 0, 100);

 if(motorState ==RUN)
 {
  motorControl(speedPercent);
 }else{
  stopMotor();
 }


  delay(500);
    //Robojax XY-GMOS MOSFET Motor driver code
      //video instruction https://youtu.be/eqXaqRFAWrA
}//loop end


/*
 * motorControl(int s)
 * @brief controls the motor with the value s
 * @param return nothing
 * @param "type" is character

 * on May 08, 2020 at 02:36 in Ajax, Ontario, Canada
 */
void motorControl(int s)
{
    //Robojax LR7843 MOSFET Motor driver code
      //video instruction https://youtu.be/eqXaqRFAWrA
  int k = map(s, SPEED_MIN, SPEED_MAX, 0, 255);
  Serial.print("Speed: "); Serial.print(s);Serial.println("%");
  analogWrite(MOTOR_OUT_PIN, k);
}//motorControl


/*
 * stopMotor()
 * @brief stops the motor
 * @param return nothing
 * @param

 * on May 08, 2020 at 02:36 in Ajax, Ontario, Canada
 */
void stopMotor(){
    //Robojax XY-GMOS MOSFET Motor driver code
      //video instruction https://youtu.be/eqXaqRFAWrA
  analogWrite( MOTOR_OUT_PIN, 0);
  Serial.println("STOPPED");
}//stopMotor()


/*
 * pushButton()
 * @brief reads the push button
 * @param return nothing
 * @param

 * on May 08, 2020 at 02:36 in Ajax, Ontario, Canada
 */
void pushButton()
{
  //Robojax XY-GMOS MOSFET Motor driver code
  //video instruction https://youtu.be/eqXaqRFAWrA
  if(digitalRead(START_STOP_PIN) ==LOW)
  {
    motorState =!motorState;
    delay(100);
  }

}//pushButton()
هغه شیان چې تاسو ورته اړتیا لرئ
-
امازونPurchase HW-532 from Amazonamzn.to
-
ای بی
-
علی ایکسپریسPurchase FR120N Motor Driver from AliExpresss.click.aliexpress.com
سرچینې او حوالې
تر اوسه هیڅ سرچینې نشته.
فایلونه📁
ډیټاشیټ (pdf)
-
infineon-IRLR7843 LR7843 MOSFET datasheet
infineon-irlr7843-datasheet-en.pdf0.37 MB
Fritzing فایل
-
HW-532B Mosfot Module
HW-532B.fzpz0.01 MB
نور فایلونه
-
infineon-irfr120n-datasheet-en
infineon-irfr120n-datasheet-en.pdf0.39 MB -
alpha-and-Omega-AOD4184A_datasheet
alpha-and-Omega-AOD4184A_datasheet.pdf0.43 MB