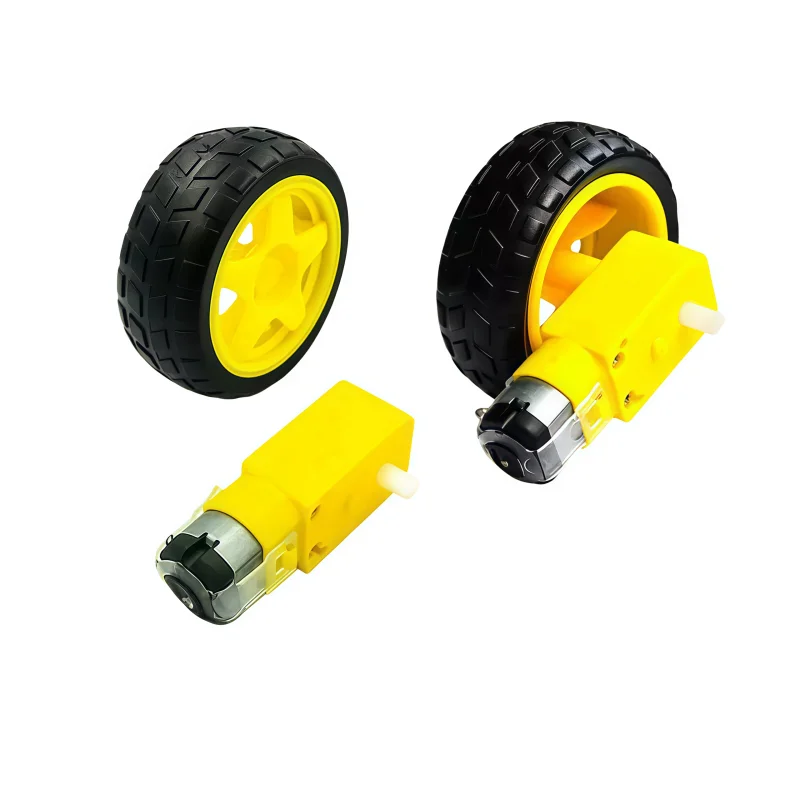
Jak używać Mosfet Optocoupled HW-532 do sterowania prędkością silnika DC do 30V lub obciążeniem za pomocą Arduino
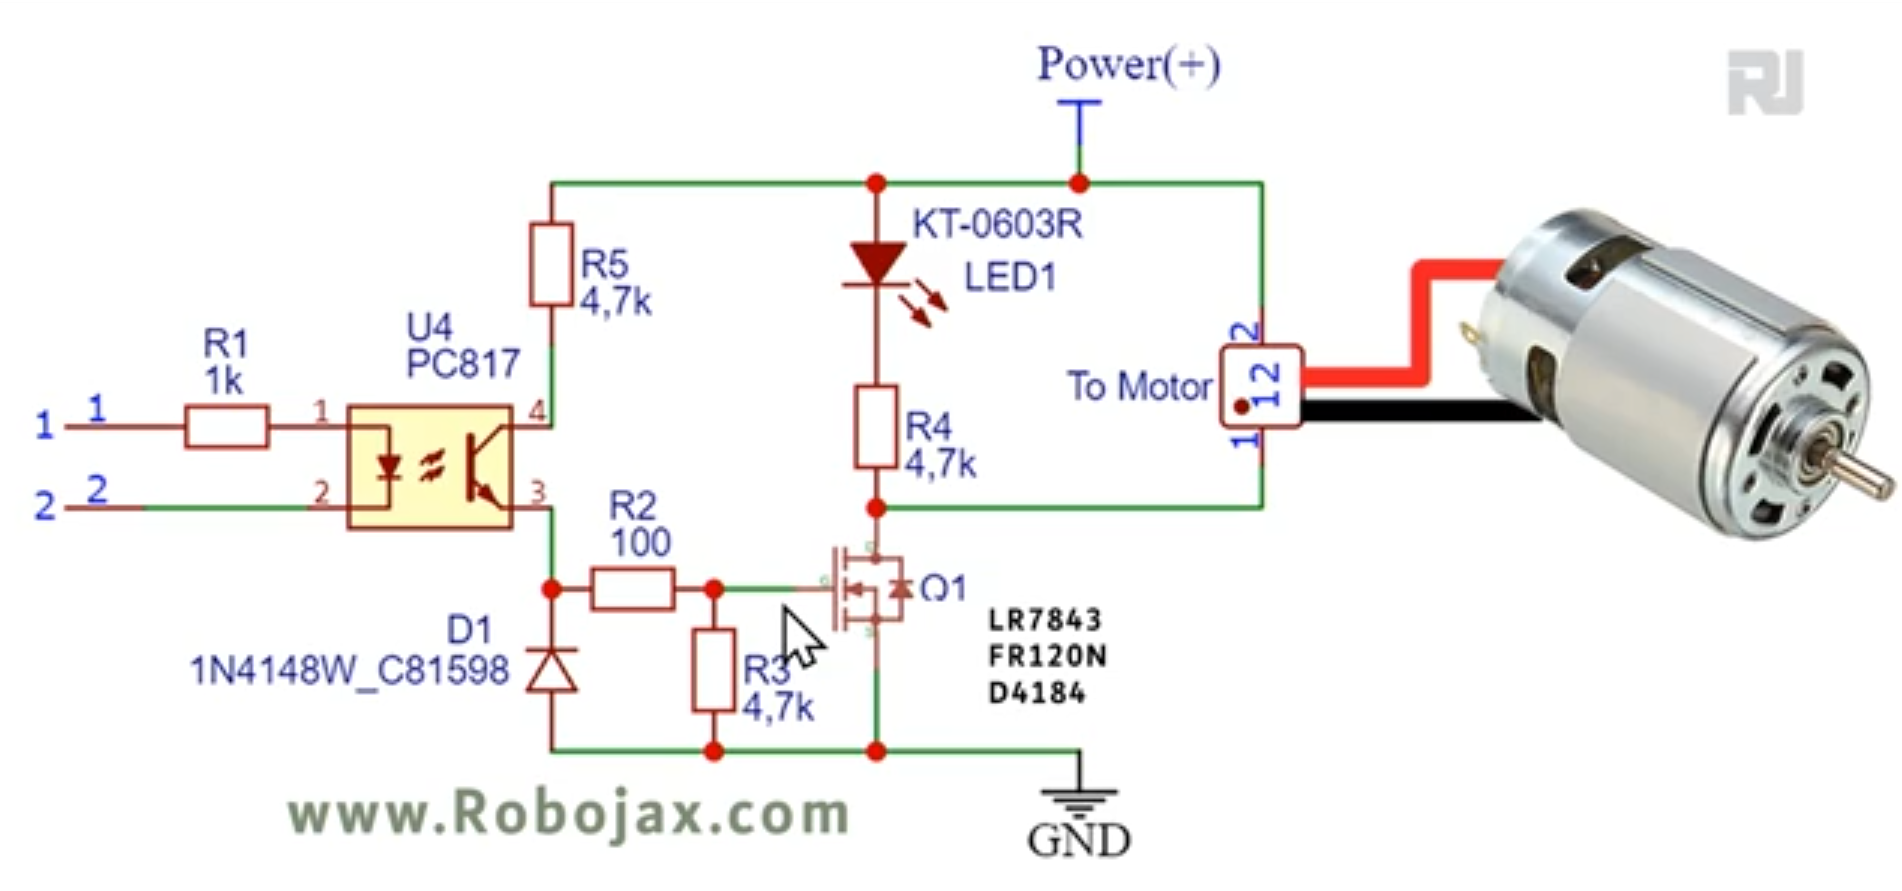
Ten przewodnik projektowy pokazuje, jak zbudować uniwersalny regulator prędkości silnika prądu stałego z użyciem Arduino i modułu MOSFET z izolacją optyczną HW-532. Tranzystor MOSFET może być FR120N , LR7843 lub D4184. Pozwala to kontrolować prędkość oraz stan włączenia/wyłączenia silnika prądu stałego przy napięciach do 30V. Moduł HW-532 zapewnia ochronę i izolację, co czyni go bezpieczniejszym i bardziej niezawodnym niż bezpośrednie podłączenie silnika do Arduino.
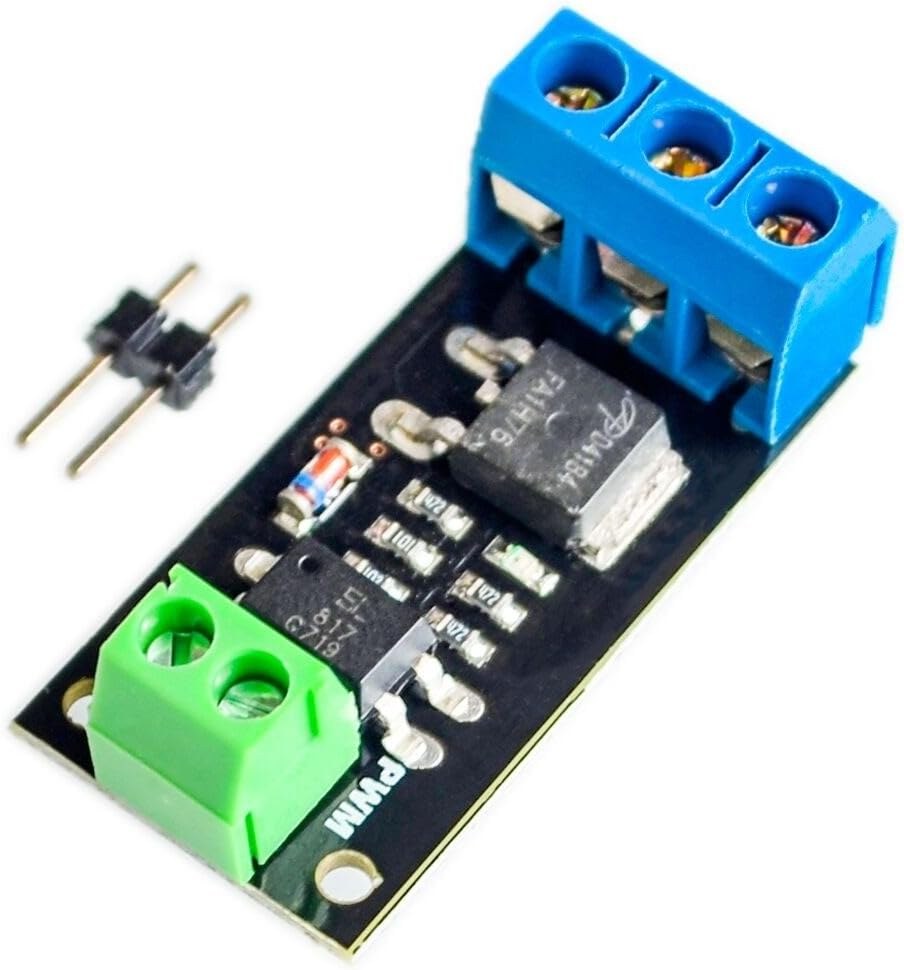
Ten projekt jest przydatny w różnych zastosowaniach. Oto kilka przykładów:
- Precyzyjne kontrolowanie prędkości ramienia robota
- Budowa wentylatora o zmiennej prędkości do systemów chłodzenia
- Tworzenie zautomatyzowanych maszyn z regulowanym ruchem
- Opracowanie sterowania zmotoryzowanym zaworem do systemów płynów
Sprzęt/Komponenty
Główne komponenty to Arduino, moduł MOSFET z izolacją optyczną HW-532 (z opcjami MOSFET, takimi jak D4184, LR7843 lub FR120N), silnik prądu stałego (napięcie znamionowe ≤ 30V), przewody łączące oraz opcjonalnie potencjometr i przycisk chwilowy do zaawansowanego sterowania (na filmie o 19:34).
Wybór MOSFET w module HW-532 zależy od wymagań prądowych (na filmie o 01:24). Film zawiera szczegółowe porównanie różnych tranzystorów MOSFET (na filmie o 06:50) i ich przydatności do różnych zastosowań (na filmie o 09:45). Pamiętaj o dołączeniu diody dla obciążeń indukcyjnych, takich jak silniki prądu stałego, aby chronić moduł (na filmie o 06:00 i 22:02).
Przewodnik po okablowaniu
Podstawowe okablowanie łączy dodatni zacisk silnika z wyjściem HW-532, ujemny zacisk silnika z masą HW-532, a pin sterujący HW-532 z pinem cyfrowym Arduino (na filmie o 11:16).

Wyjaśnienie kodu
Dostarczony kod oferuje trzy poziomy sterowania:
- Sterowanie włącz/wyłącz: Ten prosty kod (na filmie o 15:05) używa pinu cyfrowego do włączania i wyłączania silnika. Częścią konfigurowalną przez użytkownika jest stała
MOTOR_OUT_PIN, która określa, który pin Arduino steruje modułem HW-532. - Sterowanie prędkością PWM: Ten kod (na filmie o 15:39) używa modulacji szerokości impulsu (PWM) do kontrolowania prędkości silnika. Użytkownik może dostosować
SPEED_MAXiSPEED_MIN, aby ustawić górne i dolne limity sterowania prędkością, a funkcjemotorControl()istopMotor()służą odpowiednio do sterowania silnikiem i jego zatrzymywania. - Sterowanie potencjometrem i przyciskiem: Ten kod (na filmie o 22:12) pozwala kontrolować prędkość silnika za pomocą potencjometru oraz uruchamiać/zatrzymywać go przyciskiem. Części konfigurowalne przez użytkownika obejmują
POT_PIN(pin potencjometru),MOTOR_OUT_PIN(pin sterowania PWM),START_STOP_PIN(pin przycisku),SPEED_MAXiSPEED_MIN.
Projekt na żywo/Demonstracja
Film demonstruje działanie wszystkich trzech przykładów kodu. Sterowanie włącz/wyłącz jest pokazane (na filmie o 11:41), następnie sterowanie prędkością PWM (na filmie o 16:53), a na końcu sterowanie potencjometrem i przyciskiem (na filmie o 23:02).
Rozdziały
- [00:00] Wprowadzenie i przegląd projektu
- [01:24] Moduł HW-532 i opcje MOSFET
- [03:23] Schemat obwodu i wyjaśnienie
- [05:11] Szczegóły komponentów
- [06:50] Analiza karty katalogowej MOSFET
- [11:16] Podstawowe okablowanie i demonstracja włącz/wyłącz
- [15:05] Kod Arduino do sterowania włącz/wyłącz
- [15:39] Kod Arduino do sterowania prędkością PWM
- [19:34] Okablowanie z potencjometrem i przyciskiem
- [22:12] Kod Arduino z potencjometrem i przyciskiem
Obrazy


/*
* Lesson 108-1: In this lesson we learn how to use  the module with FR120N , LR7843 and D4184 MOSFET to turn ON/OFF DC load up to up to 10A. HW-532 optically isolated from 5V to 30V load up to 10A depending on the module. Schematic shown, wiring diagram explained, different
method of wiring with push button and potentiometer also shown.
Video https://youtu.be/eqXaqRFAWrA

Written by Ahmad Shamshiri for RoboJax.com
// Published on Aug 25, 2022 in Aajx, ON, Canada.


  Project 1: Turning ON/OFF a motor or load (this project)
  Project 2: Controllign Speed using Arduino code
  Project 3: Controllign Speed using potentiometer and a push button

  * Watch Video instrution for this code: https://youtu.be/eqXaqRFAWrA
  *
  * This code is part of Arduino Step by Step Course which starts here:  https://youtu.be/-6qSrDUA5a8
  *
  * for library of this code visit http://robojax.com/
  *
 If you found this tutorial helpful, please support me so I can continue creating
 content like this. Make a donation using PayPal by credit card https://bit.ly/donate-robojax


  *  * This code is "AS IS" without warranty or liability. Free to be used as long as you keep this note intact.*
  * This code has been download from Robojax.com
     This program is free software: you can redistribute it and/or modify
     it under the terms of the GNU General Public License as published by
     the Free Software Foundation, either version 3 of the License, or
     (at your option) any later version.

     This program is distributed in the hope that it will be useful,
     but WITHOUT ANY WARRANTY; without even the implied warranty of
     MERCHANTABILITY or FITNESS FOR A PARTICULAR PURPOSE.  See the
     GNU General Public License for more details.

     You should have received a copy of the GNU General Public License
     along with this program.  If not, see <https://www.gnu.org/licenses/>.

 */


const int MOTOR_OUT_PIN=2;


void setup() {
    //Robojax  MOSFET Motor driver code
  Serial.begin(9600);
  Serial.println("Robojax LR7834 ,  Arduino");

  pinMode(MOTOR_OUT_PIN, OUTPUT);
  digitalWrite(MOTOR_OUT_PIN, HIGH);


}

// the loop routine runs over and over again forever:
void loop() {


    //Robojax XY-GMOS MOSFET Motor driver code
}//loop end# include <Arduino_LSM6DS3.h>
/*
* Lesson 108-2: In this lesson we learn how to use the module with FR120N , LR7843 and D4184 MOSFET to turn ON/OFF DC load up to up to 10A. HW-532 optically isolated from 5V to 30V load up to 10A depending on the module. Schematic shown, wiring diagram explained, different
method of wiring with push button and potentiometer also shown.
Video https://youtu.be/eqXaqRFAWrA
Get code for this project from https://robojax.com/RJT797
Written by Ahmad Shamshiri for RoboJax.com
// Published on Aug 25, 2022 in Aajx, ON, Canada.
Project 1: Turning ON/OFF a motor or load (this project)
Project 2: Controlling Speed using Arduino code
Project 3: Controlling Speed using potentiometer and a push button
* Watch Video instruction for this code:https://youtu.be/eqXaqRFAWrA
*
* This code is part of Arduino Step by Step Course which starts here: https://youtu.be/-6qSrDUA5a8
*
* for library of this code visit http://robojax.com/
*
If you found this tutorial helpful, please support me so I can continue creating
content like this. Make a donation using PayPal by credit card https://bit.ly/donate-robojax
* * This code is "AS IS" without warranty or liability. Free to be used as long as you keep this note intact.*
* This code has been download from Robojax.com
This program is free software: you can redistribute it and/or modify
it under the terms of the GNU General Public License as published by
the Free Software Foundation, either version 3 of the License, or
(at your option) any later version.
This program is distributed in the hope that it will be useful,
but WITHOUT ANY WARRANTY; without even the implied warranty of
MERCHANTABILITY or FITNESS FOR A PARTICULAR PURPOSE. See the
GNU General Public License for more details.
You should have received a copy of the GNU General Public License
along with this program. If not, see <https://www.gnu.org/licenses/>.
*/
const int MOTOR_OUT_PIN = 3;
const int SPEED_MAX = 100;// in %
const int SPEED_MIN = 0;//in %
const int STOP=0;
const int RUN=1;
int motorState=RUN;//
int motorSpeed = 0;//between 0 to 100%.
//video instruction https://youtu.be/eqXaqRFAWrA
void setup() {
//Robojax XY-GMOS MOSFET Motor driver code
Serial.begin(9600);
Serial.println("Robojax XY-GMOS Motor, Arduino");
pinMode(MOTOR_OUT_PIN, OUTPUT);
}//setup ends
// the loop routine runs over and over again forever:
void loop() {
//video https://youtu.be/eqXaqRFAWrA
motorControl(50);//run motor at 50%
delay(5000);//keep it running for 5000ms or 5 seconds
stopMotor();//stop the motor
delay(3000);//keep it stopped for 5000ms or 5 seconds
for(int i=0; i<100; i++)
{
motorControl(i);
delay(200);
}
stopMotor();//stop motor
delay(3000);//keep it stopped for 5000ms or 5 seconds
for(int i=100; i >0; i--)
{
motorControl(i);
delay(200);
}
//Robojax LR7843 MOSFET Motor driver code
}//loop end
/*
* motorControl(int s)
* @brief controls the motor with the value s
* @param return nothing
* @param "type" is character
* on May 08, 2020 at 02:36 in Ajax, Ontario, Canada
*/
void motorControl(int s)
{
//Robojax LR7843 MOSFET Motor driver code
//video https://youtu.be/eqXaqRFAWrA
int k = map(s, SPEED_MIN, SPEED_MAX, 0, 255);
Serial.print("Speed: "); Serial.print(s);Serial.println("%");
analogWrite(MOTOR_OUT_PIN, k);
}//motorControl
/*
* stopMotor()
* @brief stops the motor
* @param return nothing
* @param
* on May 08, 2020 at 02:36 in Ajax, Ontario, Canada
*/
void stopMotor(){
//Robojax XY-GMOS MOSFET Motor driver code
analogWrite( MOTOR_OUT_PIN, 0);
Serial.println("STOPPED");
}//stopMotor()
/*
 * Lesson 108-3: Controlling Speed of motor using Variable Resistor (potentiometer) and using Start/Stop push button with Arduino.
 *
 * In this lesson we learn how to use  the module with FR120N , LR7843 and D4184 MOSFET to turn ON/OFF DC load up to up to 10A. HW-532 optically isolated from 5V to 30V load up to 10A depending on the module. Schematic shown, wiring diagram explained, different
 method of wiring with push button and potentiometer also shown.
 Video https://youtu.be/eqXaqRFAWrA
   Get codes for this project from https://robojax.com/RJT797
 Written by Ahmad Shamshiri for RoboJax.com
 // Published on Aug 25, 2022 in Aajx, ON, Canada.


   Project 1: Turning ON/OFF a motor or load -
   Project 2: Controlling Speed using Arduino code
   Project 3: Controlling Speed using potentiometer and a push button (this project)

   * Watch Video instruction for this code:https://youtu.be/eqXaqRFAWrA
   *
   * This code is part of Arduino Step by Step Course which starts here:  https://youtu.be/-6qSrDUA5a8
   *
   * for library of this code visit http://robojax.com/
   *
  If you found this tutorial helpful, please support me so I can continue creating
  content like this. Make a donation using PayPal by credit card https://bit.ly/donate-robojax


   *  * This code is "AS IS" without warranty or liability. Free to be used as long as you keep this note intact.*
   * This code has been download from Robojax.com
      This program is free software: you can redistribute it and/or modify
      it under the terms of the GNU General Public License as published by
      the Free Software Foundation, either version 3 of the License, or
      (at your option) any later version.

      This program is distributed in the hope that it will be useful,
      but WITHOUT ANY WARRANTY; without even the implied warranty of
      MERCHANTABILITY or FITNESS FOR A PARTICULAR PURPOSE.  See the
      GNU General Public License for more details.

      You should have received a copy of the GNU General Public License
      along with this program.  If not, see <https://www.gnu.org/licenses/>.

  */

const int POT_PIN =A0;//can change
const int MOTOR_OUT_PIN = 3;//~
const int START_STOP_PIN=2;//for push button switch

const int SPEED_MAX = 100;// in %
const int SPEED_MIN = 0;//in %
  //video instruction https://youtu.be/eqXaqRFAWrA

const int STOP=0;
const int RUN=1;
int motorState=RUN;//
int motorSpeed = 0;//between 0 to 100%.

void pushButton();
void setup() {
    //Robojax XY-GMOS MOSFET Motor driver code
  Serial.begin(9600);
  Serial.println("Robojax XY-GMOS Motor,  Arduino");
  pinMode(START_STOP_PIN, INPUT_PULLUP);
  pinMode(MOTOR_OUT_PIN, OUTPUT);
    //video instruction https://youtu.be/eqXaqRFAWrA


}

// the loop routine runs over and over again forever:
void loop() {

 pushButton();
 int potValue =analogRead(POT_PIN);
 int speedPercent = map(potValue, 0, 1023, 0, 100);

 if(motorState ==RUN)
 {
  motorControl(speedPercent);
 }else{
  stopMotor();
 }


  delay(500);
    //Robojax XY-GMOS MOSFET Motor driver code
      //video instruction https://youtu.be/eqXaqRFAWrA
}//loop end


/*
 * motorControl(int s)
 * @brief controls the motor with the value s
 * @param return nothing
 * @param "type" is character

 * on May 08, 2020 at 02:36 in Ajax, Ontario, Canada
 */
void motorControl(int s)
{
    //Robojax LR7843 MOSFET Motor driver code
      //video instruction https://youtu.be/eqXaqRFAWrA
  int k = map(s, SPEED_MIN, SPEED_MAX, 0, 255);
  Serial.print("Speed: "); Serial.print(s);Serial.println("%");
  analogWrite(MOTOR_OUT_PIN, k);
}//motorControl


/*
 * stopMotor()
 * @brief stops the motor
 * @param return nothing
 * @param

 * on May 08, 2020 at 02:36 in Ajax, Ontario, Canada
 */
void stopMotor(){
    //Robojax XY-GMOS MOSFET Motor driver code
      //video instruction https://youtu.be/eqXaqRFAWrA
  analogWrite( MOTOR_OUT_PIN, 0);
  Serial.println("STOPPED");
}//stopMotor()


/*
 * pushButton()
 * @brief reads the push button
 * @param return nothing
 * @param

 * on May 08, 2020 at 02:36 in Ajax, Ontario, Canada
 */
void pushButton()
{
  //Robojax XY-GMOS MOSFET Motor driver code
  //video instruction https://youtu.be/eqXaqRFAWrA
  if(digitalRead(START_STOP_PIN) ==LOW)
  {
    motorState =!motorState;
    delay(100);
  }

}//pushButton()
Rzeczy, których możesz potrzebować
-
AmazonPurchase HW-532 from Amazonamzn.to
-
Allegro
-
AliExpressPurchase FR120N Motor Driver from AliExpresss.click.aliexpress.com
Zasoby i odniesienia
Brak zasobów.
Pliki📁
Karta katalogowa (pdf)
-
infineon-IRLR7843 LR7843 MOSFET datasheet
infineon-irlr7843-datasheet-en.pdf0.37 MB
Plik Fritzing
-
HW-532B Mosfot Module
HW-532B.fzpz0.01 MB
Inne pliki
-
infineon-irfr120n-datasheet-en
infineon-irfr120n-datasheet-en.pdf0.39 MB -
alpha-and-Omega-AOD4184A_datasheet
alpha-and-Omega-AOD4184A_datasheet.pdf0.43 MB